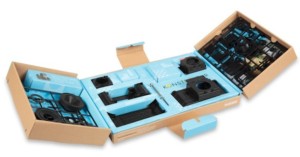
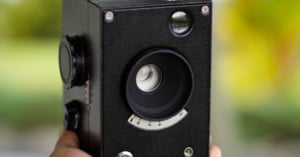
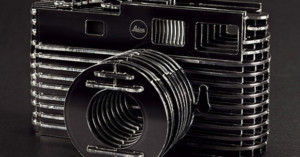
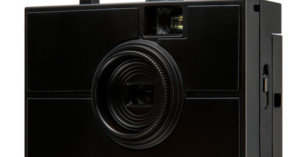
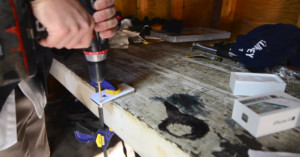
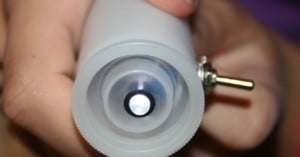
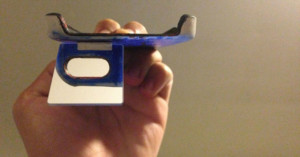
Lomography Introduces New Konstruktor Super Kit with Macro and Close-Up Lenses
Back at it again, the team over at Lomography has created a new "Super Kit" edition for one of their best-selling creations: the original DIY Konstruktor Camera.
Back at it again, the team over at Lomography has created a new "Super Kit" edition for one of their best-selling creations: the original DIY Konstruktor Camera.

Sometimes it's the small details of our photographic endeavors that bring meaning to our work, which is why we love this fun, creative mini-portfolio tutorial from the crafty minds at Photojojo

Getting your own commercial camera slider can get a bit pricey, but thanks to Derek Mellott and this great Instructables tutorial, you can build your very own DIY slider in about an hour using only $30 worth of parts from IKEA and a bit of DIY know-how!
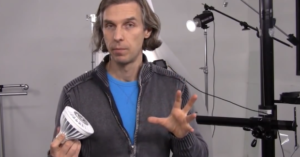
If you're just getting into studio photography, trying to figure out how to light, shoot and set up your shots can be both frustrating and expensive. After all, if you're trying to take high-quality studio shots, you need high end strobes and all sorts of other gear, right?
Maybe not. Of course high end equipment helps, but in the video above, photographer Alex Koloskov of Photigy shows you how you can light studio still life shots using a few $30 dimmable LED bulbs instead of strobes.
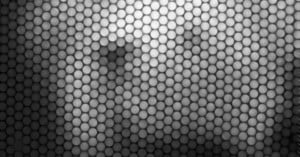
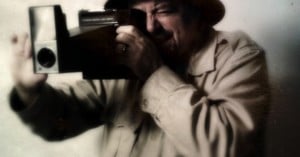
The image above isn't a crappy out of focus digital camera image or post-production experiment. In fact, it was taken using a custom-built camera made almost entirely of drinking straws and X-ray film... that's it.

Not having a dedicated film scanner is no barrier to being able to digitize your slides, but DIY methods we've presented in the past tend to be time-consuming. Even if it's an easy DIY solution that will let you, say, use your desktop all-in-one to scan them in, it'll still take you a long time to digitize the hundreds of slides you might have lying around.
Well, we've finally stumbled across a rig that fixes this problem: All you need is a modified slide projector, a macro lens, and an intervalometer to digitize hundreds of slides in minutes.
Here's a really neat DIY idea for those of you who shoot and develop your own film, and also happen to love playing with LEGOs (that's everyone right?). Using LEGOs and a bit of ingenuity, Dutch photographer Jan van den Broek built a semi-automatic film processing rig.
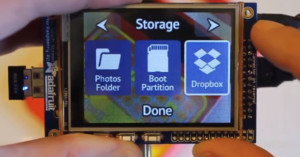
Building your own touchscreen, WiFi-enabled digital camera might seem like the most expensive of photo-related DIY projects, but it doesn't have to be. In fact, Adafruit can show you how to put one together for less than $150!
"Do-it-yourself" can mean a lot of things, but for camera dweebs, it's usually entailed some degree of scavenging and recycling parts from factory-made cameras. Grad student and specialty camera builder Kevin Kadooka understands the ease and accessibility of the practice but doesn't think it's sustainable -- eventually we'll run out of old cameras to cannibalize.
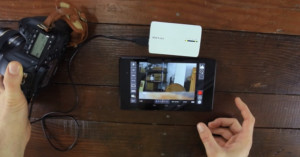
The CamRanger has been a big hit with photographers, and if you have $300 to spend on a wireless controller for your DSLR then it is a phenomenal option. But if you don't want to spend that kind of money, own an Android device and don't mind hacking a bit of router firmware, you can actually get similar results using this DIY rig for less than $40 bucks!
Build-it-yourself cameras can be both fun and educational. For photography types, a camera like the Konstructor or the Last camera makes for a fun weekend project that you can then take out on occasion when your inner hipster is calling, or give as a gift to a budding photo enthusiast.
Similarly, there's a large community of people who love pinhole cameras, which they've made using everything from LEGOs to dumpsters. So what happens when those two worlds collide? You get the Original Pin.

Got a couple of boxes of old transparencies and a bare window? Then designer/upcycler Scott Sherwood has come up with a great idea that will put those slides to functional, creative and colorful use.
You, of course, are an analog purist who will forever be devoted to film. Other folks, however, may be wondering what they're going to do with a bunch of darkroom equipment that's getting lonelier by the year.
Forget gold plating and celebrity altruism -- the rarest Leica camera of them all may be made entirely out of plastic.
If you're shopping for a young person who'd benefit from learning a little more about the principles of photography, you may want to consider the LAST Camera: a build-it-yourself 35mm film camera that could well outfreak Lomography for quirky build and artfully distressed images.
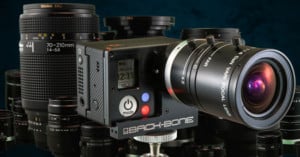
GoPro cameras may be ready to migrate from helmets to film schools thanks to the Ribcage, an in-development assembly that allows the tiny action cams to be outfitted with interchangeable lenses.
Rest easy, future astronauts. If occasional filmmaker and full-time tinkerer Mark Rober and his pals are any indication, NASA engineers can MacGyver their way into or out of any situation.
Canon owners certainly boast the most advanced custom firmware with Magic Lantern, but Nikon Hacker is making some progress. Case in point: with the release of a new hack, Nikon D5100 owners can now use manual controls while shooting in LiveView.
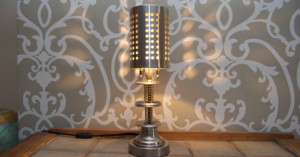
This is just awesome: professional-looking product photography done using nothing more than a tripod, an iPad, an iPhone and your camera of choice. Given the extremely affordable nature of the process, the results are downright epic.
You might have found yourself in this situation before: you're in the middle of a photo shoot and you find that you badly need to set up a shot or lighting that is, in fact, impossible to do 'professionally' given the gear you have on hand.
So what do you do? You go all MacGyver of course! You put together an off-the-top-of-your-head DIY fix that gets the job done (even if it doesn't look all that good doing it). The Tumblr blog Shitty Rigs is dedicated to showing off those brilliant, if a bit silly, creations.
I'm a self-described Apple fanboy, and even I found this funny, but if you're adverse to seeing beautifully engineered tech destroyed before your very eyes you might want to skip this one. On the other hand, if you're an Android fanboy (or girl) who harbors a deep hate for Apple, this could be therapeutic.
In the fake DIY video above, Newtography's Andrew Newlun sets out to show you how to turn a brand new iPhone into a handy-dandy keychain lanyard by drilling a hole right through the iPhone's camera.

From the Dept. of "I Wonder What Will Happen If I Shove This Into There" Research comes news of handy substitute for a dedicated remote camera trigger.
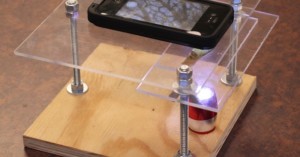
If you've followed PetaPixel for a little while, you'll already know that a laser pointer's focus lens can be put to good DIY use helping you take macro photos with your smartphone.
And even though you can simply find a way to secure the lens against your phone, a new Instructable shows you how to build a microscope stand/macro photography rig that will eliminate that particular problem altogether... and for only $10!
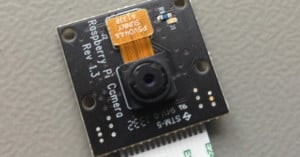
DIY camera geeks have a new low-light option with the debut of the Raspberry Pi NoIR, a version of the popular camera module add-on for the single-board-computer that ditches the infrared filter on the image sensor.
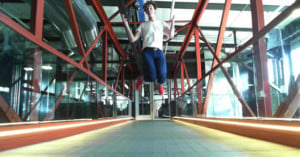
Getting shots of people in midair can be a source of fun and fascination, but making them requires either a fair investment in remote triggers or a surplus of time and luck.
With a little bit of ingenuity, however, mechanical engineer Andrew Maxwell-Parish (aka Electric Slim) has made the process easy, cheap and reliable using a laptop, webcam and open-source software.
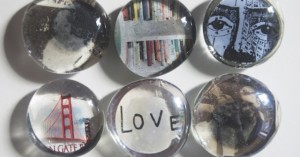
That's right, it's the weekend, and that means we can't let you start your week off without first taking on a little DIY project. No worries if you're not very tech savvy though, this one won't require that you know how to solder anything. Today, we'll show you how to make some fun little photo magnets for your refrigerator.
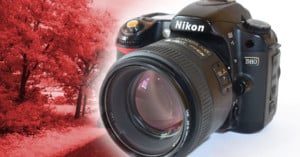
Here's a DIY project for infrared photography enthusiasts who have a few hundred dollars and some time to spend this weekend. Instead of taking the typical routes when it comes to taking IR photos -- i.e. using an IR lens filter or making the magic happen in post -- why not DIY a dedicated IR camera of your own?
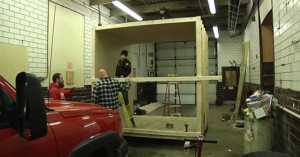
North Webster, Indiana-based photographer and videographer Justin Fredrick Clark recently shared this awesome behind-the-scenes video showing how he and some other guys at his church built a rotating room for just $350 (granted, they already had access to some pretty serious equipment) for a creative work project.
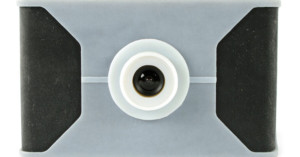
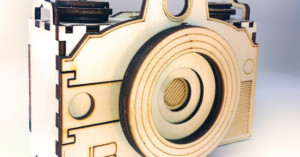
Hey, not everybody wants a homemade gun. So how about using that 3D printer you've borrowed to make your own home-brew point-and-shoot digital camera?
DIY portal Instructables now has directions to do just that, thanks to creator Randy Sarafan's plans -- including a downloadable template to print the body -- and RadioShack's mighty JPEG Color Camera Board to go inside. The final product would make a fine companion to the OpenReflex 3D-printable film SLR for those ready to go digital.
There are advantages to shooting time-lapses using a cheap point-and-shoot camera -- for example, if it gets stolen, you're not out thousands of dollars -- but there is one particular challenge that is difficult to overcome: battery life. If you want your creation to cover any significant period of time, you need a way to keep the camera running.
The video above shows you one way to get around this problem if you're using a AA-powered camera: just build your own DIY battery pack.
It wouldn't be the weekend without some interesting (and maybe a little silly) DIY project for the tinkerers out there. Last weekend it was turning an old film canister into an LED flashlight; this week we give you: how to turn an old SLR and lens into a DIY peephole for your apartment.
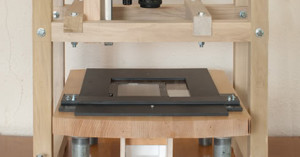
Consumer film scanners don't provide enough detail, and professional models require too much money and pampering. What's a dedicated film nerd to do? For Peter De Smidt, the answer was to build his own high-res scanner using the Nikon D600 and 50mm Micro lens he already had on hand, a bit of lumber and a lot of patience.
There are DIY projects that just about anybody can do -- for example, turning an old film canister into a flashlight -- and there are DIY projects that have a very specific "Y" in mind.
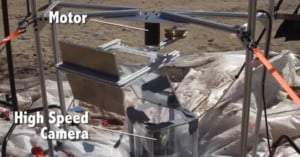
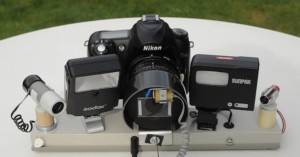
The ArnoSync High-Speed photography rig falls into the latter category. But even if you don't have the engineering prowess to build it yourself, it's still worth taking a look at what this home-brew rig can do.
Here's a good weekend project for those of you who have some old film canisters lying around, and a bit of DIY know-how up your sleeves. Those old film canisters done need to go to waste, with a little work you can turn them into tiny portable flashlights.
A lot of people love the "vintage look" in photography these days.
Of course, it's one thing is to capture it with the plethora of software readily available -- or by applying "vintage filters" (like the ones on Instagram) to a digital image -- and it's another thing entirely to get old technology to work for us today and create photographs just like we would have done 30, 40 or even 100 years ago.
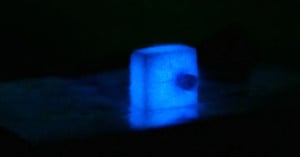
Here's a cool project for those of you who enjoy shooting with both cameras and guns. Did you know that you can photograph a speeding bullet using only a sugar cube and no other light source? As it turns out you can, and Instructables user FPSoutback has the video to prove it.

I’ve seen lots of used film canisters repurposed as dangling bag accessories for sale in trendy parts of Hong Kong. The idea is to drill or burn a small hole in the top of the plastic spool and fit a keychain to that. I figured it would be a lot more useful to use the can to give a return contact address in case the bag is lost and found. What better way could there be than to use film?
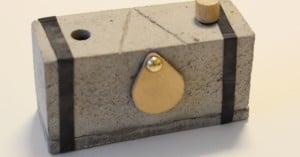
It's Sunday, which might mean doing your best to keep your mind off of the workweek to come, or already setting about planning next weekend. If you happen to be doing the latter, and there's room in your schedule for an interesting photography DIY project, we've got something for you: a do-it-yourself concrete pinhole camera.
One of our popular posts back in 2011 was a quick video tutorial on how you can use Mod Podge to transfer photographs onto blocks of wood (we also shared a text-based tutorial earlier this year).
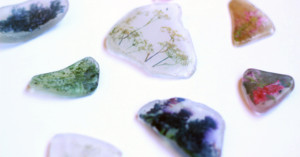
If you thought that was cool, get this: you can also do the same type of photo transfer onto pieces of beach glass!
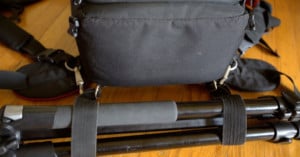
Sick of carrying your tripod separately from your camera backpack? If you have certain types of backpacks, you can add your own strap loop system to the bottom to serve as a makeshift tripod carrying feature.
We were introduced to the “Ghetto-Flo” lights after reading the excellent blog of New York-based photographer Brad Trent. He had mounted 4 standard workshop fluorescent light fixtures into light-stand mountable strip lights. “Ghetto-Flo” because they're similar in use to the much more expensive Kino-Flo lights, though there are advantages to the later (variable power and output).
Earlier this month, we showed you how some astrophotographers were turning their standard DSLRs monochrome by physically scratching the color filter array off of their sensor in order to get sharper black-and-white photos.
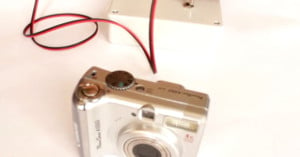
Another photographer is doing something similar, only instead of scratching off the color array and possibly doing damage to the sensor, he decided to swap out the sensor entirely.
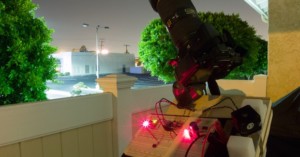
Getting quality astrophotography shots comes with several challenges, and one of the main ones is that the starts don't stand still -- or, more accurately, we don't. Since the Earth enjoys spinning on its axis once every 24-hours or so, exposures in excess of about 1 second begin producing star trails unless you have the camera or telescope on some sort of tracking mount.
Fortunately, if you don't have the money to purchase a $1,000+ equatorial mount but still want to take long-exposure astrophotography, the DIY barn door tracking mount above will enable you to do so on the (relatively) cheap.
Yage Yang of Taipei, Taiwan is passionate about two things: snapping photos with his camera and building things with his hands. In June 2012, he decided that he would build a giant replica of a Nikon D800 out of styrofoam, just for fun. The project took him an entire year to complete, but the result, a "Nikon D800X," is ridiculously impressive.

This weird looking contraption is a homemade adapter that lets you shoot digital photographs with a smartphone through the viewfinder of an SLR. Photographer Michael Amos built it a couple of years ago using a camera eyepiece and a smartphone case.
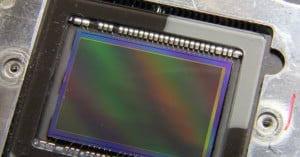
In October 2012, astrophotographer Raymond Collecutt of Whangarei, New Zealand shared a new (and risky) idea he was playing around with: converting a standard DSLR into a sharper monochrome camera for photographing space.
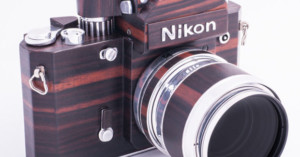
When you hear the words "retro camera," you probably think of some kind of silver or black camera crafted decades ago out of solid chunks of metal. But what would a retro camera look like if you kept the design the same but replaced its metal body with wood?
French photo enthusiast Cesar Sebouhian and his father recently decided to find out, and created the gorgeous Nikon "F2D" seen above.
Want to shoot photos using your smartphone from the hip, but don't want buy a MirrorCase? When photography enthusiast Angel Gonzales found himself in that situation recently, he decided to go the DIY route and make his own mirror case.
You can spot-meter and bounce strobes all you want, but on-location portrait photography can still be a pain the butt. Unless you take your studio lighting rig with you.
Mark Kaplan has devised a novel way to do just that with the StrobePack, a professional-level lighting setup rigged to be worn on the photographer's back.

Are you the type of person who enjoys using things built using your own two hands? 20-year-old Croatian tinkerer CroBuilder is like that too. He recently spent 10 hours in his workshop building a camera tripod from scratch.