A Step-by-Step Guide to Developing B&W Film with Coffee and Vitamin C
Here’s another helpful step-by-step guide teaching how to develop B&W film (in this case it’s …
Here’s another helpful step-by-step guide teaching how to develop B&W film (in this case it’s …
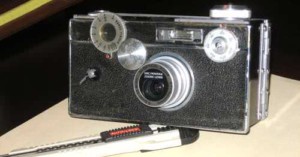
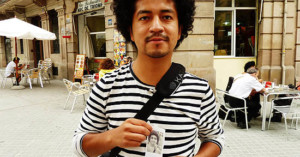
John (AKA knife141) loves turning junk into unusual creations, and one day came up with idea of building a camera for the sole purpose of confusing strangers. He took a $15 digicam and transformed it into a Argus C3 from the mid-1900s:
My goal was to install a modern digital camera inside the housing of an old, obsolete camera. I thought it might be fun to pull this camera out in a crowd of people and make them wonder why in the world an old man would continue to use a camera that was obviously as old as he was, as opposed to something more modern.
[...] I've had a lot of fun with this camera, taking it places and watching people's puzzled looks as I appear to be using an old beat-up camera that was made about the time I was born! I have even had people approach me and ask if I can still get film developed -- with no idea that the heart of my camera is actually digital! I have also had people ask me how many pictures I can take with the camera, and they always look puzzled when I tell them, "Oh, around 4,000 or so."
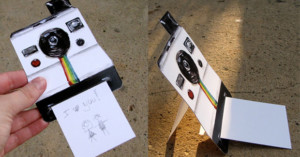
Graphic designer Ksenia Podgornaya makes and sells these nifty Polaroid camera greeting cards that feature an original watercolor illustration printed on 100lb satin paper.
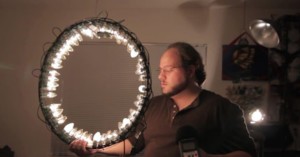
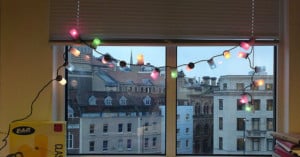
Videographer Joel Loukus created a continuous ring light source -- which he calls the "WreathLight" -- using a wreath frame and two strings of Christmas lights. The total cost came out to $24. It's a cheap and easy way of adding some soft lighting to your portraits.
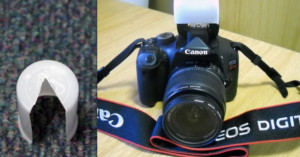
Here’s a quick and easy photo hack: cut a slice out of a white film canister to soften the …
Photographer Joseph Nienstedt was at a grocery store recently when he spotted a …
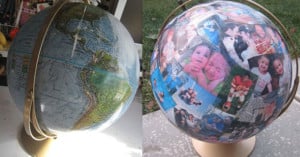
For her husband’s 40th birthday, Jen had the idea of turning an old, …
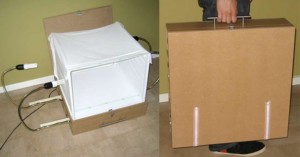
Needing a portable light box, Instructables member HHarry came up with a ingenious …
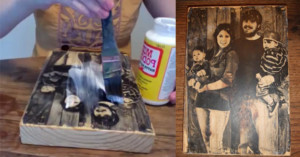
Here's a quick and easy tutorial that'll teach you a cool method of transferring a photo print (black and white or color) onto a block of wood.
Focus stacking is a technique for creating photos with a large depth of …
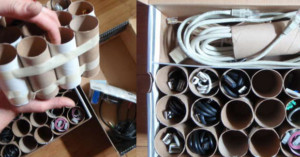
Like many electronic devices, cameras often come with certain cables that are neither necessary enough to be used often …
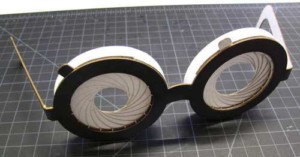
Instructables user art.makes has a tutorial on how you can make a pair of paper iris glasses with adjustable apertures. You could definitely build upon the idea to make each side more like a camera lens (e.g. adding barrels, f-stop values) -- perhaps as part of a geeky Halloween costume?
Bits of Everything has a great tutorial on how you can make a …
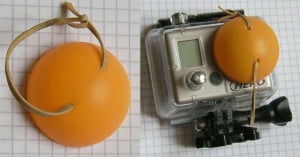
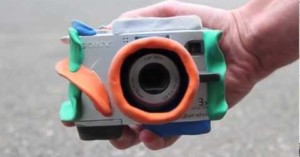
If you have a GoPro or any other compact camera with a constantly exposed lens, you can protect the …
Buying large frames for displaying your prints can be expensive. For those of you who are rich in time …
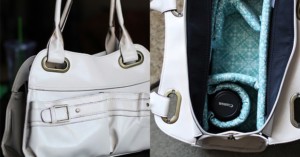
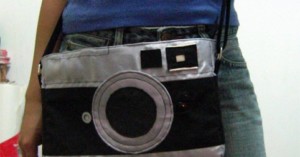
Some photographers prefer using ordinary bags with padded inserts to carry their camera gear, both for aesthetic reason and …
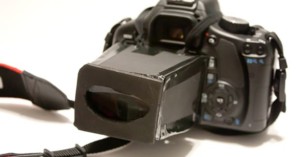
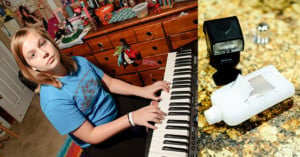
Want a DSLR viewfinder but don’t want to pay big bucks for a professional one? …
Cut Out + Keep member Myam made …

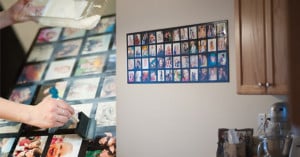
Want to adorn a wall with a giant print using your own photography? Here’s a great video in which …
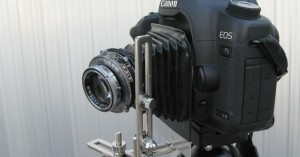
Flickr user Alex12Ga turned his Canon 5D Mark II into a DIY digital view camera by mounting a Novar-Anastigmat 75mm f/3.5 lens from 1949 with its original bellows. He mounted the bellows to his camera using an aluminum plate and an EOS mount ring that he salvaged from a broken Sigma lens.
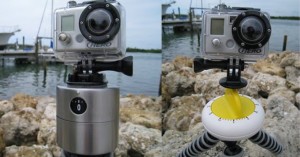
Want to add some simple panning action to a time-lapse video? Trying using a cheap IKEA kitchen timer. GetawayMoments has a tutorial on how to convert a $2-$6 timer from IKEA into a simple device for your time-lapse projects.
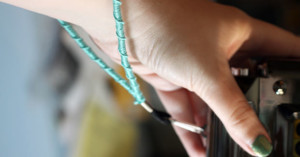
Here’s a weekend project idea: personalize your camera’s wrist strap by making it look like a friendship bracelet! All …
Kirsty over at kootoyoo transformed her old Cosina CT-2 into …

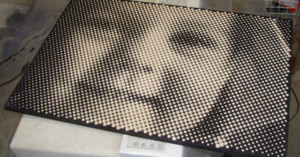
After moving into their new dorm room, Caleb Ungewitter and his roommate Kyle decided that their walls looked too empty, so they decided to decorate it with a photo. Not just any photo, mind you, but a gigantic do-it-yourself print of a beautiful city skyline. Using a free program called The Rasterbator, they converted the photograph into 152 separate frames, which they printed out themselves and attached to the wall in a grid.
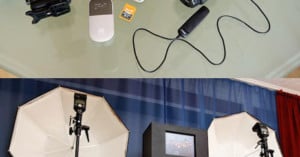
We've seen DSLR photo booth projects before, but usually they're just simple ways for guests at an event to take self-portraits of themselves. Kevin over at I Dream In Code actually made a fancy photo booth for his brother's wedding that prints out a nice keepsake for guests.
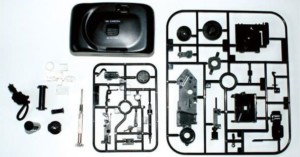
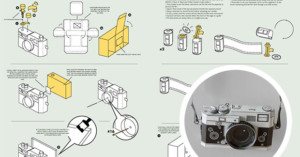
Forget model airplanes… This Plamodel snap model kit is the one to buy if you’re a photo-enthusiast (or want …
Lomo shooter wn7ant came up with a …
Most cameras designed for young children have kid-friendly designs, but eye-numbingly bad image quality. On the other hand, a …
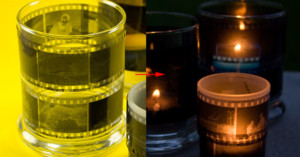
Have a bunch of film canisters lying around and not sure what to do with them? You could use them to geekify your Christmas lights by punching a hole in the caps and sticking the lights in.

Inkodye sells a line of light sensitive textile dyes that you can use …
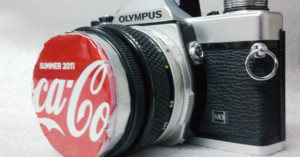
mr-korn over at Lomography recently snagged a cheap Olympus Zuiko 50mm lens on eBay, but the lens didn't come with a lens cap. Rather than try and find a replacement cap for that particular lens, he decided to craft his own DIY cap using a can of Coke.
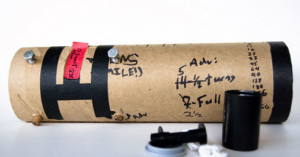
Mechanical engineer and Flickr user Some Guy (Art) was bored at his job where picture taking was explicitly disallowed, so he did what any rebellious photo-fanatic would do: build a makeshift camera out of trash! Bringing $5 worth of parts (e.g. dowels, bolts, super glue) from home, he successfully turned some machine core -- which he calls "cardboard toilet paper tube on steroids" -- into a 35mm pinhole camera.
Craftzine has a step-by-step tutorial teaching how to turn your unwanted 35mm film …
Finish modder metalfusion has a sweet DIY way of showing off photographs. After …
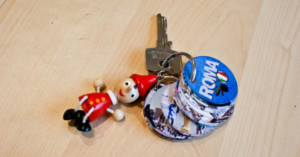
Here’s a fun weekend project: create a tiny keychain photo album with your favorite photos! Simply print out your …
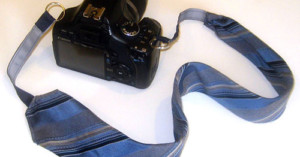
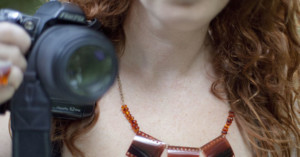
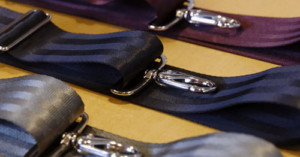
Ties are meant to be soft and comfortable around the neck, so they’re a perfect fit for a do-it-yourself …
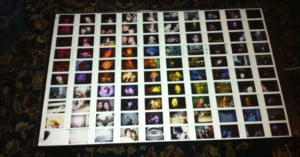
If you ever find yourself with some unwanted negatives on your hands, you can upcycle them into creative film …

If you've tried to scan film using an ordinary flatbed scanner as you would a piece of paper, you've probably discovered that it didn't turn out very well. The reason is because film needs to be illuminated from behind, while conventional scanners capture light that's reflected off what they're scanning. Before you give up hope and shell out money for a film scanner, here's some good news: you can build a cheap and simple cardboard adapter that turns any scanner into a film scanner!
File this under “awesome ways to show off your photos”. Lomographer zakguy had …
Remember that super realistic Leica M3 paper pinhole camera we featured back in June? You can now …
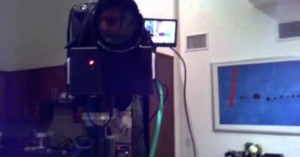
Niklas Roy built a unique electronic "instant" camera using an old black & white video camera and thermal receipt printer. When turned on, the printer slowly prints the live video feed from the camera onto cheap receipt paper. Since the image isn't stored anywhere first, the subject has to remain still during the three minutes it takes for the image to be printed.
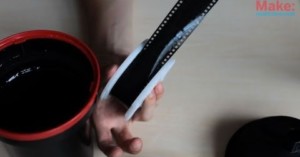
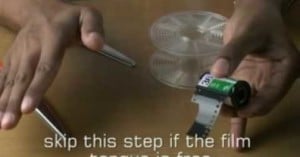
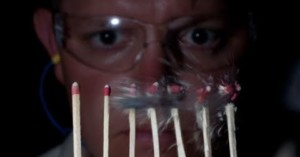
Here’s a step-by-step video tutorial teaching how to develop your B&W film using instant coffee and powdered vitamin C …
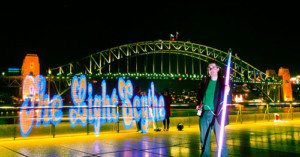
Gavin of Sydney, Australia created an awesome 2-meter long programmable staff that makes painting giant words and images as easy as waving/walking the staff around during a long-exposure photograph. The staff, which he call the LightScythe (we would have called it the "Lightsaber"), was inspired by the Wi-Fi light painting project we shared here earlier this year.
The hardware is pretty simple. There’s a 2m programmable LED strip inside an acrylic tube, which is controlled from a small receiver and battery pack. A laptop PC with a wireless Xbee link sends the image data to the scythe at a specified time. [#]

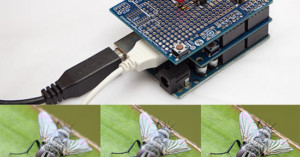
Time-lapse enthusiast and electronics wiz Achim Sack came up with this super-small hardware-based …
Editor's note: The guest author of this DIY tutorial, Vadim Gordin, is also selling DIY kits and ready-made Lens Loop slings for $15 and $25, respectively. You can find the project over on Kickstarter.
Here's a DIY camera strap I came up with 2 years ago and have been steadily revising as I use it while traveling and shooting all over the country. The design is simpler, more comfortable, and more attractive than any of the other commercially available slings. I hope that by sharing my design here, I can generate interest in my project and help DIYers make a great camera sling on their first try.
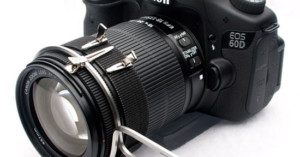
DSLR Solutions has a new follow focus kit that allows you to keep track of focus points without being bulky or expensive. The $60 kit is basically a clamp, a velcro strap, and some metal markers that attach to the strap. Attaching the markers allows you to bounce between focus points, or keep track of a number of points if you have multiple subjects. We've featured a number of DIY follow focus solutions here in the past, but using a velcro strap and markers is something we haven't seen before.
German wedding photographer Rocco built this ingenious …
San Francisco-based photographer Ian Tuttle came up with this funky way of …
Photographer Don Barnard made this video tutorial showing how to convert a styrofoam shipping box into a …
When Eadweard Muybridge shot the first motion picture of a galloping …