
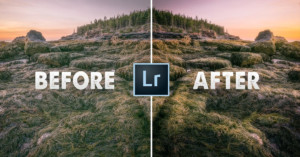
Show This to People Who Say Your Photos are ‘Fake’ Because They’re Edited
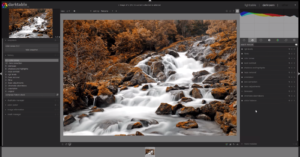
I guess we've all been there: people question our images, saying they're "fake" because we edit our raw files.
I guess we've all been there: people question our images, saying they're "fake" because we edit our raw files.

CES 2020 is starting to rev up, and while we're still waiting for Nikon and Canon to make their expected announcements, photo and video editors already got some exciting laptop news courtesy of Acer.

A month ago, a photography podcast slammed the preset industry in a scathing episode that was all about how presets and the photographers who sell them are terrible. Now, the photographer duo behind the popular YouTube channel Mango Street are speaking up and sharing their thoughts on this contentious topic.

Most people can't afford to buy Apple's powerful Mac Pro or iMac Pro, but what if you could turn the company's much more affordable Mac Mini into a high-end workstation that can compete on that level? That's exactly what the ANIMAIONIC docking station promises to do, adding two GPUs, four SSDs, and an SD card reader to Apple's diminutive desktop computer.

Last month, we reached out to Razer to see if they would lend us a Razer Blade 15 Studio Edition for testing. With the 16-inch MacBook Pro just announced and on its way in as well, it seemed like the perfect time to see which top-of-the-line laptop would take the photo editing crown.

Photography podcast The Group Chat has only released one episode since it was launched a few days ago, and yet it's already receiving a good bit of attention among photographers. Why? Because they chose slam a very profitable and widespread practice in the industry: the sale of presets.

When Adobe released the first version of "full" Photoshop for iPad, the company reassured us that updates to this limited first version "will be impactful, and frequent." Today, Adobe followed up on that promise by revealing some of the major updates that will be coming to the app in the coming months.
There’s a common misconception among beginner photographers, especially those that are just getting started with post-processing and editing their landscape photos. This mistaken belief is that dodging and burning is a highly complex procedure that should only be attempted by seasoned professionals and Photoshop wizards -- this belief could not be further from the truth!

When it comes to Lightroom alternatives, nobody has taken more users away from Adobe than Capture One Pro. But if you've never used Capture One and you need a crash course on the basics, Ted Forbes of The Art of Photography has put together a helpful video that you might find handy.
Adobe MAX 2019 ended last night with, perhaps, the most anticipated event of the whole show. No, it wasn't the reveal of Photoshop for iPad; we're talking about the "Adobe Sneaks" showcase, where the company demoed some of the most impressive early-stage technology being developed by Adobe employees.
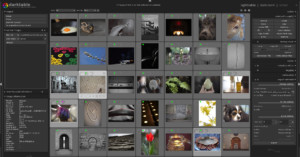
The first release candidate for Darktable 3.0—the popular free, open source Lightroom alternative—was announced earlier today, and it comes with some major improvements over 2.6, including UI improvements, a major rewrite of the Lighttable module, bug fixes, and more.

Creative consultant and talented videographer Daniel DeArco is one of the best there is at creating impressive transitions from shot-to-shot in his videos. In his latest video, he'll take you behind the scenes to show you exactly how he created one of the coolest cuts in his recent empathy video.
Photoshop expert Sid Vasandani of StyleMyPic has put together a fantastic, in-depth look at luminosity masks that could significantly speed up your photo editing workflow. If you don't understand luminosity or you've never used luminosity masks, this tutorial could legitimately change the way you make selections.

If you're one of the holdouts still using Apple's defunct Aperture photo editor, and you upgraded to macOS Catalina, you might have discovered to your dismay that the application no longer works. Have no fear, IT consultant and developer Tyshawn Cormier is here to help.

Adobe has been granted a license by the US government to keep serving creatives in Venezuela, allowing the company to overturn a very controversial decision from earlier this month.

Software company DxO has released the latest version of DxO PhotoLab, a program they're calling "the most advanced photo editing software on the market in terms of image quality." We don't know about all that, but the new DxO PhotoLab 3 does come with some very interesting new features, especially where color management is concerned.

YouTuber and Photoshop expert Unmesh Dinda of PiXimperfect has put together a helpful and detailed guide that shows you exactly how to set up your Wacom tablet and keyboard shortcuts for the best photo editing and retouching experience.

If you're looking to pick up one of the (if not the) best photo and video editing laptops on the market, and your wallet is trembling at the prospect, today is a day for good news: Razer has revealed the pricing for its top-of-the-line Blade 15 Studio Edition "creative workstation," and it's more affordable than people expected.

If you're looking for a quick set of useful techniques that will help improve your portrait photography, this video from Tajreen Hedayet of Tajreen&Co is a great resource. In just four minutes she covers four subtle-but-impactful Lightroom adjustments that you can use to create more professional-looking portraits.

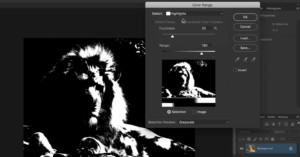
Did you know that Photoshop has a built-in focus stacking function? This article explains about how it works and how to make the most of it.

Talented landscape photographer Michael Shainblum has put together a helpful tutorial that shows you two ways to dodge and burn your landscape photos depending on how selective you want to be.

Adobe has unveiled the latest version of Photoshop Elements, and thanks to the power of Adobe's Sensei AI, Photoshop Elements 2020 brings a slew of one-click photo effects and photo editing tools to the enthusiast-grade software.

BenQ has finally launched the SW270C monitor, the successor to the best-selling 27-inch SW2700PT model, which has been a favorite among budget-conscious photographers. I had the pleasure to be one of the first European photographers to test the new SW270C, and made sure to properly put it through its paces for one whole month before writing this review.

Skylum continues to tease impressive AI features that are coming to its Luminar 4 software this fall. First we got AI Sky Replace, then AI Structure, and now the software company is showing off two impressive new AI-powered tools that will take out blemishes, whiten teeth, adjust facial features, and more: AI Skin Enhancer and AI Portrait Enhancer.

Sooner or later, every professional photographer runs into similar situations. Situations that are uncomfortable for the photographer and the client. One is the topic of post-production and retouching. Some clients might tell you that your retouching fee is too high. Others might tell you to not do any retouching. And then some others might ask you to send them all the pictures.

Monogram (the artist formerly known as Palette Gear) has just launched a powerful new editing console on Kickstarter. The Monogram Creative Console and compatible modules are more compact, while giving users more creative control; and a new "Orbiter" module was specially designed for ultimate color grading control.
Anthony Morganti of IAmMrPhotographer.com recently teamed up with photographer and fellow YouTuber Rico Richardson to produce a comprehensive introduction to the popular (and free) Lightroom alternative Darktable. If you've been wanting to try this open source RAW editor but don't know where to start, this video is for you.

Apple made a big splash with their Pro Display XDR, promising unmatched performance for creative professionals, but "unmatched" might no longer apply. ASUS just unveiled a new lineup of ProArt Displays at IFA 2019, including a beastly 32-inch, 1600-nit 4K HDR display that promises to go step-for-step with Apple.

When you're editing thousands of photos for clients every single week, time is quite literally money. This helpful video offers a few key tips that may help you speed up your workflow and save precious minutes every time you sit down to process your RAW files.

Photographer, YouTuber, and educator Serge Ramelli must be a glutton for punishment, because his most recent video reveals his opinion on a very controversial question: is retouching cheating?
Adobe updated Lightroom with GPU Accelerated Editing a couple of weeks ago, helping to give your workflow a boost. But if your Lightroom Classic is still running too slow for your taste, this video will help you squeeze out more performance without upgrading to the latest Mac or adding better hardware to you PC.

After announcing the development of Lumiar 4 and teasing its intelligent sky replacement tech, Skylum is keeping the AI train rolling by debuting a new content-aware feature: AI Structure.

ON1 let loose a barrage of announcements today as it prepares to release a new suite of software for 2020. In all, they announced two desktop apps, one smartphone app, and one service: ON1 Photo RAW 2020, ON1 Video 2020, ON1 Photo Mobile 2020 and ON1 Sync.

Photoshop expert and photo editing teacher Aaron Nace just took on his most inexperienced pupil yet: his mom. In a special episode of Phlearn, Aaron sat down with his mom to teach her how to edit some of his childhood photos in Photoshop. The result is both entertaining and, if you're a rote beginner like Mrs. Nace, a great intro to photo editing.
Earlier today, Corel launched a new version of PaintShop Pro that includes some intriguing features for photographers. Boasting intelligent new cloning and selection tools and costing just $80 for the full suite, PaintShop Pro 2020 promises to "meet the needs of photographers and content creators at an unbeatable value."

Pye Jirsa over at SLR Lounge recently published a Mac vs PC comparison that answers an important question for photographers: which is better for Adobe Lightroom Classic CC, a powerful iMac Pro or an equivalent custom-built PC?

In this short tutorial, Unmesh Dinda of PiXimperfect lays out his "Sharpening Separation" technique: a more advanced sharpening technique that allows you to sharpen your images as much as you like without creating those dreaded halos.
Earlier today, popular macOS Photoshop alternative Pixelmator Pro just released a major update. Pixelmator Pro 1.4 'Hummingbird' adds a slew of useful new features, but the biggest news is the addition of an Apple Photos extension that turns Apple's built-in photos app into a full-blown editing suite by integrating all of Pixelmator's features.

Each year, someone new comes along to try and demystify bit depth for the masses. In 2017 it was Tutvid, in 2018 Greg Benz did a great job in this article, and now StyleMyPic has created a comprehensive and easy-to-follow video that explains exactly what bit depth is, how it works, and debunks a common myth.

Skylum has officially announced the upcoming release of Luminar 4—the next generation of their increasingly popular photo editor—by showing off a new AI-powered editing tool that will be available only to Luminar 4 users: AI Sky Replacement.