Dodging and Burning in Lightroom to Transform Your Landscape Photos
There’s a common misconception among beginner photographers, especially those that are just getting started with post-processing and editing their landscape photos. This mistaken belief is that dodging and burning is a highly complex procedure that should only be attempted by seasoned professionals and Photoshop wizards — this belief could not be further from the truth!
It wasn’t until three years into my then landscape photography hobby that I decided to put my editing skills to the test and attempt to wrap my head around this “advanced” post-processing technique. Once I began digging into the details surrounding dodging and burning, I was flabbergasted to find that this all intimidating procedure was actually easier to comprehend than originally thought.
In the 16-minute video above, I discuss three simple ways to dodge and burn your landscape photos in Lightroom. And why you should try this technique now as opposed to delaying as I did, but before we jump into the ‘How’, it’s important to first understand the ‘What’ and the ‘Why’.
What is Dodging & Burning?
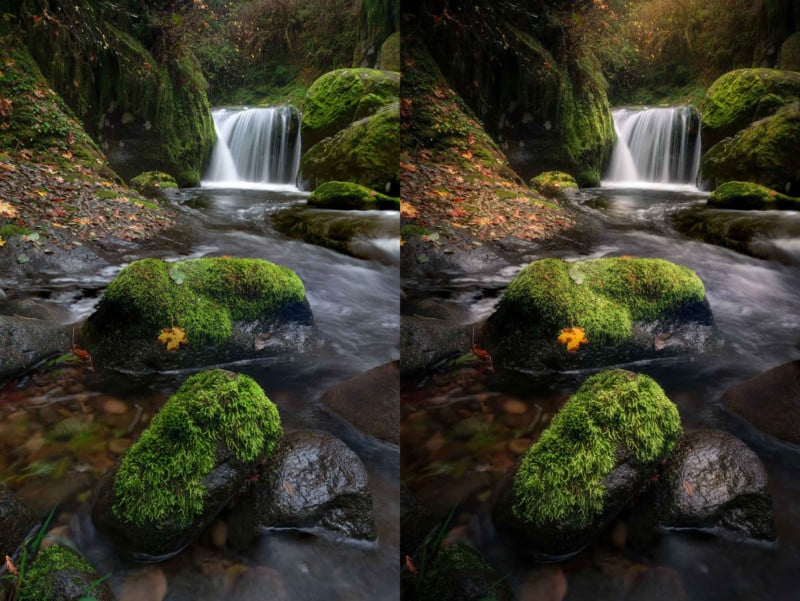
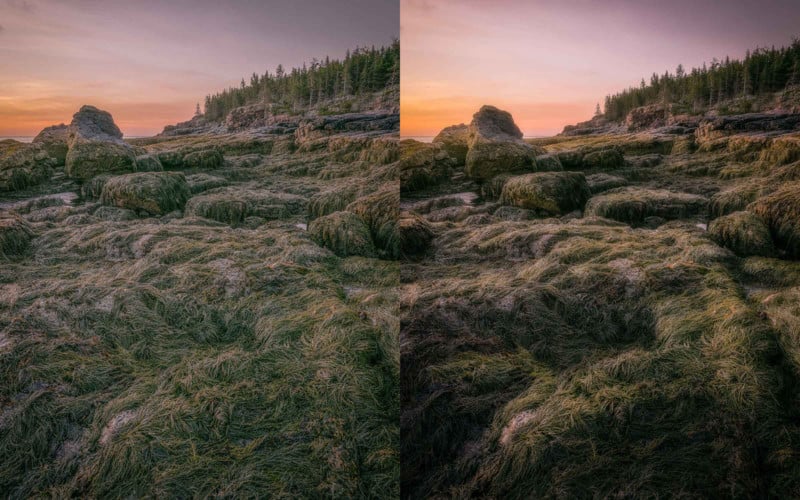
It’s quite simple honestly, dodging means to brighten an area of your image and burning means to darken an area of your image.

Why Should You Dodge & Burn?
There are many reasons to dodge and burn a photo, but the main reasons for me are to create shape and dimension in an otherwise flat looking image and to complexify light and direct the viewer’s attention to certain areas of a photo. The eye is naturally drawn to areas of brightness and at the same time generally ignores areas of darkness. Dodging and burning allow you to take advantage of this.

How Do You Dodge & Burn?
There are three ways to dodge and burn your photos in Lightroom. Below are the methods I use on my landscape images.
Adjustment Brush
In this section within Lightroom, there’s actually an effect called ‘Dodge (Lighten)’ and Burn (‘Darken)’. I always start with dodging and set the feather to 100 and flow to 50 and paint the effect directly onto areas of highlights and then do the adverse with burning by painting areas of shadow. This will add shape and dimension to your image.
![]()
Radial Filter
This approach is similar to the adjustment brush but is designed around creating circular or oval areas of the effect. You still have access to the Dodge (Lighten) and Burn (Darken) effects and the premise is really the same. Dodge areas of highlights and Burn areas of shadows to create dimension and direct the viewer’s attention to specific portions of your image.
![]()
Range Mask
This is a great option if you’re looking to get really refined with your Adjustment Brush or Radial Filter selection. You can use either the Luminance or Color Range Mask depending on the specific situation to get a bit more targeted with your adjustment.
In Summary
To close out, that’s the What, Why, and the How with regards to Dodging and Burning inside of Lightroom. Once I began practicing this technique, I was not only surprised by how easy it was to begin implementing, but I was also impressed by the results that could be achieved. I quickly found that Dodging and Burning is one of those techniques that you don’t fully understand what you’re missing until you try it for yourself.
P.S. If you enjoyed this video and article, you can find more by subscribing to my YouTube channel.
About the author: Mark Denney is a landscape photographer based in North Carolina. The opinions expressed in this article are solely those of the author. You can find more of his work on his website, Facebook, Twitter, and Instagram.