DxO Year in Review 2026: Four New Versions and Where Each One Fits in Your Edit
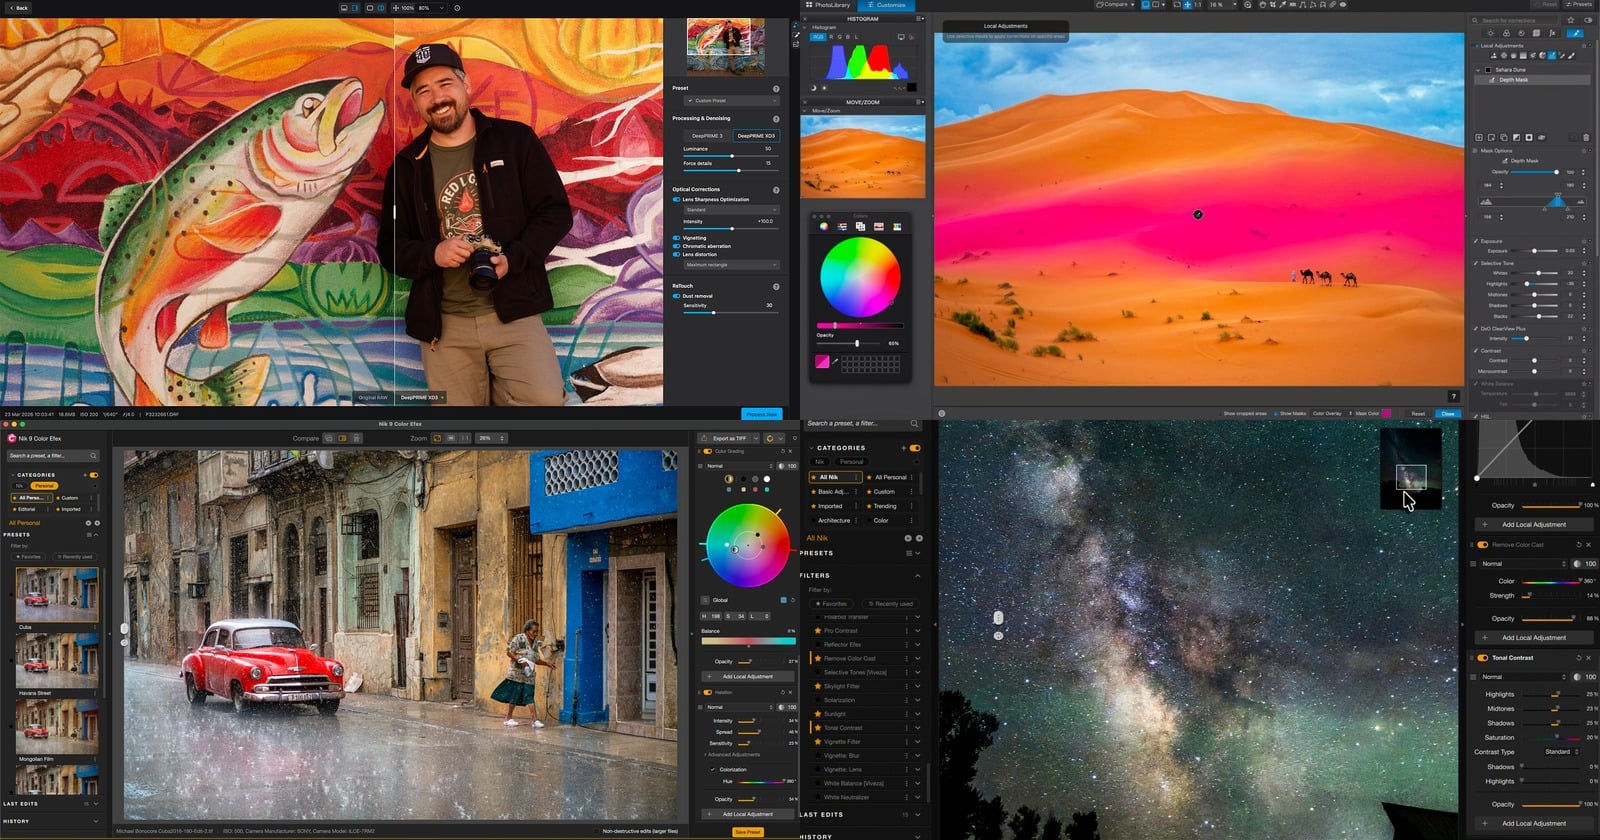
A lot changed in DxO’s photo editing tools in 2026. The strongest noise reduction reached far more cameras. Masks learned to find each person in a frame, and the distance behind them, without a brush. The glow of film around a streetlight went from a stack of layers to a single filter.
Together, DxO’s software updates changed how a hard file gets edited, from first cleanup to finished look.
Full disclosureThis article was brought to you by DxO. DxO’s Black Friday prices apply to new licenses and upgrades of PhotoLab 10, Nik Collection 9, ViewPoint 6, PureRAW 6 and FilmPack 8 through November 29. The prices are applied automatically at dxo.com/bf26/PetaPixel, with no code required.
Photos taken in New Mexico by Chris Niccolls and Michael Bonocore, in Cuba and Morocco by Michael Bonocore, and the Milky Way by Matt Suess.
At a Glance
Four New Versions, One Edit
DxO released new versions of four applications in 2026: PureRAW 6, Nik Collection 9, PhotoLab 10 and, in October, ViewPoint 6. DxO keeps improving its applications, and three of them received free updates in November.
Each one handles a different stage of an edit. PureRAW cleans the RAW file, the unprocessed data a camera’s sensor records. PhotoLab develops that file into a share-worthy photograph, ViewPoint corrects perspective and distortion, and Nik Collection adds the finishing look.
Always looking for new ways to edit old photos, I ran photos from New Mexico, Cuba and Morocco through three of them for PetaPixel stories throughout 2026. Even though I also shoot astrophotography, a fourth story followed OM SYSTEM ambassador Matt Suess through a Milky Way edit, as he is a much more impressive editor than I am. What follows runs in the order of a typical edit of mine, and that starts before any creative decision, with the RAW file itself.
Start With a Cleaner RAW File
If you zoom to 100% on a frame shot at a high ISO, the camera’s sensitivity setting, the flaws become obvious. There is grainy noise in the shadows, edges the lens left soft and a dust spot or two from the sensor. Every later editing adjustment that you add only makes the problems worse, and they follow the photograph through the rest of the edit.
PureRAW 6 helps to make all of these fixes. It applies noise reduction, lens corrections and dust removal to the RAW file before editing starts, then hands back a new file to edit. The usual choice for that file is a DNG, a format that keeps a RAW file’s editing flexibility. The original RAW file is never modified.
This year’s PureRAW 6 expanded the reach of DeepPRIME XD3, the stronger of PureRAW’s two noise reduction engines.
In the past, it only worked with Fujifilm’s X-Trans sensors. It now works with Bayer sensors, the design used by Canon, Nikon, Sony and OM SYSTEM.
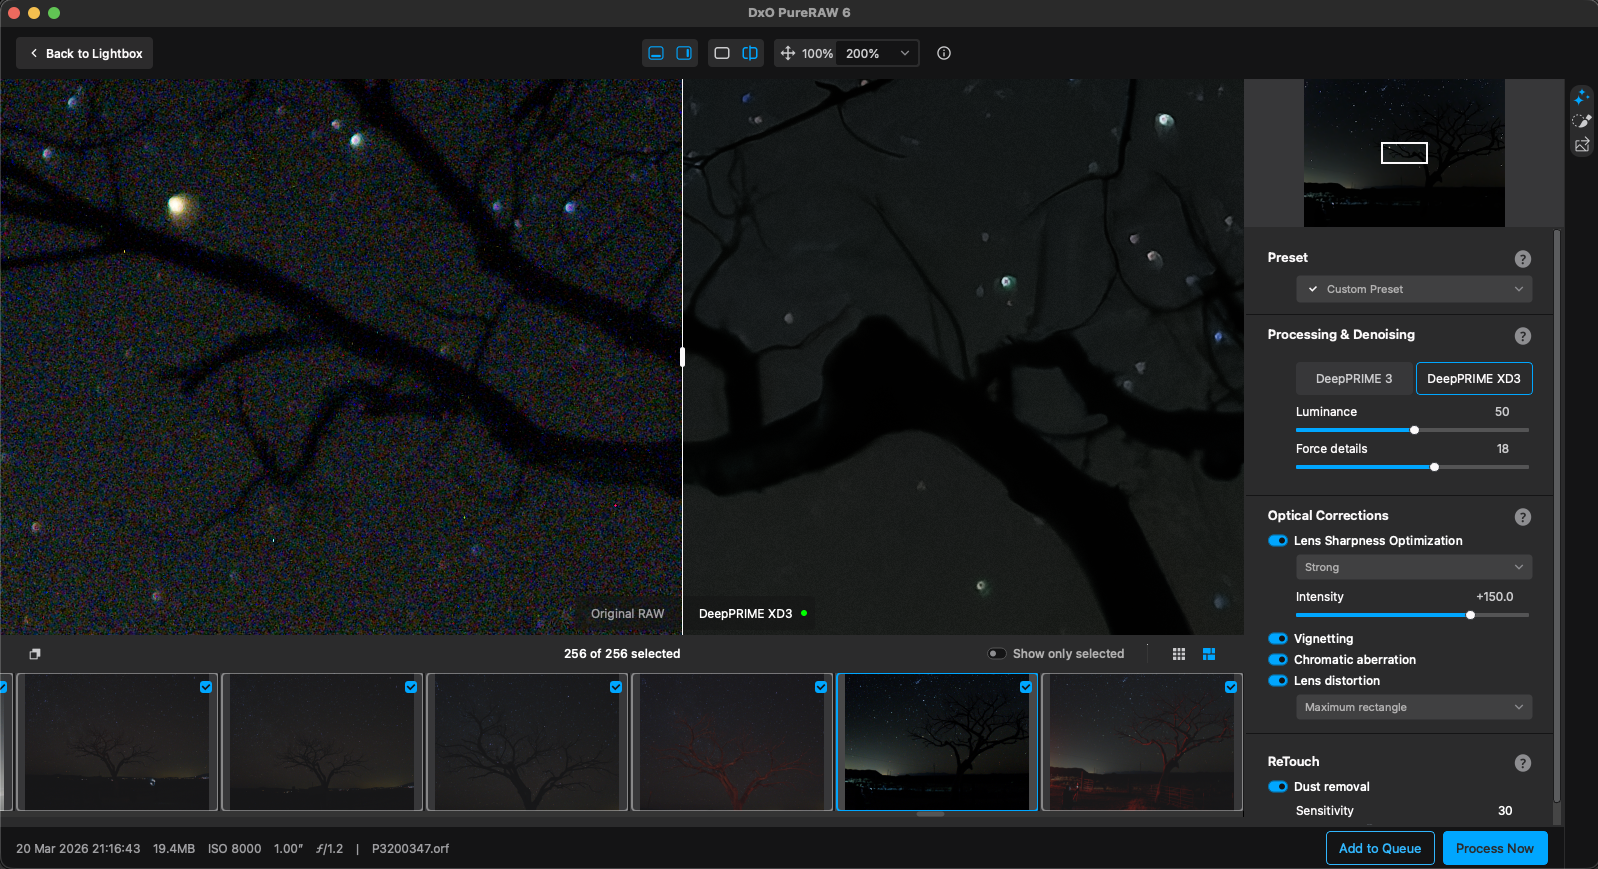
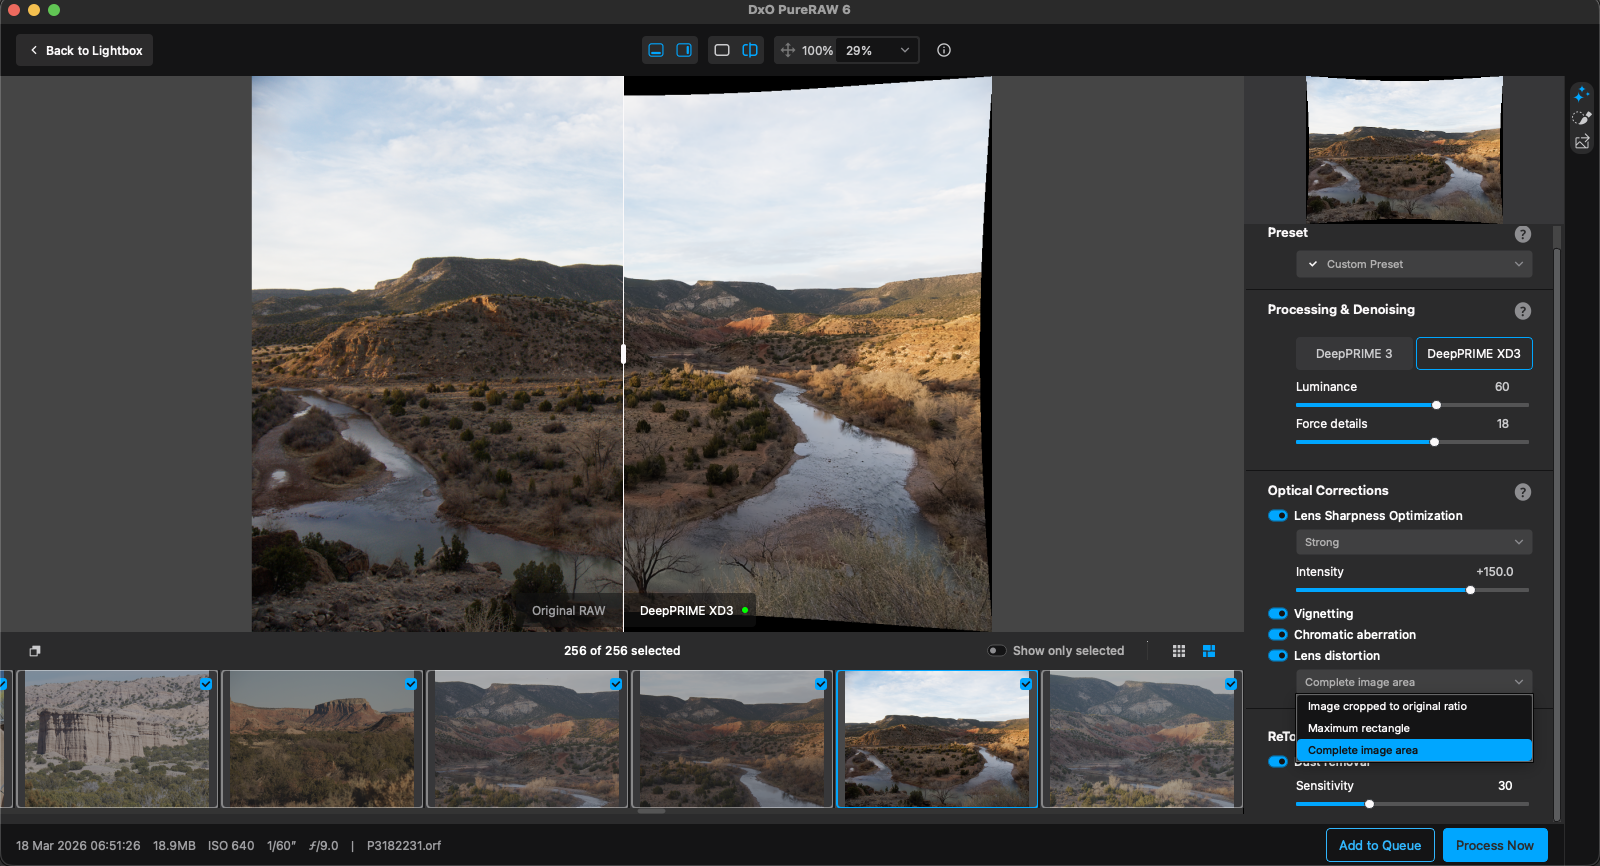
The lens corrections are an especially strong feature of DxO software, starting with PureRAW. They test each supported camera and lens pairing in their own lab, and PureRAW applies that impressive data for the exact combination that made the photograph.
In this day and age with skyrocketing storage costs, PureRAW 6 shrinks the files with a new DNG option called High-Fidelity Compression. In one example, a 57.8MB RAW file becomes a 136MB DNG without compression and a 17.2MB DNG with it.
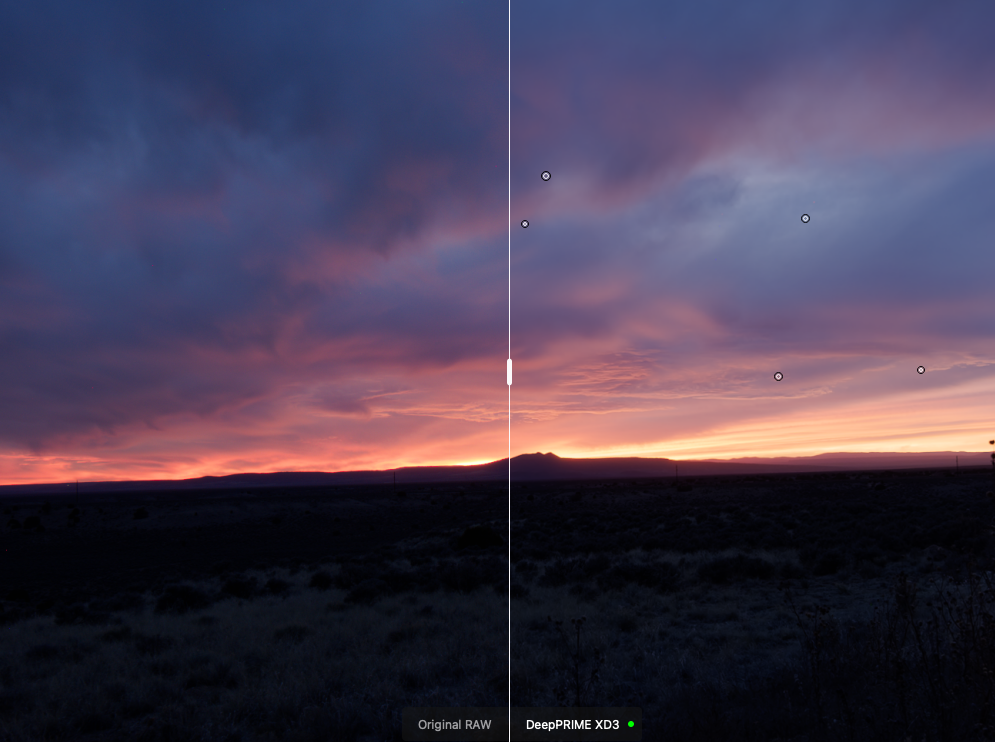
I have come to find that most photographers are like me, and they often shoot with less than spotless equipment. Luckily, dust spots are automatically detected and removed across a whole batch. And in PureRAW 6, batch edits finish quicker, because the processor prepares the next image while the graphics card renders the current one.
For noise reduction, start with DeepPRIME 3 and switch to XD3 for high-ISO files, heavy crops and fine detail such as feathers and fur. XD3 takes roughly twice as long, though the gap narrows on newer graphics cards, and it can leave artifacts (visible processing errors) on smooth surfaces. For portraits and architecture, stay with DeepPRIME 3.
If the processed file goes back to Lightroom, make sure to turn off its own lens corrections and noise reduction for that file. PureRAW has already applied both, and running them a second time doubles the correction and creates artifacts.
PureRAW fits a photographer who plans to keep editing in Lightroom, Photoshop or Capture One, because it only changes the file those editors receive. A photographer who would rather work in one application gets DxO’s processing inside PhotoLab 10, the company’s all-in-one editor. The full walkthrough, with recommended starting values for each control, is in DxO PureRAW 6: The Ultimate Beginner’s Guide.
Let the Editor Find the People and the Distance
Brightening one face in a group photograph is a small change. Telling the software which pixels belong to that face is the slow part. The area an adjustment affects is called a mask, and building one by hand means painting an outline and then cleaning up its edges.
PhotoLab 10 builds those masks itself, and my guide shows each one at work on my photographs from Morocco. Its AI Masks recognize the individual people in a photograph instead of treating the group as one subject. One easy step generates a separate mask for each selected person.
For portraits the masks go finer, selecting facial skin, eyes, teeth, lips or facial hair without a hand-painted outline.
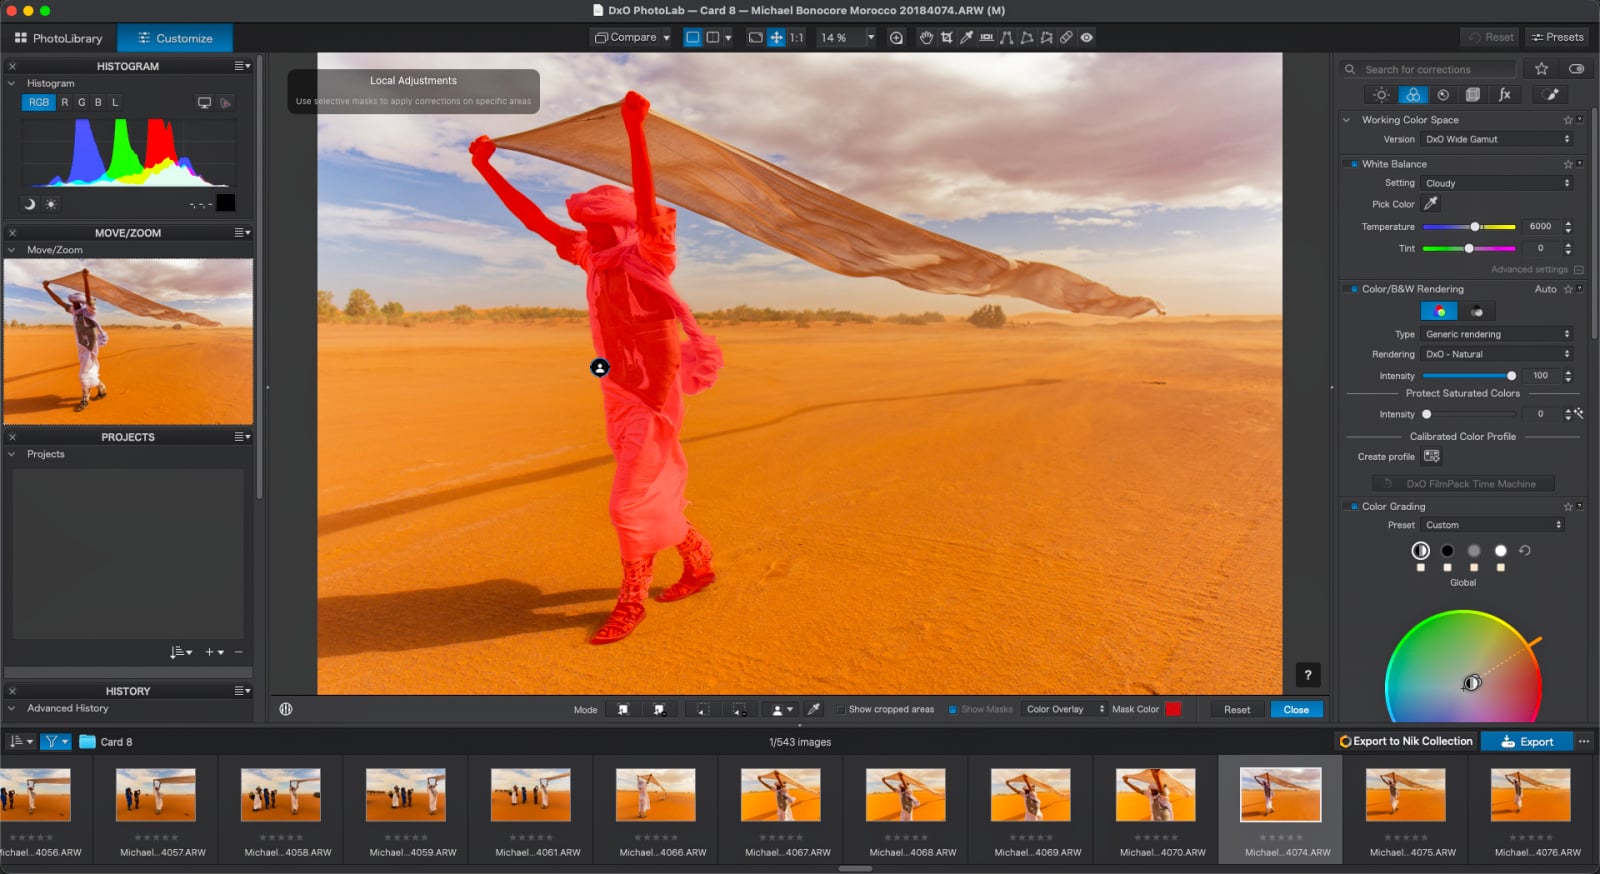
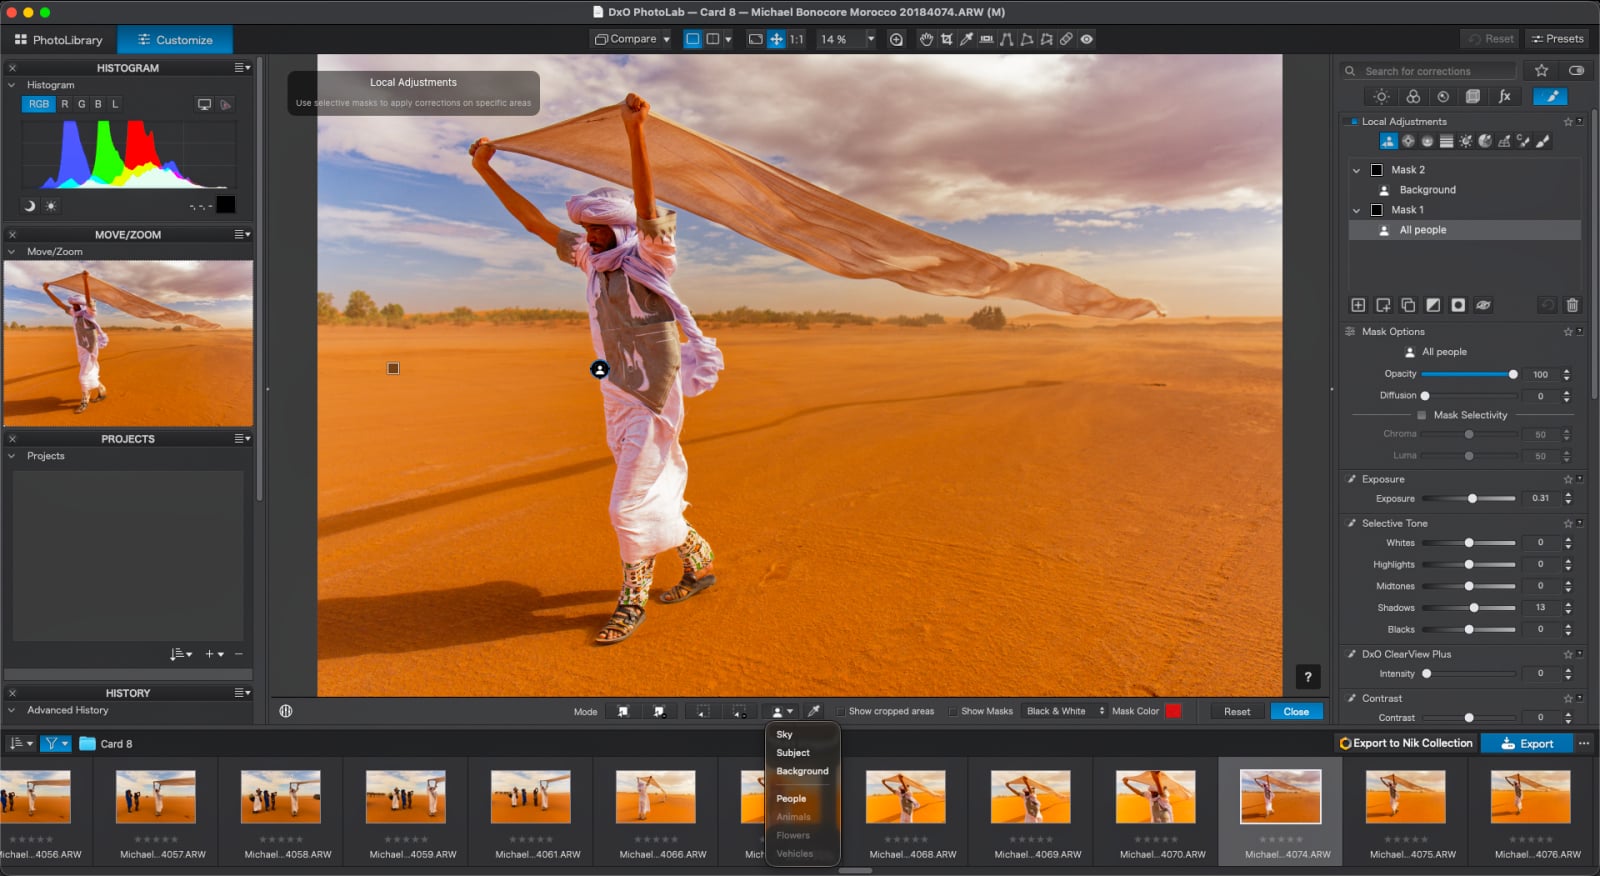
No matter the subject matter, every photograph has depth, and the new Depth Masks select areas by how far they are from the camera. PhotoLab builds a depth map, a model of which parts of the scene are near and which are far, without needing depth data recorded in the file.
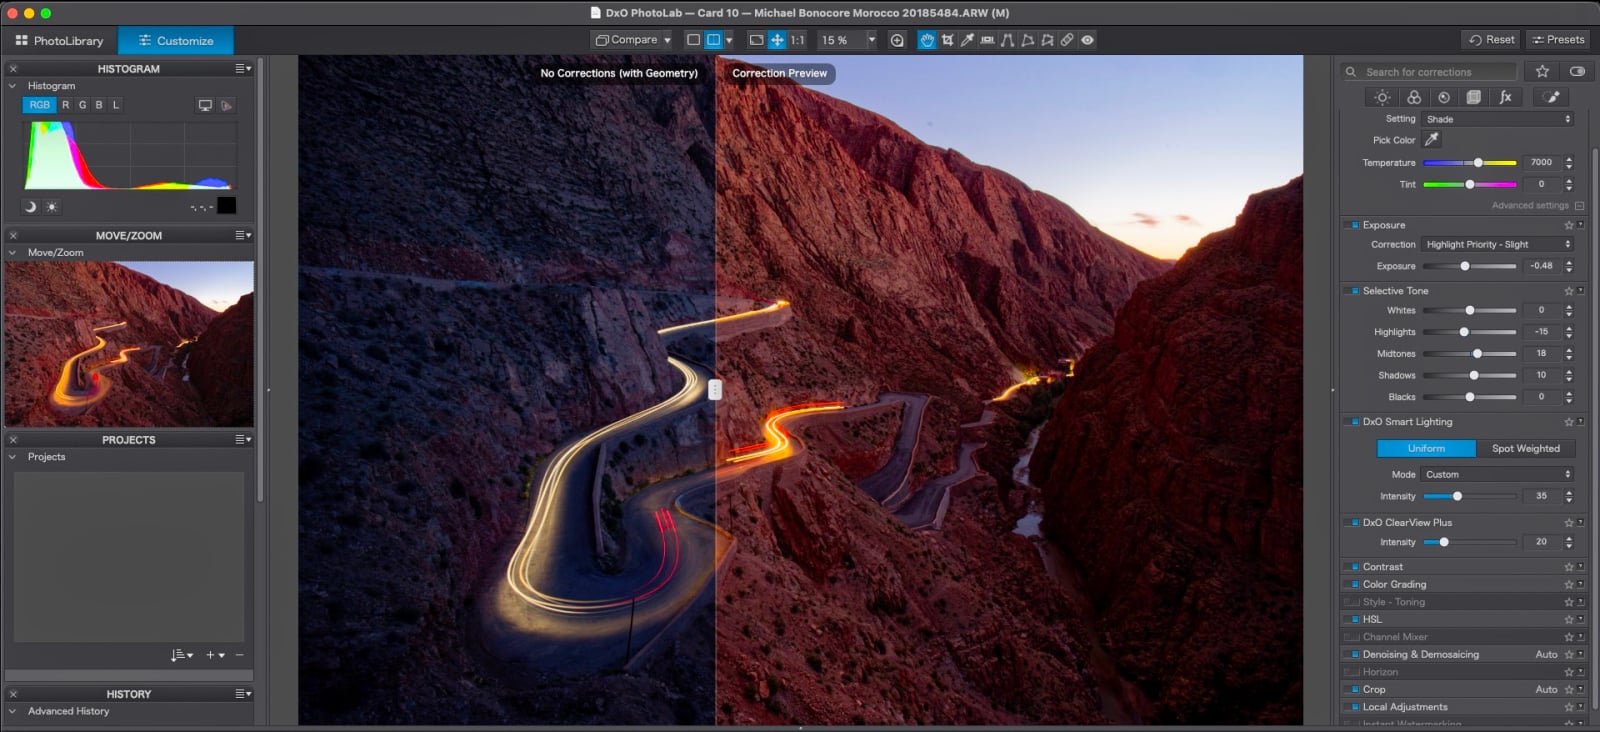
These masks utilize DxO’s own AI, which runs on the photographer’s own computer, so the masks work on an airplane or in a hotel with unreliable Wi-Fi. Additionally, for those concerned with privacy, this means that the photos are never sent to the cloud and stay local on their computer.
An automatic mask is a starting point to refine. When one misses part of the subject, PhotoLab 10 lets you correct it instead of rebuilding it.
Their U Point technology selects pixels by comparing their color and brightness. The Control Brush applies that matching inside an area the photographer paints.
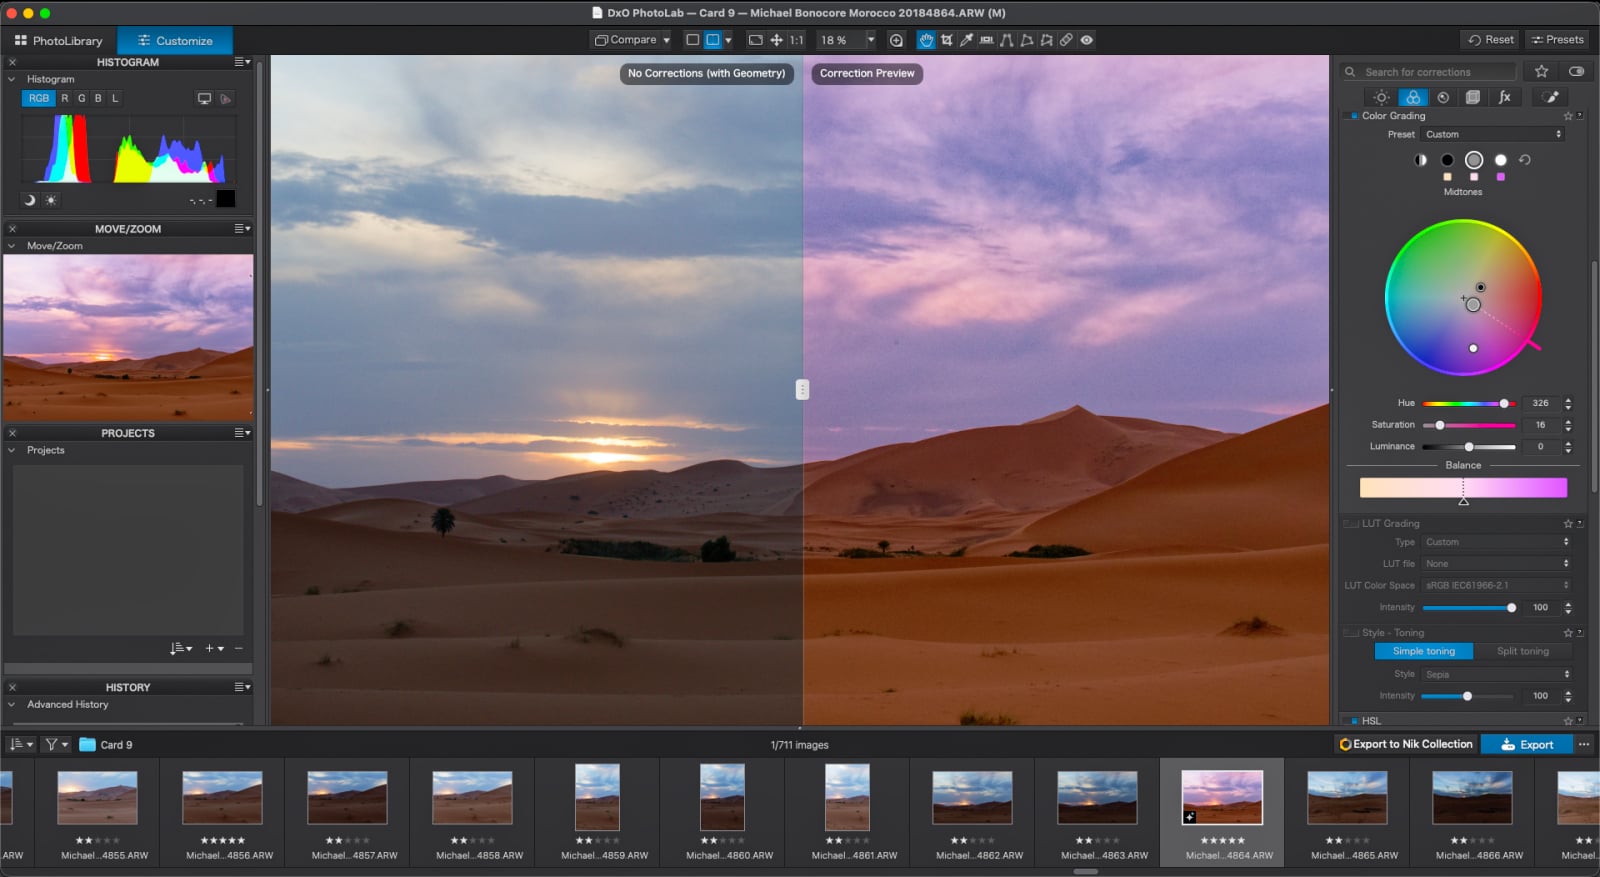
Color grading shifts the color of the shadows, midtones and highlights separately. PhotoLab 10 puts all three on a single wheel, with a Global control for the whole image.
With the three ranges selected, dragging one marker moves all of them and keeps the same distance between them. This allows for trying a different color direction without rebuilding the color grade.
The free 10.3 update, released in November, extends the masks to noise reduction. Each local adjustment, an edit confined to a masked area, can now use its own noise reduction engine. Reserve DeepPRIME XD3 for the subject, where it extracts the most detail, and let DeepPRIME 3 handle the rest of the frame.
Straighten One Thing Without Bending the Rest
Point a camera up at a building and its walls lean toward each other in the frame. That is a perspective problem, and no exposure or color control fixes it. ViewPoint 6 is the application to fix that: it corrects geometry, perspective and distortion.
Released in October, it adds AI masks to ReShape Fusion, the tool that reshapes part of a picture. A mask finds the outline of a subject, however complex its shape, and the correction mesh is built to match it.
The photographer sets how far the change carries into the rest of the picture. As before, the correction needs no forced crop.
The standalone app now opens RAW files directly. November’s 6.1 update adds DNG export, so a RAW file corrected in ViewPoint can leave with its geometry fixed and continue in any editor that opens DNG files.
Saving and exporting are now separate. Save records the corrections for the next session, and Export produces the finished image.
Give the Photo Its Look
Photographers miss the days when film made bright lights glow. Light passed through the film’s layers, bounced off the back and leaked in again, leaving a soft halo around streetlights and candle flames. A digital sensor records the same lights with crisp edges and no halo.
Rebuilding that glow in Photoshop means duplicating the image, blurring the copy, masking the highlights and blending the layers together. Nik Collection 9 does it with one filter. The suite is a set of plug-ins for Photoshop, Lightroom Classic, Affinity and PhotoLab, and every application in the suite can open the photo from inside one of those editors.
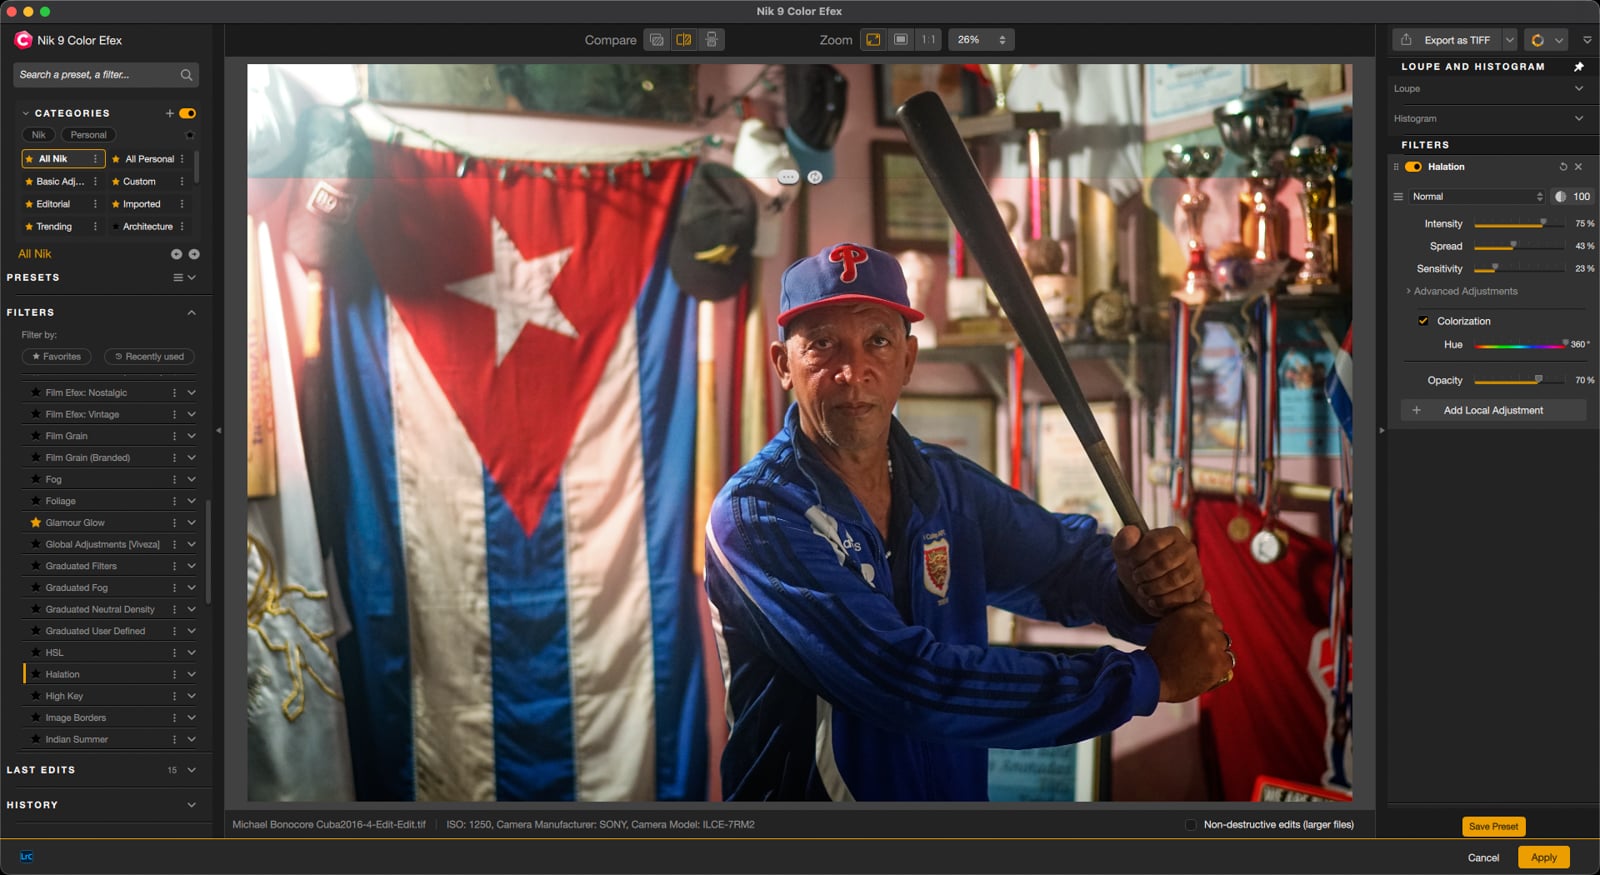
That filter, Halation, is one of three new effects in version 9, each shown on my photographs from Cuba in my Nik Collection 9 guide. It works best on an image that already has strong highlights worth softening, such as a night cityscape or a backlit portrait.
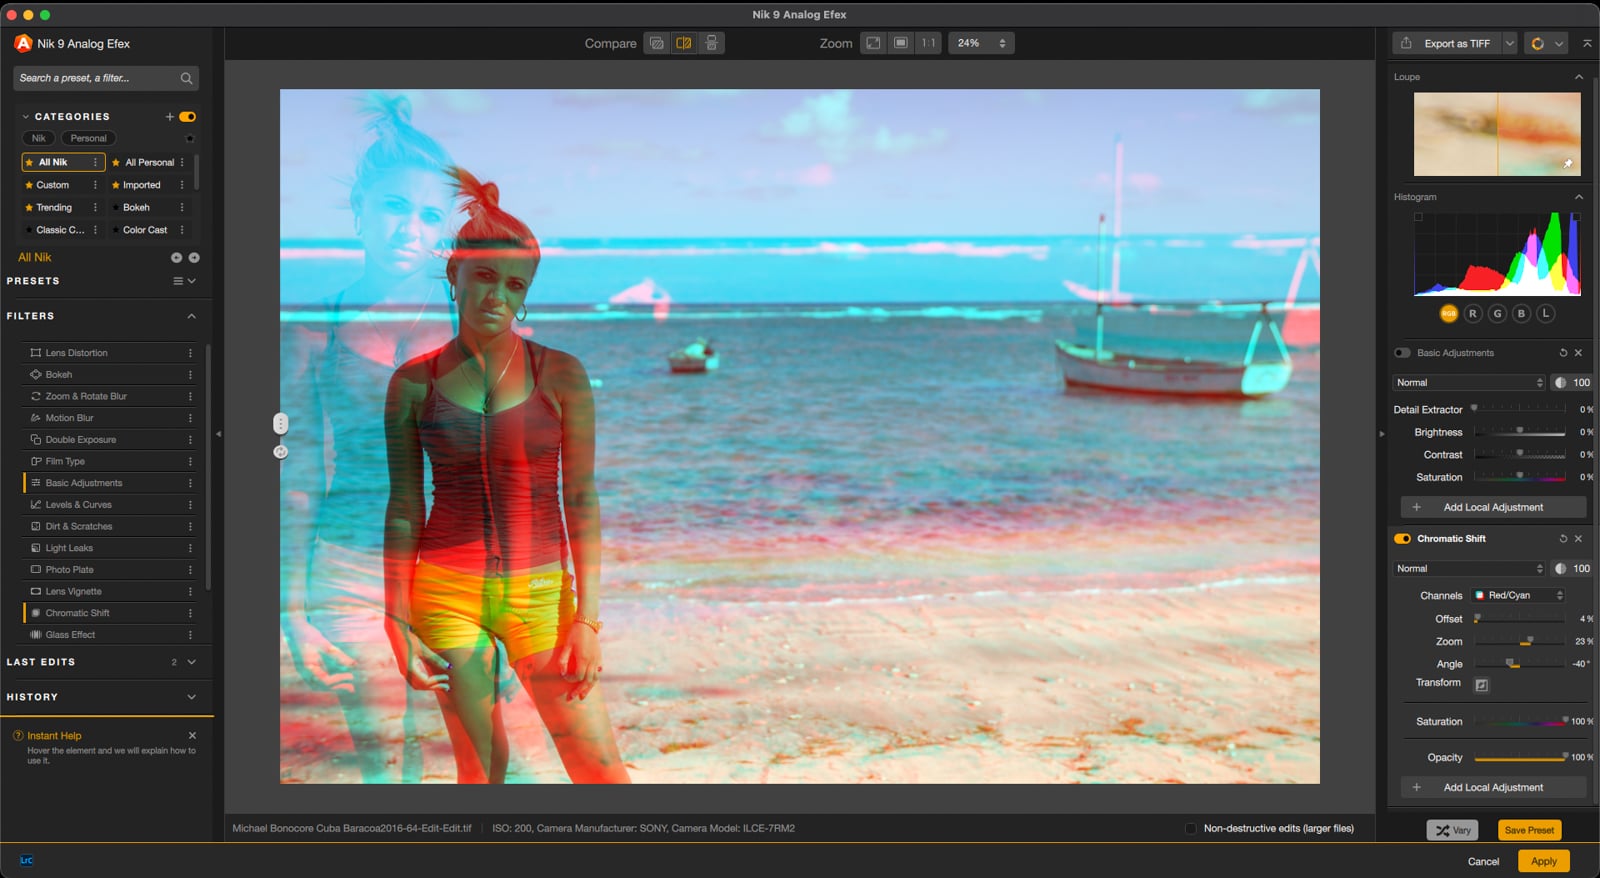
Chromatic Shift copies the color offset of a misaligned printing press, the red edge on one side of a face and the blue-green shadow on the other. A subtle shift of that kind gives a portrait a retro, editorial feel. Using an AI mask can keep it off the eyes and lips.
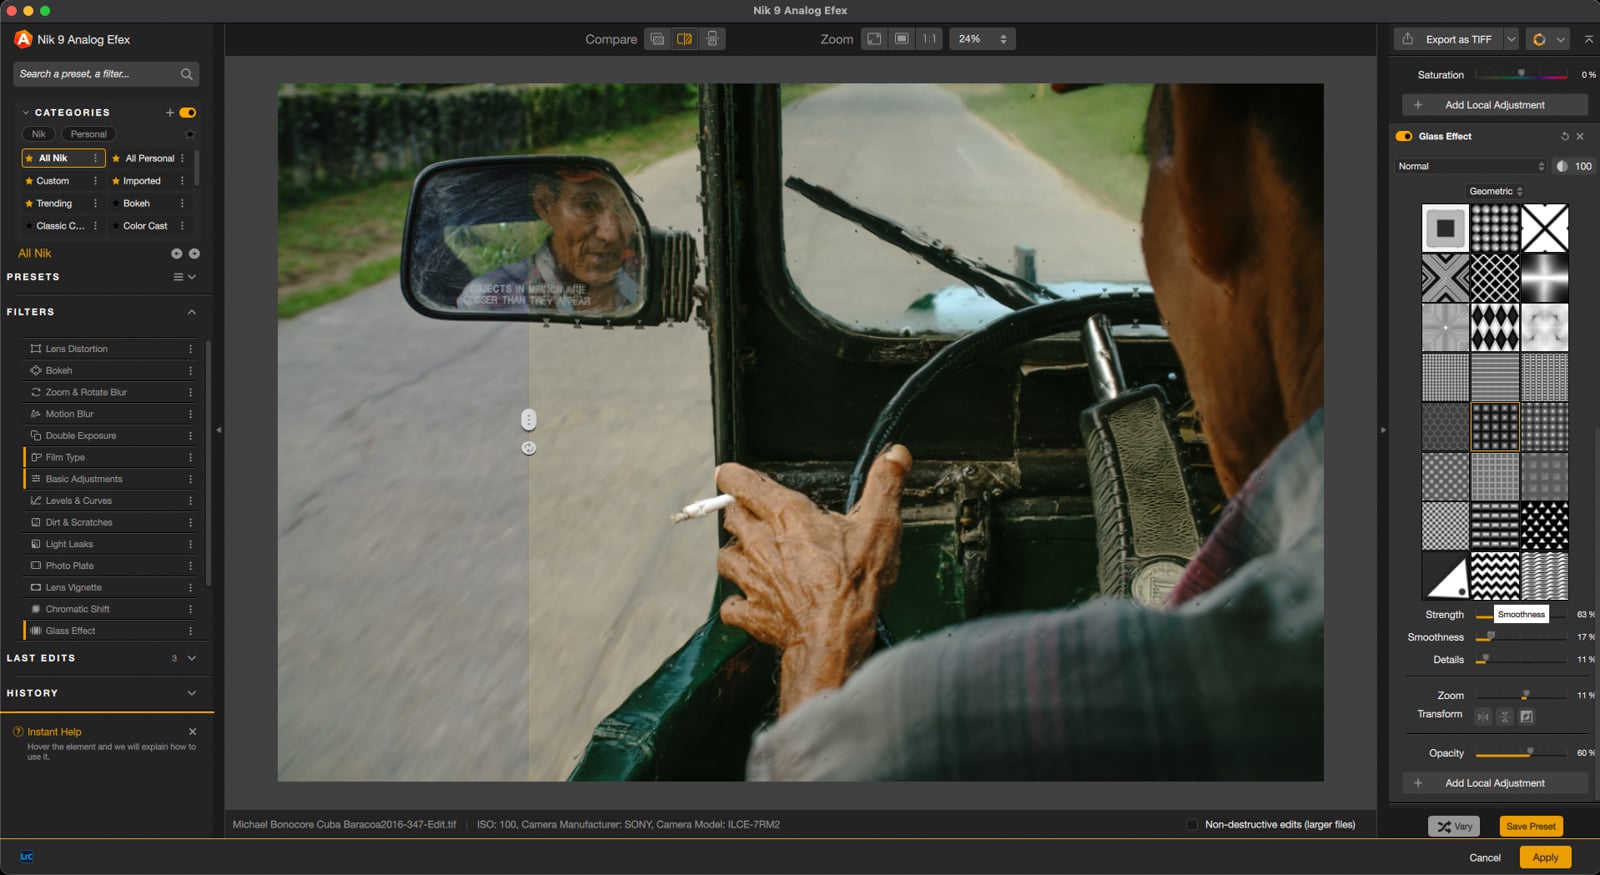
Glass Effect distorts the frame as if it were shot through textured glass. On a portrait, the distortion can wrap the frame while an AI Object Mask keeps the face sharp.
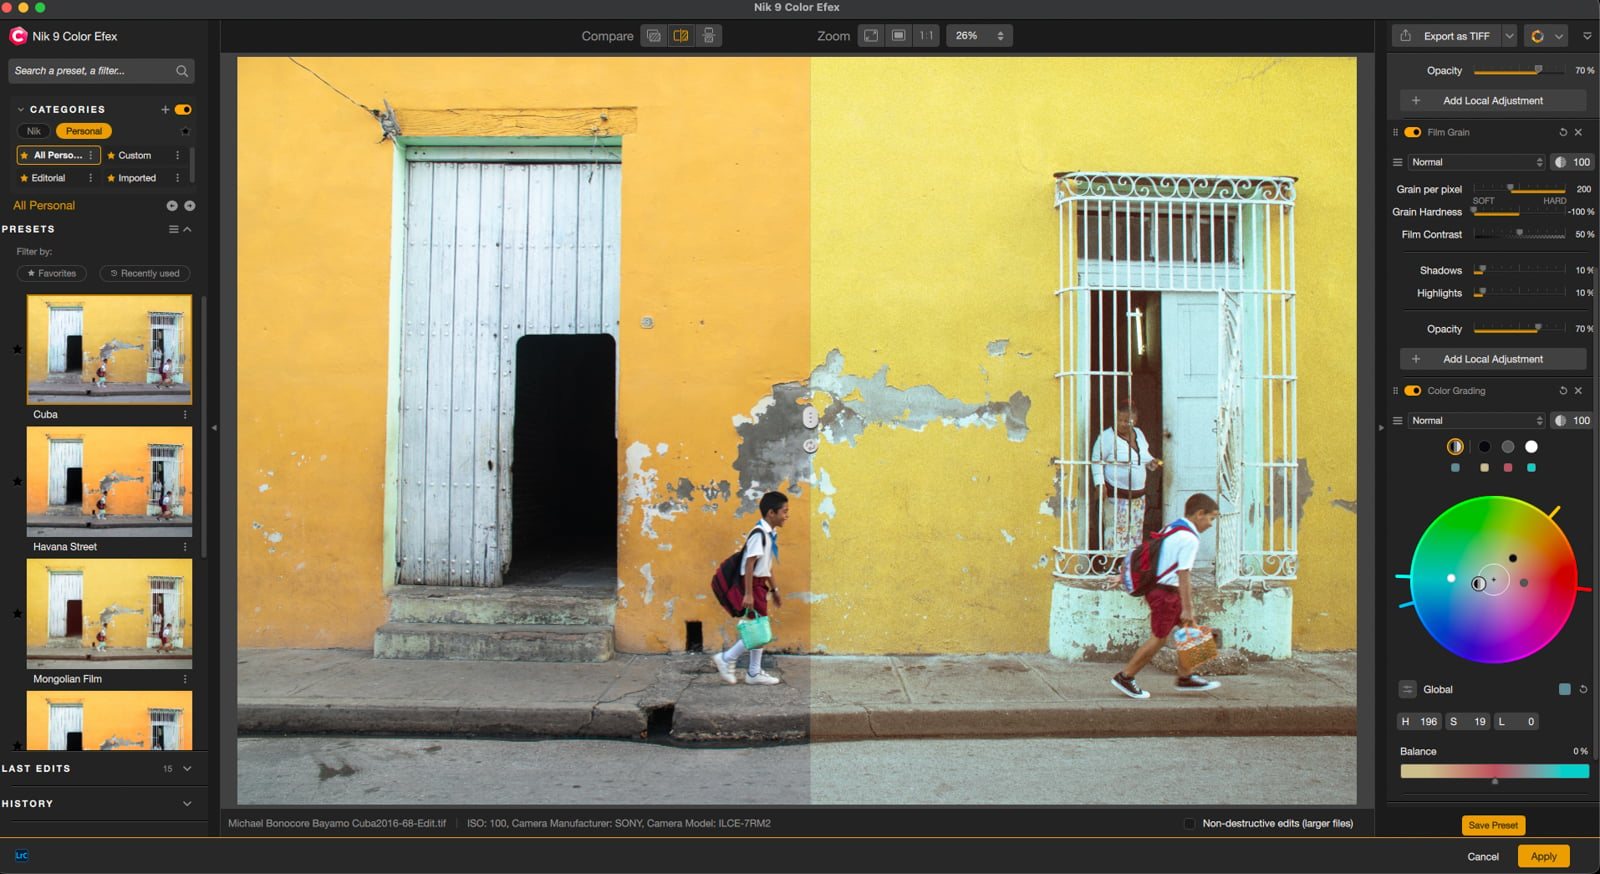
The new Color Grading filter in Color Efex, one of the Nik Collection 9’s plug-ins, puts shadows, midtones, and highlights on one wheel. Two shortcuts move all three together: one shifts hue, the color the tones lean toward, and the other shifts saturation, how vivid that color is. It gives photographers who finish in Photoshop, Lightroom Classic or Affinity the single-wheel grading that PhotoLab 10 has built in.
Eighteen blending modes now sit inside Color Efex and a second plug-in, Analog Efex. A blending mode sets how an effect mixes with the image beneath it. On the Halation filter, Multiply sinks the glow into the shadows for a darker image, while Soft Light keeps the glow and more of the original contrast.
Aim any of these effects at part of the frame with AI Object Masks and Depth Masks, which work in every plug-in.
Version 9.2, the November update, adds snapshots. A snapshot saves every edit made so far. Try a different look, then come back to the snapshot at any point in the session.
The update also brings 18 new presets, or saved looks: six each for Color Efex, Analog Efex and Silver Efex.
Put the Tools Together on a Night Sky
Matt Suess has photographed dark skies for decades and leads astrophotography workshops in places such as Grand Teton National Park. One of the most challenging files he has edited came from a test.
He normally caps his Milky Way exposures at ISO 6400, but he wanted to test PureRAW, so he shot a nightscape at ISO 12,800 to see how far he could push it.
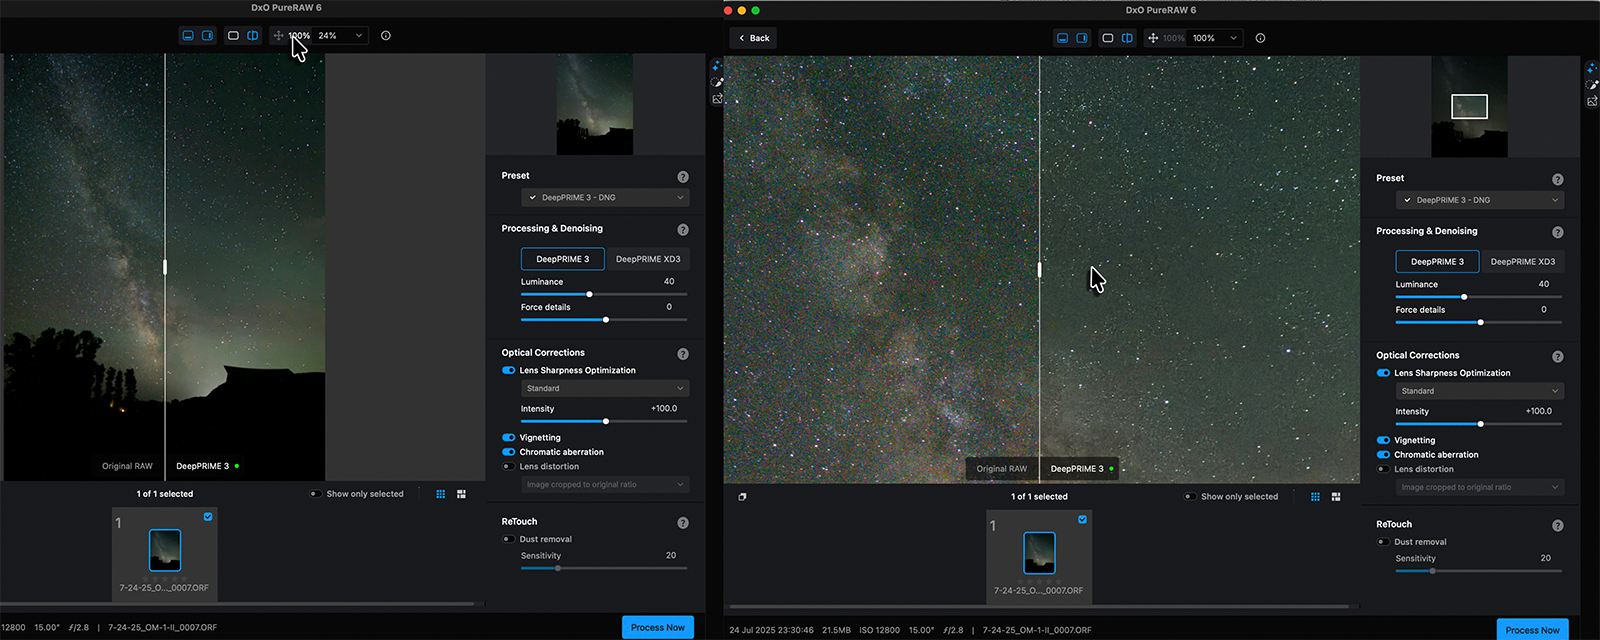
Sharpening or adding contrast to a noisy night file bakes the noise in, so Suess runs noise reduction before he develops the RAW file. He opens PureRAW’s Preview and Process mode, which shows the controls first, because a night sky is where he wants to make those calls himself.
XD3 is the stronger engine, but a star field is where Suess often skips it. That much processing can start to soften the stars themselves, so he picks DeepPRIME 3, and he treats it as a per-image call.
He keeps Lens Sharpness on Standard, since the Hard setting starts sharpening the noise along with everything else.
The develop pass in Lightroom stays restrained. Suess switches to a color profile built for landscapes in place of the flatter default, adds a little contrast and holds back on the other sliders. He treats this pass as the place to protect the sky’s real color, with the finishing touches saved for later.
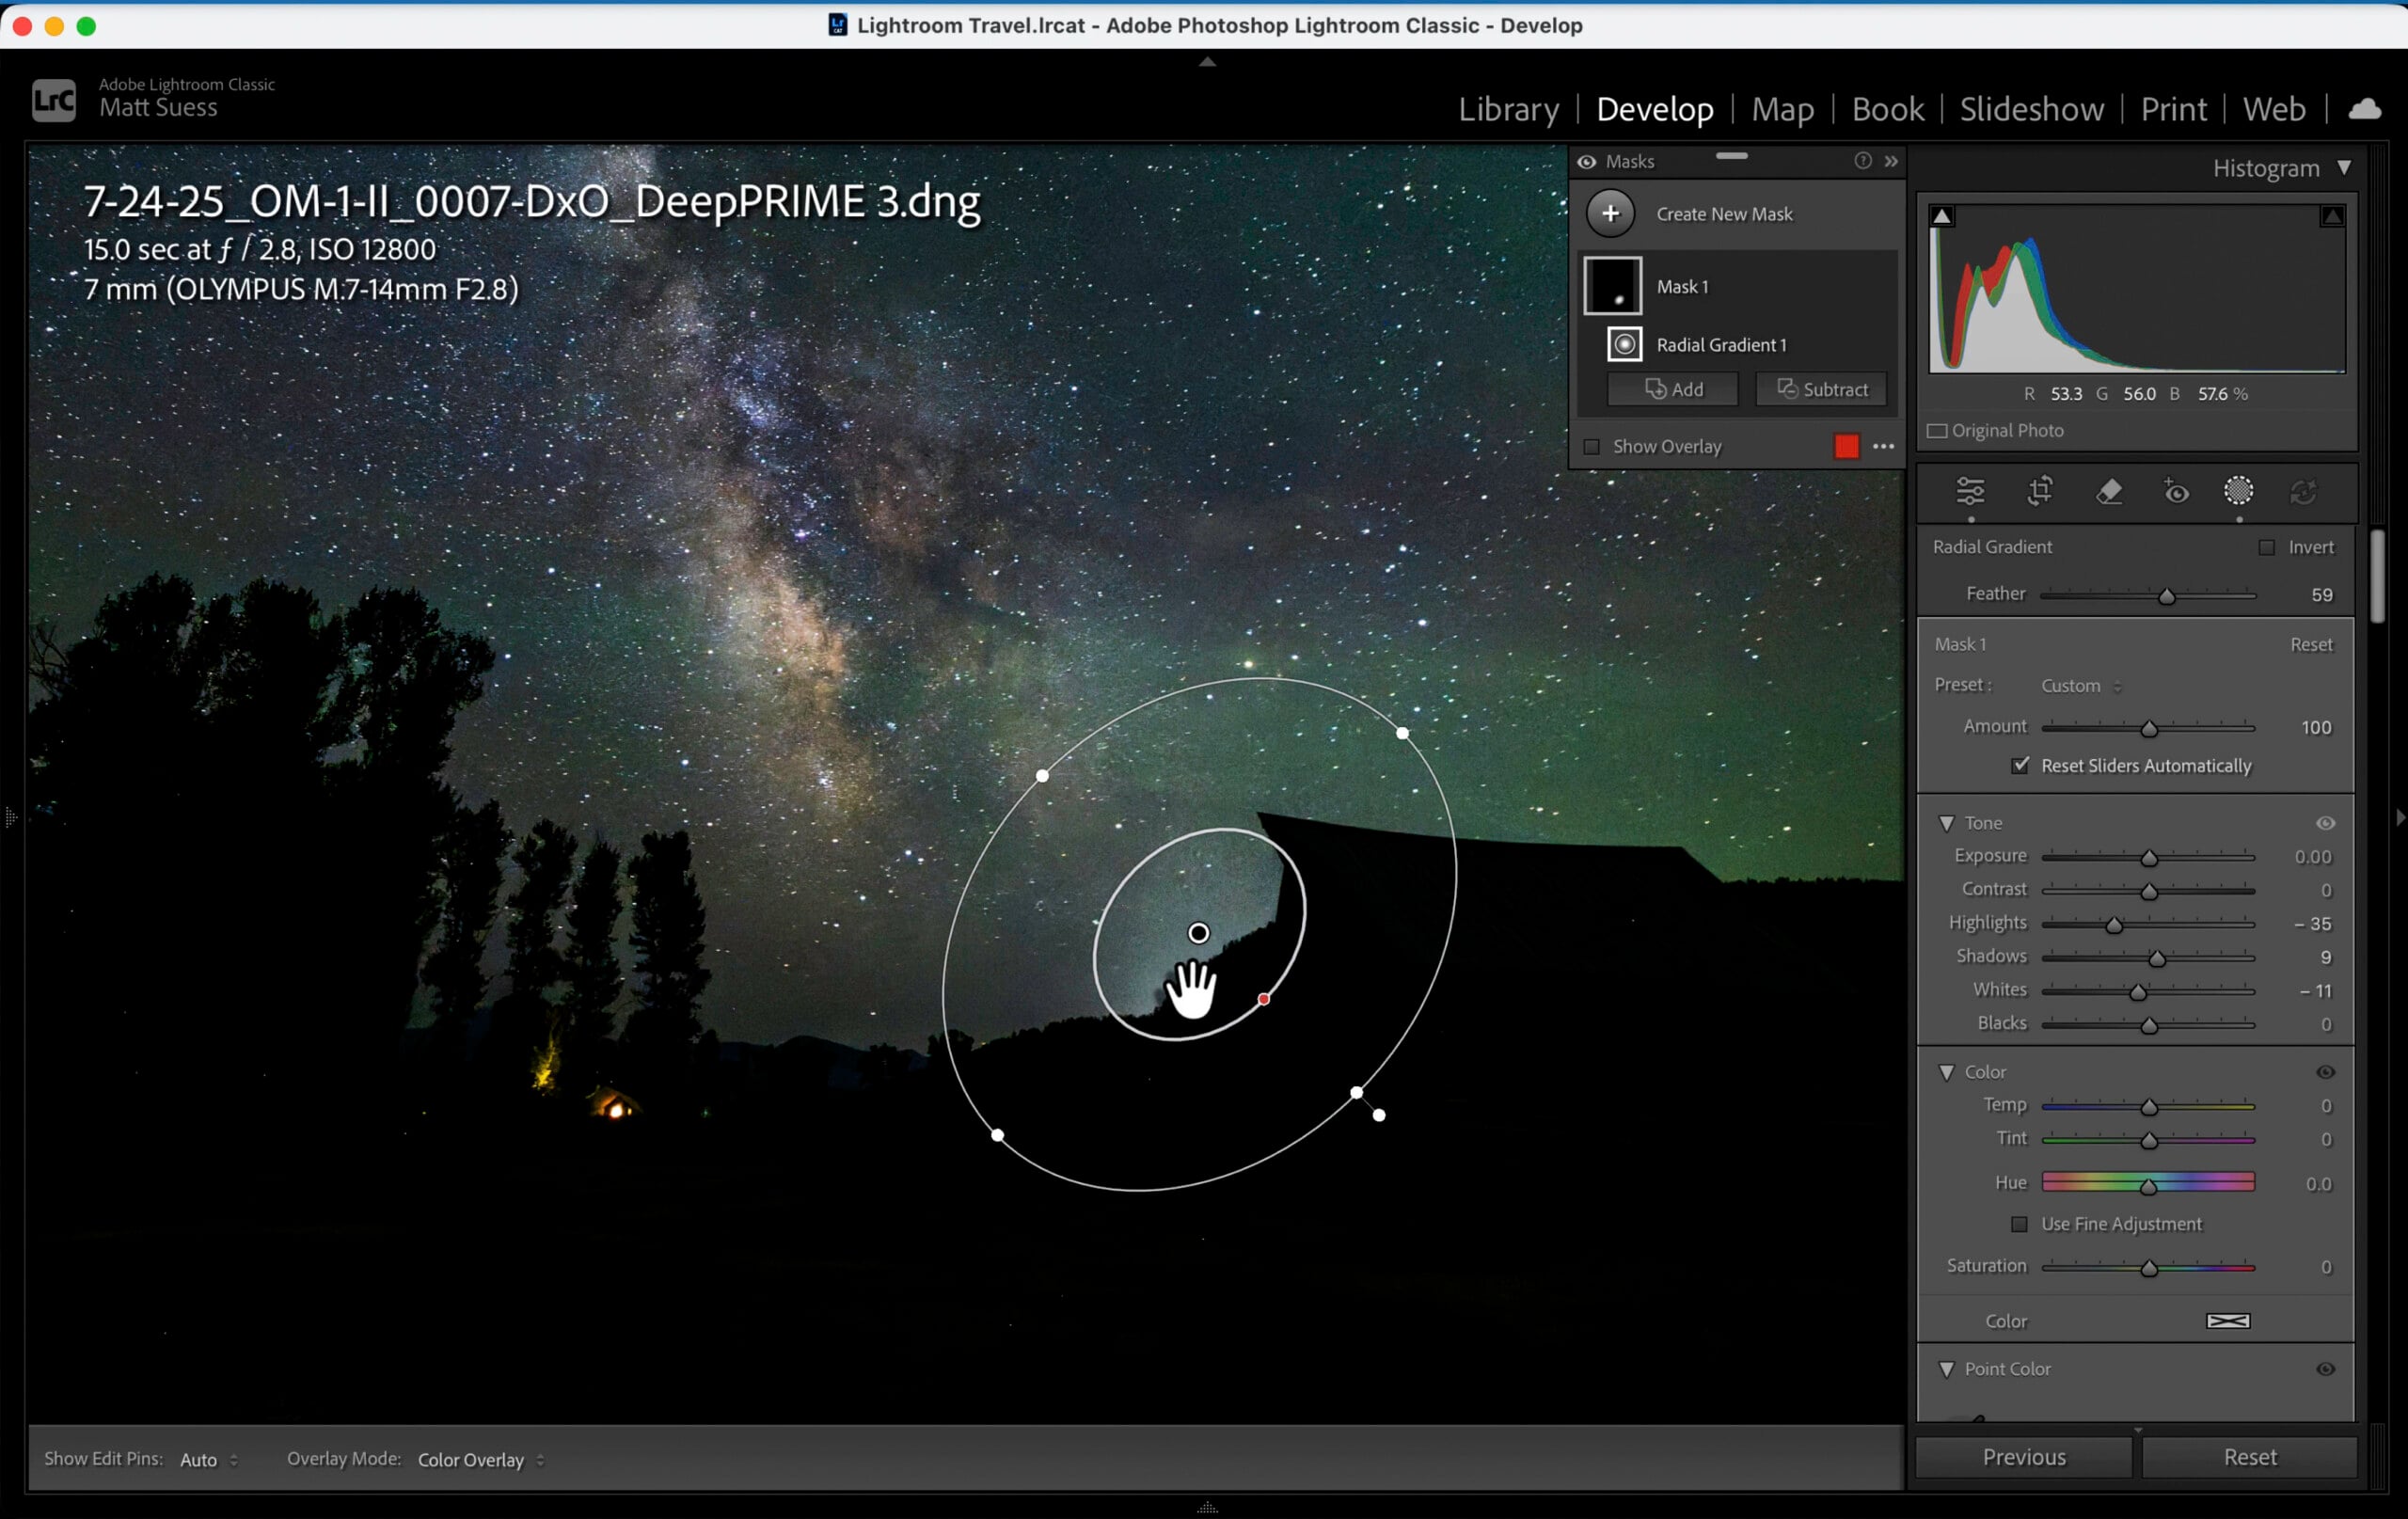
The finish happens in the Nik Collection 9 plug-in Color Efex, with the same four filters in the same order on nearly every Milky Way photograph. ClearView lifts the faint gray haze that dulls a night photo, and Suess keeps it low so it does not outline the stars. Glamour Glow spreads a soft bloom of light from the brightest points.
Remove Color Cast pulls one unwanted color out of the frame. Tonal Contrast raises contrast separately in the shadows, midtones and highlights, and he raises the midtones, where the structure of the Milky Way sits. Once the stack works, he saves it as a preset for the next photograph from his astrophotography session.
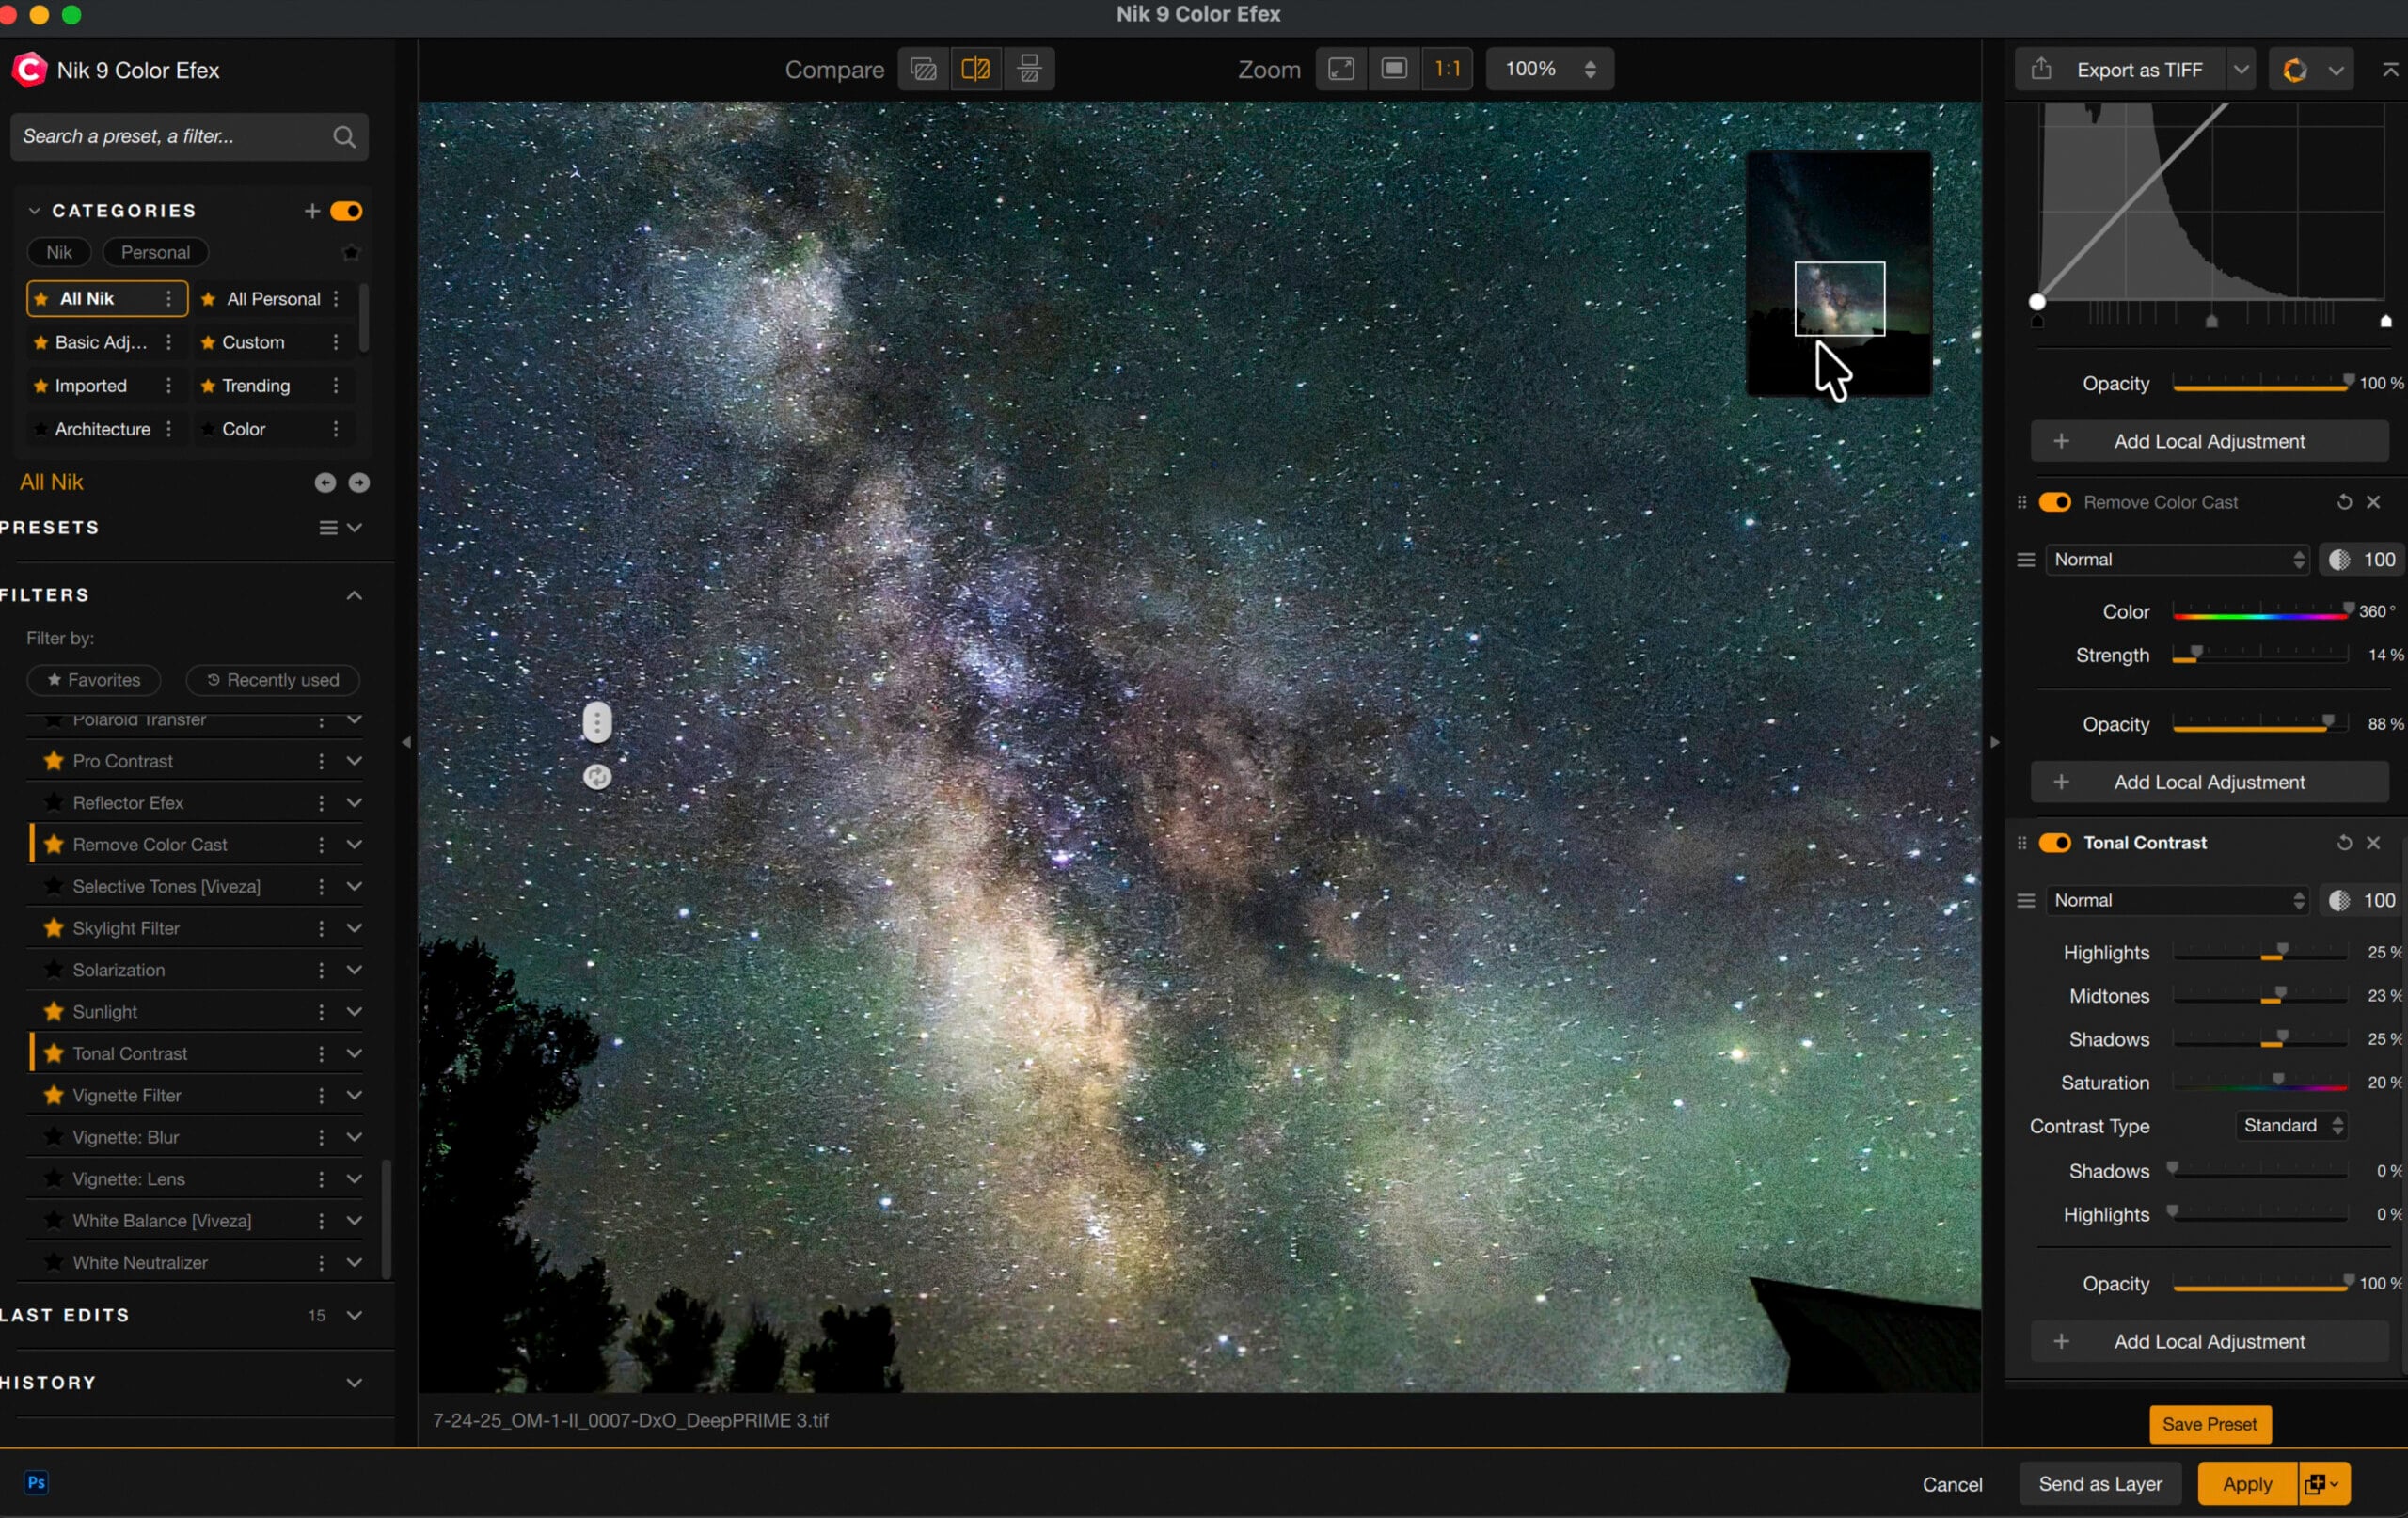
Suess fine tunes the filters with two tools. A Color Mask, a local adjustment added inside a filter, selects one color across the whole frame. He uses it on air glow, the faint green tint that shows in the sky on very dark nights.
An AI Object Mask points a filter at a single foreground element instead of the whole image.
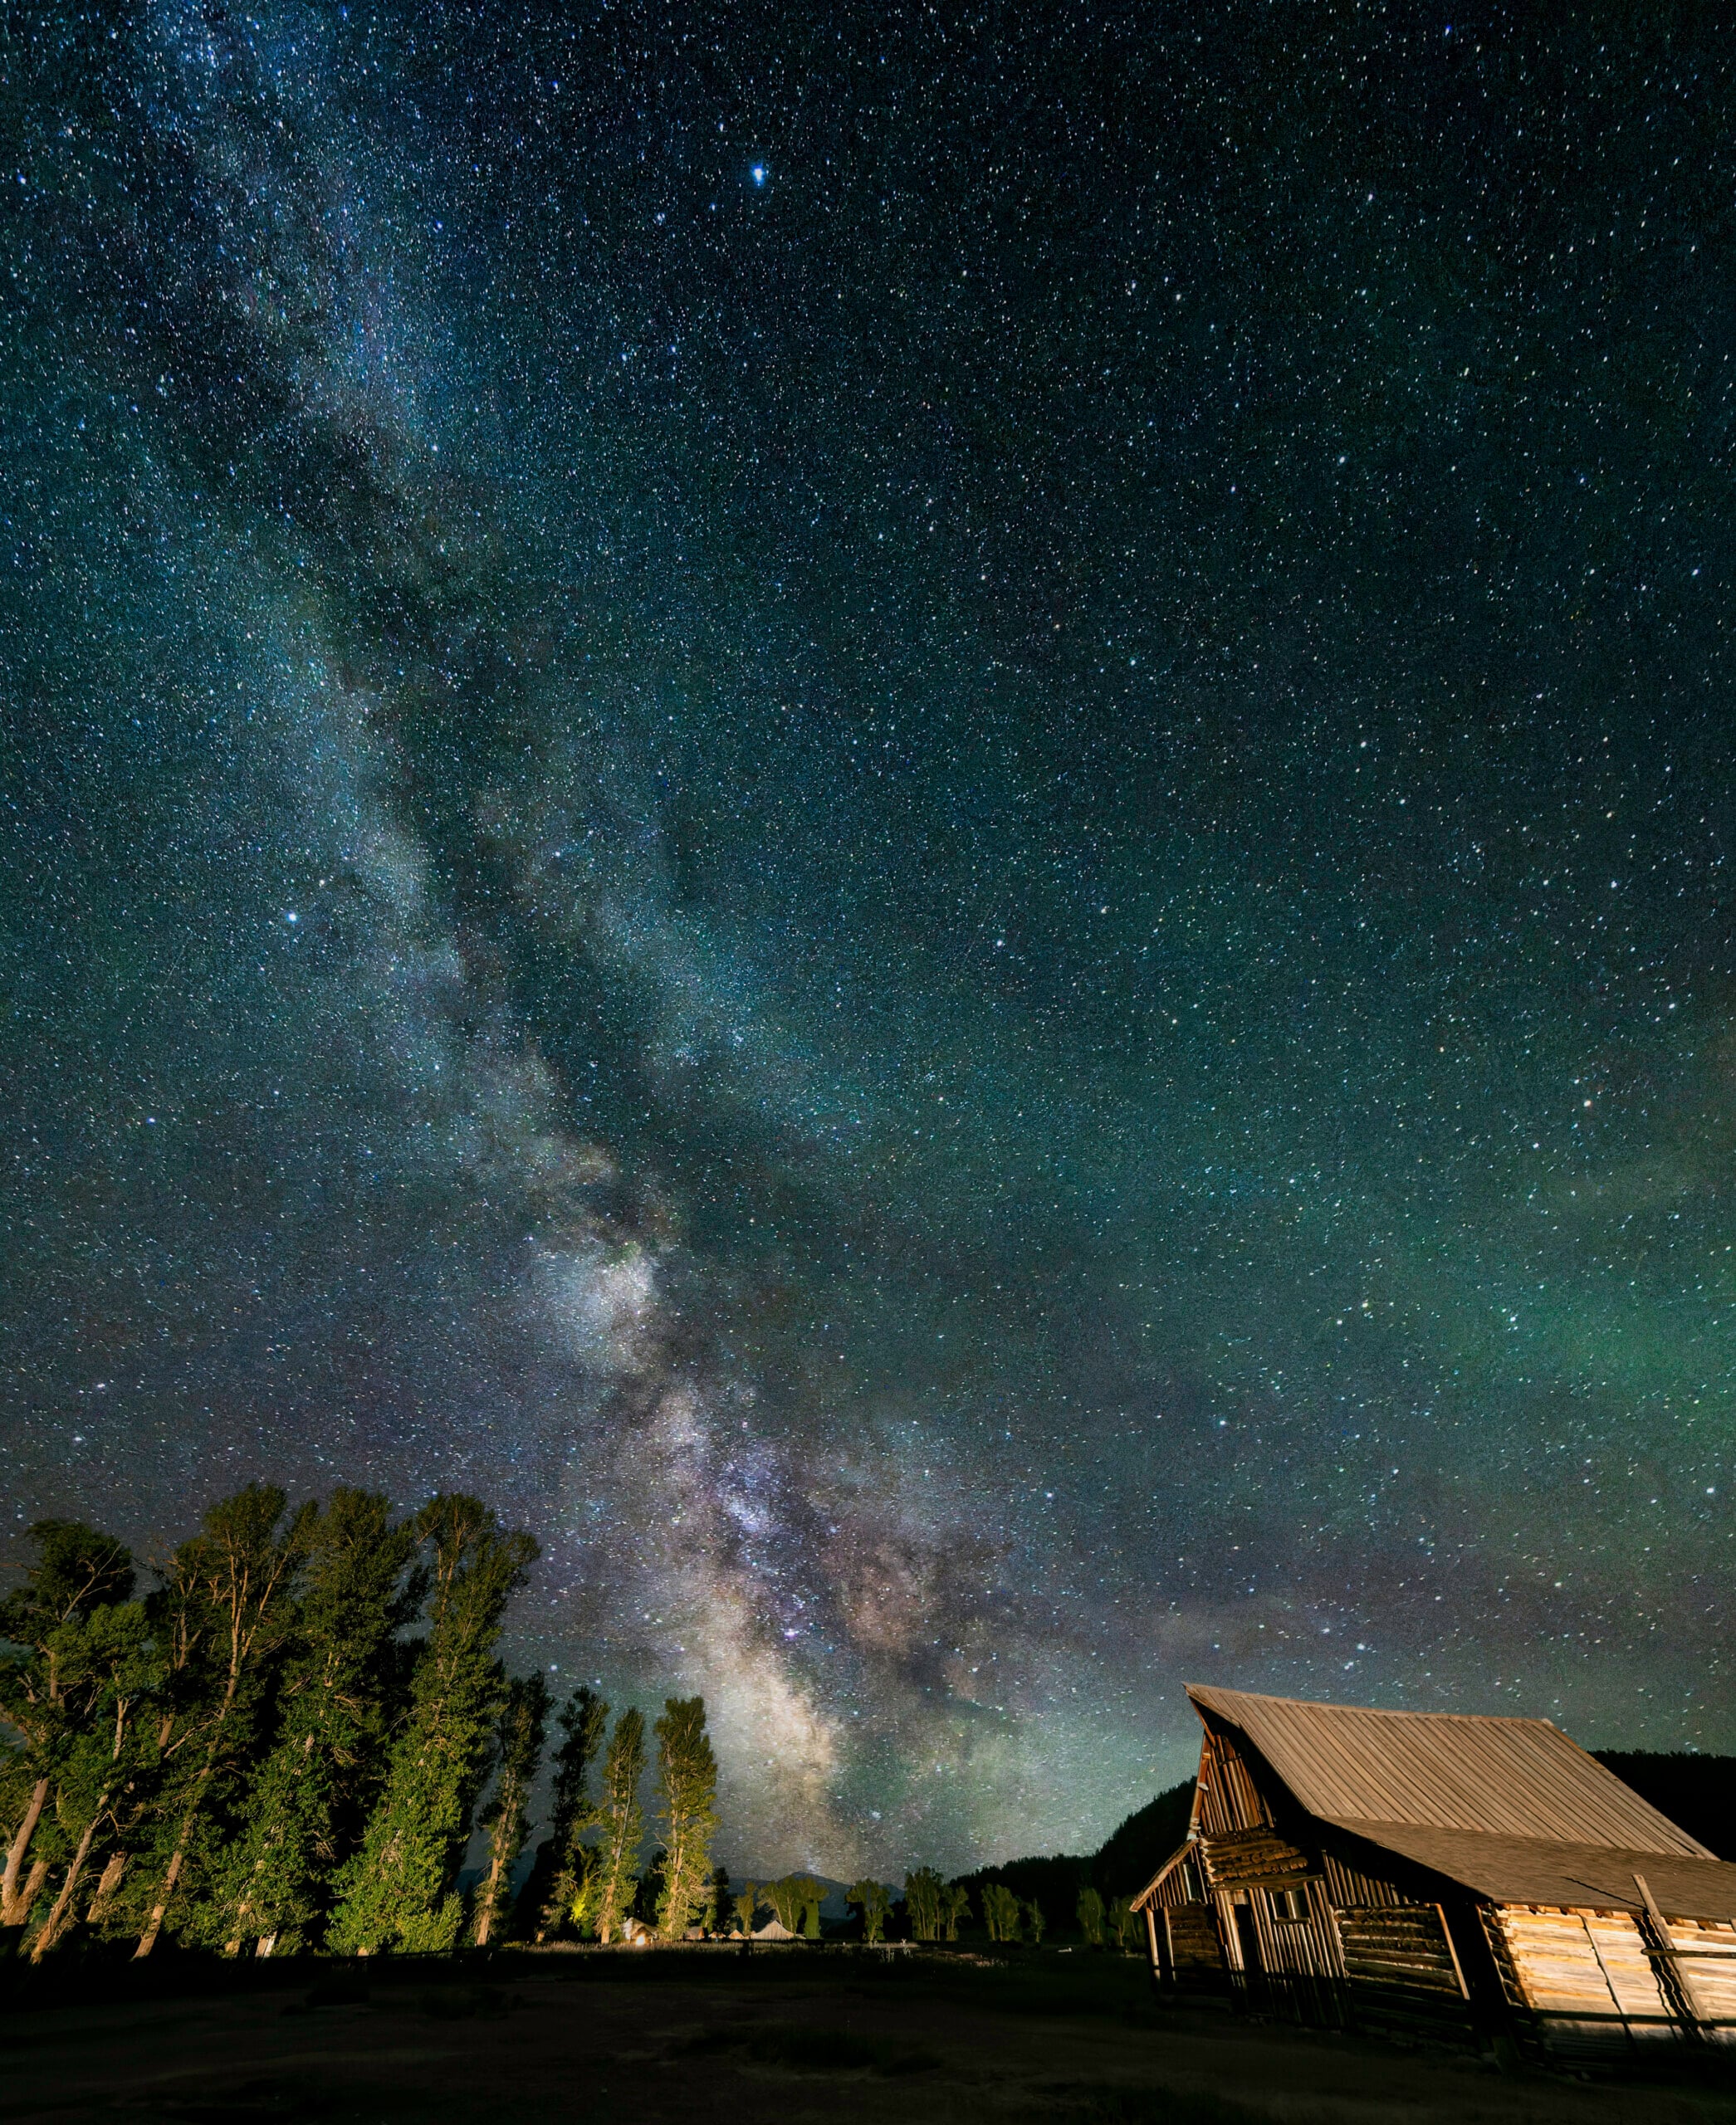
He judges every move at 100%, not from the small preview. Each one gets a before and after comparison, and he looks for halos, the bright rings that too much contrast leaves around stars. Every step of the edit, with his settings, is in How to Turn a Flat, Noisy RAW Into a Finished Milky Way Photograph.
Hand the Photo to Affinity and Get It Back
Some jobs cannot be done by developing a RAW file: a layered composite, added text, an object removed or replaced, detailed retouching. Those jobs need a pixel editor, software that changes the pixels of the picture directly.
DxO announced a partnership with Affinity by Canva in September. Affinity runs on macOS and Windows and costs nothing beyond a free Canva account.
PhotoLab 10 launched without a direct Export to Affinity button, and PhotoLab 10.1 added it. With the 10.3 update, Affinity’s own .af files appear in PhotoLab’s library like JPEG and TIFF files.
That makes a round trip possible. A photographer can develop a RAW file in PhotoLab, continue in Affinity with retouching, compositing or layout, then finish and export the result in PhotoLab. Changes saved in Affinity are visible in PhotoLab straight away, and PhotoLab’s own adjustments are stored separately and never change the Affinity document.
Nik Collection 9.2 connects from the other side by saving its work as an .af file. The file keeps the edited image and the original as separate layers, and the masks come across as layers too. Going the other way has a limit: Nik Collection opens an .af file with its layers merged into a single image.
The Black Friday Prices
DxO’s Black Friday prices cover new licenses and upgrades of their five applications through November 29th, 2026. They apply to purchases from dxo.com/bf26/PetaPixel for macOS and Windows, are applied automatically with no code required, and cannot be combined with any other offers.
PureRAW 6 suits a photographer who wants cleaner files and plans to keep editing in Lightroom, Photoshop or Capture One. It is $99.99, down from $139.99. The upgrade from version 4 or 5 is $69.99, down from $89.99.
PhotoLab 10 suits a photographer who wants one application for the whole edit, with DxO’s processing, the automatic masks and the Color Grading wheel in the same place. It is $199.99, down from $249.99. The upgrade from version 8 or 9 is $99.99, down from $129.99.
Nik Collection 9 suits a photographer who has an editor already and wants the finishing looks: film glow, color grading and blending modes without stacked layers. It is $149.99, down from $179.99. The upgrade from version 7 or 8 is $79.99, down from $99.99.
ViewPoint 6 corrects geometry, perspective and distortion, and version 6, released in October, adds an AI mask that fits a correction to the outline of a subject. It is $99.99, down from $129.99. The upgrade from version 5 is $69.99, down from $84.99.
FilmPack 8 recreates the look of classic film stocks from laboratory measurements of real film, and it includes a tool that prepares home-scanned negatives and slides for editing. It is $74.99, down from $149.99. The upgrade from version 7 is $49.99, down from $89.99.
Free trials of every DxO application are available from dxo.com. November’s 10.3, 9.2 and 6.1 updates are free for owners of PhotoLab 10, Nik Collection 9 and ViewPoint 6.
Full disclosureThis article was brought to you by DxO. DxO’s Black Friday prices apply to new licenses and upgrades of PhotoLab 10, Nik Collection 9, ViewPoint 6, PureRAW 6 and FilmPack 8 through November 29. The prices are applied automatically at dxo.com/bf26/PetaPixel, with no code required.
Affiliate Disclosure PetaPixel articles may include affiliate links; we may earn a commission if you buy through one.