A Beginner’s Guide to Aperture, Shutter Speed, and ISO in Photography
This guide to photographic exposure aims to help you take full control of your camera. I often tell my students that I want them to move away from the idea “taking a photograph” and towards the idea of “making a photograph.” I teach them how to take the camera off auto mode and take full control of the settings themselves in order to create the photograph they want.
I hope to do the same for the readers of this tutorial. I want you take control of your camera. In order to do this, it’s essential to understand the 3 components of what we call “The Exposure Triangle”. These are: aperture, shutter speed, and ISO. By the end of this tutorial, you should understand what these 3 components are and how they affect the final photograph. You will also learn how to use the 3 main shooting modes on your camera: aperture priority, shutter priority and manual. Finally, I’ll explain how to decide which settings to choose as you prepare to shoot a scene.
Table of Contents
What is Exposure?
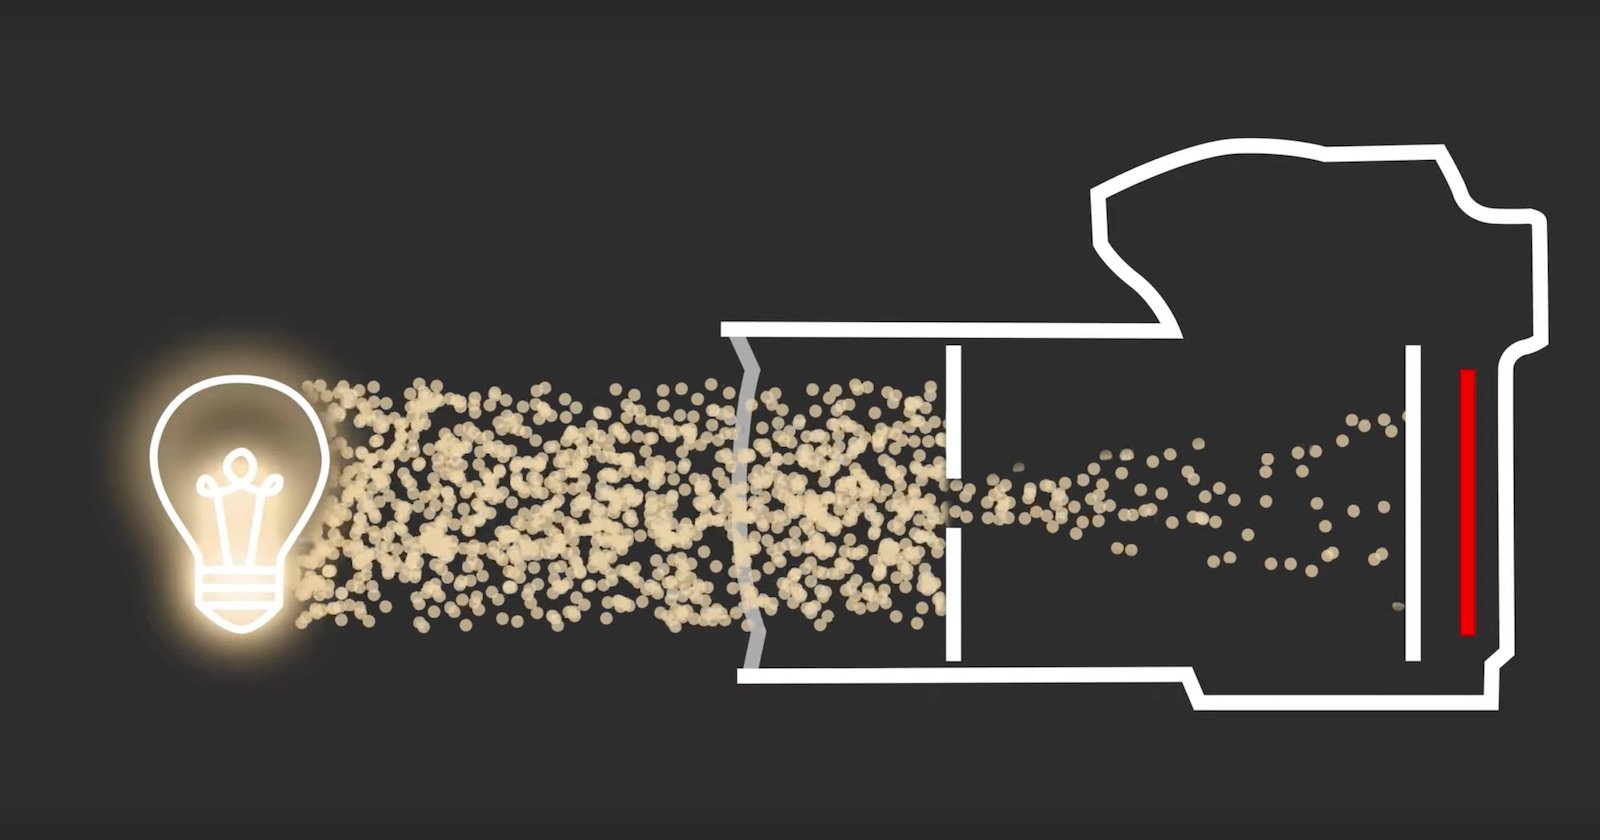
First of all we need to define what we mean by exposure. Exposure refers to the amount of light that enters the camera and hits the digital sensor. Basically, it is a measure of how dark or bright a photograph is.
If the image is too bright, it is overexposed. Too much light has been allowed to hit the sensor. If it is too dark, it is underexposed. Not enough light has been allowed to hit the sensor. We can control how much light reaches the sensor by changing the aperture, shutter speed and ISO settings.
Exposure is measured in ‘stops’. For example, if you find that your photo has turned out too dark (underexposed), you may increase your exposure by a ‘stop’ or two to make it brighter. Conversely, if the image is overexposed, you may need to decrease the exposure by a stop or two. There is no such thing as the ‘perfect’ exposure, only the right exposure for the photograph you are creating. Some photos such as night shots are supposed to be dark while photos taken in the snow for example are supposed to be bright.
Measuring Exposure Using a Histogram
All digital cameras allow you to see a visual representation of exposure using the histogram. Check your camera’s manual to find out how to turn on the histogram feature. There was a member of my photography club who would tell all new members to RTFM. This stood for ‘Read the Manual’. I’ll let you figure out what the ‘f’ stood for yourself.
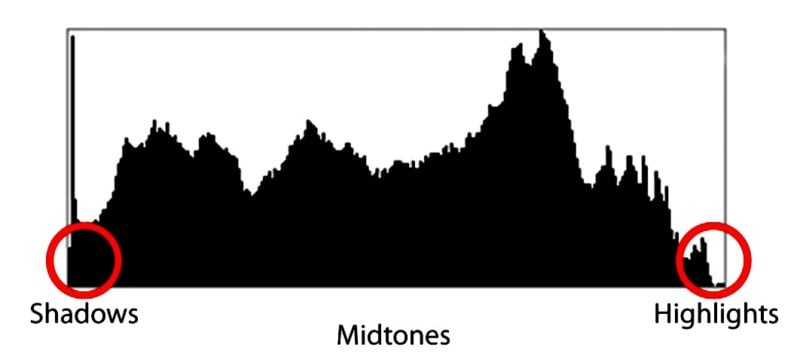
The histogram is a graph that represents the spread of tones in a photograph, from the shadows, to the mid tones to the highlights. It allows you to check if the photograph has any shadows that are too dark or ‘clipped’ and to see if you have any highlights that are too bright or ‘blown out’.
Clipped shadows are areas of pure black and contain no detail. Blown out highlights are areas of pure white and also contain no detail. Very generally speaking, you will want to avoid both of these. That said, I personally don’t mind a little clipping in the shadows as it adds punch to the image.
If you look at the histogram below, you will see that some of the graph is right up against the left hand axis of the graph. This means that some of the shadows are clipped. If you look at the right, you will see that a very tiny amount of highlights have been blown out as a very small part of the graph is up against the right hand edge. Sometimes this is unavoidable for example with street lights or if the sun in the frame. Remember, that the histogram is only a guide.
Examples of Underexposed and Overexposed Photographs
Below we have examples of an underexposed photo, an overexposed photo and a correctly exposed photo.
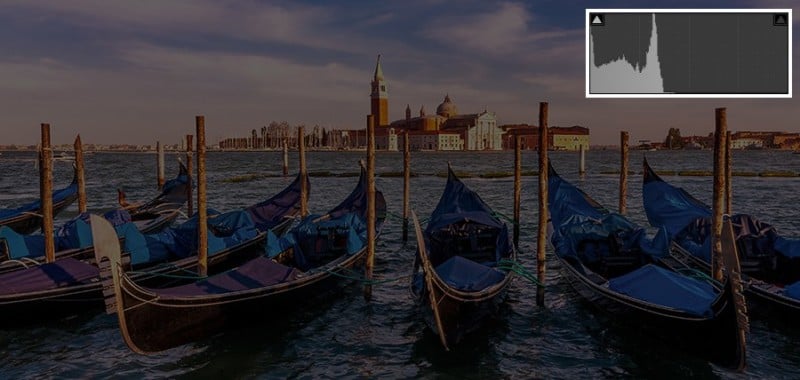
Underexposed photograph: This photograph is underexposed by about 3 stops. You can see that the histogram is completely bunched up to the left as a result. There are lots of clipped shadows on the underside of the gondolas.
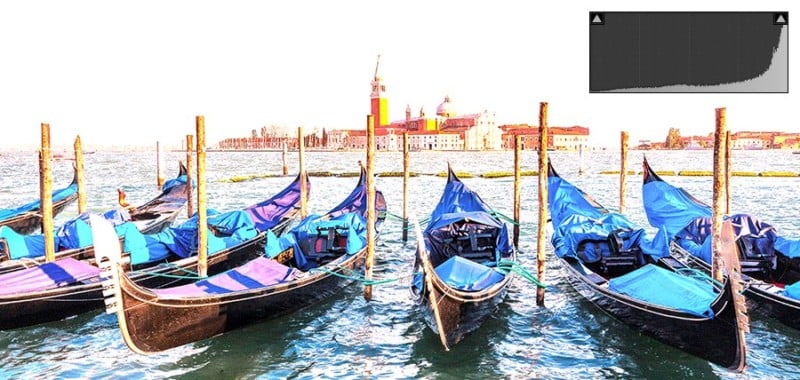
Overexposed photograph: This image is overexposed by about 3 stops and as you can see, the histogram is bunched up to the right as a result. There are a lot of clipped highlights is this photo. In fact, the entire sky is pure white and contains no detail whatsoever.
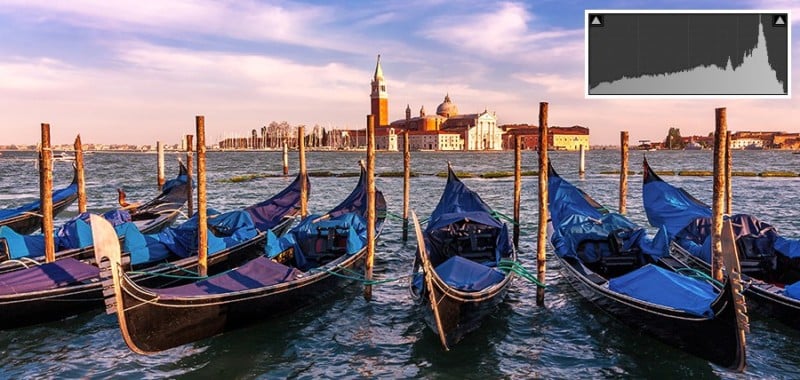
Correctly exposed photograph: The photo above has the right exposure for the scene in question. You can see on the histogram that there is a good spread of shadows, mid-tones and highlights. It’s quite a bright image as you can see from the fact that the graph spikes on the right of the graph.
There is a little clipping in the shadows which I don’t mind as it adds some punch to the shot. As you can see from the right hand side of the graph, there are some very bright areas but the highlights are not blown out.
Using the Highlights Warning Feature on Your Camera
It’s always a good idea to check the histogram after you’ve taken a shot in order to prevent too many clipped shadows and blown out highlights. Most digital cameras also have a ‘highlight warning’ feature.
This makes areas of the image that have blown highlights flash on your screen. It’s an incredibly useful feature and I keep it turned on all the time. Below, you can see how the highlight warning looks on the overexposed gondola photo. A huge amount of the photo is flashing because so many of the highlights have been blown out.
What is Aperture?
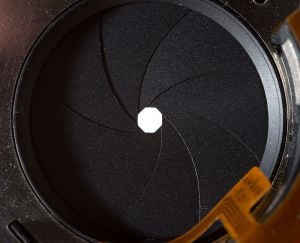
The aperture refers to the size of the opening in the lens through which the light enters the camera. The size of this opening can be adjusted and the aperture size is measured in f-stops. The image on the right shows you exactly what the aperture on a lens looks like.
When you change the f-stop value, you change the size of the opening. Here’s the weird thing though. The higher the f-stop, the smaller the opening.
Take a look at the chart below to see what different apertures look like at different f-stops. On the far left, you can see that setting an aperture of f16 will result in a small opening. Choosing an aperture of f1.4 will result in a very wide opening.

How Does Your Choice of Aperture Affect the Photograph?
The most noticeable effect your choice of aperture has on the photograph is the depth of field. What do we mean by this exactly? In very simple terms, depth of field refers to the amount of the image that is sharp. What does this mean in practice?
If you use a wide aperture, the depth of field will be shallow. Only part of the image is sharp and the rest will be out of focus or blurred. Look at the picture on the left below. The cat is perfectly sharp but the background is blurred. Using a wide aperture works well for portrait style photographs as it makes the subject of the shot really stand out against the blurred background.
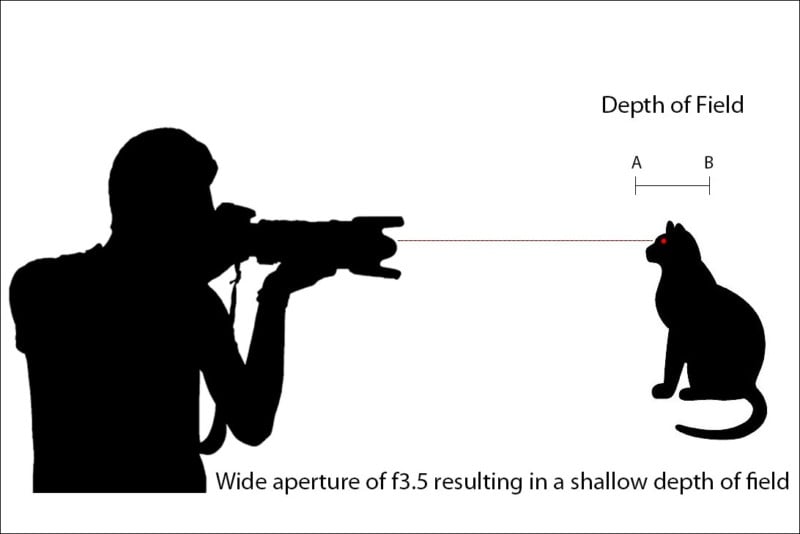
In this case, the depth of field extends from about the tip of the cat’s nose to just behind its head, no more than a few centimeters (from point A to point B in the diagram). Anything not in this range, either in front of it or behind will not be sharp. For this shot, I used a wide aperture of f/3.5.

When you use a narrow aperture, the depth of field is deep. When the depth of field is deep, all of the photograph from foreground to background is sharp.
Take a look at the photo below taken in the Dublin Docklands. Everything from the dock cleat in the foreground to the bridge in the background is sharp. In this case the depth of field is several hundred metres, extending right from the foreground to the background of the scene. In this case, I used a narrower aperture of f/11.
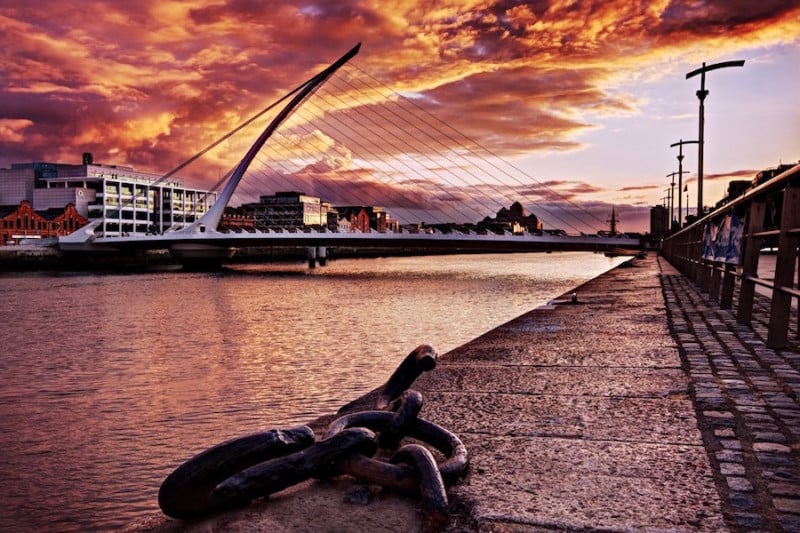
Most of the time, we want to achieve a deep depth of field when shooting landscapes. We want all of the image to be pin sharp.
The mid range apertures (around f/8) are good for shooting handheld for example when doing street photography. You get a good balance between having enough depth of field and fast enough shutter speeds to shoot hand held. We’ll discuss shutter speeds in more detail later.
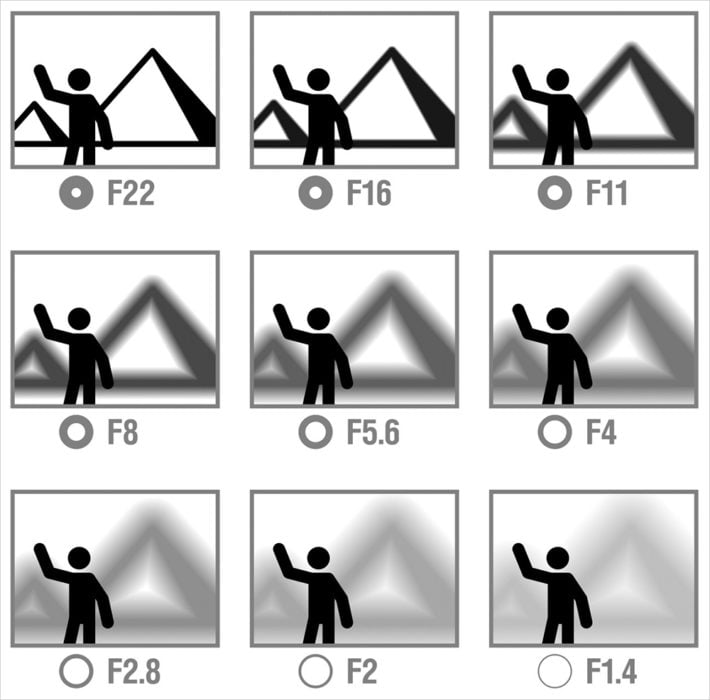
The chart below gives you a good idea how different apertures will affect the depth of field in your photographs. You can see that as the aperture gets wider, the pyramid in the background becomes more blurred.
What Is Shutter Speed?
The shutter speed refers to the length of time the opening in the lens remains open to let light into the camera and onto the sensor. The shutter speed can be as fast as 1/10,000 of a second or as slow as several minutes.
How Does Your Choice of Shutter Speed Affect the Photograph?
Fast shutter speeds have the effect of freezing motion in the scene you are photographing. Conversely, slow shutter speeds will blur motion in a scene. Both of these can be used to great creative effect.
The shutter speed settings on your camera provide a great way to experiment with capturing motion in your landscape photography. This is especially the case with moving water.

By using a slow shutter speed (1/2 second), we can blur the water in a waterfall for example and create a sense of motion even though it’s a still image. You can see this in this photo of a waterfall in Ireland above. When working with slow shutter speeds, it is essential to use a tripod otherwise camera shake will result in a completely blurred photo.
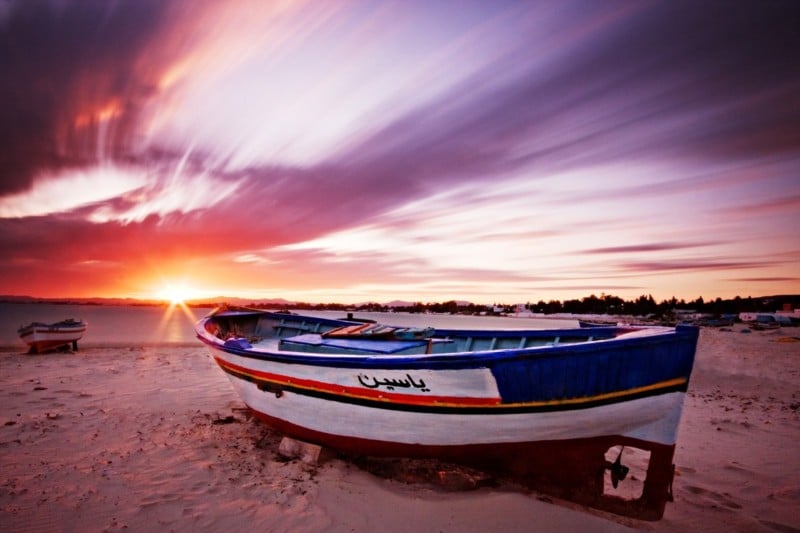
In the second photograph taken in Tunisia, I used an extremely long shutter speed of 160 seconds. To achieve this, I used a 10 stop neutral density filter. This reduced the light entering the camera down to 1/1000th of what it would be without the filter. This, in turn, allowed me to set such a long exposure time.
As you can see, the clouds moved across the sky during the almost 3 minutes it took to take the photo resulting in the blurred effect.
You can also use fast shutter speeds to freeze motion like in this black and white seascape below.
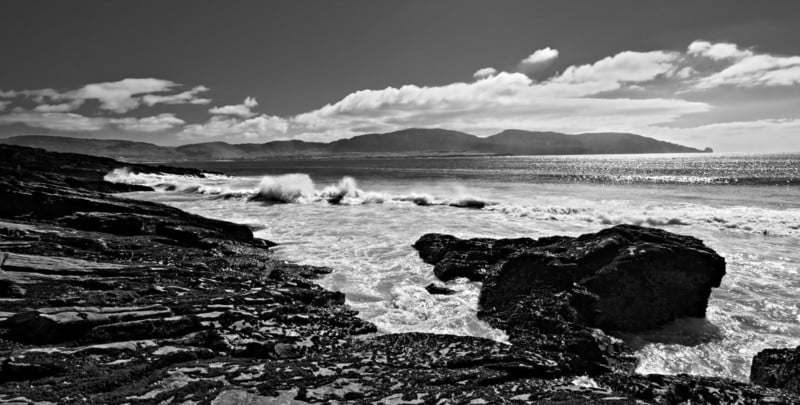
For this photograph, I wanted to freeze the motion of the waves crashing against the shore. A fast shutter speed of 1/320th of a second ensured that the wave seems to ‘freeze’ in time. Landscapes that include moving water afford great opportunities to experiment with different exposure times.
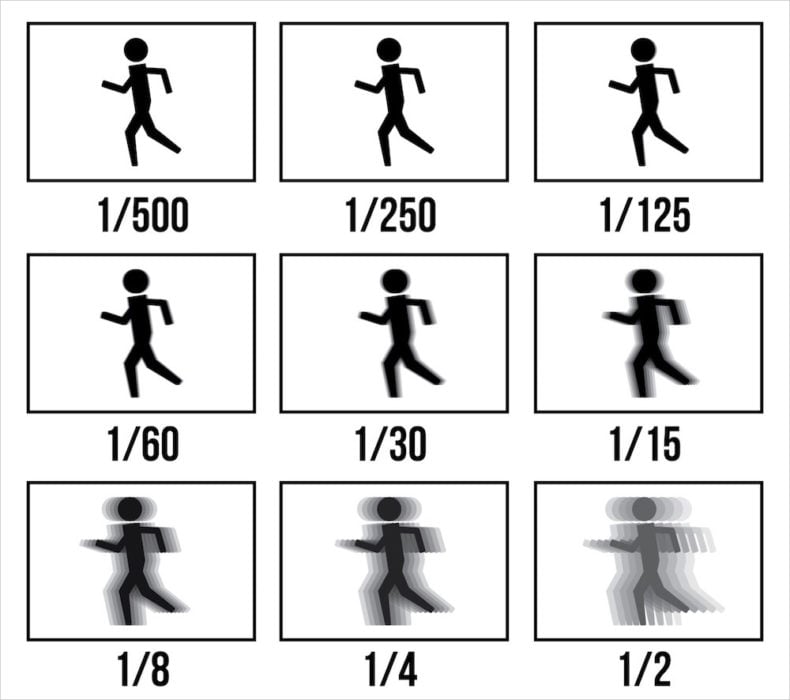
The chart below shows how different shutter speeds would effect the sense of motion if you were photographing a person running. Fast shutter speeds will freeze the motion. This technique is often used in sports photography. The slower the shutter speed becomes, the more blurred the person running becomes in the photograph.
How Do You Know if Your Shutter Speed Is Fast Enough to Shoot Handheld?
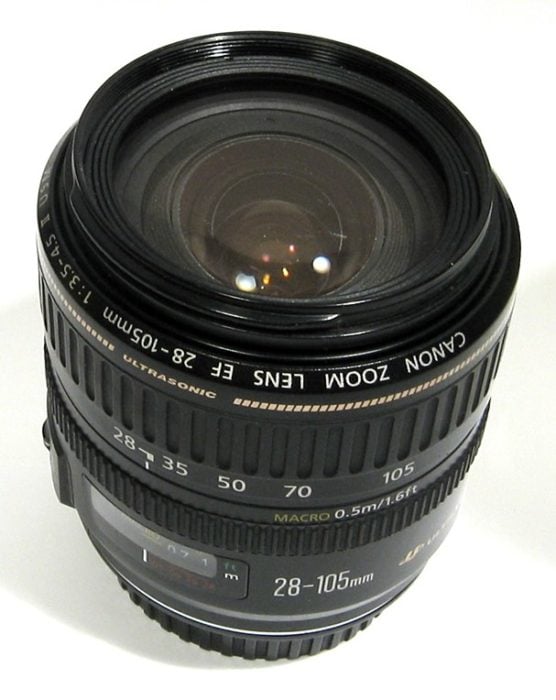
There is a very simple trick to check if your shutter speed is fast enough to shoot hand held. Simply look at the focal length you have zoomed in to on the lens.
On the lens below, the focal length is set at about 30mm. In this case I simply multiply the focal length by 2 and divide it into 1 to get the minimum shutter speed required to shoot hand held. So, 30 x 2 is 60 therefore the minimum shutter speed required to shoot hand held is 1/60 of a second.
This means that you can get away with using slower shutter speeds when the angle is wider. It’s obviously harder to keep the camera steady when zooming in. Think of how difficult it is to keep your sights on an object when using binoculars. It’s the same principle.
If you find that the light is low and you can’t get a fast enough shutter speed, you can increase the ISO. In the next section, I’ll explain what ISO is and how it effects the photograph.
What is ISO?
The ISO refers to how sensitive the digital sensor in your camera is to light. The lower the ISO number, the less sensitive it is to light. Setting a higher ISO number increases the sensitivity of your camera sensor to light. Most cameras have ISOs ranging from about 50 or 100 ISO right up to 16,000 ISO or higher.
How Does Your Choice of ISO Affect the Photograph?
As you increase the ISO value, your camera sensor becomes more sensitive to light. This means that you can achieve higher shutter speeds. This can be extremely useful when shooting in low light without a tripod. You may find that shooting at 100 ISO results in shutter speeds that are too slow to hand hold without camera shake. By increasing the ISO to 800 ISO for example, you may find that your shutter speed is now fast enough to hand hold.
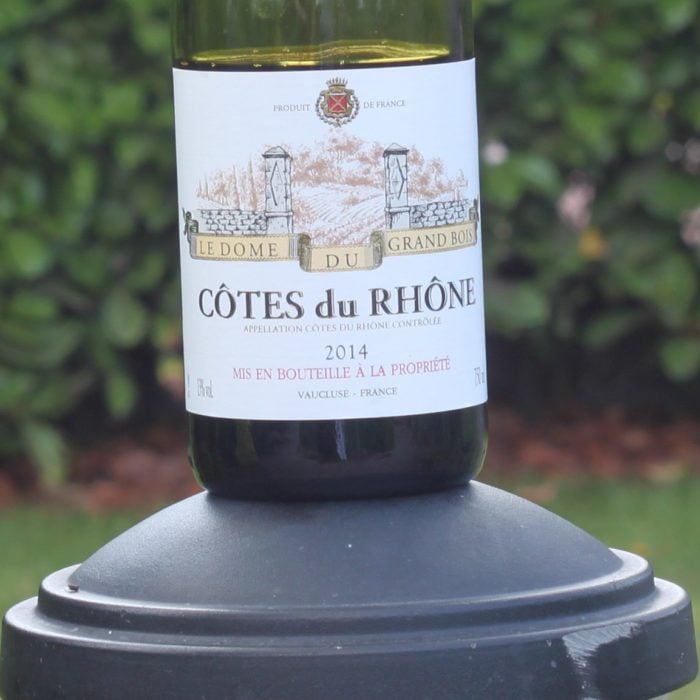
You may be wondering: why not just use a really high ISO every time to ensure a sharp photo? The problem is that there is a trade off when it comes to image quality. The higher the ISO used, the more digital noise will be present in the image. Digital noise results in a graininess that can have a negative effect on image quality. Take a look at the labels of this bottle of wine shot at different ISOs.
The first one was shot at 100 ISO.
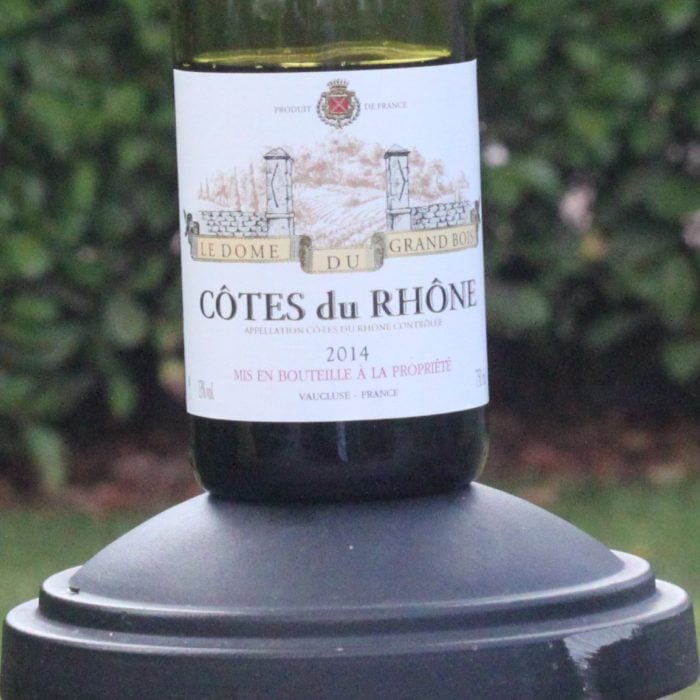
The second photo was shot at a very high ISO 3200. You can see that the graininess has degraded the image quality quite a lot.
When I finished taking these shots of the bottle of wine, I of course sampled the contents. I… eh… wanted to learn about French culture. Funnily enough, after I finished the bottle, the image quality from my own eyes degraded somewhat.
The chart below illustrates the effect of ISO on image quality.
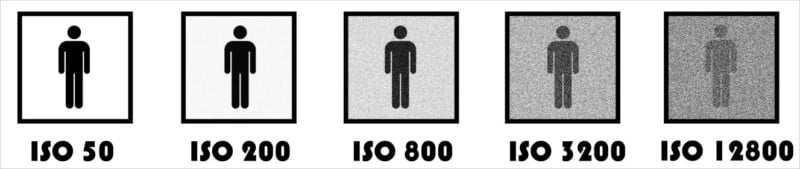
This does not mean that you should not increase your ISO when the need arises. The example of ISO 3200 above is quite extreme. Most of the newer cameras actually handle higher ISOs very well and retain high image quality. I know that in low light conditions, I prefer to increase my ISO a little to avoid camera shake even it it means a little graininess. It’s usually not enough to seriously degrade the image quality though.
Next, we’re going to take a look at how to actually set the aperture and shutter speed in your camera. There are 3 modes you can use: aperture priority, shutter priority and manual.
How to Use Aperture Priority Mode on Your Camera
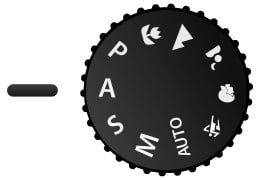
Aperture priority mode is a semi-manual mode. When using this mode, you choose the aperture you want and the camera chooses an appropriate shutter speed in order to achieve a correctly exposed photo. To switch your camera to aperture priority, turn the dial on top of your camera to ‘A’.
This is actually the shooting mode I use 90% of the time when shooting urban landscapes. I usually choose an aperture of around f16 to ensure maximum depth of field and then let the camera choose the correct shutter speed. As I usually use a tripod, I am generally not too concerned about the shutter speed being too slow.
If I am shooting hand held, I always keep an eye on the shutter speed the camera has chosen just to make sure it isn’t too slow. If it is too slow, I use a wider aperture which will give a faster shutter speed as the opening is larger and lets the light in faster. I also have the option of increasing the ISO to get a faster shutter speed.
How to Use Shutter Priority Mode on Your Camera

Shutter priority is basically the opposite to aperture priority. You set the shutter speed you want and the camera sets the aperture. To switch your camera to shutter priority, turn the dial on top of your camera to ‘S’. On Canon models, this mode is actually called “Tv” mode which stands for “time value”.
I personally don’t use this mode too often. It can be useful if you need to set a minimum shutter speed in order to avoid camera shake. You may also want a specific longer shutter speed in order to create motion blur. I tend to use manual mode in this case as it gives me greater control over the shutter speed and aperture together. More on manual mode later.
How to Use the Exposure Compensation Feature on Your Camera

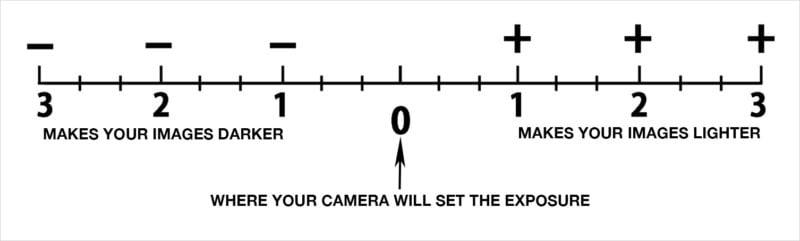
Sometimes when you use aperture or shutter priority modes, you may find that your images are too bright or too dark. Sometimes the lighting conditions may confuse the camera and it results in the image being underexposed or overexposed. Thankfully, there is a way of fixing this. It’s called exposure compensation. To switch this on, press the button with the plus/minus symbols.
This will bring up a chart that goes from -5 to +5. Sometimes these numbers are different and may only range from -3 to +3 depending on the camera. This chart represents the exposure of your photograph. So how does it work?
When you are using aperture priority mode for example, the camera will set a shutter speed that makes the camera expose at the “0” point of this chart, right in the middle. In theory, this should be the correct exposure. In reality though, this is not always the case. As we said, some photos are supposed to be bright and others are supposed to be dark.
If you find that your photo is too bright or overexposed, you simply dial down the exposure by a stop or whatever you think is needed. When you turn the dial to the left (RTFM to see which dial), you can set the exposure at -1 for example. This will make the photograph 1 stop darker. When you turn the dial to the right, you can make the photo brighter. You may need to experiment a little to get the exposure you want.
How does exposure compensation work exactly? If you are using aperture priority mode and dial the exposure down 2 stops for example, the aperture will stay the same but the shutter speed will change to a faster speed so that less light enters the camera and the picture is made darker.
The opposite happens when you dial up the exposure. The aperture stays the same but the shutter speed will get longer to let more light in and make the image brighter. As already mentioned, keep an eye on the shutter speed if you are shooting hand held. Don’t allow it to become too slow in order to avoid camera shake.
Exposure compensation works in the same way when using shutter priority mode except that the shutter speed will stay the same and the aperture will be changed by the camera accordingly.
How to Use Manual Mode on Your Camera
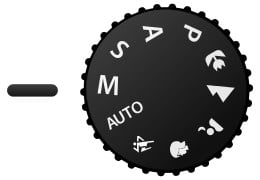
Here comes the scary one: manual mode! When you set the camera to manual mode, you set both the aperture and shutter speed. How do you know what combination to use to ensure the right exposure? It’s actually quite easy. When you switch to manual mode on the dial (M), you again see an exposure chart that is exactly the same as the exposure compensation chart.
You then turn the aperture and shutter speed dials until the exposure is set to 0. Check your manual to see which dials to use.
Here is an example of how I might use manual mode when shooting a landscape:
- I decide what aperture I want to use. If it’s a landscape, I might pick an aperture of about f/16 to ensure plenty of depth of field. After all, I want everything to be sharp from the foreground to the background. I turn the aperture dial until, the aperture is set to f/16.
- I then turn the shutter speed dial until the marker on the exposure chart is at zero. This in theory should mean that I now have the correct combination of aperture and shutter speed to ensure the right exposure.
- I then check that I am happy with both the aperture and shutter speed and make some adjustments if necessary.
- If I find that the shot is too bright or too dark I retake it after moving the dial to either minus a stop or plus a stop (or more as the case may be). The ‘right’ exposure may not always be at the “0” point in the middle. As I have said a few times now, some photos are supposed to be bright or dark.
How Do I Decide Which Settings to Use in Manual Mode?
This is where your own creativity comes in to play. I usually decide which is the most important element in the photo and set this first.
As I mainly shoot urban landscape photos, this means I usually set the aperture first as ensuring plenty of depth of field is my biggest concern. I then set the shutter speed. It’s basically a balancing act and with practice you will gain an intuition for what settings you need to achieve the vision you have for a particular photograph.
What if the Highlights Are Blown Out or the Shadows Are Clipped No Matter What Settings I Use?
Sometimes the contrast in a scene is simply too much for your camera to handle no matter which combination of aperture and shutter speed you use. In this case, bracketing can be used to solve the problem.
When I bracket a photo, I usually take 3 photos of the same scene, one with the exposure set to “0”, another deliberately underexposed by 2 stops and a final one deliberately overexposed by 2 stops. I can then combine these these in post-processing to get the ‘perfect’ exposure. There are several methods of doing this which I will cover in a future tutorial.
In the example below, I took 3 exposures of the Charles Bridge in Prague and blended them in post production to produce a single photograph with plenty of detail in all areas of the frame.
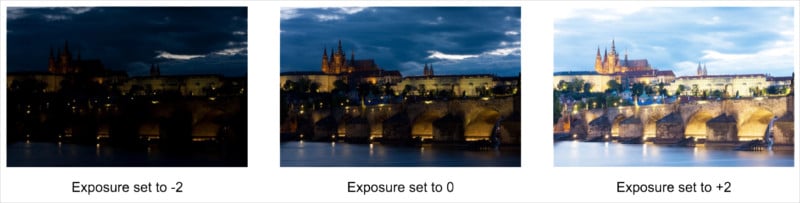
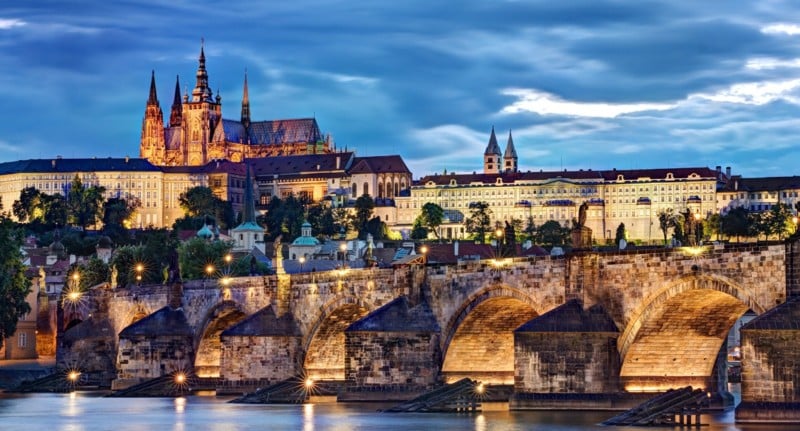
The final photograph is a blend of all 3 images, leading to plenty of detail throughout the image. There are also no clipped shadows or blown out highlights. As you can see, I also cropped the final image to create a better composition.
I hope that after reading this tutorial that you will be confident to take your camera off auto mode and take control of the settings yourself. In this way, you can move from merely taking a photography to making a photograph. Don’t be afraid to experiment with all of the settings you have just learnt about. Over time, you won’t even have to think too much about the settings.
I often advise students to go on a photo shoot where they specifically experiment with different apertures, another to experiment with shutter speed and so on.