Beginner’s Guide to Mastering Manual and Avoiding Auto Mode Mistakes
Getting a proper exposure means that you’re letting enough light through the lens and onto your sensor/film to capture your subject and the environment. To achieve a proper exposure, you’ll have to balance shutter speed, aperture, and ISO according to your purpose. The key word there is “purpose.”
What is Your Purpose?
You can apply your settings almost like a painter applies brush strokes to the canvas. This means certain effects and aesthetics can be achieved with your camera settings if they’re used with appropriate control.
When we’re new to photography and start using auto modes instead of learning how to shoot in manual, our purpose might be there—we might know exactly how we want the final image to look—but the camera will more-than-likely fail to capture the scene in that way. We’ll learn more about this when we dig deep into the manual and auto settings of some photos further below.
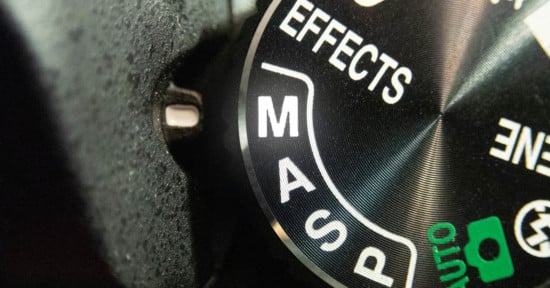
Auto Modes are NOT Smarter than You
To simplify what the auto settings are like, let’s pretend that you live in the desert and you’re controlling the AC setting of your house. Typically, you might keep it set to around 78 degrees to save some energy, but you lower it to 70 when your friends come over for lunch to make them more comfortable. If your Aunt Marge comes over and she’s always overheating, you might lower the temperature further, to like 65.
You’re changing the settings based on your subject. Your thermostat is clueless to who is visiting you, so it’s your job to control the settings. That’s why the auto settings on your camera are not going to be smarter than you. Perhaps they are now, but worry not, by the end of this article you’ll be in full control.
Light Meter 101
We’re going to learn very quickly how to be in full control of exposure, and we’ll see how similar our camera is to the human eye. First, let’s take a look at the light meter on the camera.
It’s very simple to understand. As we make adjustments to our settings, we’ll see the line move right and left. The middle considered an appropriate exposure (for the most part), all the way to the right is overexposed, and all the way to the left is underexposed. Pretty simple!
Keep it in the middle for now, and as we learn more about shooting in manual we’ll learn more about how the light meter can be deceived and deceiving at times.

A Simplified Summary of Each Setting
Shutter Speed – “Subject Speed”
The shutter provides two functions that work in balance with aperture and ISO: it helps control the light (exposure), but it also controls the length of time that is captured.
The shutter speed is like the blinking of an eye. Close your eyes, then open and shut them really slow and more light will be let in as opposed to blinking fast. The whole time your eyelid (a.k.a. shutter) is open, two things are happening: the light is coming in, and movement is being captured. The camera sees all of this light and movement as well, combining it all into a single frame. That’s why some images might seem blurry or too bright—the camera’s “eye” was blinking too slowly.
The higher the shutter speed, the faster your camera will blink and freeze what it’s seeing. This also results in less light getting through the lens. You can always have your camera blink fast as long as it is:
- capturing the subject as you need
- working with the aperture and ISO to capture sufficient light for a proper exposure.
You should select your shutter speed mostly based off of the subject you’re photographing. We can call it “subject speed” if it makes it easier to remember. If you’re capturing a fast-moving subject that you want to freeze, like a hummingbird, you’ll have to choose a very high shutter speed (i.e.1/8000). If it’s a fast-moving subject like a speeding car that you want to capture with a directional motion blur, you’ll use a slower shutter speed (i.e. 1/60).
This also means that, whatever you’re setting your shutter speed to, you’ll have to balance it with aperture and ISO to get a proper exposure. Understanding the subject will allow you to optimize your settings, which will provide the best possible outcome.
Aperture – “How Much Blur”
The aperture provides two functions: it helps control the exposure, but it also controls the depth of field.
The aperture is like the iris of the eye, which dilates and contracts to control the light. Have you ever walked out of your favorite coffee shop and been blinded by the bright environment? You’re viewing the scene much like an overexposed (too bright) image. Your iris (a.k.a. aperture) hasn’t contracted yet to block out the light, so all you see at first is white.
Just like with shutter speed, the higher the number, the less light is let into the lens. The aperture also controls the “depth of field,” which is sometimes confusing to photographers.
An easier way to understand what the aperture does to an image, aside from helping to control light, is that it also controls the blurriness of the out-of-focus area (usually seen in the background). We can think of this blurriness as the depth of field. The higher the aperture, the less blurriness we see in the final image. The blurriness is referred to as “bokeh” (bow-kay).
If you want more bokeh for an aesthetically “softer” feel, you need a smaller aperture (f/1.2-2.8). If you want to increase the amount of the scene that is in focus, you’ll use a higher aperture (f/11-22). All of this adjusting from soft to more focused is the essence of understanding depth of field.
ISO – “Night Vision”
The ISO (ASA for film) provides only one function: it increases the camera sensor/film’s sensitivity to light.
Using ISO is much like the rod cells in your eyes, which are used to see at night when the more precise (and color sensitive) cones can’t get enough light. This setting is typically the last resort for a good exposure, because it can have a negative impact on the final image. The higher the ISO, the more noise/grain you get.
Some noise/grain can be aesthetically pleasing to photographers, and with modern technology low ISO’s have very little impact on the final image. It’s at really high ISOs like 12800 that we’ll start to notice a significant decline in crispness of large prints or magnified digital files. Older cameras may start showing degraded quality as low as ISO 1600 or 3200. We’ll see an example soon that has an ISO of 6400 and lots of noise.
To avoid any unwanted noise, always have your ISO set to the lowest setting and adjust it (if needed) only after you’ve set your aperture and shutter speed. Typically, if you’re always shooting in the daylight or with a flash, the ISO will remain at its lowest setting.
Digging Deep Into Images
Some great questions to always ask yourself as you’re learning to shoot in manual mode is, “Do I want to capture the subject with motion blur or freeze it in time? How much bokeh do I want in the background or foreground? Do I need more of the image to be in focus?” After you set those settings, if your image is underexposed, you can use the ISO setting or external lighting to help get a proper exposure.
Now, let’s take our knowledge of the settings and look at some different photo scenarios.
Applying Shutter Speed
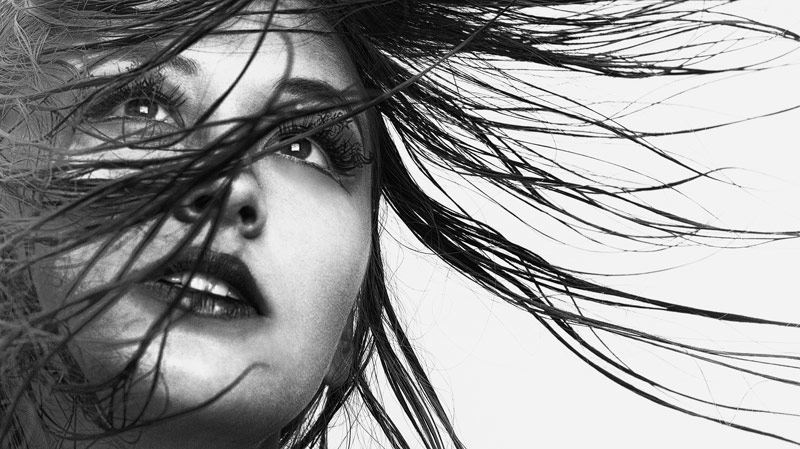
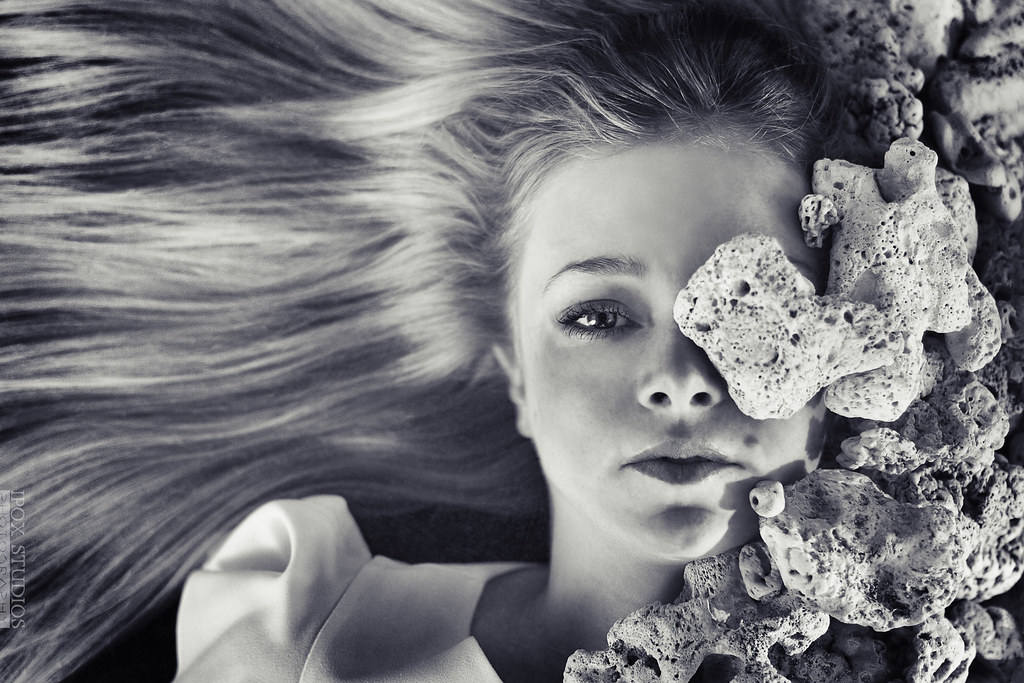
The image below shows a woman lying motionless, but a fast shutter speed was still used (Settings: f/1.8, 1/1250, ISO 100). Why is that? Well, it’s because I had my aperture setting low to have more bokeh, and the ISO was set low to have minimal noise. I didn’t want to increase these two settings at all, so the only other option left from the triangle to control the exposure was the shutter speed.
The shutter speed was increased in order to capture a proper exposure. All three settings play off of each other to create a nice exposure, but it’s your choice as to which settings you want to adjust in order to get the look of the final image. Remember, you’re an artist who wants to express something visually, so take control of the settings and show everybody what you’ve envisioned.
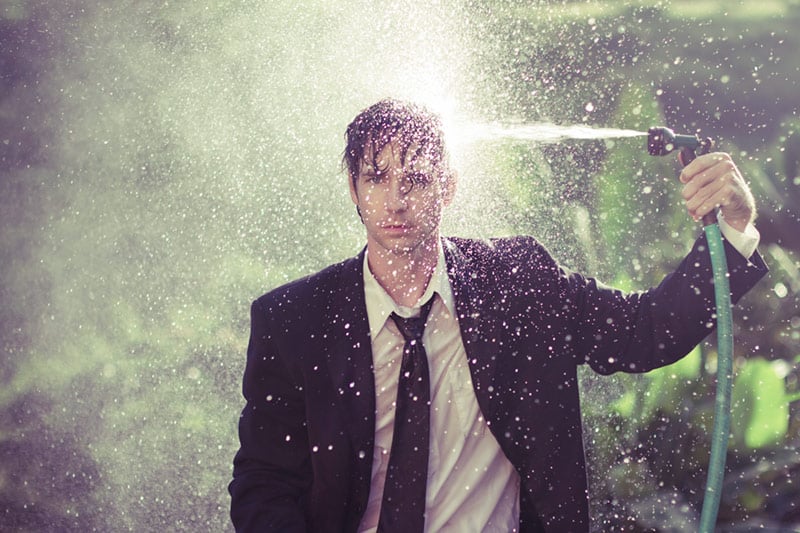
In this next image (Settings: f/2, 1/1600, ISO 100), the shutter speed was set at 1/1600, which helped freeze some of the water bouncing off of my head. When we look closer, we can see motion blur in the water shooting from the hose. This water has more velocity, so the shutter speed would have to be even higher (maybe around 1/4000) in order to freeze that motion.
Are you starting to understand how shutter speed can freeze or allow movement? We’ll learn later how to capture longer exposures for certain effects.
Applying Aperture
Aside from controlling the amount of light we let into the lens, the aperture is used for aesthetic reasons. Do you want a hard or soft image? In other words: do you want everything to be in focus, or do you want just the subject in focus with more bokeh in the background (or foreground)?
Bokeh is an oft-glorified aesthetic, but it should always serve the purpose of the photo. For instance, it can be strategically used to soften background distractions in busy environments. This is especially great for beginners who are just starting out, because they rarely understand how to capture the subject while also fitting it into the background nicely. Most professional fashion and landscape photographers use a higher aperture and knowledge of composition to capture more of the subject in-focus while also having a nice foreground and background clarity (a.k.a figure-ground relationship).
In this next image (Settings: f/ 1.4, 1/60, ISO 250), I used a very low aperture because I wanted maximum bokeh. The aperture of f/1.4 allowed the model’s eyes to be the primary focal point and everything else to fall into a nice creamy blurriness. She was wearing a sequin shirt, which created specular highlights and allowed some additional bokeh circles to form.
Notice that the ISO was set to 250. Why is that? Why not a lower setting like 100? Well, the aperture was set for the subject (at its lowest setting) and I didn’t want to adjust it. The shutter speed was set for the motionless subject, and it was as low as I could go without risking motion blur from shooting handheld (camera shake is explained more in the video up top). With those settings good to go, the image was still underexposed (too dark), so I had to increase the ISO a bit to create a proper exposure.
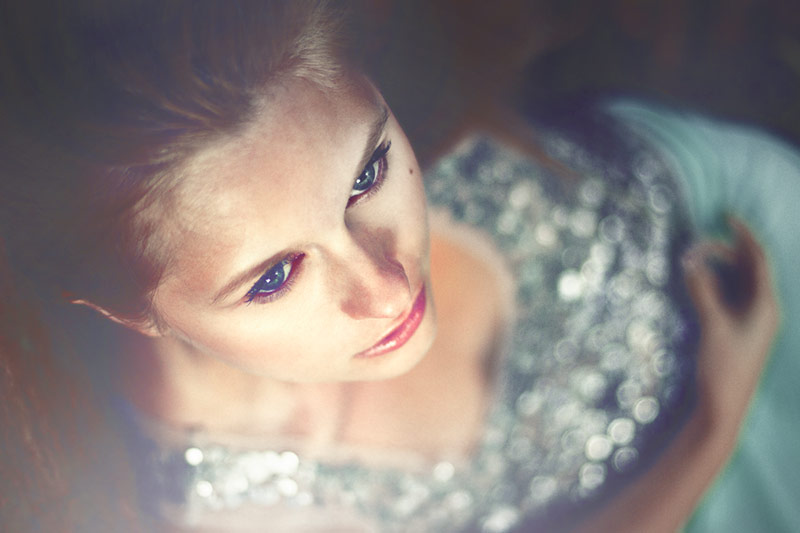
Another thing to point out about aperture is that the focal point determines where the bokeh will reside. If I were focused on her hand, the bokeh would be in the foreground where her face is. Since we are focused very close on the model’s face, the bokeh is in the background.
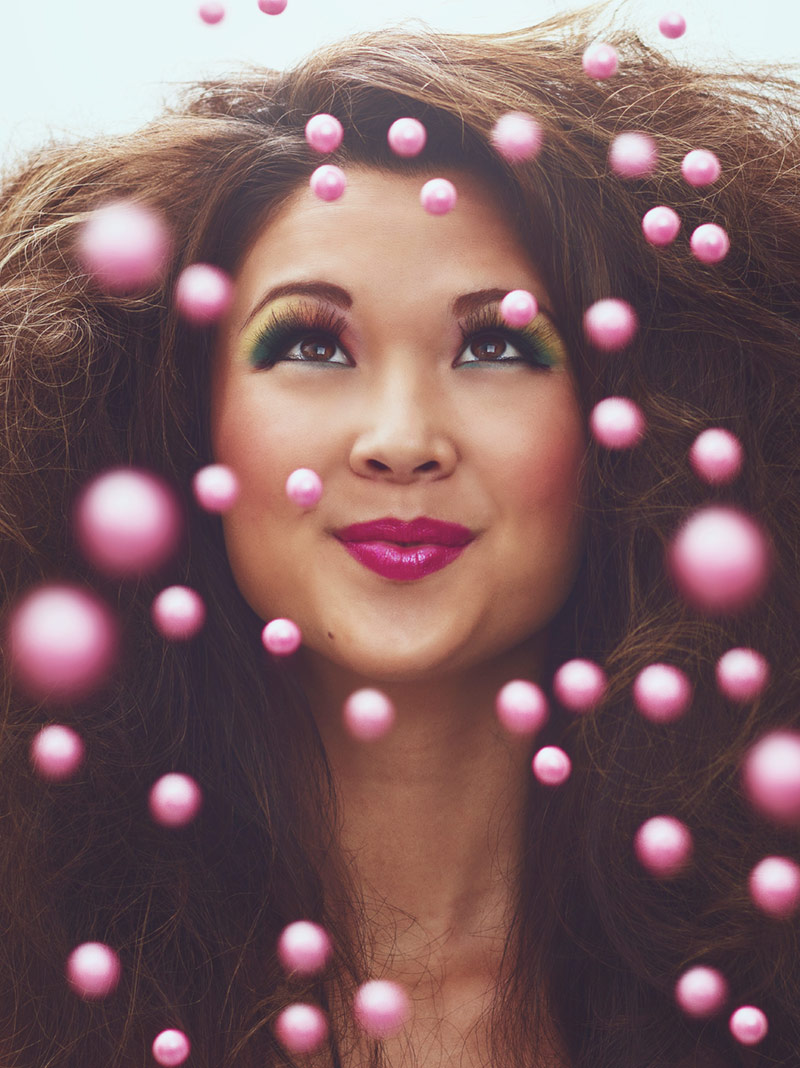
Even if we use a small aperture and focus relatively close for a portrait, anything closer to the lens will continually get blurrier. We can see the “focal planes” in this next image (settings f/2.8, 1/250, ISO 200), where the primary focus is on the model, and the different layers of pink candy get blurrier and blurrier as they get closer to the lens.
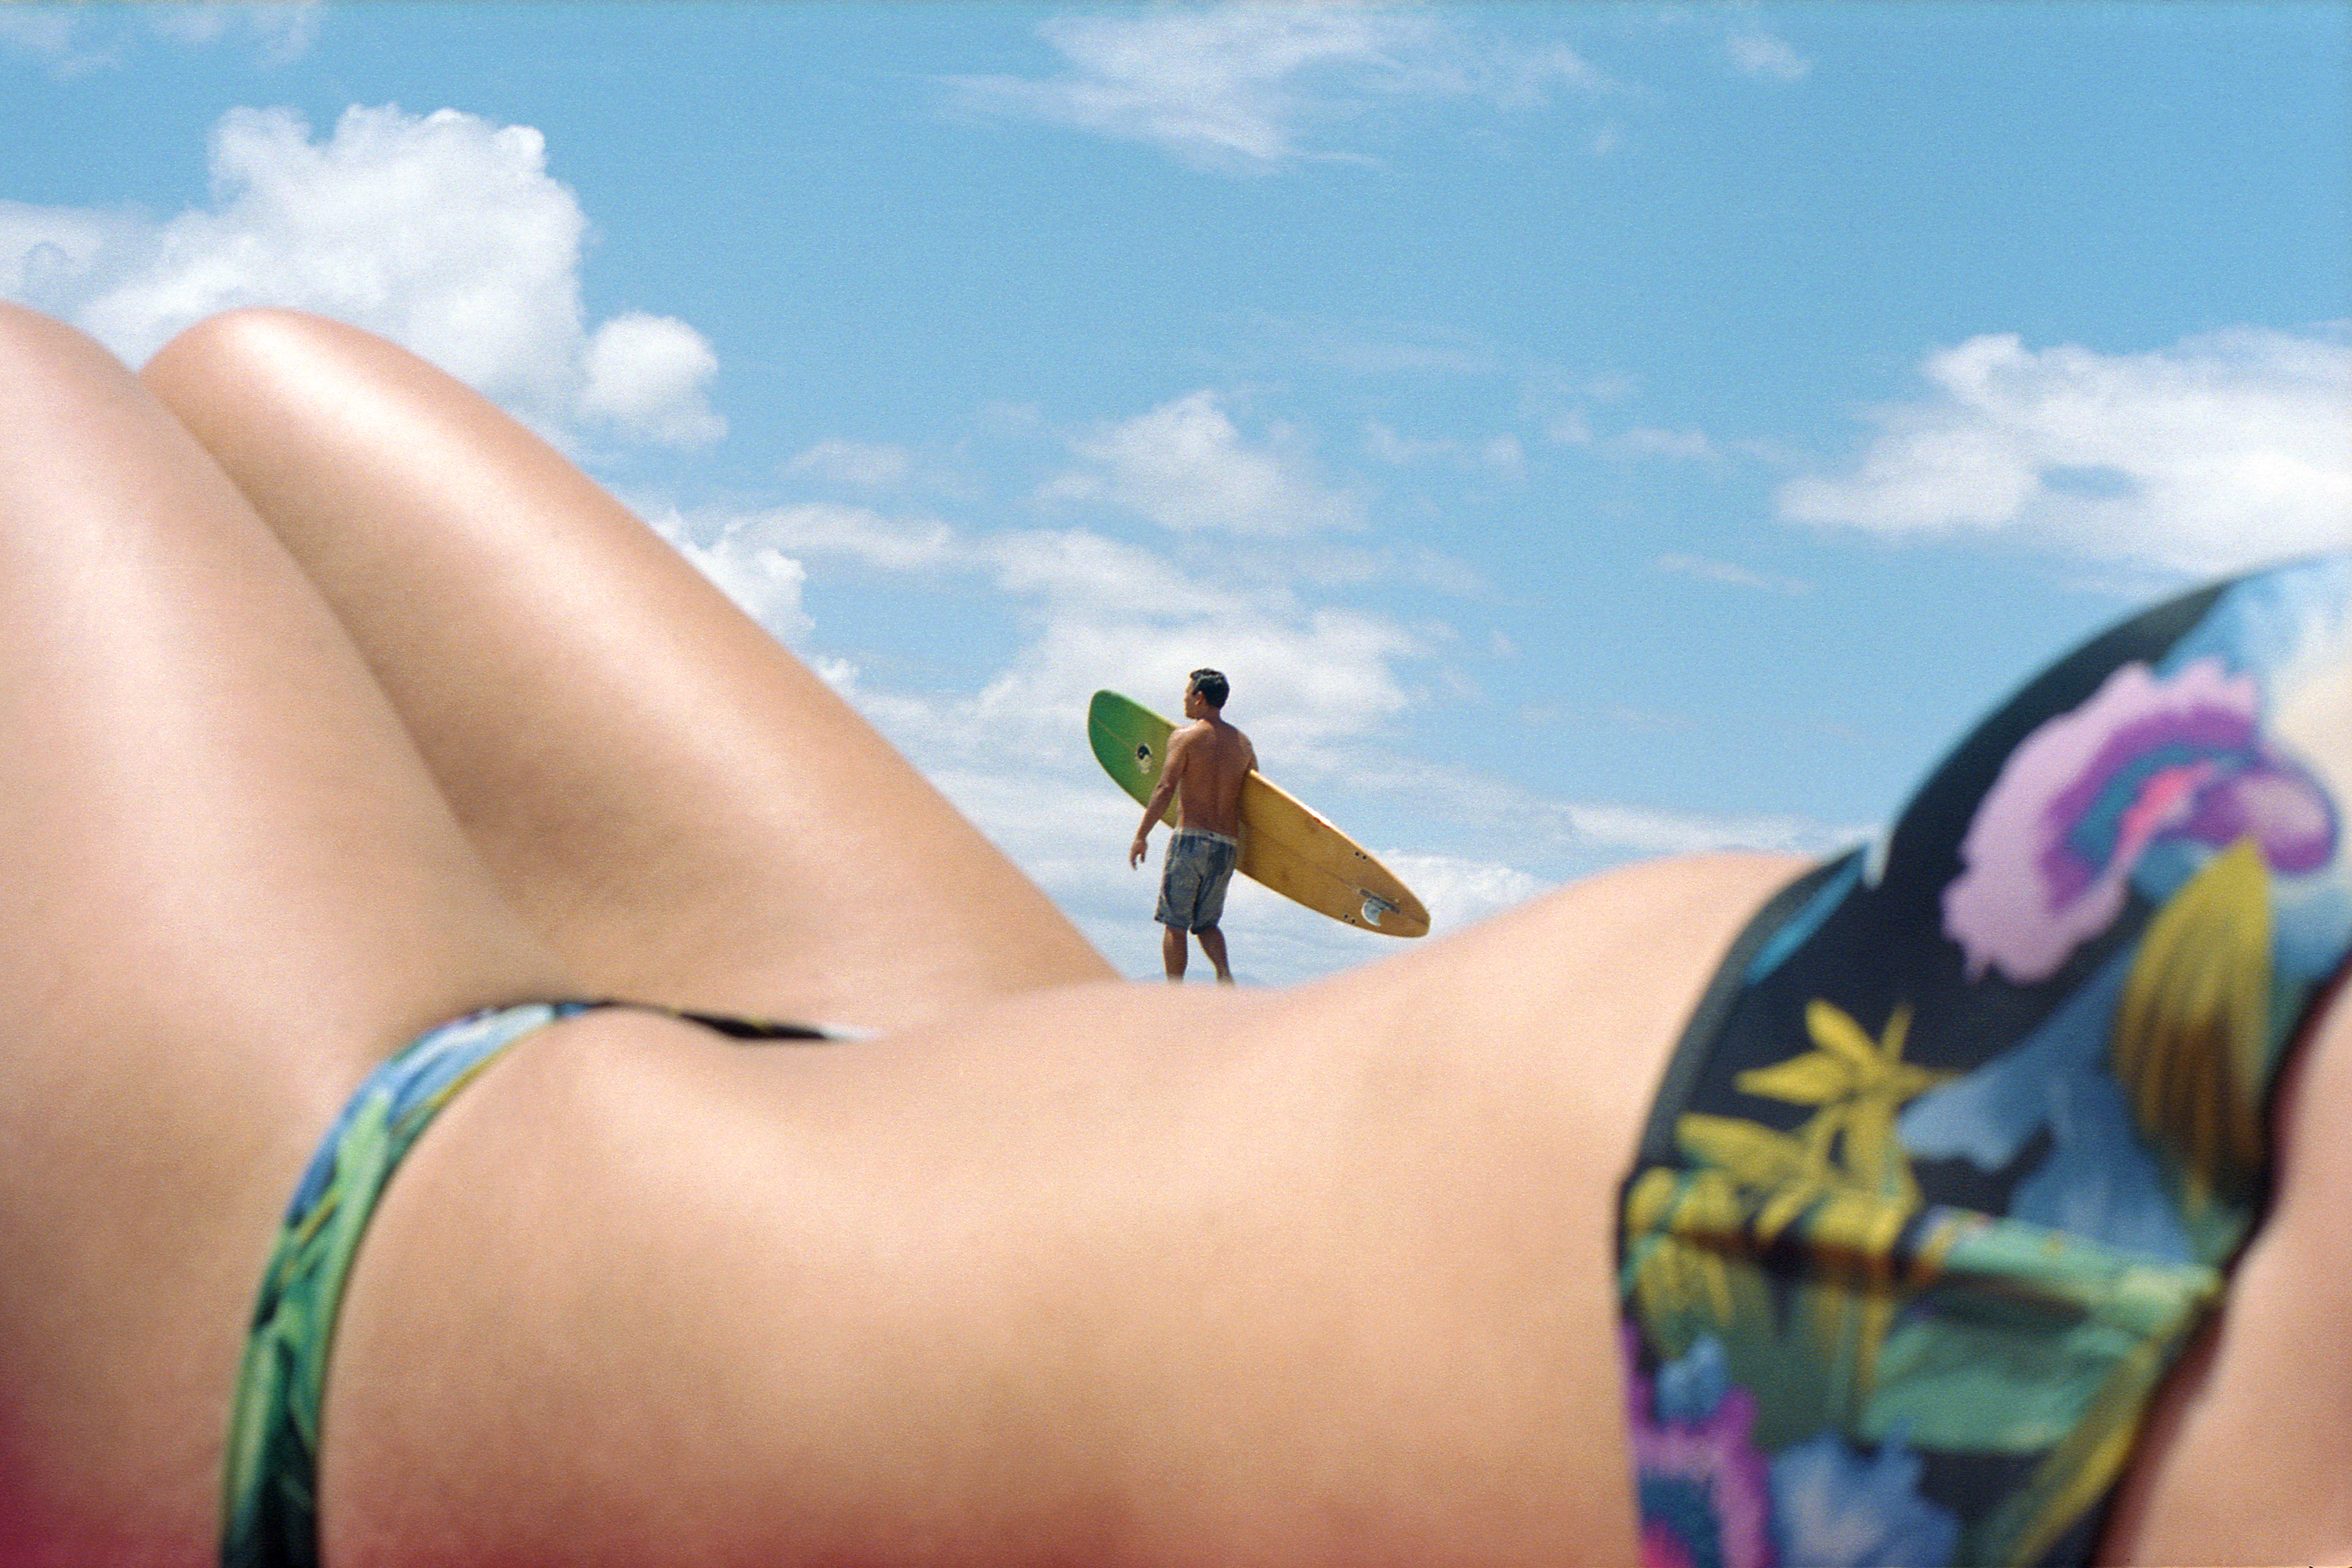
We can take this concept and apply it to a photo to get a reversed focus, which can tell a different story (a.k.a. Figure-Ground Relationship Reversal). In the next image (Film: Kodak Portra 400, Approximate Settings: f/11, 1/1000, ISO 400) we see the story is shifted to the surfer rather than the girl in the bikini. I’m able to create bokeh in the foreground with a high aperture because I’m very close to the subject and focused in the distance.
We’ll cover this in more depth when we look at macro images.
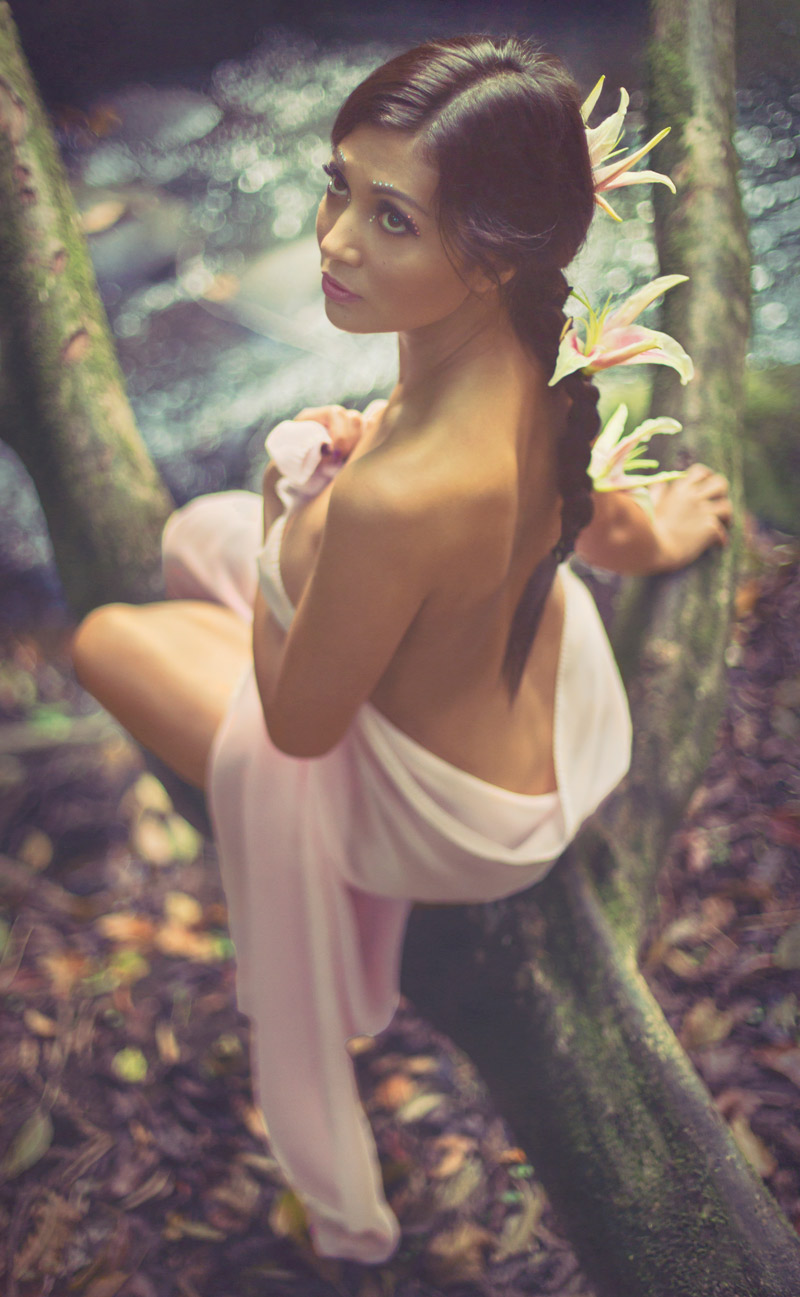
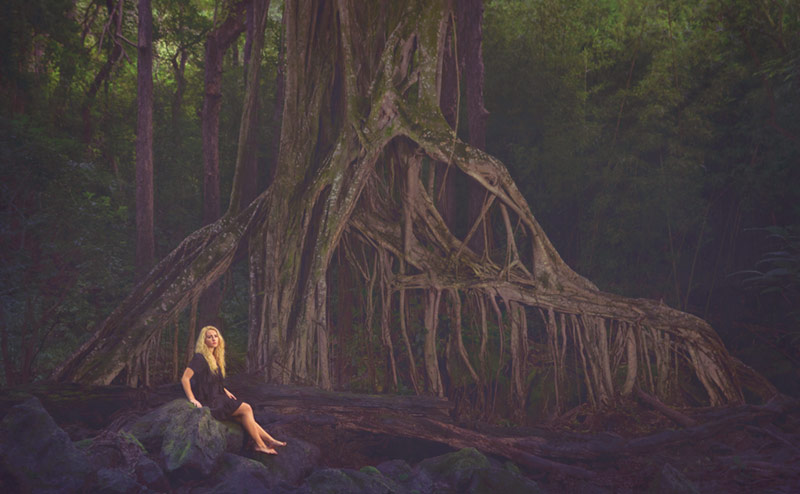
In the jungle scene below (settings f/2.8, 1/60, ISO 200), we have a low aperture being used, but why isn’t there as much blurriness in the background? It’s because the model and the tree are far from the camera lens and the strength of the bokeh is weakened. Increased distance is bokeh kryptonite. That is, unless there is something in-between the subject and the lens.
Just like the pink candy image, if we are focused on the blonde model in the image, any object we place closer to the lens will be blurrier. This is another example of how the depth of field is determined by the focal point and the proximity of other objects to the lens.
Macro Photography
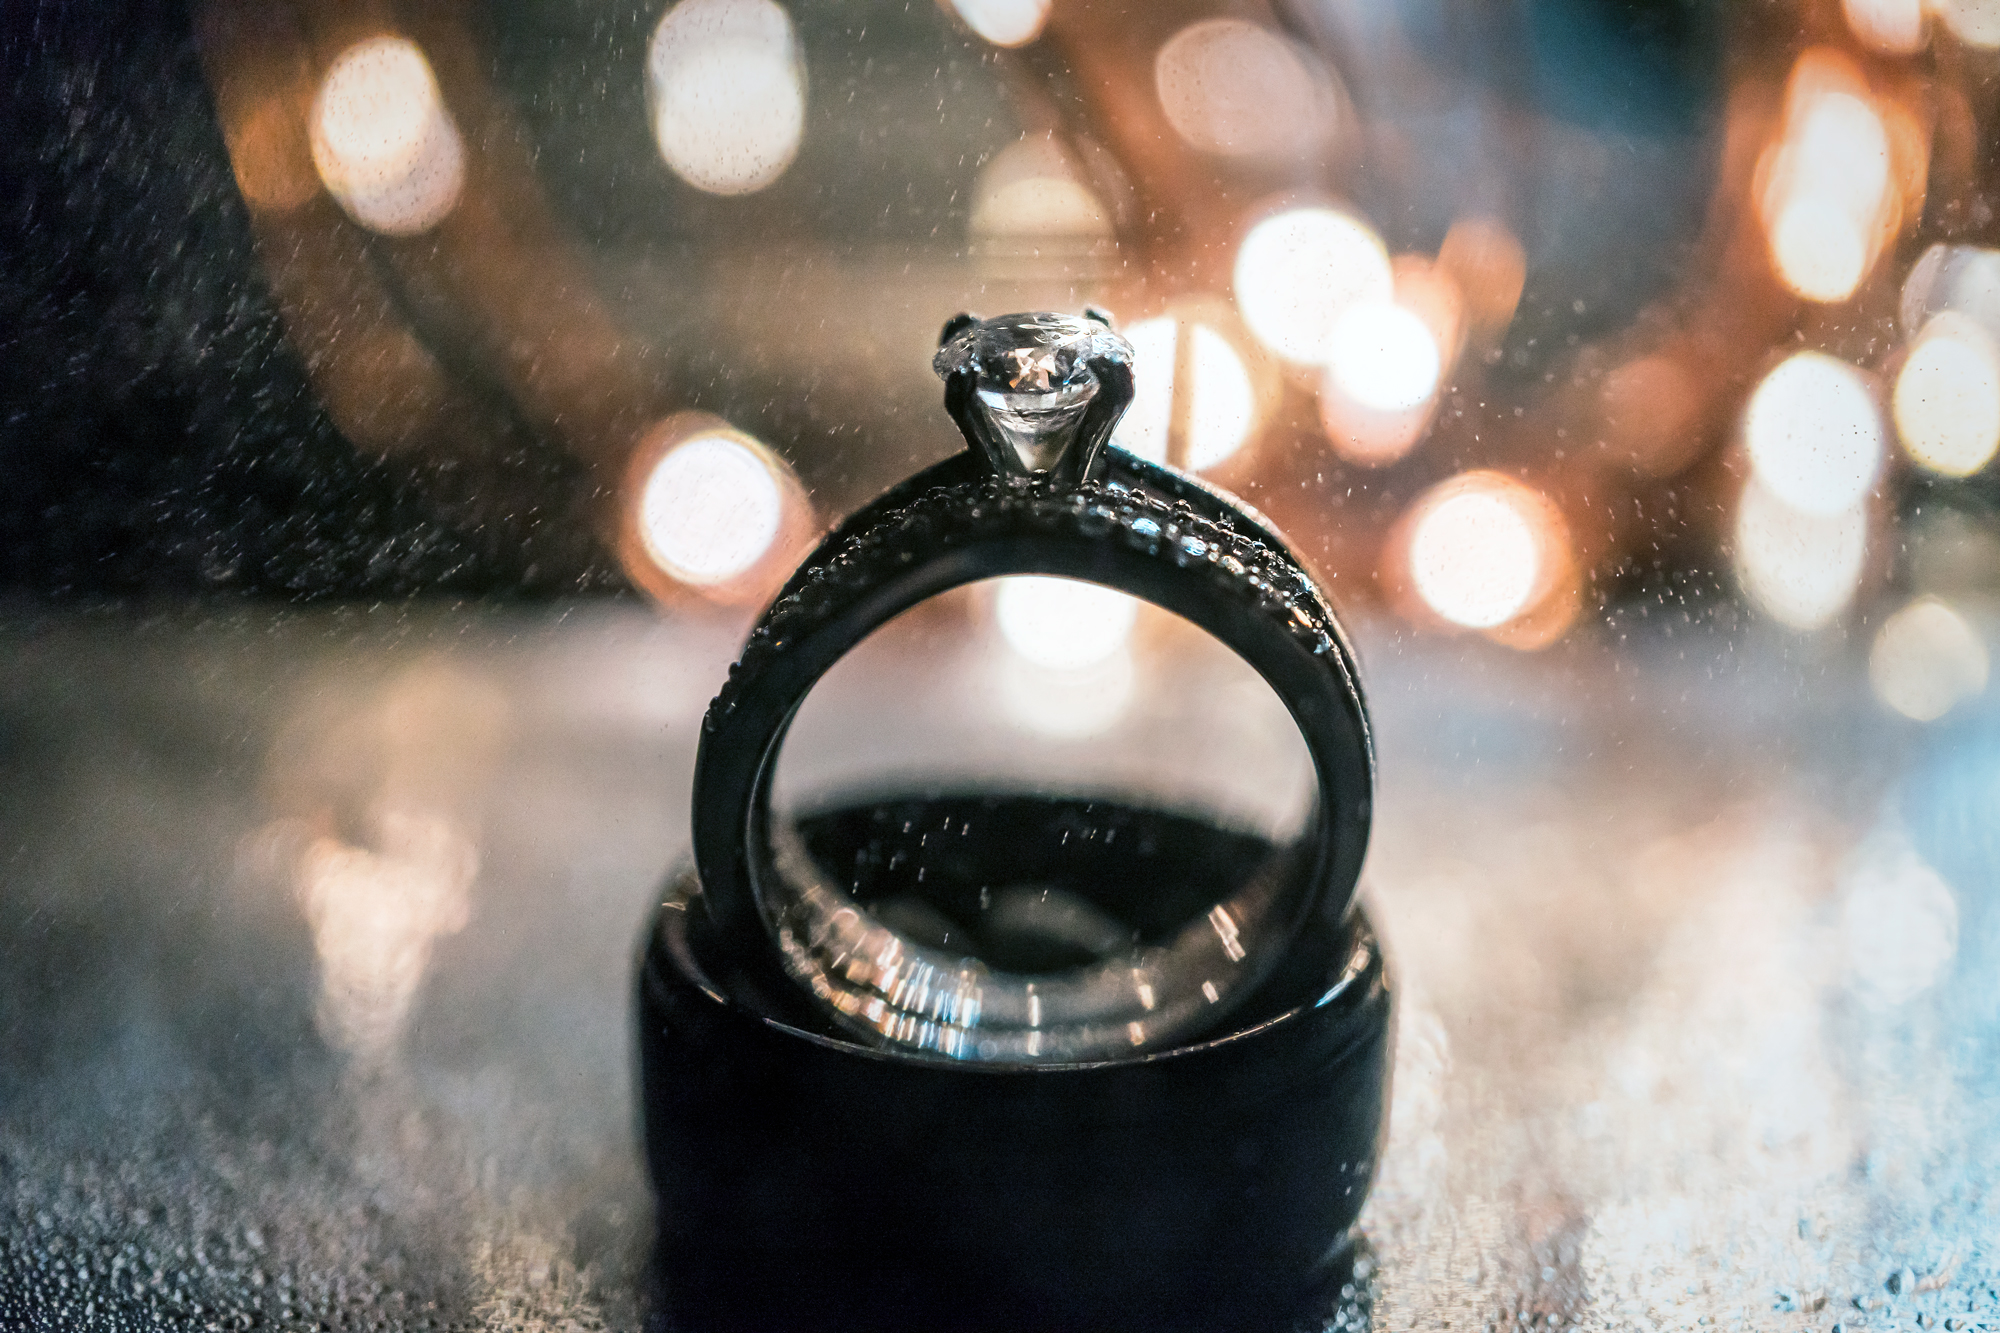
Photographers who shoot small subjects—like bugs or wedding rings—with a macro lens are extremely close to their subject. This means the bokeh will be very prominent. If you use a small aperture on a subject that is very close to the lens, you’ll only have a sliver of the subject in-focus (a.k.a. an extremely “shallow” depth of field). If you want to capture more details, you’ll have to increase the aperture.
In this dramatic wedding ring photo (Settings: f/3.5, 1/1000, ISO 800) the settings are being put to the test. The aperture is set to f/3.5, which could go a bit higher to get more detail in the ring, but then that would affect the background bokeh. The shutter speed is set fairly high to help freeze the water spraying over the ring, and the ISO is adjusted to make a proper exposure.
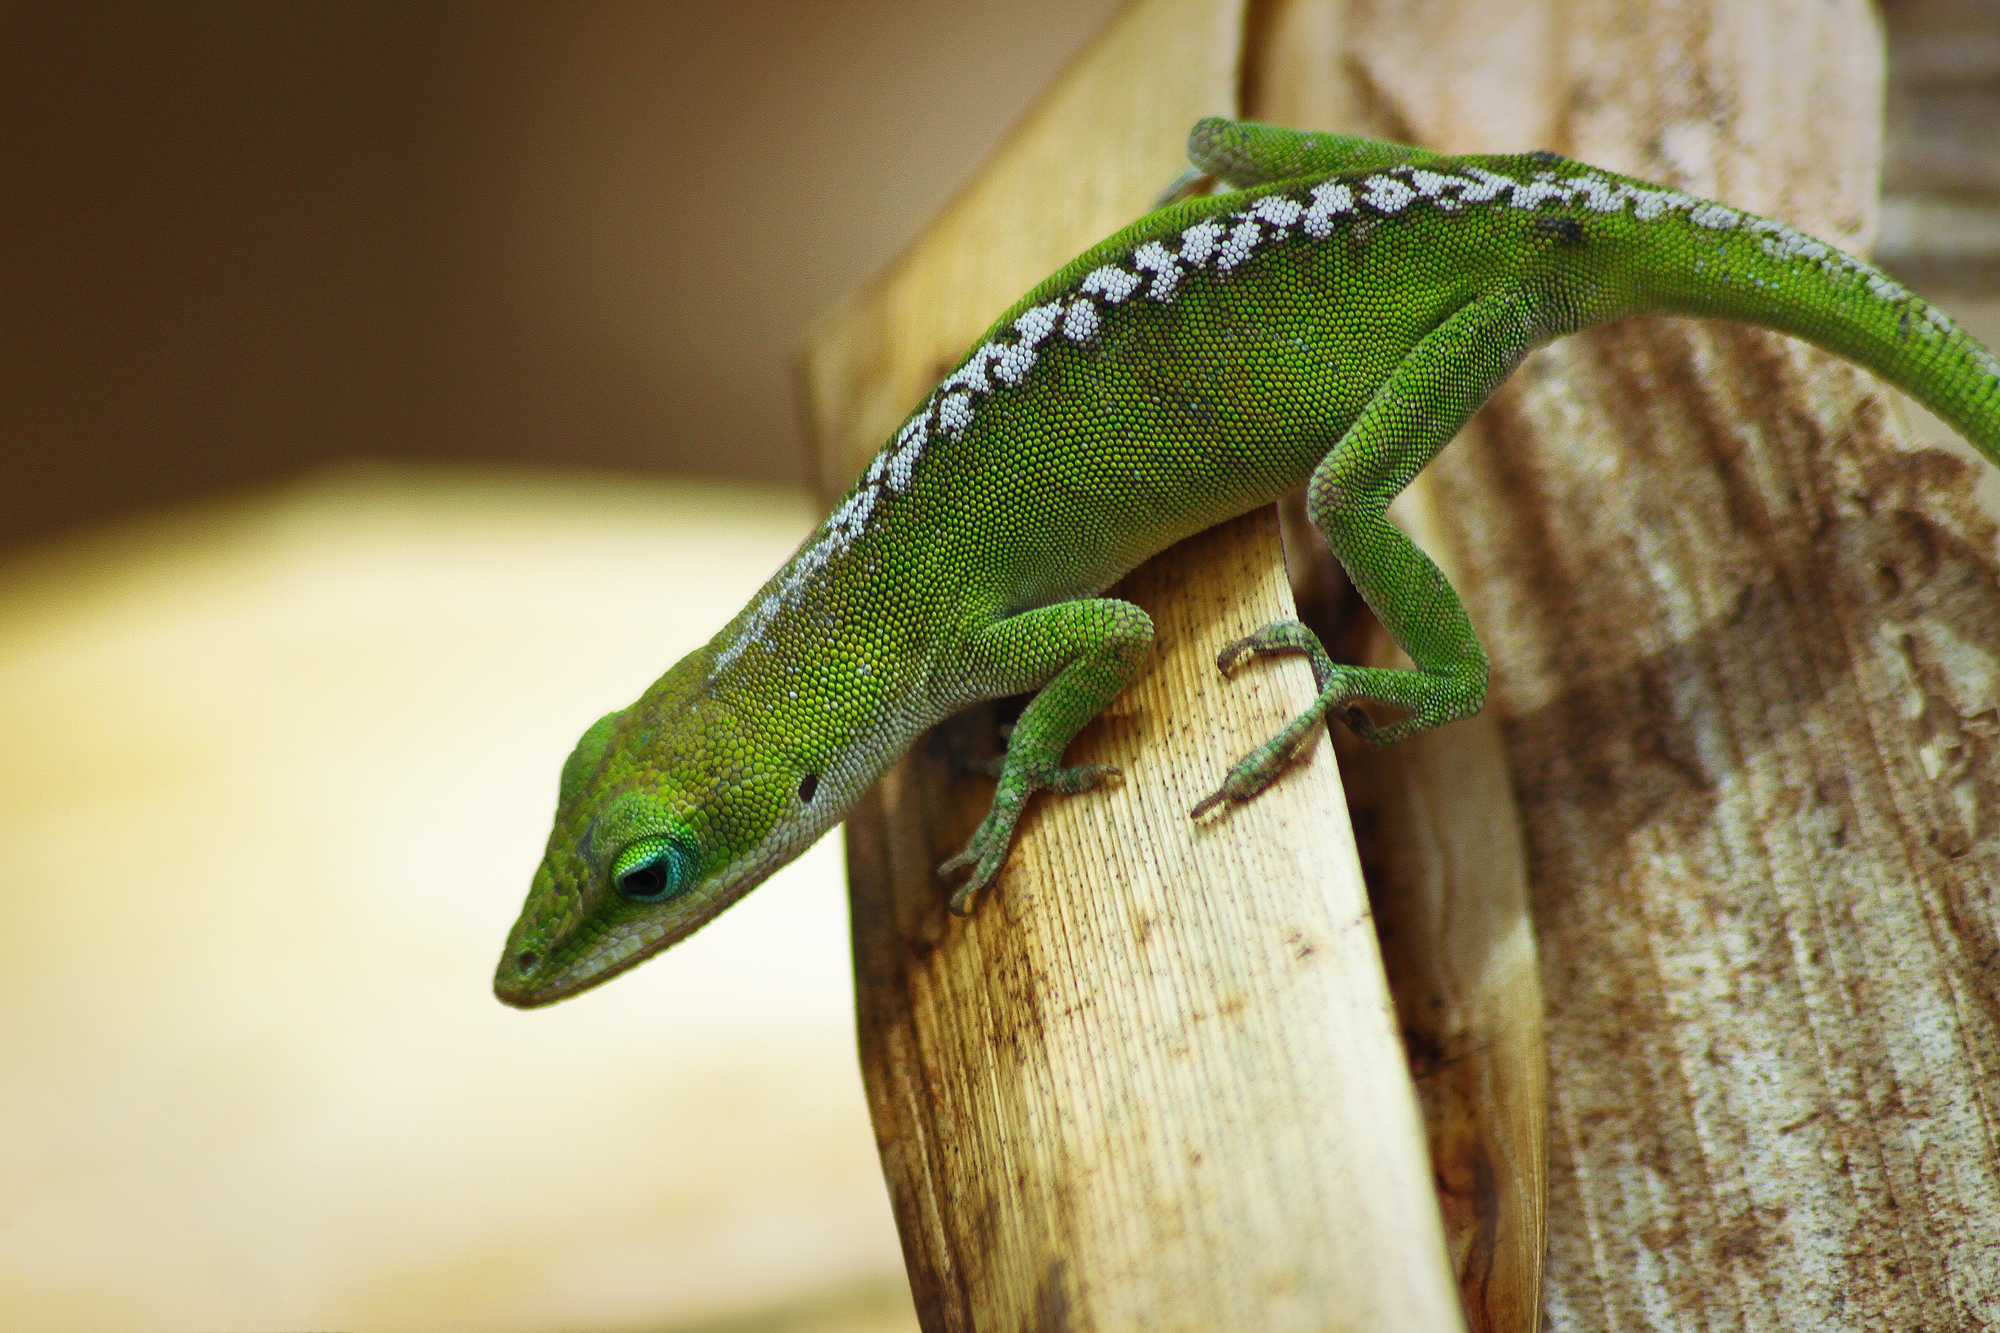
In this photo of a lizard from 2010 (Settings: f/7.1, 1/400, ISO 125), we can see how the blurriness is increased when using a macro lens. This was taken with an inexpensive 300mm lens with a macro setting, but zoom lenses increase the bokeh as well becausem theoretically, you are closer to the subject when zoomed in.
Since the aperture is f/7.1 we have most of the lizard in-focus, which is good… considering I didn’t know what I was doing back then.
Understanding Auto Settings
Now that you are more familiar with manual settings, you can also understand and utilize some of the auto modes. Using the auto modes without understanding the way shutter speed, aperture, and ISO affect the final image is similar to a pilot flying a plane without knowing how to manually take off and land. The simple computer in your camera won’t ever understand exactly what it is you’re trying to capture, so it’s up to you to keep it in line. You shouldn’t start with auto modes, then learn to shoot manual, which is exactly what I did with my first DSLR.
My first DSLR was a Canon 7D, which served me well. I bought it for a Euro-trip in 2010 with my best friend from high school, but had no idea how to use it. I tried to watch YouTube videos and understand the concept of a proper exposure, but nothing was sinking into my thick skull.
As a result, I ended up traveling around Europe for a month and using the auto bracket mode to shoot three exposures (typically used for blending into hight dynamic range, or HDR, photos). After that, I would pick the image looked best and delete the others. Some were too bright, some were too dark, but I had no idea how to control the auto setting to get an exposure that I liked.
Every time I pressed the shutter while it was in Auto Bracket Mode, I would hear “click, click, click.” After an entire month of this, my friend was ready to kill me. Near the end of the trip, he jokingly mocked me after every picture, saying, “click, click, click” with every shot.
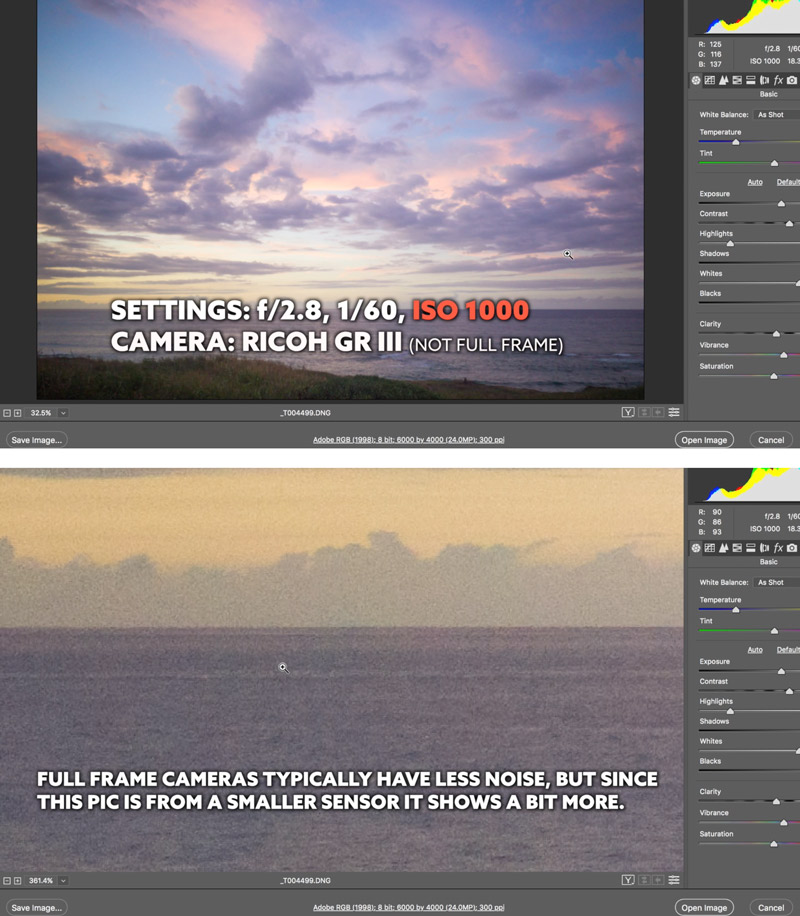
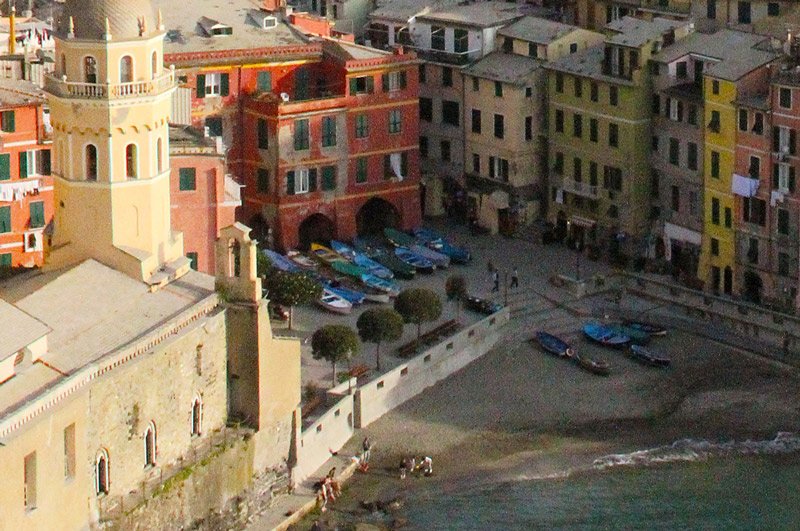
This panoramic image of Vernazza, Italy (Settings: f/20, 1/1250, ISO 6400) turned out ok, but when we look at it close up, we’ll see where it fails.
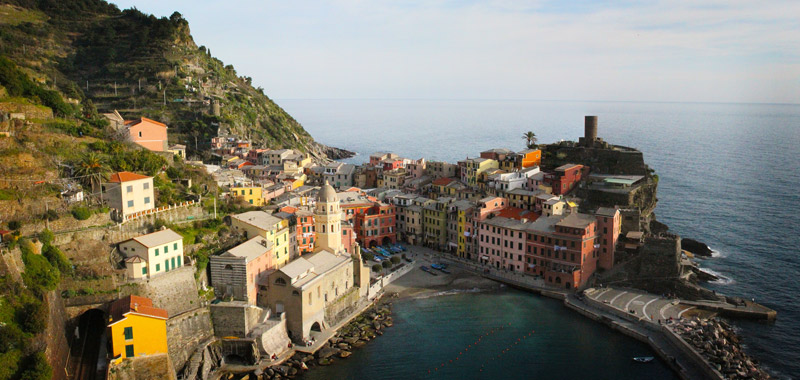
Since the settings were on auto, the camera just guessed at what I needed for the scene. Why would I need a shutter speed of 1/1250 if the scene is basically motionless? Why is the ISO so high in a daylight setting, isn’t there plenty of light? Why is my aperture so high, couldn’t I use something a bit lower than f/20?
Each one of these settings were working against each other, which shows you how dumb the camera can be at guessing your needs for the subject.
If I were to capture this photo again, I could adjust the settings by first identifying the subject, which is a landscape. My ISO would already be set to its lowest setting, so I would adjust the aperture first. Most landscapes have enough in focus at around f/11, so I’d start there. After that is set, I would adjust the shutter speed to make a proper exposure. If the shutter speed gets too low and I don’t want to risk camera shake, I’ll slightly increase the ISO to help out. Piece of cake!
In the detail shot of Vernazza, you can see how the high ISO creates lots of digital noise. This might be aesthetically pleasing to some photographers because it slightly resembles the look of film, but more crispness is what I would prefer for a large print. In the video, you can see the noisy image compared to one that was captured with better settings.
Auto Modes: Live and Learn
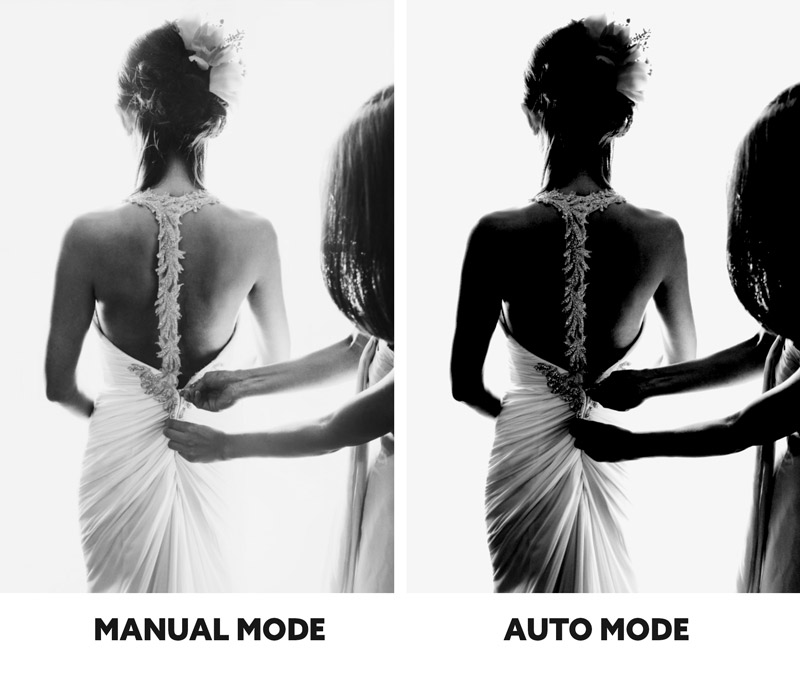
If you’ve been shooting in auto modes, you already know that sometimes your camera doesn’t capture the scene as you’re wanting. I had a friend shoot a wedding in auto mode and the wedding dress was causing the meter in the camera to continually underexpose the image. All of his images were dark and he couldn’t figure out why. Needless to say, his employer fired him for being incompetent. I explained to him what the camera was doing, but it’s kind of hard to understand for some photographers.
The geeky science behind the meter is that it measures the lights and darks in the scene and uses 18% gray to calculate a proper exposure. So if there are a lot of lights in the image and very few darks, the scene will look overexposed and the camera will reflect this in the light meter. If you’re shooting manual, you’ll make adjustments to your settings by letting in less light. If you’re using auto modes it will do it automatically, but in the case with the wedding dress, the camera didn’t know what the subject was and overcompensated; creating an underexposed image.
The same thing can happen when shooting in a snowy or sunny environment. The camera doesn’t know exactly what the subject is and how to expose for it, so it’s just doing its calculation with the knowledge of a goldfish. There are other metering modes, like spot metering, but we won’t get into all of those.
There is a bit of control over auto modes by using the EV dial (Exposure Value), and it’s covered in the video. Basically, it allows you to adjust the exposure in situations where it calculates incorrectly.
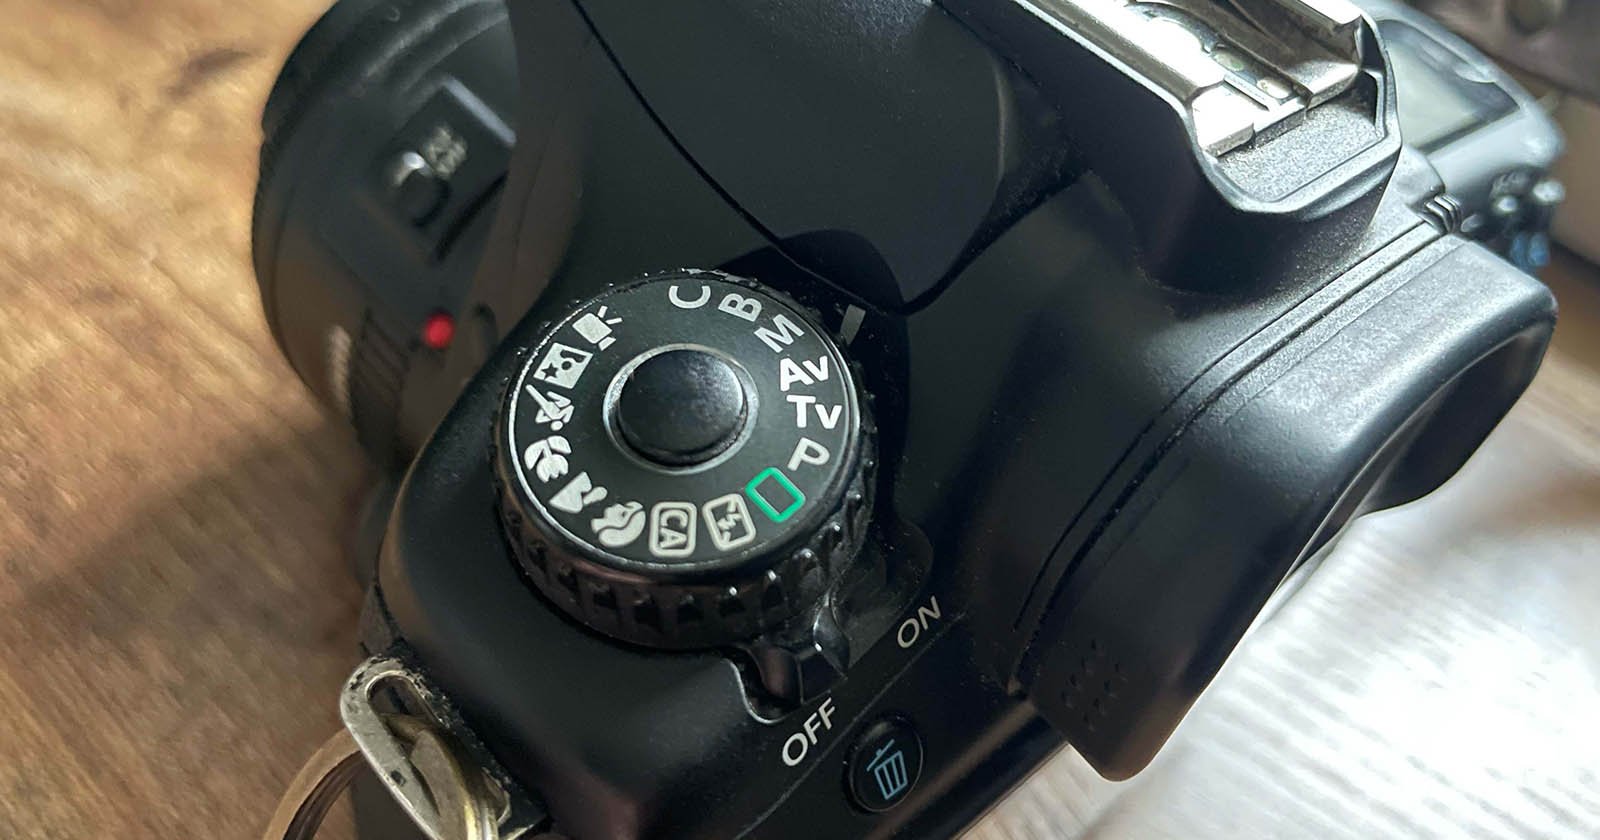
Using Auto Modes
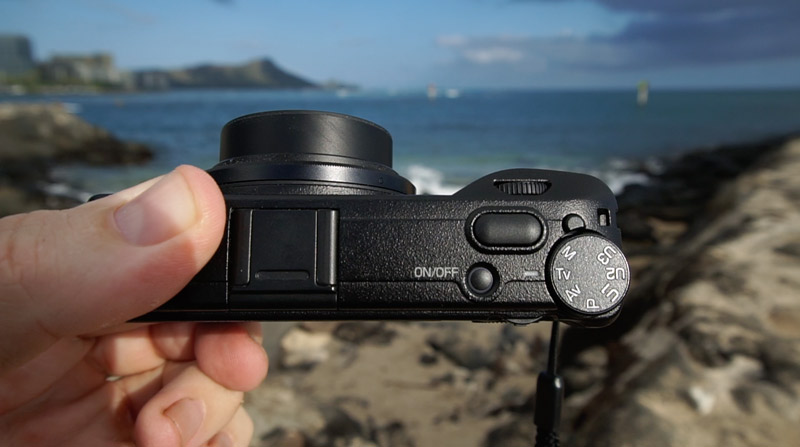
There are several different auto modes when it comes to beginner cameras, but let’s learn the more useful ones. First there is AV mode, which stands for “aperture value.” It’s where you’re in control of the aperture and ISO, but the camera sets the shutter speed automatically.
Then there is TV mode, which stands for “time value.” Remember how the shutter speed controls the length of time a moment is captured? This auto mode is where you’re in control of the shutter speed and ISO, but the camera automatically controls the aperture.
The final and most unpredictable auto mode on most full-frame cameras is P mode, which stands for “program.” This is where your camera controls the shutter speed and aperture. You can even set your camera to auto ISO and then you’ll leave the fate of your image to your camera. Talk about living on the edge! Most artists usually want more control than this.
The first two auto modes (AV, TV) can come in handy at events like weddings, where the lighting is always changing and it’s a fast-paced environment. Usually, with weddings, you want to be controlling the aperture for portraits, and the shutter speed when people are walking around and dancing.
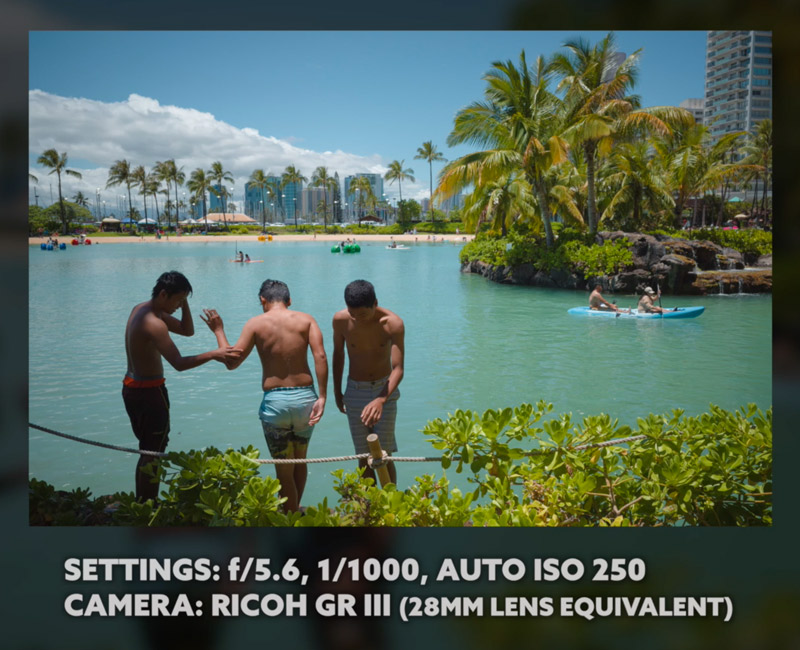
Now that you know even more about shooting in manual mode, you can set up your user presets.
I do this with my street photography camera and have one user mode with settings for outdoors (f/5.6, 1/1000, Auto ISO), and one with settings for indoors (f/2.8, 1/250, Auto ISO). With the indoor settings, I know I will have more bokeh and won’t be able to capture subjects moving very fast. Yet, the cool thing about it is I can switch to each mode without looking while the camera is by my side. This is great for street photography!
Special Effects
Now, it’s time for some fun special effects that can be created by adjusting the settings on the photography tools you probably already own. First up, let’s learn about the settings used to create a long exposure with a model.
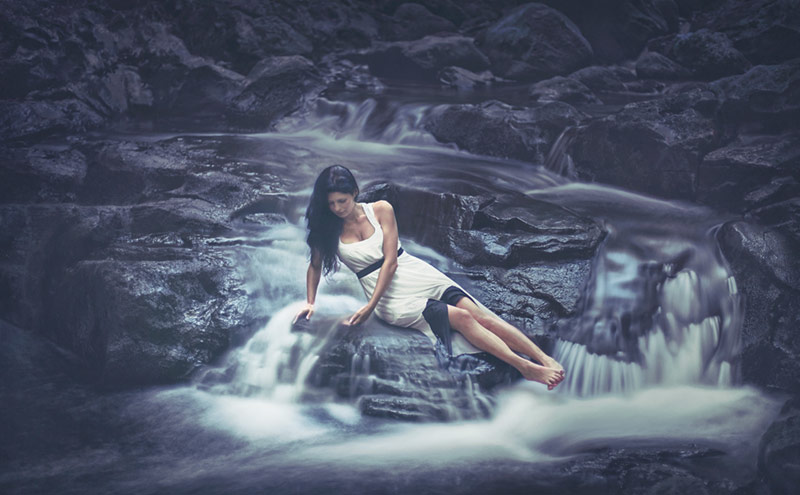
In this next scene (Settings: f/1.4, 5 seconds, ISO 640), I wanted to capture a subject in the river, where she is motionless while the river shows movement. I had to use a tripod for this because I was capturing a long exposure that goes well beyond what I can do hand-held. You can also place your camera on the ground or use your bag to prop it up. Whatever works.
The model had to stay very still to appear frozen in time. This means she had to hold her breath for 5 seconds and resist the temptation to swat off any pesky mosquitos. You can also use a timer or external remote in order to avoid camera shake from you pressing the shutter button.
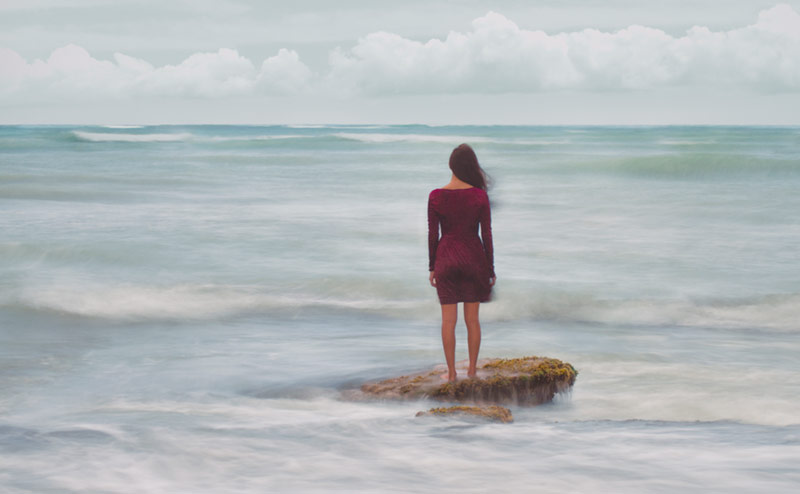
Low Aperture in a Bright Environment
If you want to capture a nice soft portrait of a model during the bright sun, while also creating a long exposure, you can use a Neutral Density (ND) filter to compensate for the amount of light coming through the lens. This blocks the light coming into the camera like sunglasses, and allows you to use the lower aperture and shutter speed you’re needing.
This is how I captured the next long exposure in broad daylight (Settings f/5, 1.3 seconds, ISO 100). Be sure that the model stands relatively still for the slow shutter speed. Notice how the coral is in-focus while everything else has a nice soft motion blur. If the waves were moving faster, there would be even more motion blur. Adjust your shutter speed according to the effect you want to create and balance the other settings to create a proper exposure.
Flash Photography and Light Streaks
Even if you’re using a flash on your camera in a low light scenario, you can still create long exposures if your settings are appropriate. Say you’re at a wedding and want to capture the excitement of the reception by getting some light streak effects in the image. All you would do is set the shutter speed to a lower setting (i.e. 1/5) to control the ambient light. Using your camera LCD allows you to gauge the amount of ambient light being captured.
After that, set the aperture to a medium setting (i.e. f/5.6-f/8) to control the amount of bokeh. We usually want to capture a few different people in the image so we don’t want a lot of bokeh; we want more things in focus. The ISO can be set to the lowest setting because we are using a flash. Right after the shutter button is pressed, if you twist your wrist you can create movement with the ambient light while the flash freezes the subject.
In this next street photo (Settings: f/5, 1/5 sec, ISO 100), I used an external flash with remotes, the flash was on my hip, and I used a 20mm lens. I could shoot from the hip to capture the subject, freeze them with the flash, and the slow shutter speed would then capture some motion with the ambient light of the environment.
Conclusion
Hopefully you’re feeling more confident with your camera settings and ready to get out there and try shooting Manual. Be sure to set your ISO to its lowest setting, then determine what your subject is and how you want to capture it. Try to decide how much blurriness you want in the image, and if you want to freeze the subject in time.
Once you get familiar with the settings, try out each of the auto modes in turn and see how they work. In the video up top, you’ll learn about the exposure value dial (EV) as well, so you can control the auto modes a bit more. Fun stuff!
That’s it for this one, thanks for joining in!
About the author: Tavis Leaf Glover is a fine art photographer and author based in Honolulu, Hawaii. The opinions expressed in this article are solely those of the author. You can find more of his work on his website, Flickr, Instagram, and Facebook. Glover is also an educator about applying Gestalt psychology principles to photography and art. This article was also published here.