Panning, or: How I Learned to Stop Worrying and Love the Blur
Photography is unique, as far as artistic media is concerned. Behind the camera, we can freeze time, turning once-in-a-lifetime moments into indelible mementos that have a good chance of outliving the gear that created them.
Other times, though, perfectly freezing time may not be the best way for you to convey the meaning of your image. For fast-moving scenes, cranking up your shutter speed can create a disconnect between the implied, contextual motion of your subject and what the viewer actually sees in your image. While it may not make them motion sick the same way a virtual reality or first-person-view drone headset might, this disconnect can render an otherwise well-produced image sterile and lifeless.
So, what can we do about this? Well, there are a number of techniques that can help, but let’s take a look at just one in-depth: panning. In the camera world, a “pan” is a camera movement in which the camera itself does not change its position, but swivels from left to right or vice-versa. This can be achieved on a support, like a monopod or a tripod, or handheld if you’re feeling brave (and, if you’re using a large telephoto lens, you didn’t skip arm day).
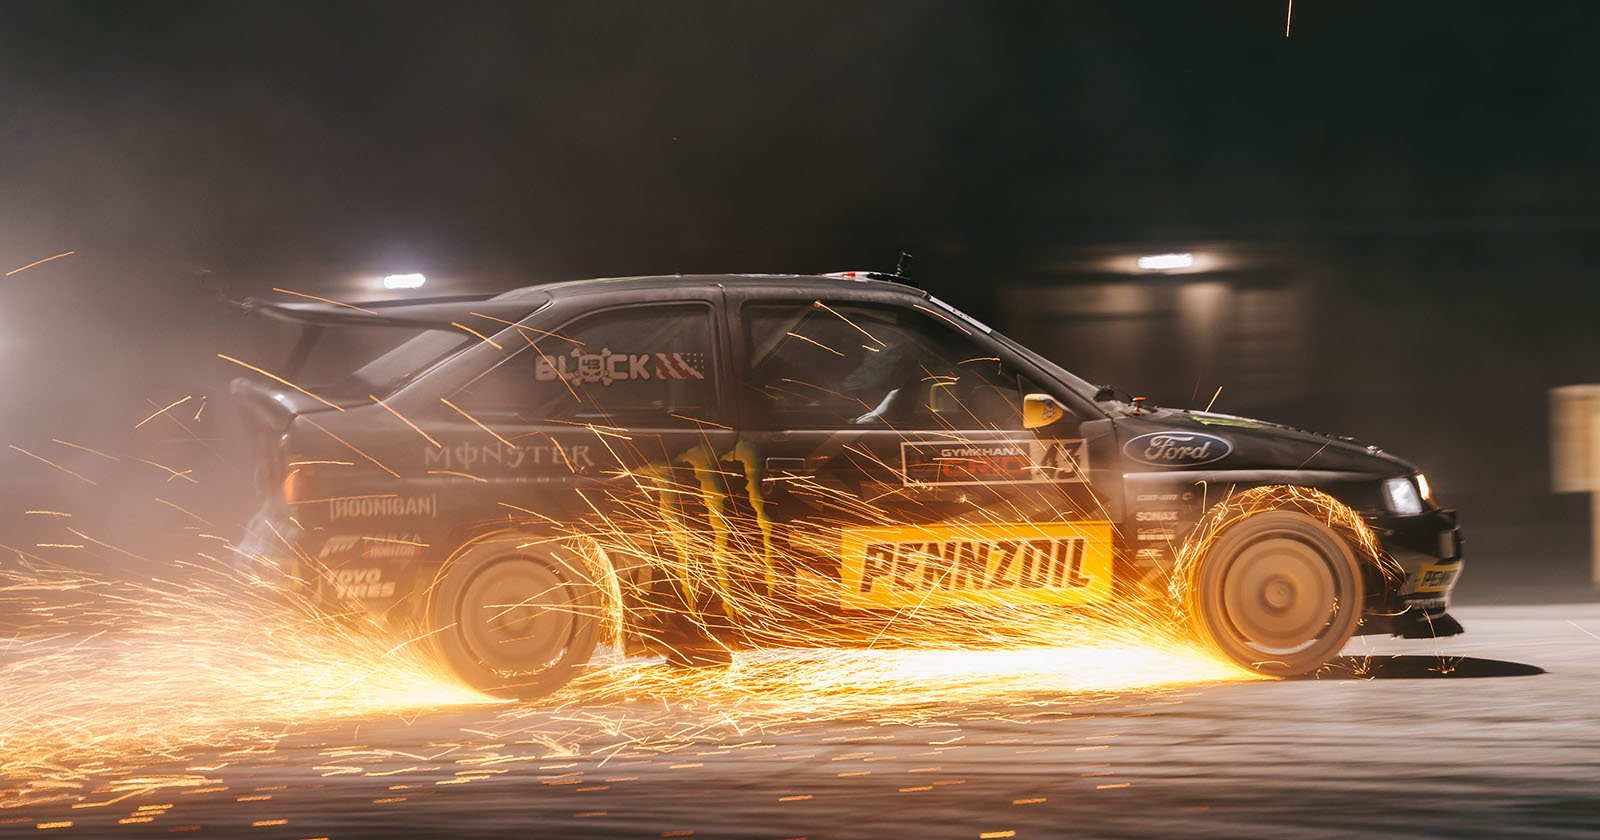
Panning allows you to create shots like this:
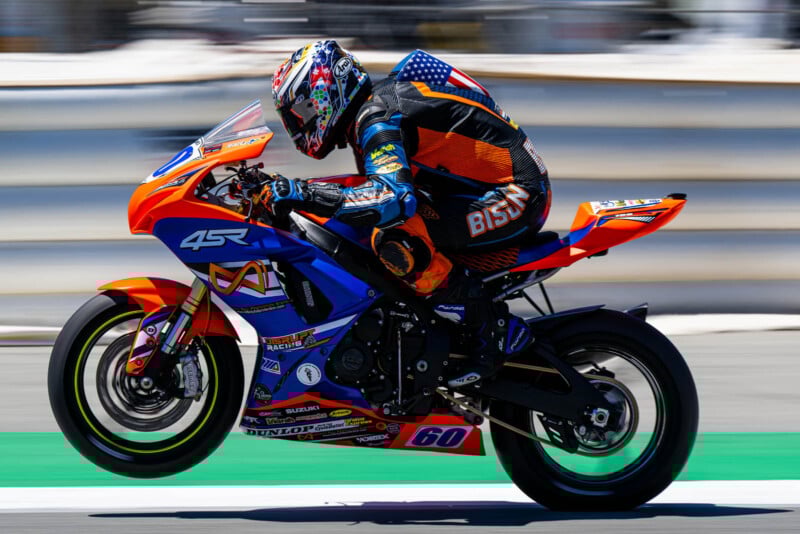
When I look at this image, I can almost hear the roar of the engine and the cheering of the spectators through my ear defenders. I can smell the gas cans in the pits behind me, feel the hot asphalt through the soles of my shoes, and taste the asada fries I’d had just minutes before. Much more than just a visual reminder of a day at the races, it’s a full sensory experience that puts me back at Weathertech Raceway, in that moment.
The Basic Technique
If you regularly photograph animals, cars, or anything else that moves, you probably already have the fundamentals down without even knowing. All we do is follow our subject, trying to keep it in exactly the same place in the frame, while letting rip with our camera.
This will take practice to master. Many photographers have a habit of tensing up as the nerves involved in getting the shot set in, and this can not only make your camera movement jittery but can mess with your reaction time and perception of the world. Take a deep breath, relax, and focus on smooth and consistent motion.
Now let’s talk camera settings. As with anything in photography, there really is no such thing as a “one-size-fits-all” exposure triangle for panning shots. The correct settings will depend on the amount of environmental light, the relative speed of your subject, your distance from them, and just how far you want to push the envelope as far as the amount of background separation you want your subject to have, and a variety of other factors.
While nobody can say definitively what your camera’s setup should be in any given situation, there are trends and other hints that can serve as a good starting point for most people.
Shutter speed. This is the main setting that will dictate the rest. Here, we take a hint from the reciprocal rule, which states that to avoid camera movement ruining your photos, your shutter speed should never be slower than 1/(focal length), i.e., when shooting at 200mm, you should always be at 1/200s or faster. Thankfully, we don’t care about that, in fact, that’s the whole point! Start off at the reciprocal of your focal length, and slow it down as you get more comfortable or as you notice that you aren’t getting as much blur as you want.
Aperture. This is more of a setting of necessity than anything else. If you’re shooting in bright daylight, there’s a good chance that the shutter speed you’re using will not allow you to open up your aperture very far at all. You may consider this a nuisance since you won’t be able to get the kind of subject isolation you want, but I’ll let you in on a bit of a secret-when you’re panning, there comes a point in the shutter speed continuum in which it simply stops mattering what your aperture is set to because everything except your subject is a blurry streak anyway. Set your aperture to whatever gives you the exposure you’re looking for -f/11 or f/14 are very common for fast-moving subjects.
ISO. Another setting of necessity. Of course, as with any shooting situation, lower is usually better, and fortunately, with this technique, you’re probably going to run into problems of too much light rather than not enough. For daylight scenes, aim for your lowest native setting to preserve quality, usually 64 or 100 for most cameras. For darker scenes, you’re going to need to balance this with your aperture-try to open your aperture wider before increasing your ISO.
Gear-specific settings. Depending on your particular platform, there may be settings in your camera or your lens that may be beneficial. Nikon cameras, for instance, have a “Sport” stabilization mode that relaxes the vibration reduction to allow for slow, deliberate camera movements without feeling like your camera is fighting back. Many cameras and lenses designed for sports and action will have multiple such modes, so it’s important to do research on your specific equipment to determine which settings are best for you.
Simple Geometry
One aspect of this technique that often goes overlooked by photographers is their positional relationship to their subject, and how it can affect the ease (or lack thereof) of getting an image they are happy with.
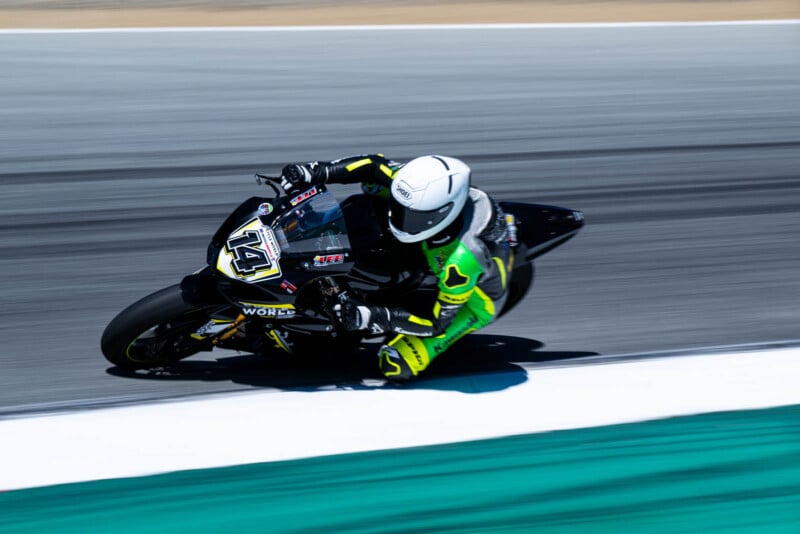
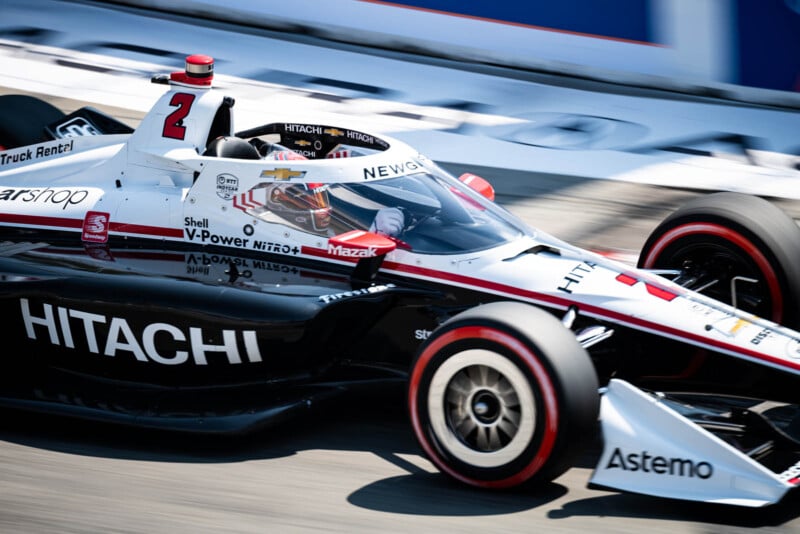
For example, in the above image, you can see that while the front of the motorcycle is quite sharp, its sharpness tapers off towards the rear. This is because the perspective of the subject is changing relative to the photographer due to the oblique angle of the photo, and since it’s further away, the perspective of the back of the bike is changing faster than the perspective of the front.
For this reason, when just starting out trying to master your own panning technique, it’s often beneficial to try to position yourself such that your subject is moving as close to perpendicularly to the camera as you can manage. This eliminates perspective shift as much as possible and gives you a much higher chance of nailing your shot.
A Numbers Game
No matter what anyone may tell you, sports and action photography, and panning especially, is a game of numbers. Even the best photographers in the world will come away from a sporting or other such event with thousands or tens of thousands of photos, and only a handful may ever see placement on a website or in a picture frame.
Panning is this concept turned up to 11. Whereas a fashion or product photographer may have a practically unlimited ability to retry, recompose, and reset, we as action photographers do not have any such luxury. You can have your settings dialed in, your positioning can be perfect, your timing can be exact, and there will never be a guarantee of getting your shot. This is not a black mark on your skills, but rather simply the nature of the beast.
Fortunately, we can stack the deck in our favor. While we may be scoffed at by street photographers or fine art photographers who wait for the perfect moment and take one deliberate photo at a time, and while you may hear the term “spray and pray” used derisively, you should never feel self-conscious about motor-driving your camera as hard as it will go. If your subject permits, shoot bursts of 2, 3, or 4 seconds. Storage is cheap-use it. Worry about sifting through your photos when you sit down at the computer.
Closing Thoughts
Many photographers are hesitant to try to incorporate motion into their photos, instead being concerned only with absolute, uncompromising sharpness. While there is certainly a place for this, action and sports photography can often benefit from adding elements of motion because it allows the viewer to better interpret the image.
While there’s no way to guarantee that any given photo taken in this manner will be sharp, there are a number of different elements one can incorporate into their technique to maximize the chances of success. At the end of the day though, as with so many things in a creative field, practice will be your best friend. So get out there! No matter what your area of interest is, get out and shoot. Challenge yourself at every opportunity, and you’ll surprise even yourself with what you’re capable of.