How I Built a Digital Toy Camera
Are you sometimes annoyed by having too many easy and convenient ways to take perfect photos? Don’t despair…
Of course, there are other reasons as well, large film planes allow building cameras that tolerate slightly larger deviations in precision during manufacturing, etc., but the two main reasons (I reckon) are: why compete with digital if you’ve got an excellent digital camera in your smartphone and the fact that digital sensors simply are a pain.
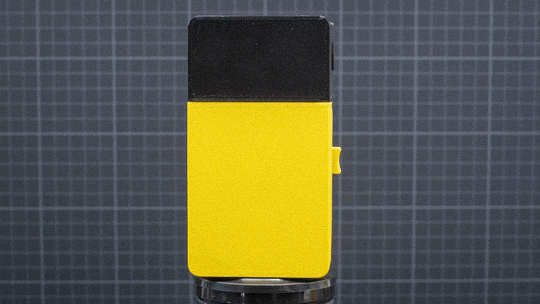
Anyway, I built one (or two):
The thing is, digital cameras are pretty boring. Where is all the quirkiness gone? Lens movements like tilt/shift/rise/fall? Weird and cheap lenses? Square aspect ratios? Panorama cameras? Memory cards that over-expose all images when you open them before they are full? All gone!
So, I made cameras. With sh**ty sensors and weird lenses. The sensors are really small so I can use really cheap glass. The lenses are mostly M12, that’s stuff for surveillance cameras and related applications.
Does it have autofocus? No.
Does it have manual controls? No.
Techniques that can be considered lomographic
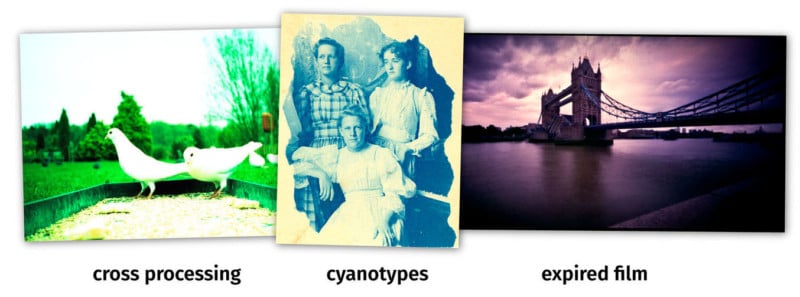
Maybe you know lomography. Buying old and sh**ty or new and overpriced cameras, grabbing some expired film, and having a lot of fun with stuff that just always surprises you? Well, I do from time to time, but sometimes I would really like to have a digital lomography camera. Something with sh**ty lenses and a lot of weird stuff. Something that’s not exactly my mobile phone.
So, can I buy one? Can I build one? Let’s build one. The good thing here is that a lot of complex electronics stuff has become really accessible and easy to use. That’s the only reason why I am able to do these things as a software person. But the one thing that’s still a pain? Image sensors… You basically have to sign NDAs, order in bulk, sell your soul and still need to write your own drivers on top of that.
The only way to get access to any decent image sensor at all is to use the Raspberry Pi ecosystem.

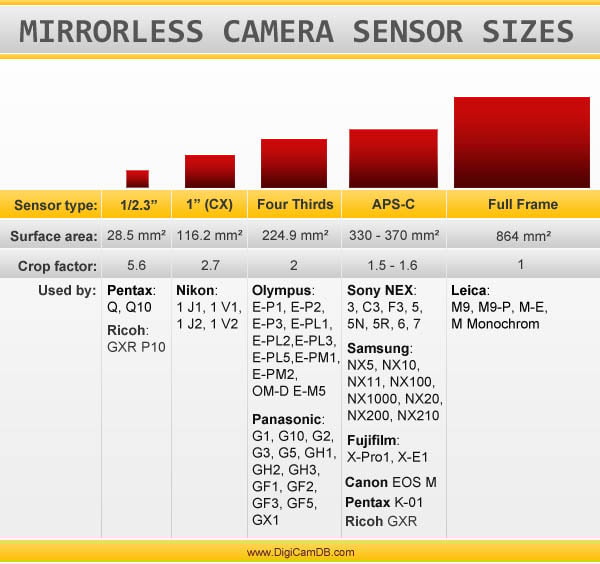
So, what I am using here is the OV5647, a tiny $10 sensor, (also known as the Raspberry Pi Camera V1 chip). That’s 3.6×2.7 millimeters with a whopping 5 megapixels! The big advantage of such a small sensor is that I can use M12 lenses.
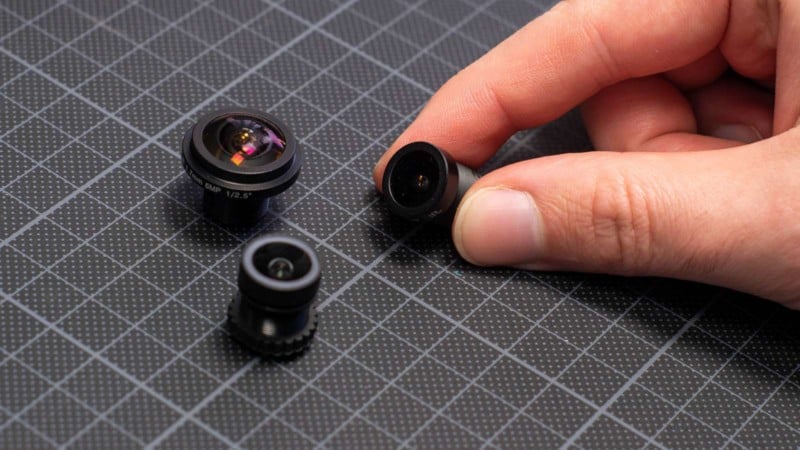
These are tiny lenses with a 12-millimeter screw thread. You’ll usually find them on security cameras or machine vision stuff. They’ve got a fixed aperture, and for focussing, you just screw it closer to the sensor or unscrew it. You often won’t know the actual quality of the thing before you buy it — there are very few standards and it’s basically just a lot of… fun.

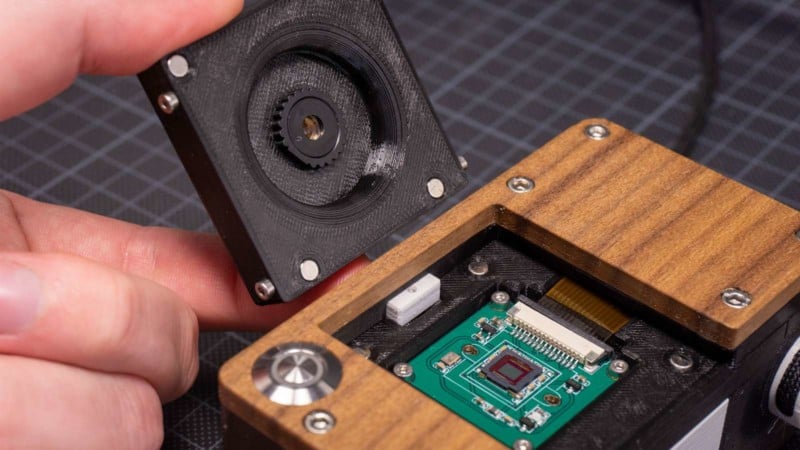
The correct thread for an M12 lens can be cut with an M12x0.75 thread cutter. I tried 3D-printing the thread (didn’t work well), cutting it on a CNC with a single-tooth thread cutter (better, but quite a hassle) and finally spent the money to buy a dedicated manual thread cutter with the correct dimensions.
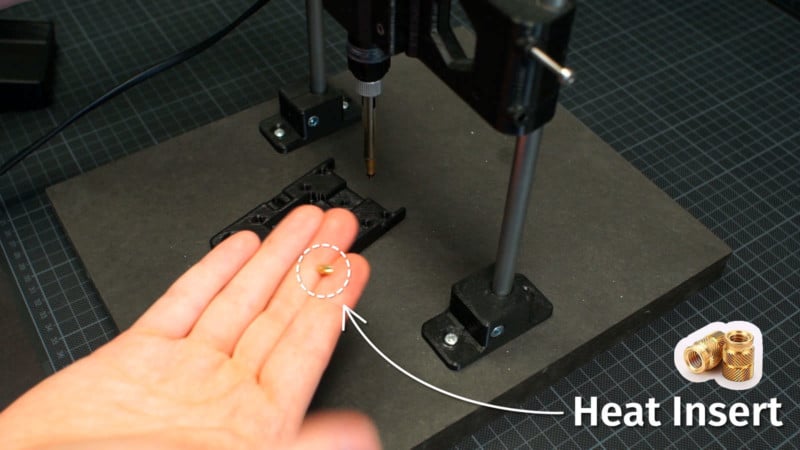
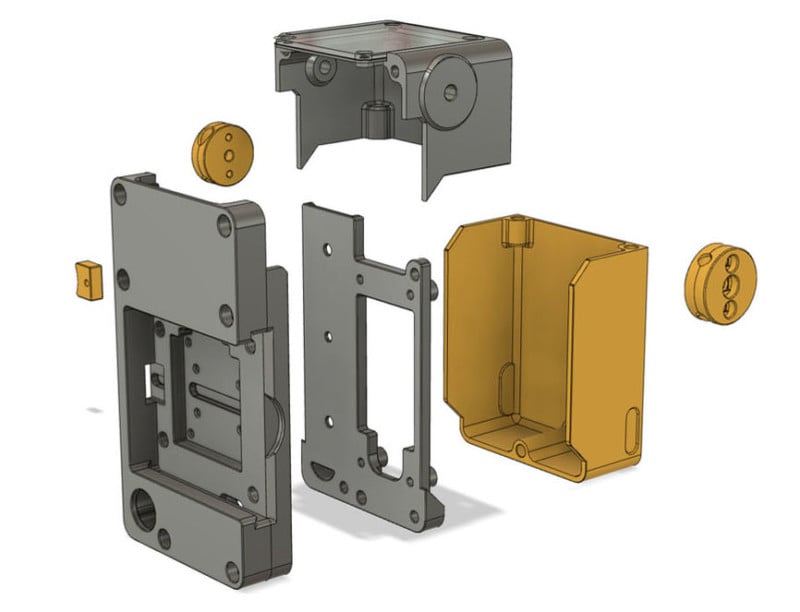
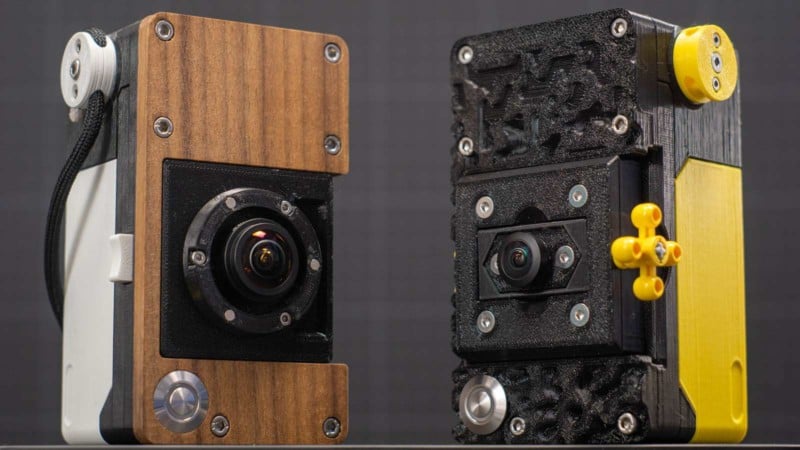
The whole body (except the walnut front) is 3D printed and held together by screws, heat inserts, and magnets.
The lens mounts slide in place and are aligned by magnets as well.
I made two versions since I am not sure which one I like more:
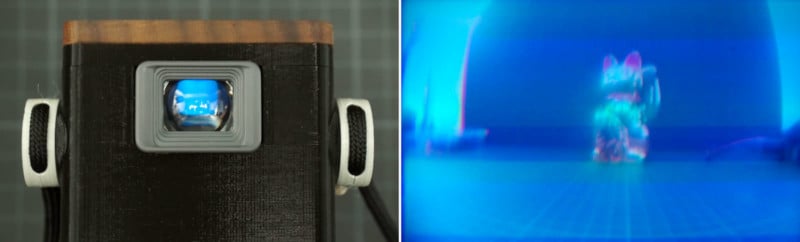
One uses a small electronic viewfinder usually found in nightvision goggles. It is driven by an analog video signal at 640×480 pixels.
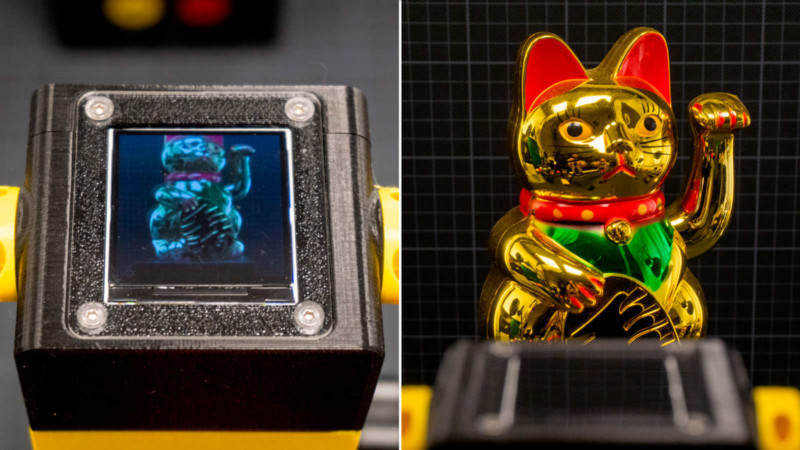
The other version is using a small 240×240-pixel square LCD display (ST7789) originally designed for low-end smartwatches.
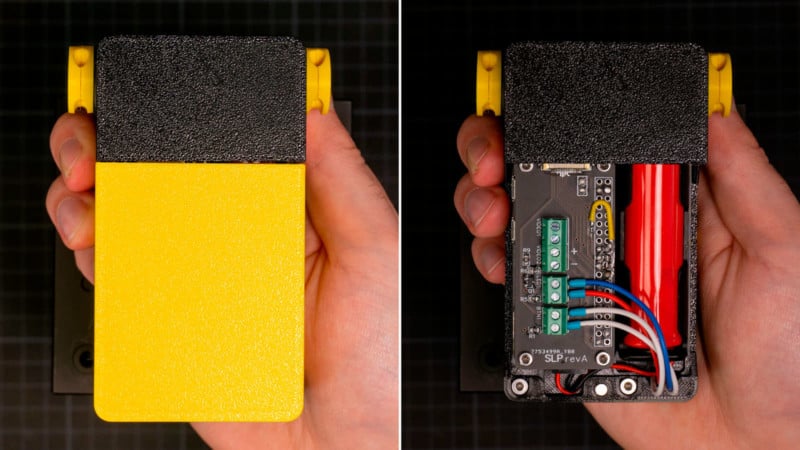
The whole thing runs on a Raspberry Pi Zero and a 18650 battery. There is one dedicated power management board that provides 5V to the Pi and a second board, sandwiched on top which holds the circuit for the button LED and the display/viewfinder connectors.
In case you might be wondering about the pattern on the front: I was slightly annoyed by the flat surface and modified it with a Perlin noise pattern.
Lens Mounts
For the M12 lenses there are different lens mounts with different movement axes:
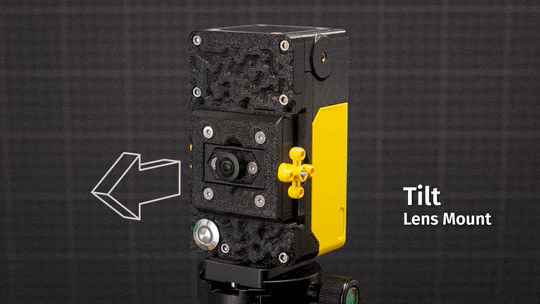
Tilt mount: allows to tilt the lens relative to the sensor. Especially with longer lenses, this allows a bit to play with images that are only partially in focus.
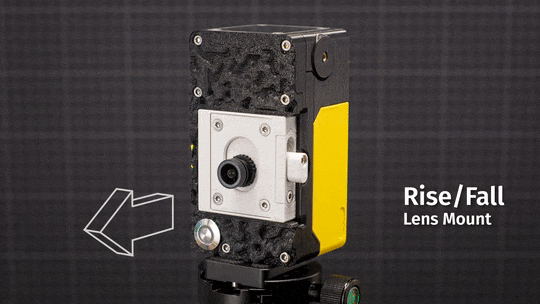
Rise/Fall mount: distorted angles on buildings? Want to have a strong vignetting effect? Rise and fall gives up to 10mm of travel to avoid distortions or move the lens out of the sharpest center region towards the edges of the image circle.
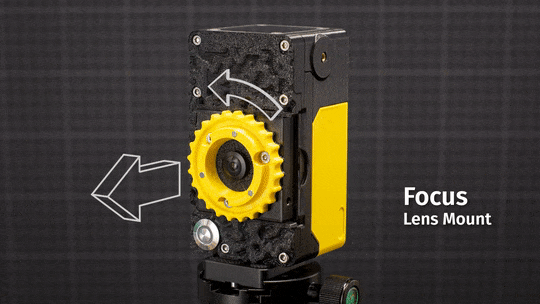
Focus mount: most of the wide-angle M12 lenses have a very large focal plane. So it’s pretty easy to get almost everything in focus when finding the hyperfocal point. However, being able to focus the lens is a pretty nifty feature, so we’ve got a helical mount with a simple very low-pitch screw thread.
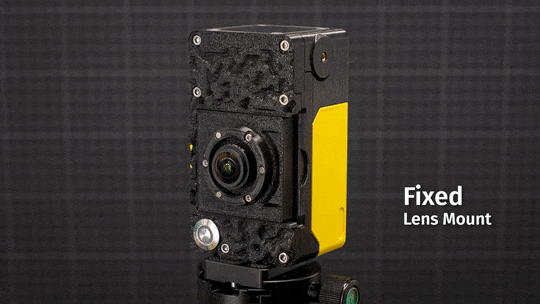
Fixed standard mount, mostly suitable for the wide-angle lenses. Just a fixed mount without any movement. A lens cap or hood can be attached with magnets.
But Why Create a Digital Toy Camera?
Well, … why not? Why bring a big, fat camera to your vacation when all you would need is the tiny sensor on the phone in your pocket? But is it fun? Is it fun to pull out our phones and take snapshots you seldom will look at?
On the other hand, analog Lomography cameras are a lot of fun, but is it really cool to mix chemicals, develop film and scan negatives for your vacation snapshots?
So, kind of a tie here. The 3D-printable sh**ty plastic toy camera is what fills this gap for me.
One More Thing
Because someone will inevitably come up with “how about… two lenses, like a classical Twin Lens Reflex camera?!”. Yes, there is also a dual-lens version:
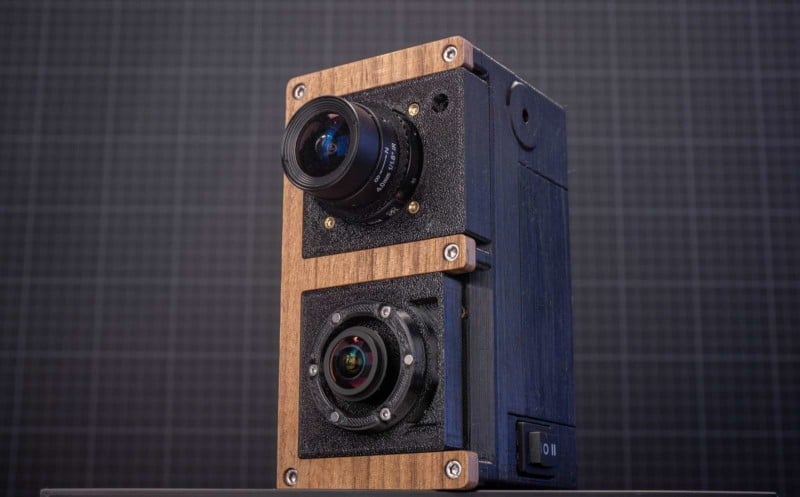
But that’s slightly more clunky and less fun to handle. It runs on a Compute Module 4 to handle two cameras in parallel and is compatible with the 12MP Raspberry Pi HQ sensor as well. So the proof-of-concept works, but that’s not gonna come with me if I want to do stupid stuff.
Downloads
The software and design files for this project are available on GitHub for both the single-lens and the dual-lens version.
However, there is little documentation, so this is mostly suitable for people who would want to build something similar anyway.
Note: If you want to build this camera you will need to find a power supply PCB that runs on a single-cell LiPo battery. I am using my own, but due to global supply chain issues components are not available for anyone right now. Other commercial products that might be available and will work: Adafruit PowerBoost 1000, Omzlo PiVoyager, uugear Witty Pi Mini.
About the author: Christopher Getschmann is a software guy, photographer, and tinkerer based in Weimar, Germany. The opinions expressed in this article are solely those of the author. You can find more of Getschmann’s work on his website, Twitter, Flickr, and YouTube. This article was also published here.