Canon Said My Lens Was Dead… So I Fixed It Myself for $140
A little while ago, I was shooting the icebergs on the black sand beach by the Jokulsarlon Glaicer Lagoon, Iceland with a rental EF 24-70mm F2.8L II. Iceland is notorious for being windy, and while I was shooting there was blowing winds carrying ocean spray and water splashes all over me and my camera + lens.
Unfortunately, it seemed that sea water got into the lens either from the autofocus switch, the “weather seal,” or the extended barrel when you zoom out. After a short while, the lens stopped autofocusing and I began getting errors about connecting to the camera.
My worst fear had happened. I could see the lens was soaked with water. I was so focused on composing that I had forgotten to check the equipment conditions.

I immediately disconnected it and let it dry, but after a full day of drying, the autofocus failed. The iris was working fine and i could take a photo no problem, but I had to keep the lens on manual focus.
I explained my case to the shop when I returned the rental, but a few weeks later after they sent it out for repairs, Canon replied that the lens was damaged beyond repair due to sea water and nothing can be done. They planned to send the lens to recycling and I would have to pay the full price. I agreed, as it was in my possession anyways, but I asked that the lens be returned. So I paid the full price (luckily it had $500 off promo) and took the lens home.
I didn’t really mind it as I already had plans to purchasing this lens, but I couldn’t understand how water damage could damage a lens to the point where it was “beyond repair.”
I opened the lens and found that the parts affected were only the PCB (later I found some salt stains in the USM motor), so I went on eBay where I found an original new OEM PCB assembly for this lens for just $36. Then I got a new USM focusing unit as well (also on eBay) for $90. Total with shipping: $140.
To my surprise I was able to fully fix the lens and it works perfectly fine now. I wrote this step-by-step visual guide on how to fix this lens for any kind of water/focusing damage, or just as a general repair guide for this lens. The weather sealing is rather piss-poor, they use gaskets… but if I didn’t ask for the lens, this would have been a perfectly salvageable lens gone to recycling and I would have paid full price for nothing.
I hope this guide will help you fix your lens one day or even show you how to replace critical components.
DISCLAIMER: Opening up your lens will void your warranty. I am not responsible for any damage you cause by following this guide. Proceed at your own risk.
Step 1

First, wash your hands. Next, be calm and patient. Lenses are precision devices and you need to be patient. Please ensure you have the required tools as shown above.
You will not need to de- or re-solder anything. And please for the love of photography and DIY, use magnetic screws. If one screw slips and falls inside the lens assembly, it will be a nightmare to find it.
PLEASE be very gentle and careful, if something (except Step 4 might require some strength) doesn’t come out easily, you are probably doing something wrong—check that all screws were removed or try turning the barrels to a better position. I apologize, I don’t know the number for these screwdrivers (they’re not marked and they come from a set I had a while back). I put them next to a Canadian 10 cent coin to show the sizes you will need.
This is what a new autofocus unit looks like. I forgot to take a photo of the PCB before assembling this guide, but you will see it below in other pics.
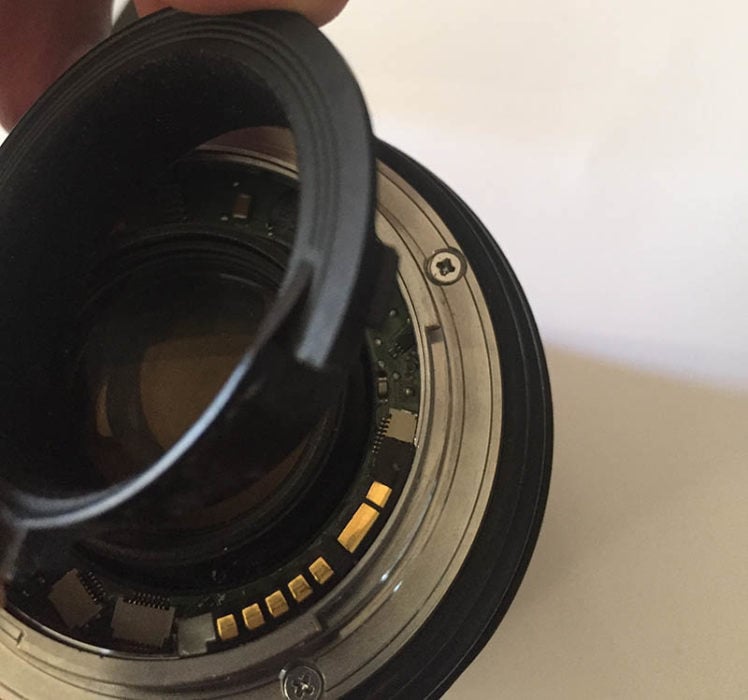
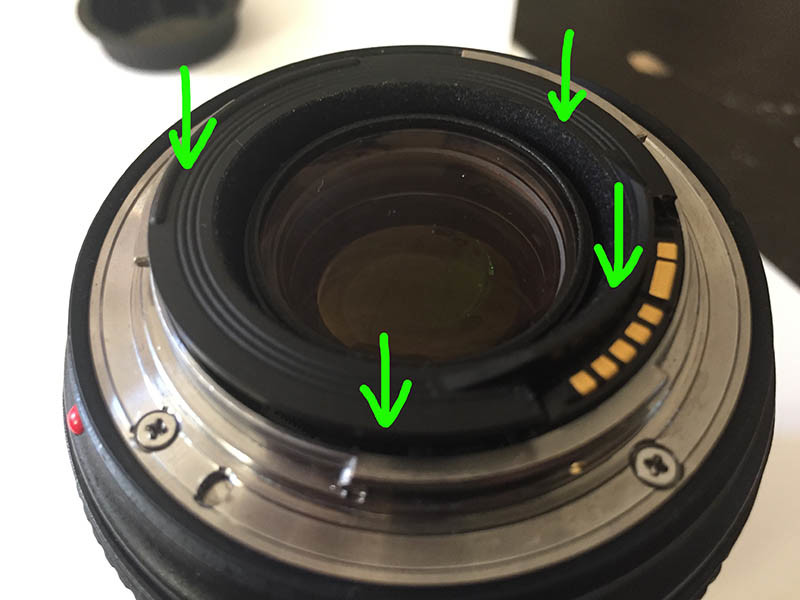
Step 2

Remove the rubber ring by sliding the flat head screwdriver and pull it off.
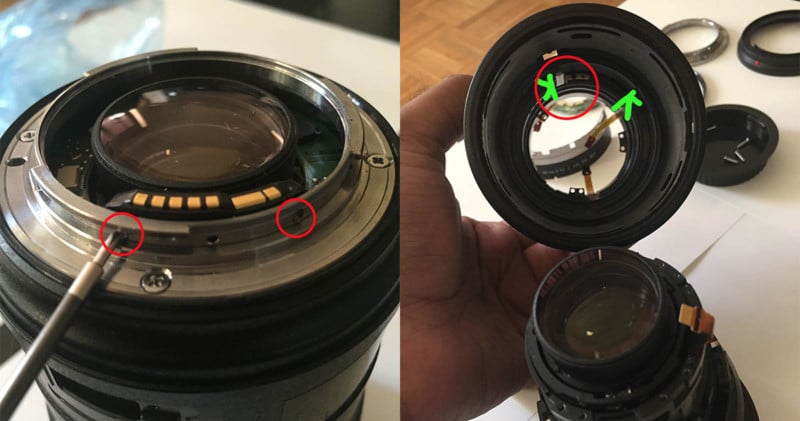
Step 3
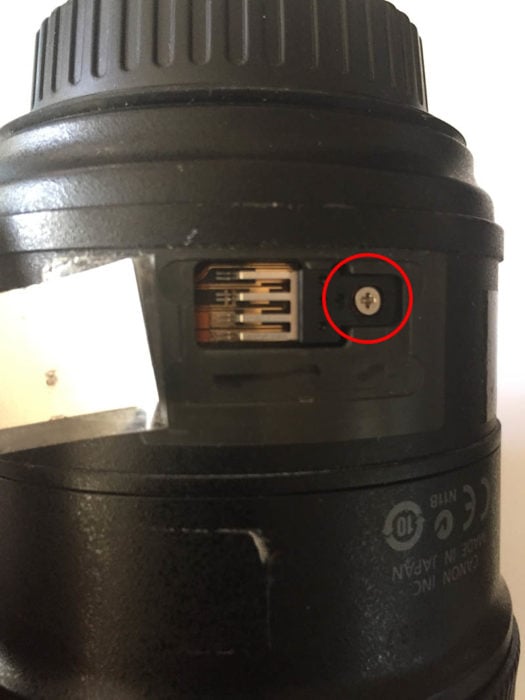
Remove this screw that holds the position encoder. This is hidden under some tape.
Step 4
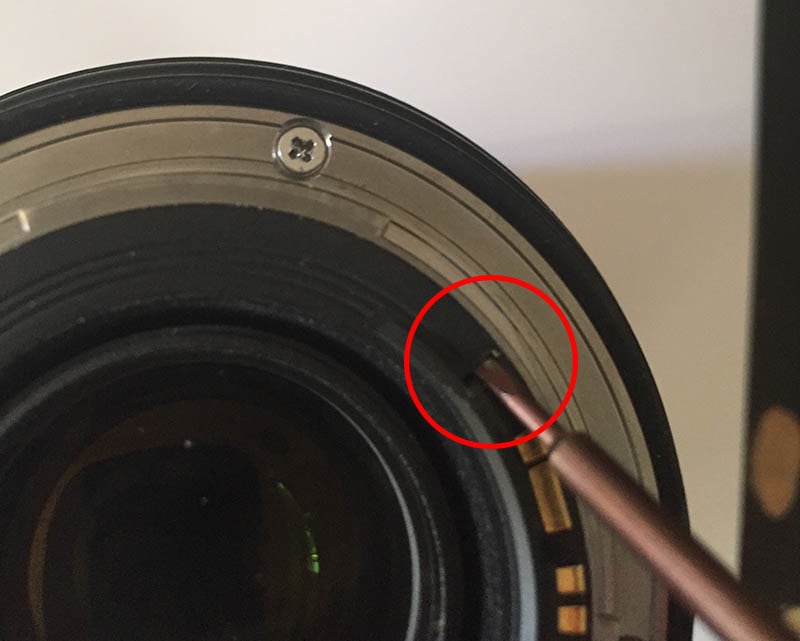
The only part that might be fiddly. Insert the screwdriver between the contact PCB and this plastic cover, then lever it up gently.
Step 5
Remove that peasant cover that uses no screws… grrrr!
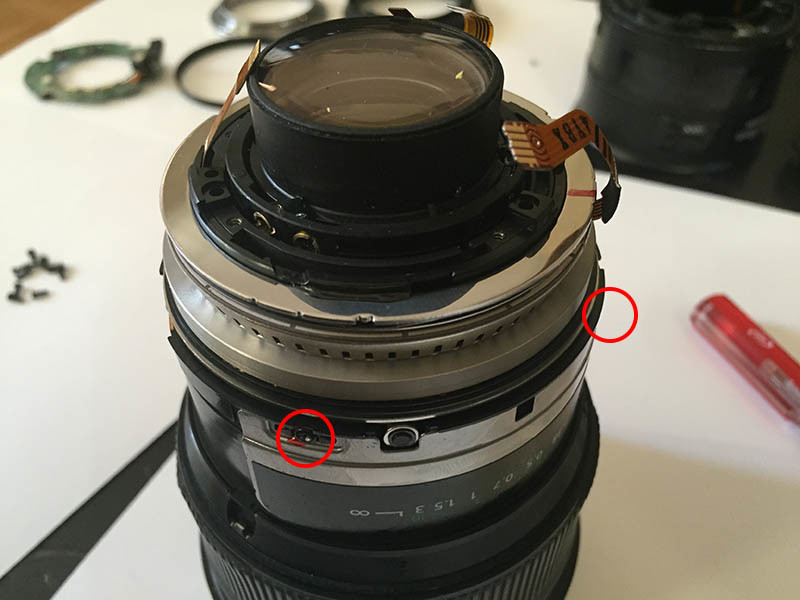
Step 6
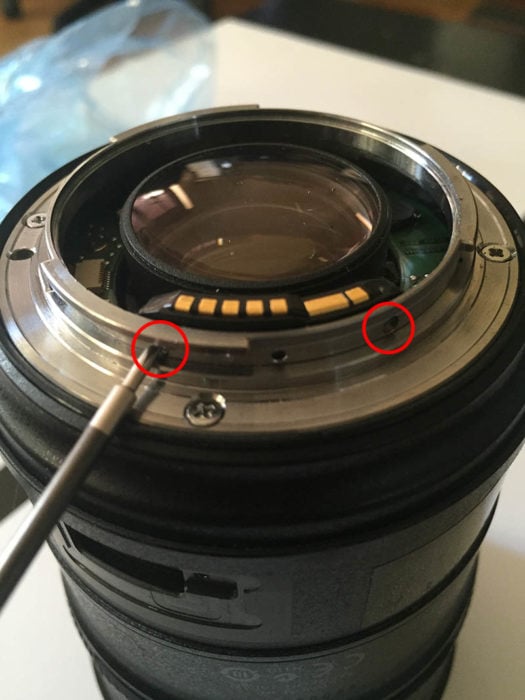
Using the smallest phillips screwdriver, remove these two tiny screws first.
Step 7
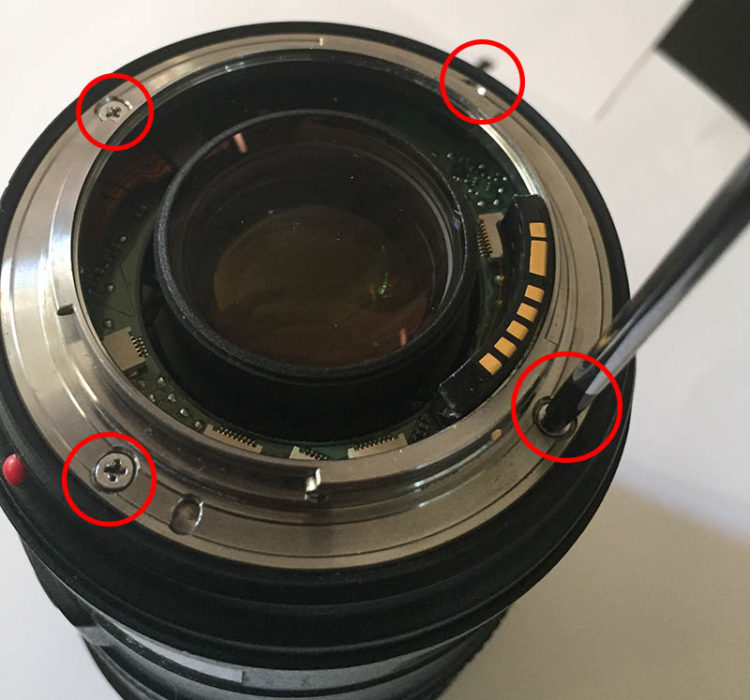
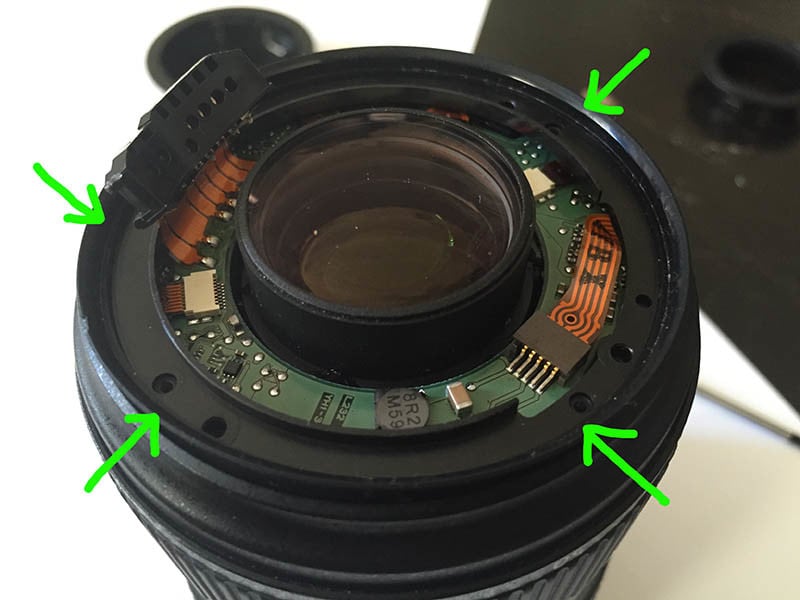
Remove the 4 screws as shown above.
Step 8
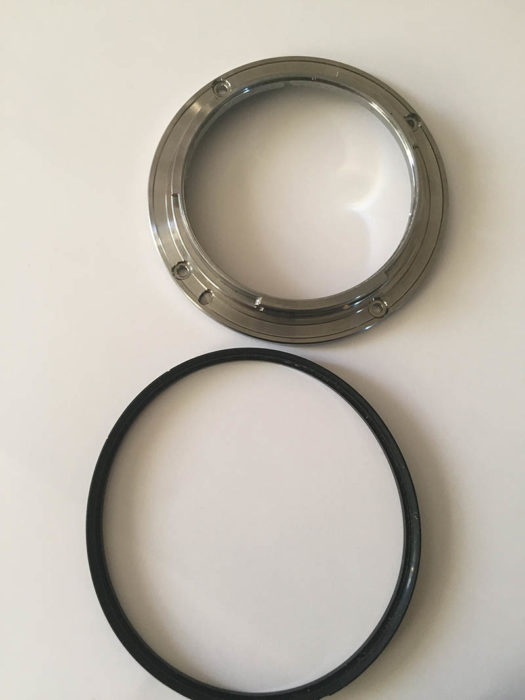
Gently lift off the metal ring, note the “weather seal” gasket will come off as well. Store safely.
Step 9
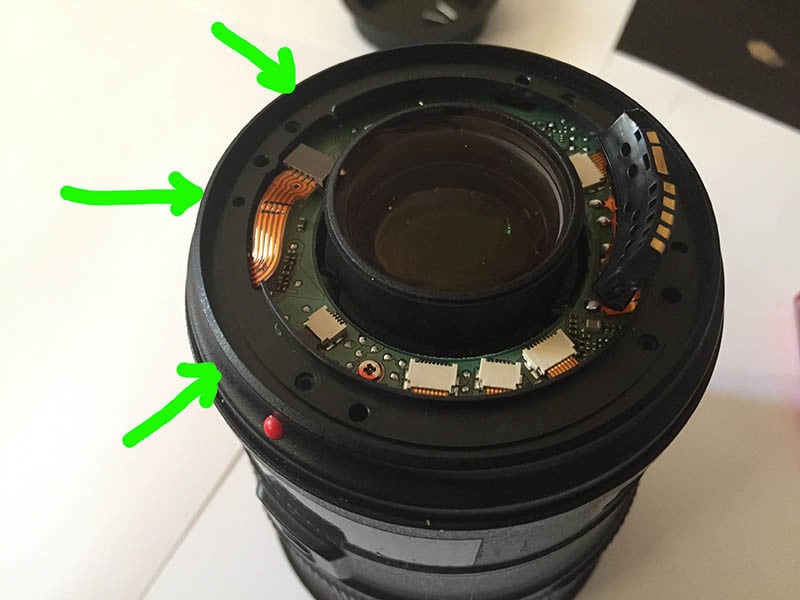
Gently lift off this plastic cover.
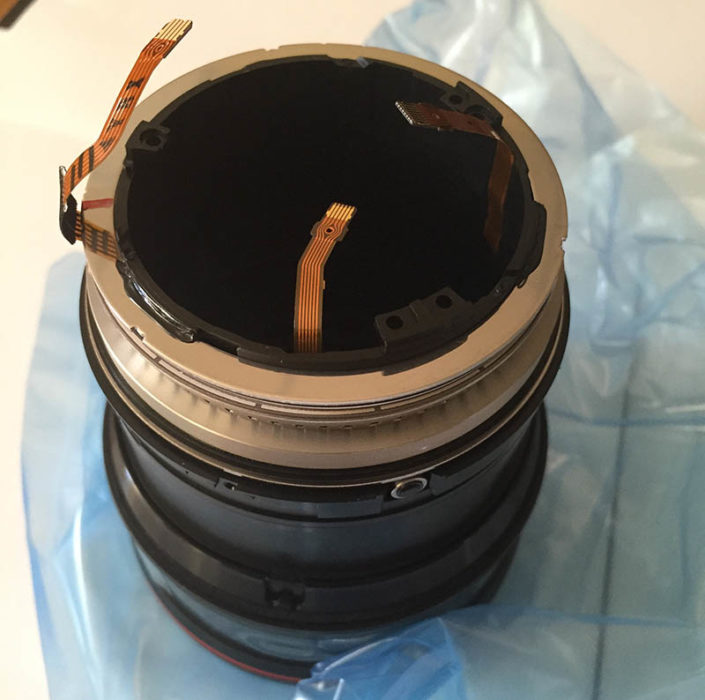
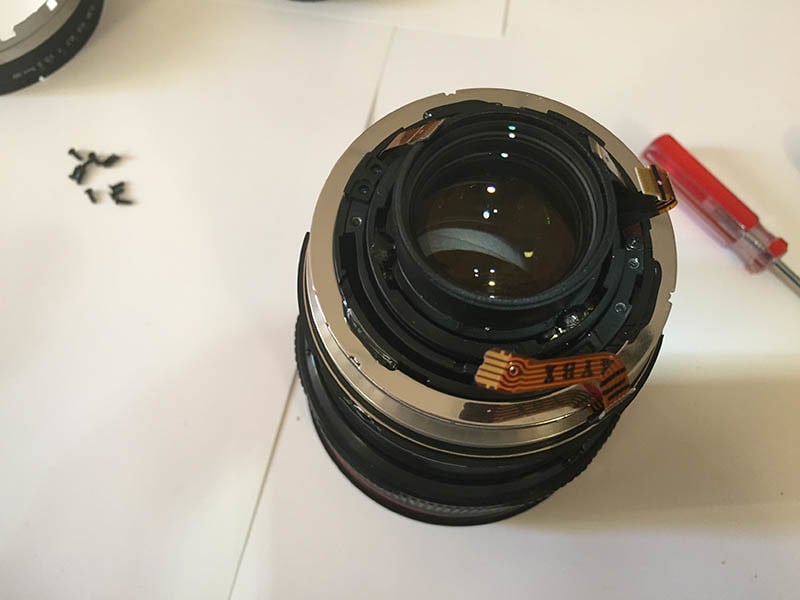
Step 10
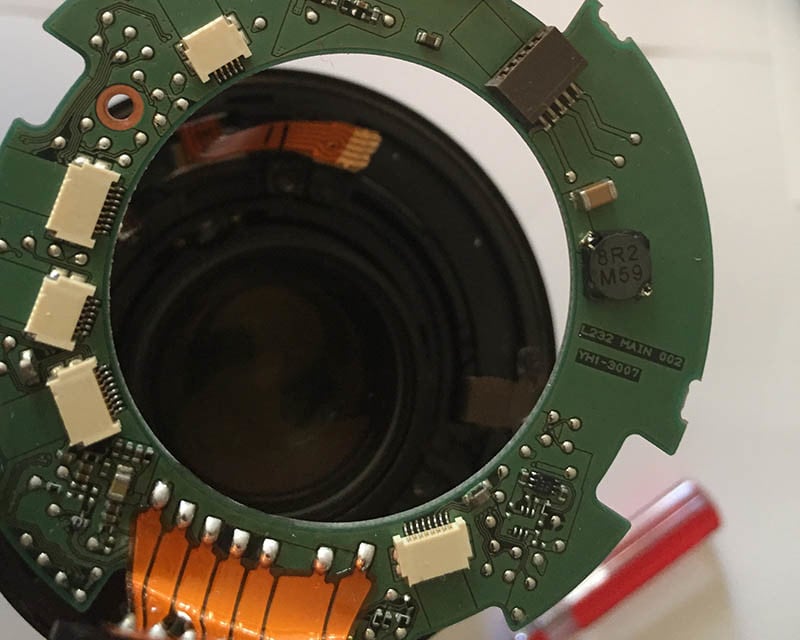
This is the PCB board exposed. Don’t remove the screw yet!
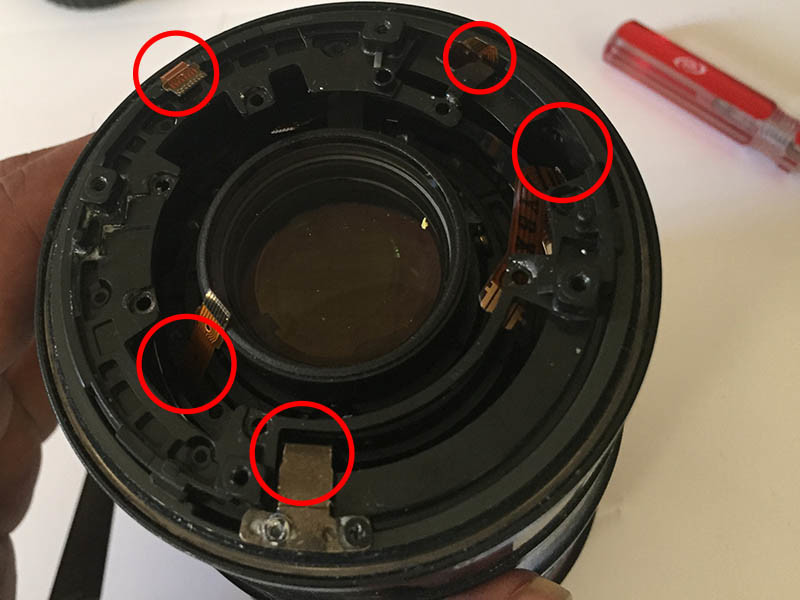
Step 11
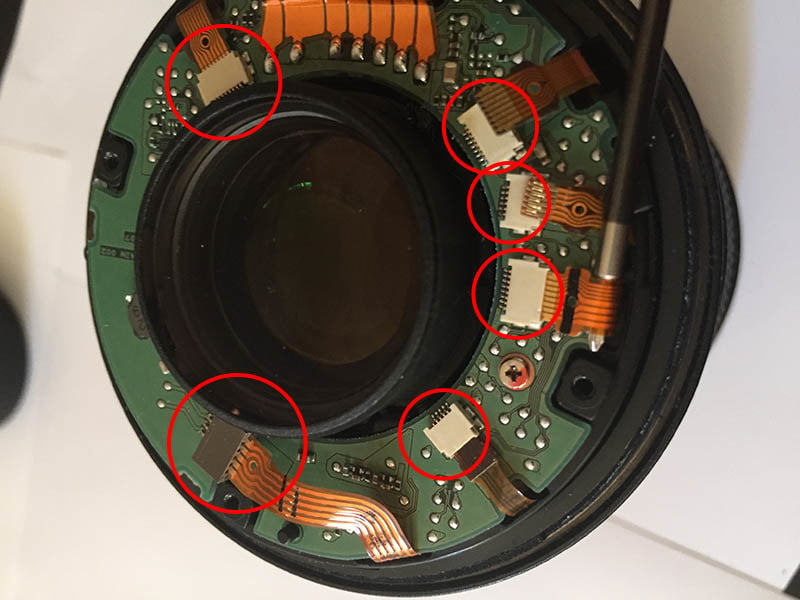
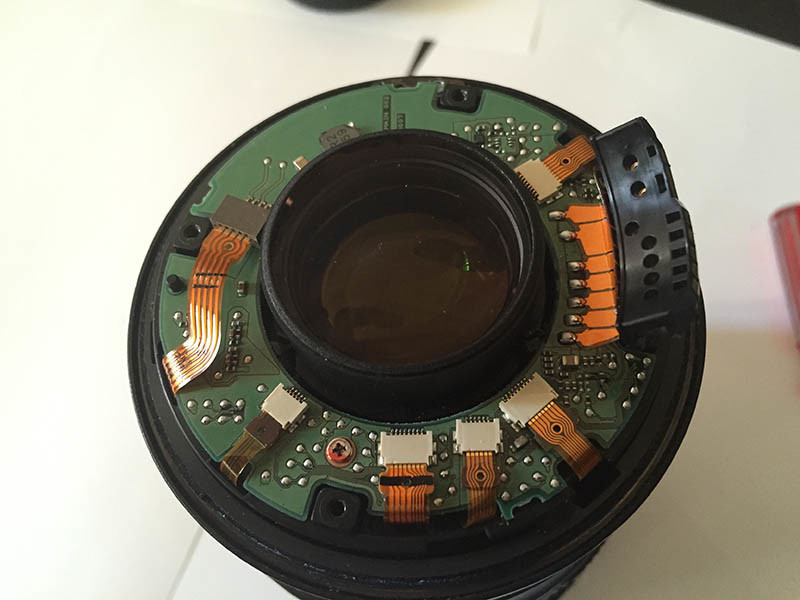
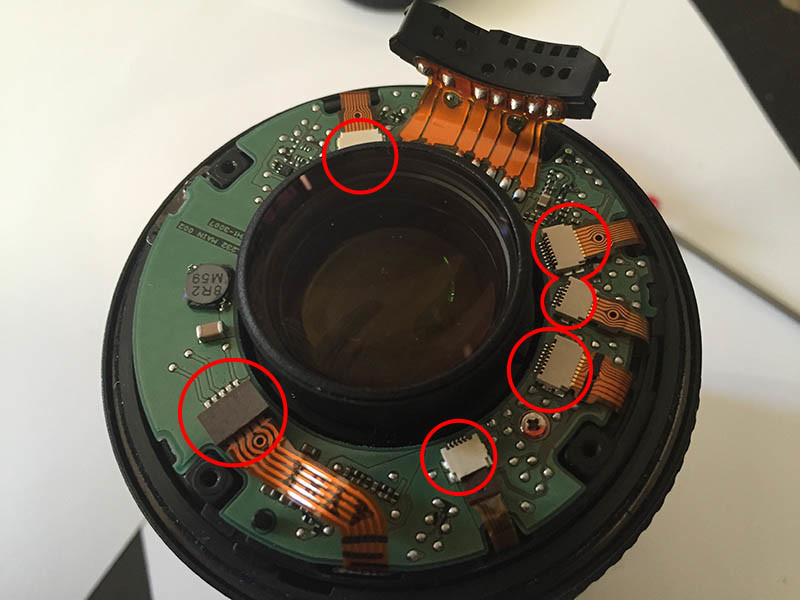
This is nightmarish and the trickiest part. GENTLY remove these princess ribbon cables. Don’t use squeezing tools, you might break it (happened to me in the past) I use this screwdriver trick and gently pull it out perpendicular to the socket.
You can use tweezers, but make sure the tips are rubber coated.
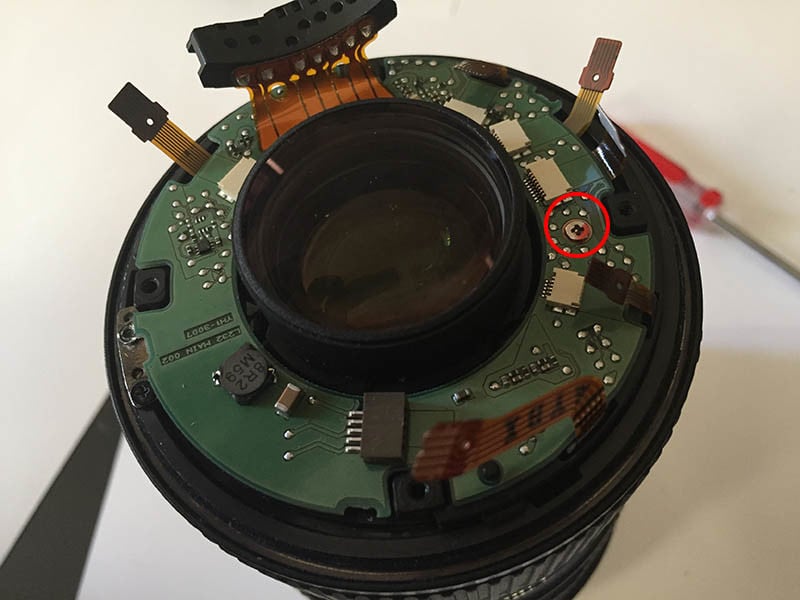
Step 12
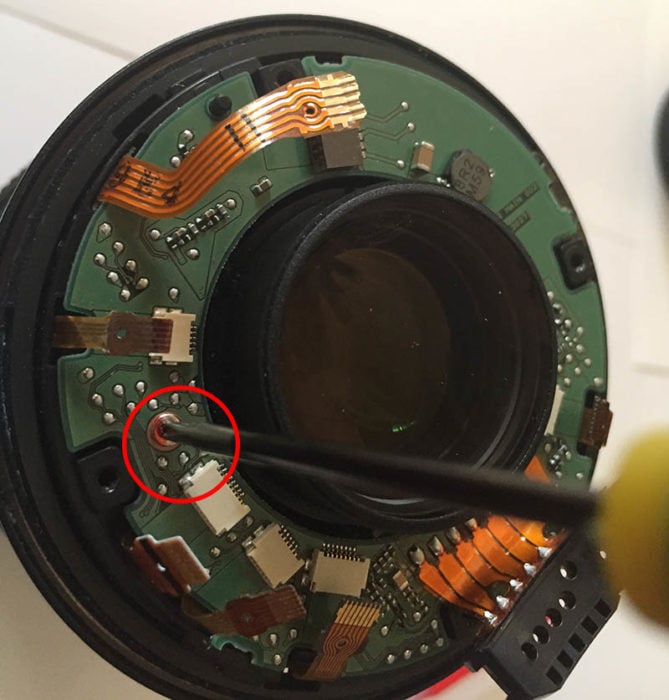
Then remove this screw. Had you removed it first, you could have damaged the princess ribbons since the whole assembly will start moving.
Step 13
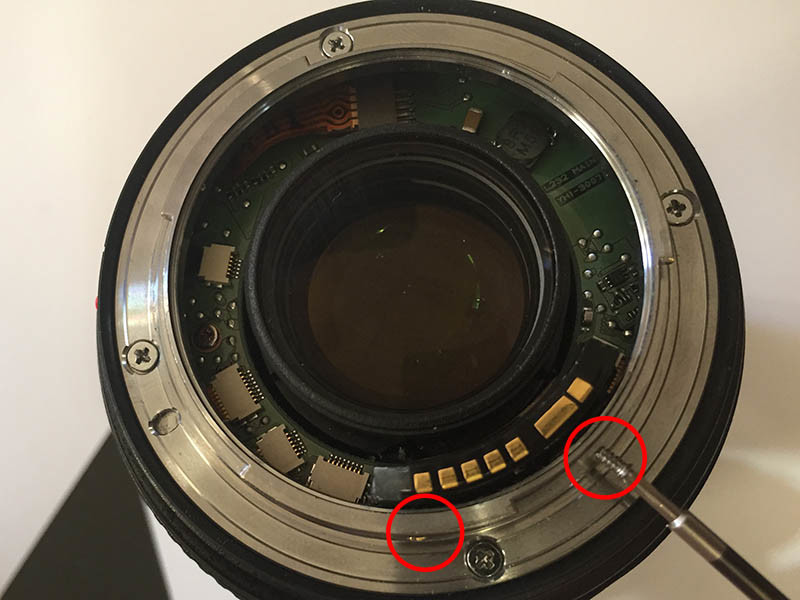
Pull out this out very gently to avoid breaking the princess ribbon cables. (screw ribbon cables, seriously!)
Step 14
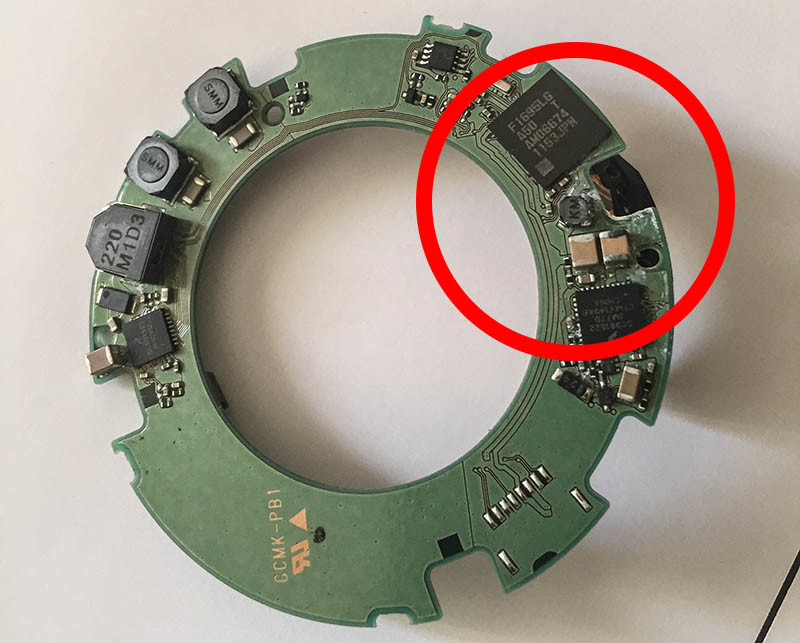
This is where the water got in. Damage is visible… it probably shorted the board’s chip. Chuck this piece away. Funny enough, I couldn’t find any other places with salt water, maybe some stains on the USM motor, but I wonder if I really had to change that part… (Really Canon? This is what you call beyond repair?!)
Step 15
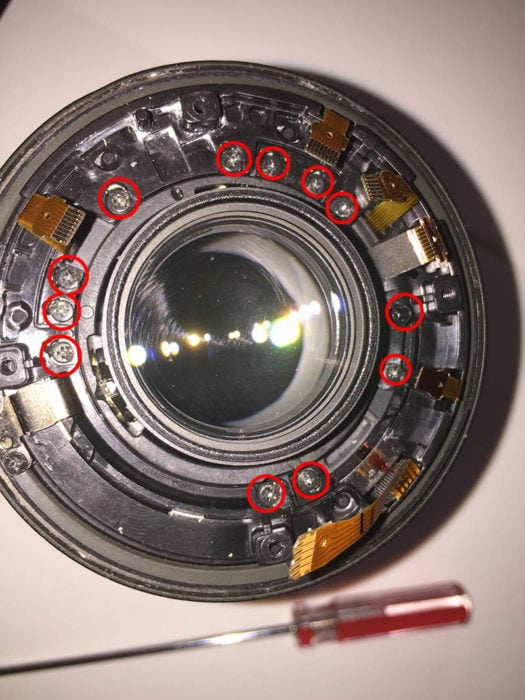
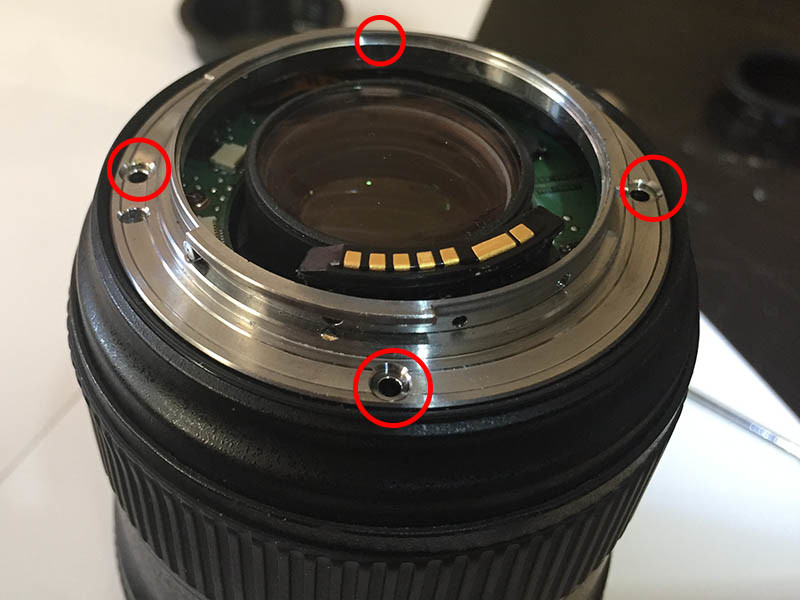
Once the board is removed, you will find 12 screws in a ring. Remove all of them.
Step 16
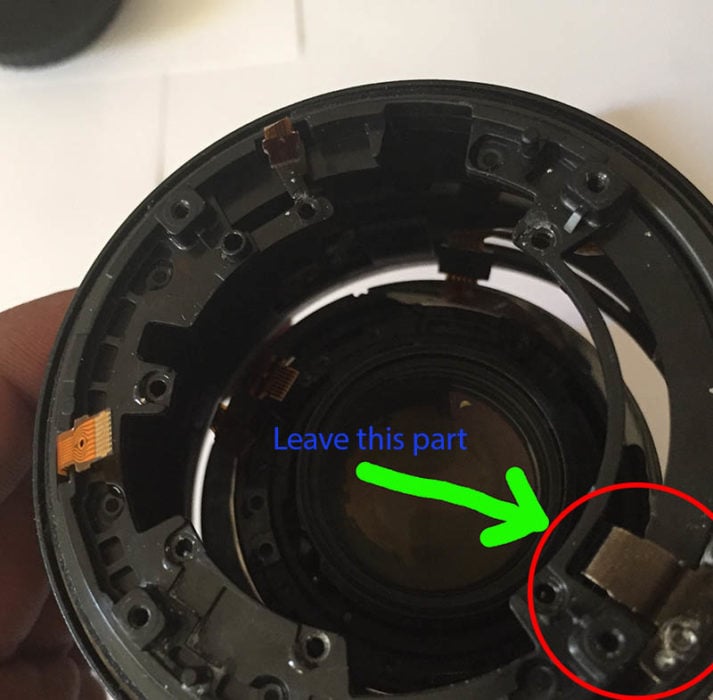
Gently pull out the top cover barrel, that’s where the autofocus switch is. You might have to zoom out completely so it comes off. Leave the part with the metal dip.
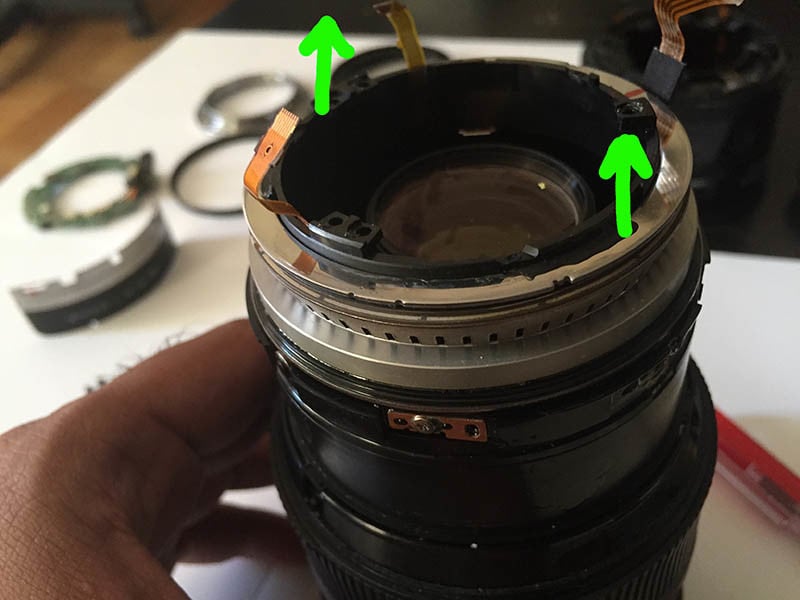
Step 17

The USM autofocus unit is exposed. These two screws hold the focusing plate, remove these 2 screws and the plate and install them in the same location on your new autofocus unit.
Step 18
GENTLY pull out the USM autofocus kit. Then chuck it away.
One day I will test mine with the new PCB… I have a feeling this part is OK but I wanted to make this lens was new as possible so I thought I would put in a new USM motor and explore this lens for the purpose of this guide.
The problem with electronics is that if the motor unit is shorted, it could short the new PCB so I took no risks and changed both.
Step 19
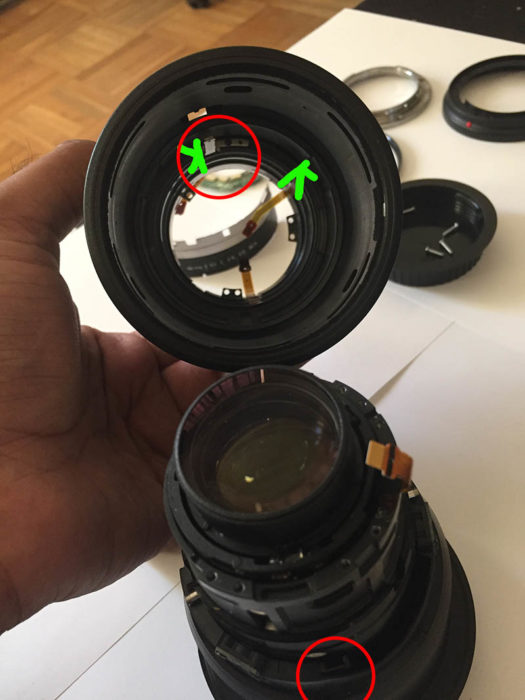
Put in the new autofocus part. Please pay attention to the metal bar in the autofocus unit and make sure it is to the left-most position in its groove as shown above.
When you insert it, it needs to align with the hole in the lens unit as shown above. The autofocus works by moving this bar, which once in the hole, moves the inner lens element to allow for focusing. Simple!
Step 20
This is what it will look like once you assemble the new USM autofocus unit. Take care of the princess ribbon cables.
Step 21
In case you forgot, please make sure you put the focusing plates back on or else you will have to repeat all above steps again.
Step 22
Put back the top barrel cover, the part that has the autofocus switch. Be careful of hurting the princess ribbon cables.
Step 23

Put the position encoder back in its place and don’t forget to put back the tape over it.
Step 24
BEFORE putting the princess ribbon cables back, put the screw in first. This will make sure everything is held down securely.
Step 25
Nightmare, Part 2: Princess Ribbon Insertion. Most of these cables have an extruded part behind the contacts, you can use a screwdriver tip to push each one in one side at a time, or use tweezers to push both sides in at the same time.
Step 26
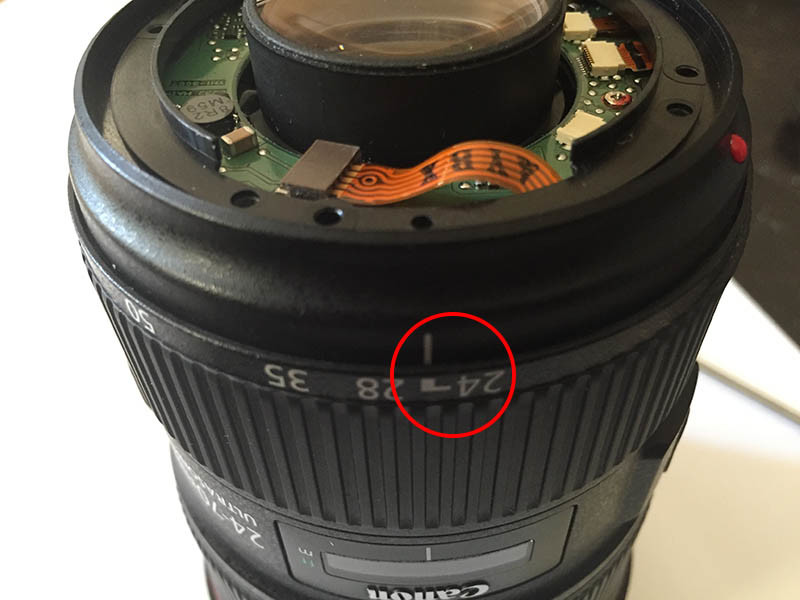
Put back the plastic cover, make sure the line aligns with 24mm.
Step 27
Put the “weather seal” gasket back on.
Step 28
Insert the 4 screws first before the 2 tiny ones.
Step 29
Insert the tiny screws and make sure they are securing the contact board to the metal ring.
Step 30
Put back the peasant plastic cover and test the lens! Phew! We are done and we have a perfectly (electronically new) revived EF 24-70mm f/2.8L II : )
Autofocus Test GIF
Gif showing my tests after changing the parts. Hope you this guide and find it useful! Leave me a note if you have a question.
Here is a link to a RAW file I took today after fixing this lens. No optical errors found, as we didn’t go into the optics, which were fine and pretty well protected. Position encoder worked fine, lens is recognized, EXIF is stored. Mission successful!
About the author: Bimal Ramdoyal is a Toronto-based amateur landscapes photographer and full-time software developer. You can find more of his work on his website, Facebook, and Instagram. This guide was also published here.