7 Steps to Taking Clone Photographs
As a lot of the interviewees we’ve had on PetaPixel have shared, a great way to improve in your photography skills is to experiment. Even though many of the experiments I share on PetaPixel have nothing to do with directly improving your photography skills, they’ve definitely helped me gain a deeper understanding of various aspects of photography, post-processing, and manipulation, and I hope they can do the same for you. Today, I’ll show you how to take photographs of multiple yous. Let’s get started!
Here’s a photograph titled “Clone Wars” that I took in a field behind my house yesterday:

Canon 40D + Canon 16-35mm. f/5.0 and 1/500s at ISO 100.
The difference between this kind of thing and other kinds of photo manipulation is that you’re not trying to add fake people or objects into a photograph that are actually out of place (in terms of things like lighting and shadows). Instead, you’re taking certain parts of real photographs and merging them together. This means the editing can be nearly undetectable if you handle the whole process very carefully.
So, without further ado, the seven steps to taking clone photographs:
#1: Bring the Right Gear
Here’s what you’ll need to bring:
- Camera (see below for requirements)
- Tripod (as sturdy as possible)
- Remote Shutter Release (optional, though recommended)

Believe it or not, you don’t need a fancy schmancy camera or lens. Any camera with a tripod mount, manual focus, manual exposure, and a self-timer should do.
The most important thing you need to focus on is consistency. Many of these steps are ways for you to achieve consistency in your shots, which leads to a consistent looking result. We want every single photograph to be nearly identical to all the others in everything except the person in the shot, and a tripod will help you to do this. It’s very important that the tripod does not move at all through the entire series of photographs.
If you have a remote shutter release, you can bring it along to ensure that the tripod does not move between shots. It’s not necessary though, as long as you’re very careful when pressing the shutter button each time.
#2: Setting Manual Exposure

To keep your exposure identical between shots (assuming the lighting/weather isn’t changing), use manual exposure mode. Since you want everyone in the shot to be sharp, use a higher aperture to increase the depth of field. I used f/5.0, but feel free to go higher.
Once you’ve decided on an aperture, adjust the shutter speed until you decide that the exposure is correct. Adjust, shoot, and view the result until you’re confident that it’s about right. The exposure will apply to all of the photographs, so it’s very important that you nail this step. I might cover how to determine correct exposure in a future post, but for now, just eyeball it.
For ISO setting, try to go as low as you can in order to reduce noise. If you’re taking the photo outdoors in bright lighting, ISO 50 or 100 is probably the way to go.
#3: Setting Manual Focus

Another thing that you want to keep constant in each of the photographs is the focus. Focus on something at an average distance away from the camera (based on where you’ll be located in the shots), and then change your focus mode to manual to lock this focus and prevent the camera from auto-focusing between shots.
#4: Determining Where You’ll Be
Now that you’ve adjusted all the camera settings you need to, you can start thinking about where each of the yous in the photograph will be located.
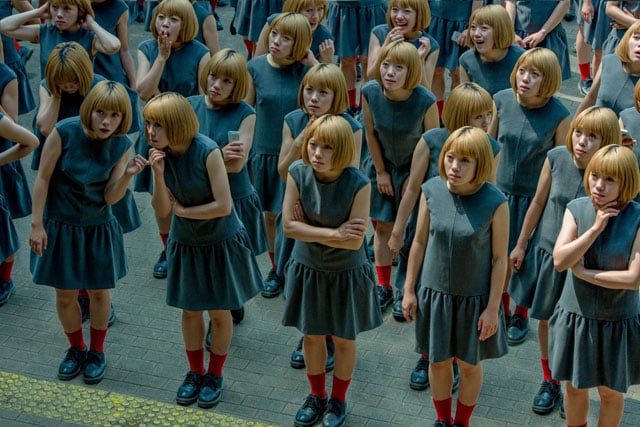
This can be kind of tricky, unless you seriously plan out things ahead of time and mark out locations on the ground or something. For my “Clone Wars” photograph, I simply decided where to go next after each photo, and remembered my location for subject interactions by remembering little “landmarks” on the ground, like a branch or patch of dirt.
I was shooting alone (though a friend would have made things easier), and took about ten minutes from start to finish to capture the shots I needed. The photo is composed of 11 separate photographs, one for every me you see in the picture. Here’s a little montage of the individual photos that were combined to produce “Clone Wars”:

Unless you want to spend an absurd amount of time merging the photographs, try to avoid overlap as much as possible. If none of the yous overlap, then the last step (merging the photos) is a breeze. If they overlap a lot, either toss the particular photo, or brace yourself for some painful Photoshop work.
Finally, try to vary your location and distance from the camera in the photographs to make the scene more realistic. Notice how in “Clone Wars” I sometimes appear right in front of the camera, and sometimes appear pretty far away. Going farther away from the camera also allows you to squeeze more yous into the shot, since you won’t occupy much space in the frame.
#5: Taking the Pictures
Taking the photograph is relatively straightforward.
- Be careful not to disturb the camera
- Start the timer by pressing the shutter button or remote release
- Run to whatever location you determined in Step #4 for this particular shot
- Hold your pose (or get into your airborne pose) as the timer activates the shutter
- Review the photo carefully, and redo it if something is off.
- Repeat until finished
If viewed by themselves, the individual photographs that make up the picture look pretty ridiculous.

Try to find a location where there aren’t many people watching (I was alone in the field). Otherwise, be very comfortable making a fool of yourself.
If you need to jump in one or more of the photographs (like I did for one frame in “Clone Wars”), you’ll need to get used to when to actually jump while watching the blinking timer light on your camera. This can be pretty tricky, and was actually the frame I had to redo the most.
Once you’re done shooting, off to post-processing you go!
#6: Post-Processing the Images
You were careful to keep the framing and exposure consistent in the first five steps, so don’t blow the consistency during this step. If you post-process at all, you must do the exact same modifications to all of the photographs.
I used Adobe Camera Raw (ACR), which allowed me to synchronize my changes across all the photographs.

I’m not sure how you should synchronize the edits if you use Lightroom or Aperture, since I don’t use those programs, but I’m sure there’s an easy way you can do it. If you know, please leave a comment for other Lightroom or Aperture users!
Here’s one of the original images before post-processing was done. Hover your mouse over it to see what it looked like after raw processing and conversion:

If you’re perfectly consistent in your post-processing, the photographs will continue to be nearly identical no matter how much you do to them.
#7: Merging Everything Together
We’re finally here — the step where it all comes together. This is also potentially the most difficult, but shouldn’t be too bad if you managed to keep your people from overlapping in Step #4.
- Choose one of the photographs to use as the canvas on which all the others will be “painted”
- Copy one of the remaining photos into a new layer
- Create a layer mask for this photo
- Fill the layer mask with black to mask out the new photograph. (tip: you can also create a black mask instantly by holding the alt key when clicking the mask button.)
- Using the brush tool, paint white over the area of the new photograph you’re located at. This will reveal you very seamlessly since, aside from your body, the backgrounds are nearly identical (even if wind affects the location of the grass, branches, etc…).
- Continue painting until everything in the new photo you want to reveal is revealed, and nothing looks out of place.
- Repeat until all the yous in all the other photographs are added to the original photo
The final state of the image and layers should look something like this (with each layer except the canvas mostly masked):

There you have it. Once you do it once, subsequent attempts will be less and less difficult and time consuming.
Here are some other “clone” photographs I took during the same afternoon:
“Chillin’ With My Clonies”

“Duck-Duck-Goose”

“Execution”