Capturing Blue Hour in Landscape Photography
The difference between a good landscape photo and an extraordinary one often comes down to one thing: Light. And there’s a magical window of time, called the Blue Hour, that offers some of the most atmospheric, cinematic light in landscape photography. However, many photographers overlook or struggle to fully capture its unique potential.
What is Blue Hour?
Blue Hour is one of the most magical times for shooting landscapes. Many people overlook this unique light period, thinking it’s less dramatic than a vivid sunset or sunrise. But if you know how to use it, Blue Hour can produce some of the most atmospheric and striking images. Photographers who pack up right after sunset may not realize they’re missing out on some of the most beautiful light of the day.
When I shoot landscapes, I always try to maximize the full potential of the location. Recognizing and understanding different types of light allows you to capture a broader range of moods and tell a richer story. This is something I love exploring in-depth with participants during my workshops. It’s always exciting to see them discover creative possibilities with this light.
When we talk about the Blue Hour we’re referring to a very specific time of the day, the Twilight, that happens twice a day—before sunrise (morning twilight) and after sunset (evening twilight).
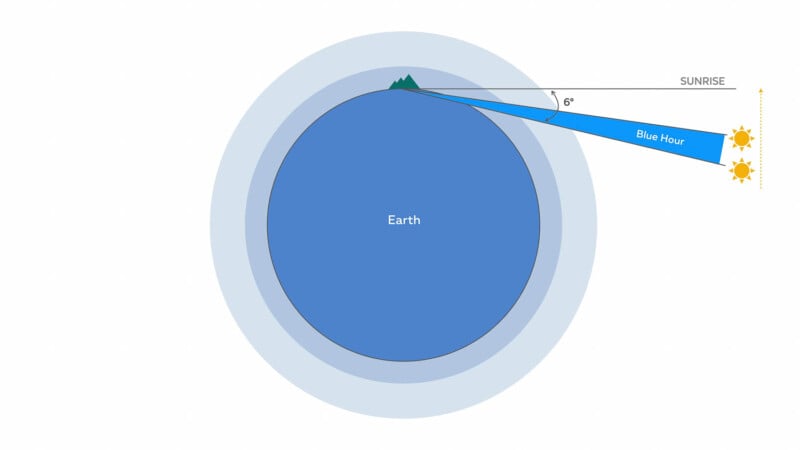
It’s called the Blue Hour because of the deep blue tones that fill the sky during this time. Even though the sun is below the horizon, the indirect sunlight scattered in the atmosphere creates a beautiful, soft, and moody light. There are no harsh shadows, and it has a dreamlike quality, with subtle dimensionality.
But what exactly is twilight?
Twilight Phases
Twilight, by definition, is the period between day and night when the sun is below the horizon, but its light still illuminates the sky. There are actually three forms of twilight: the Astronomical, Nautical, and Civil Twilight. Think of twilight like a dimmer switch gradually turning on or off—it moves from near darkness to soft, subtle light.
First off, why does it matter to know these phases? Each one is important to the outdoor photographer for different reasons. A simple one is that knowing about twilight helps us plan our shots and be in the right place at the right time.
Let me give you a quick overview of the three phases:
1. Astronomical Twilight: This occurs when the sun is between 12 and 18 degrees below the horizon. How far below the horizon is not so much of a matter for photographers, but that’s the scientific definition. The sky is almost completely dark and it starts approximately 1 ¾ to 1 ½ hours before sunrise.
2. Nautical Twilight: The sun is between 6 and 12 degrees below the horizon. The sky is still dark, but the general outline of the ground objects is distinguishable. You’ll get the basic shape of things. It begins approximately 1 1/4 to 1 hour before sunrise.
3. Civil Twilight: This happens when the sun is just below the horizon (up to 6 degrees), usually about half an hour or so before sunrise or half an hour after sunset. And this really depends on where you’re located around the globe. Each area has a shorter or longer Twilight depending on where you are. This is the time that most people think of as sunrise or sunset.
Plan for the Blue Hour
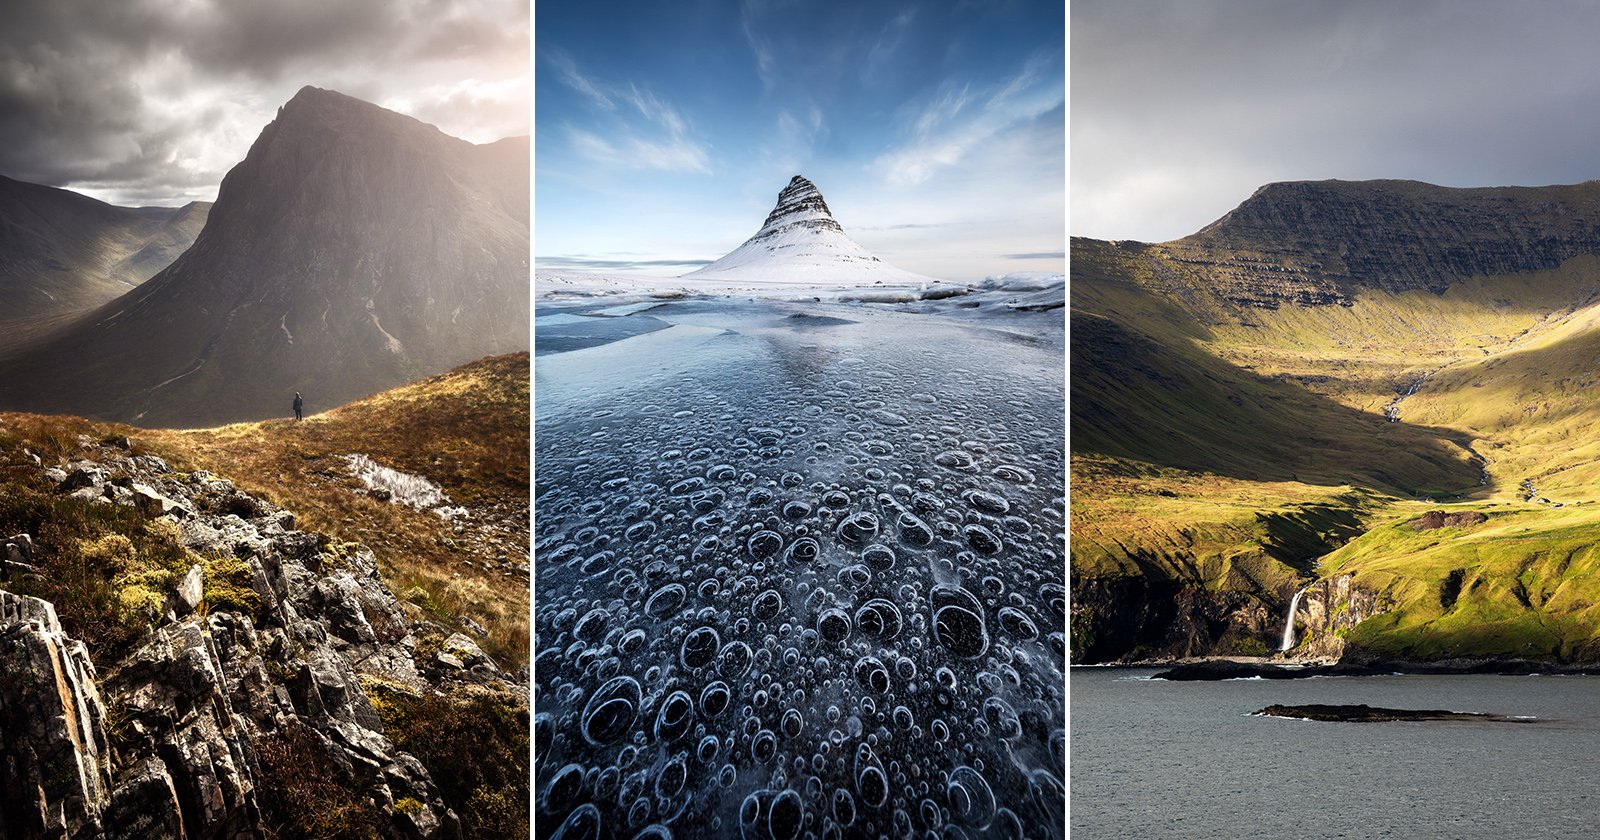
The Blue Hour happens during the civil twilight, so just before sunrise or just after dusk, and often lasts only 15–30 minutes, depending on your location. For example, in higher latitudes, like Iceland and Scandinavia, the Blue Hour can last multiple hours, especially around the summer solstice, where you’ll experience some of the longest Blue Hour conditions. In equatorial regions, the transitions are much quicker, so the Blue Hour and civil twilight are nearly identical in duration. Understanding these location-specific timing differences can help you plan your shoots more effectively, especially when traveling.
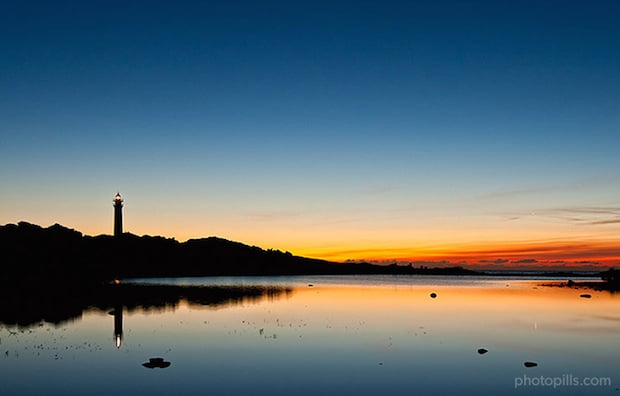
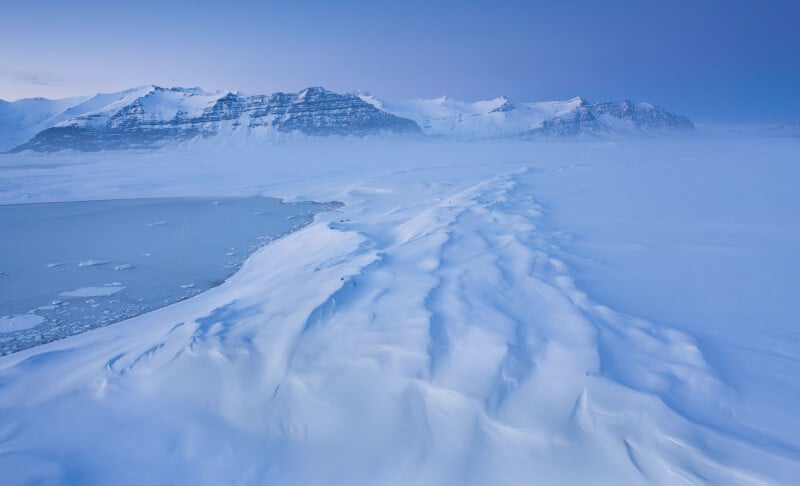
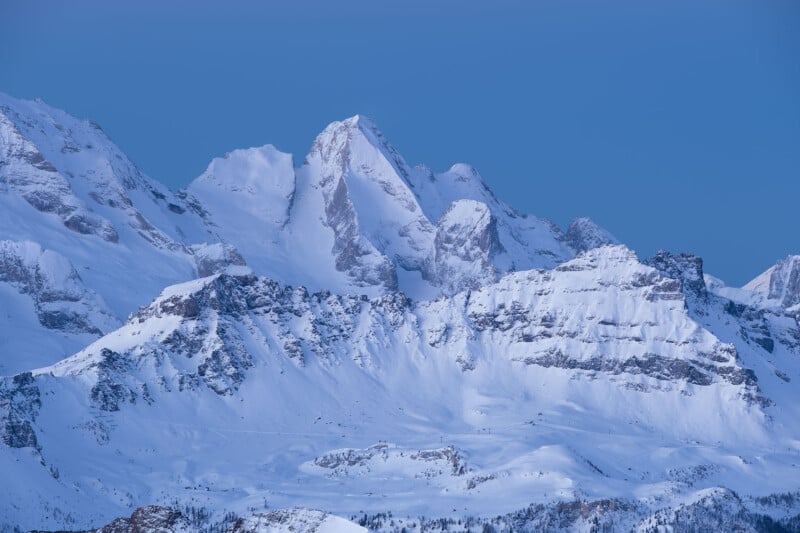
Let’s go over this first example to see how the Blue Hour plays out.
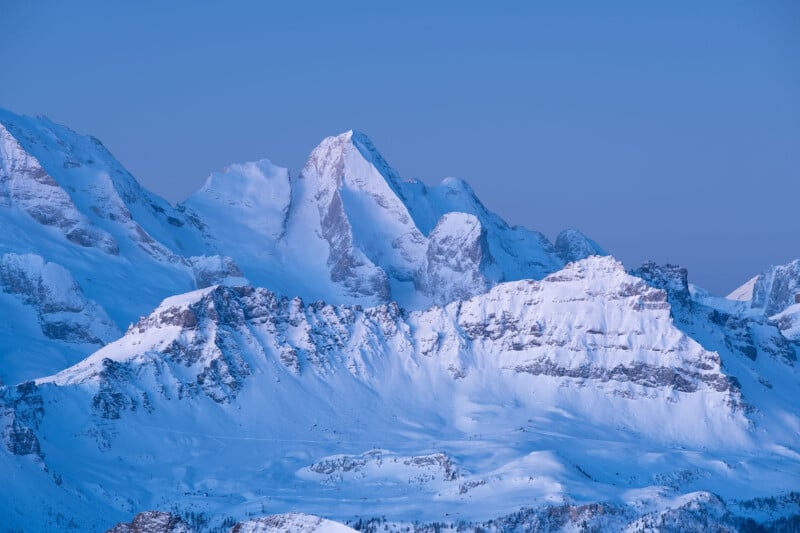
I photographed this scene during civil twilight, using the app PhotoPills to plan my timing. If you are not familiar with PhotoPills, it’s a fantastic app with many different functionalities. The most relevant is the planning feature that lets you pull up a map and see where the sun will be in the sky at any given time and day. It’s also great for planning Milky Way shots because it can overlay where the Milky Way will be in the sky so you can plan what angle to shoot. It really is a fantastic app for landscape and astrophotographers.
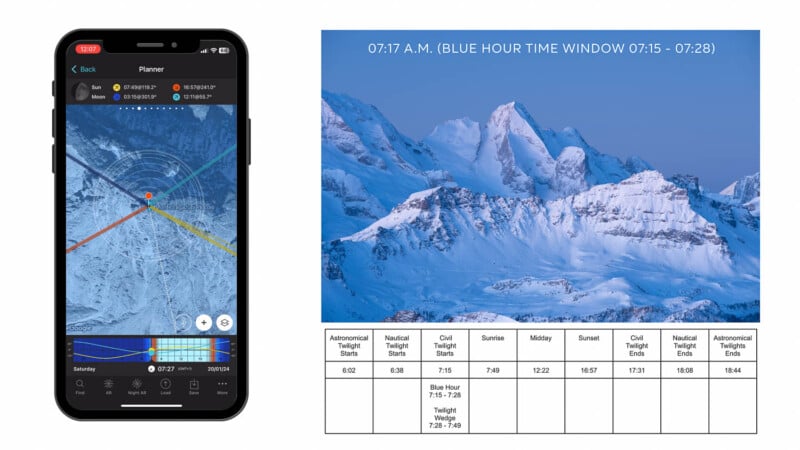
I selected the date and location where I wanted to shoot, and the app gave me the exact times for each phase of twilight.
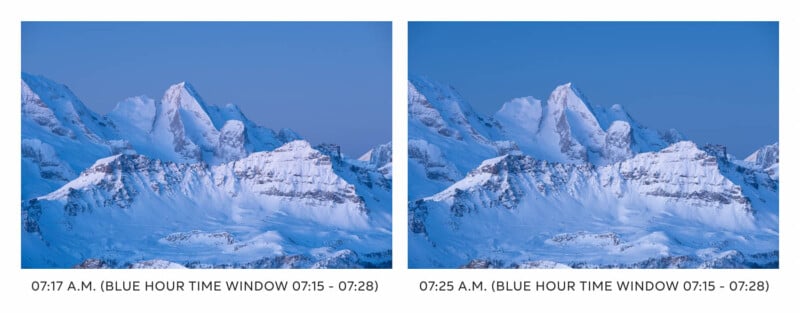
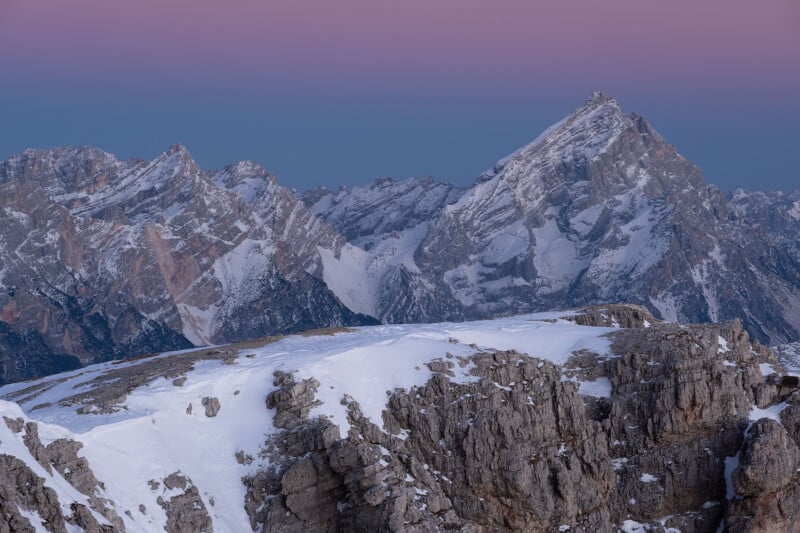
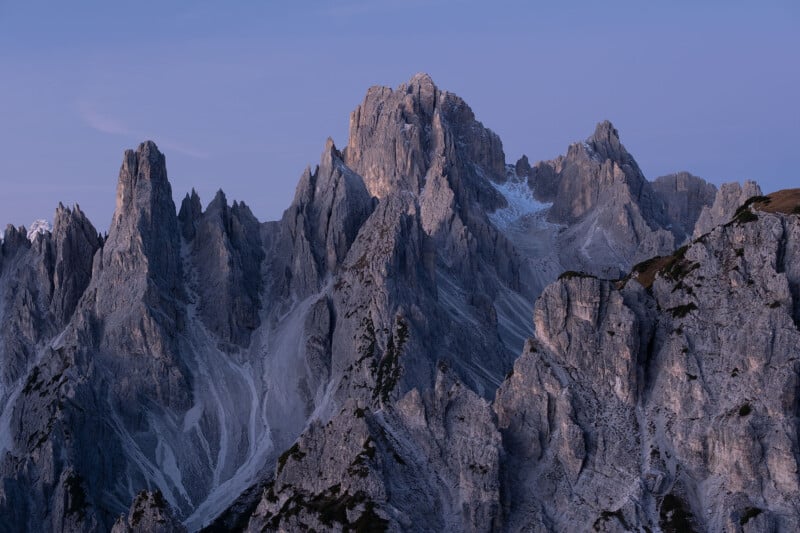
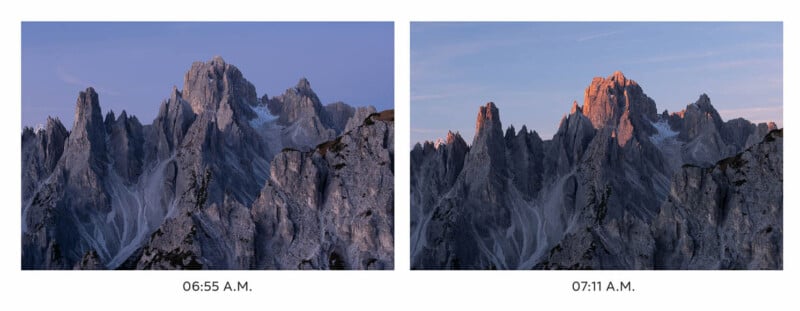
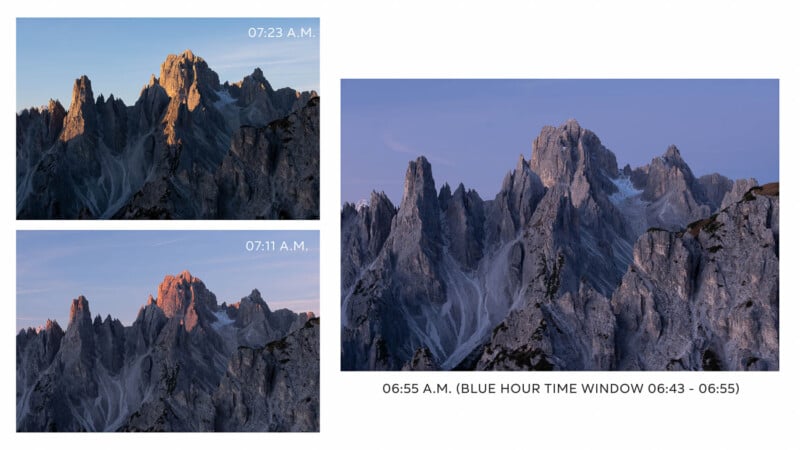
The first shot was taken right at the start of the Blue Hour, between 7:15 and 7:28. At first glance, the first two shots look similar, but there’s a small difference—the first one has a bit more depth, while in the second one, the sky reaches its deepest, richest blue. So, the second shot really shows off the Blue Hour at its best.
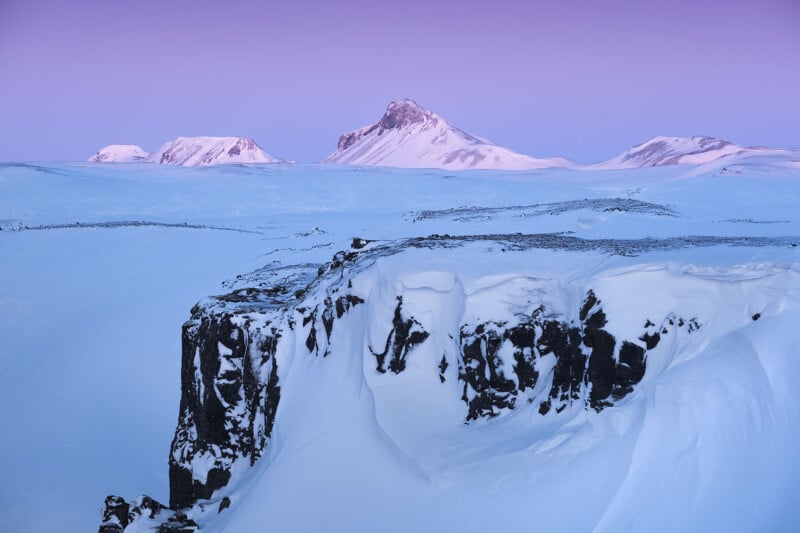
Moving to the third shot—this one was taken just outside the Blue Hour window, and to me, the difference is pretty clear.
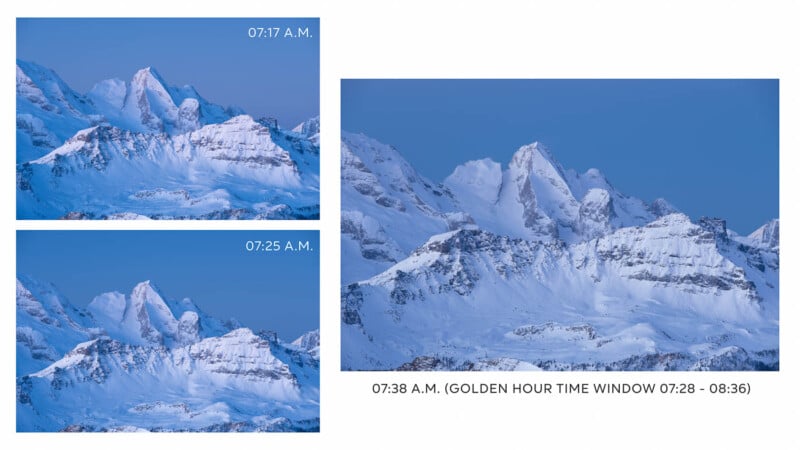
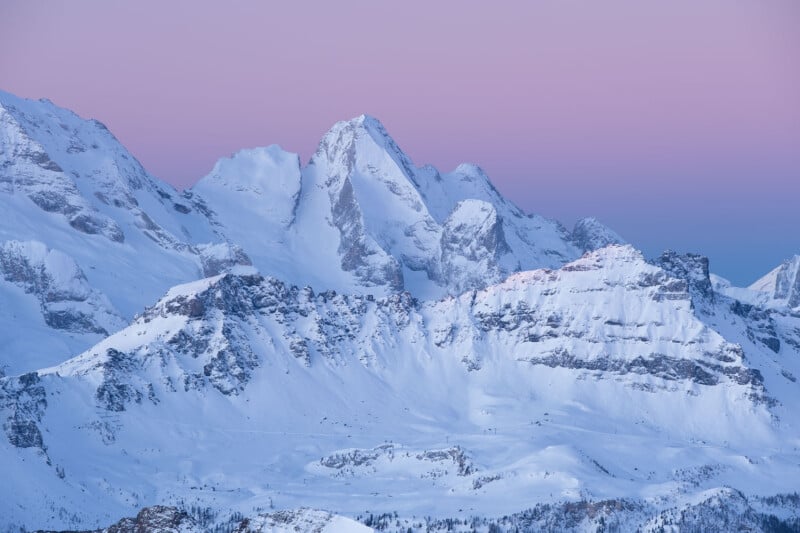
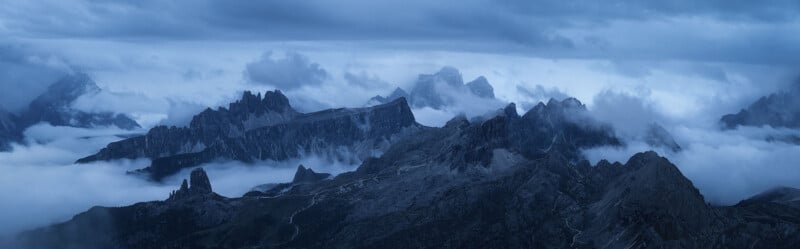
The scene has softer light and less contrast, and there’s a subtle shift towards purple tones. If you look closely at the top of the frame, you’ll start to see a faint pinkish-purple glow forming in the sky. All the images I’m showing here are RAW files with zero edits.
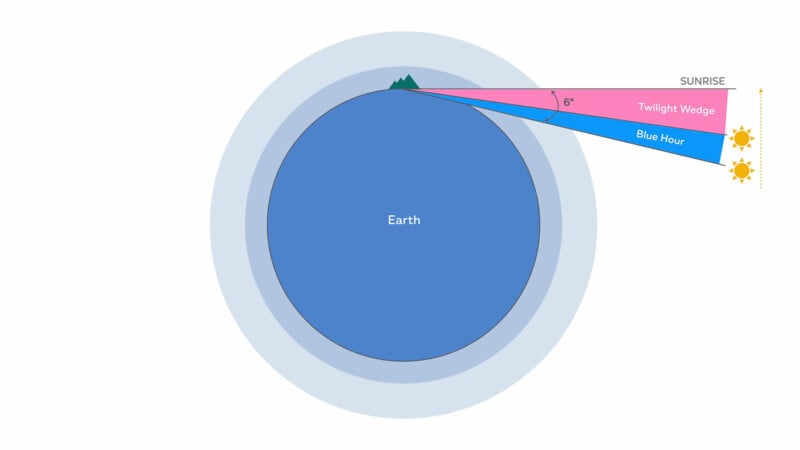
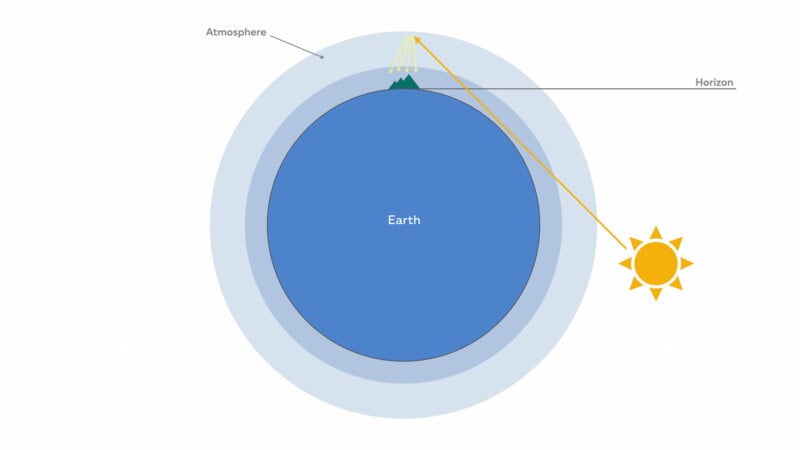
At this point, we’re actually entering a different phase of civil twilight, called the Twilight Wedge—and the fourth shot captures it perfectly. So, what is the twilight wedge? The Twilight Wedge is this beautiful atmospheric phenomenon that happens right around sunrise or sunset.
When the sun is still below the horizon, you’ll see a dark blue and purple band stretching across the opposite side of the sun. The blue band is actually Earth’s shadow, projected onto the atmosphere. The shadow is blue because no direct light is reaching that part of the atmosphere. The only light you see coming from the direction of the shadow is the blue light scattered from the beam of direct sunlight reaching the atmosphere above.
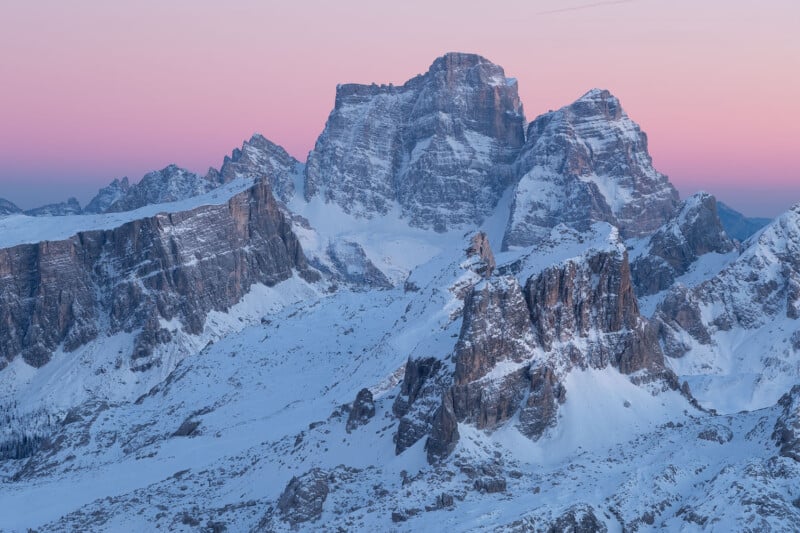
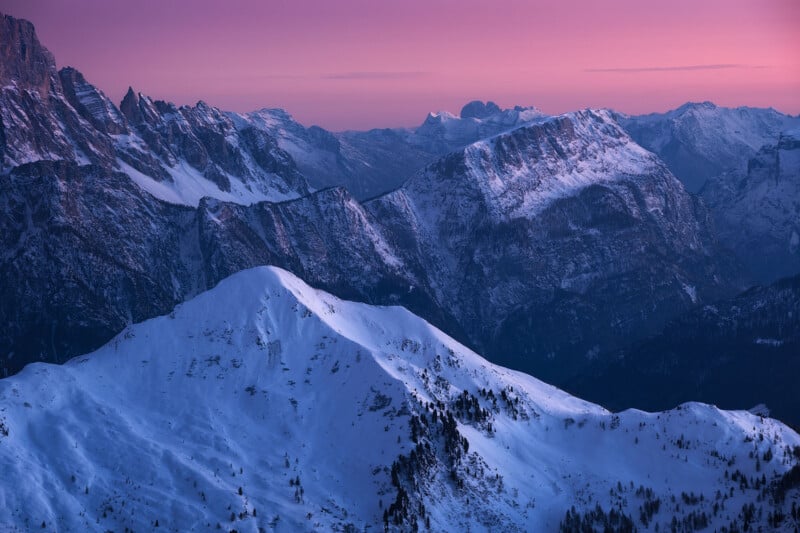
As the sun gets closer to rising, this shadow slowly sinks down toward the horizon, while the sky in the east starts glowing with warm tones. The purple/pink band is called the Belt of Venus, and it’s caused by sunlight scattering in the upper atmosphere.
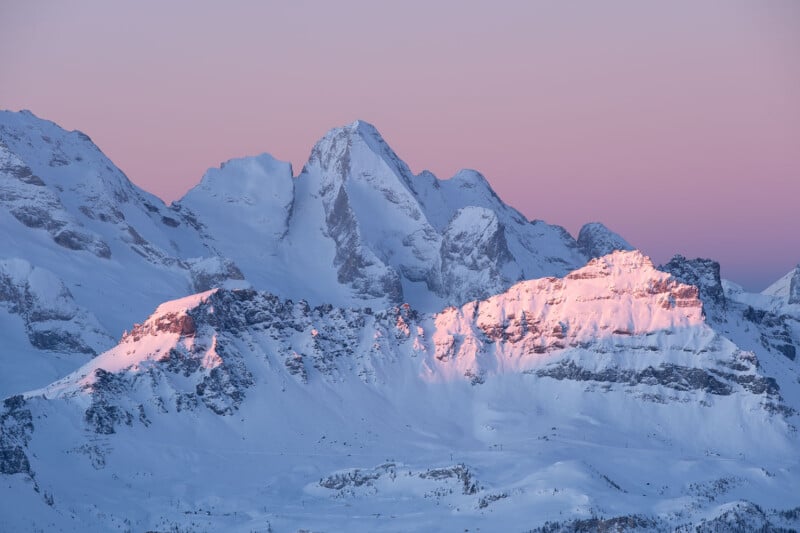
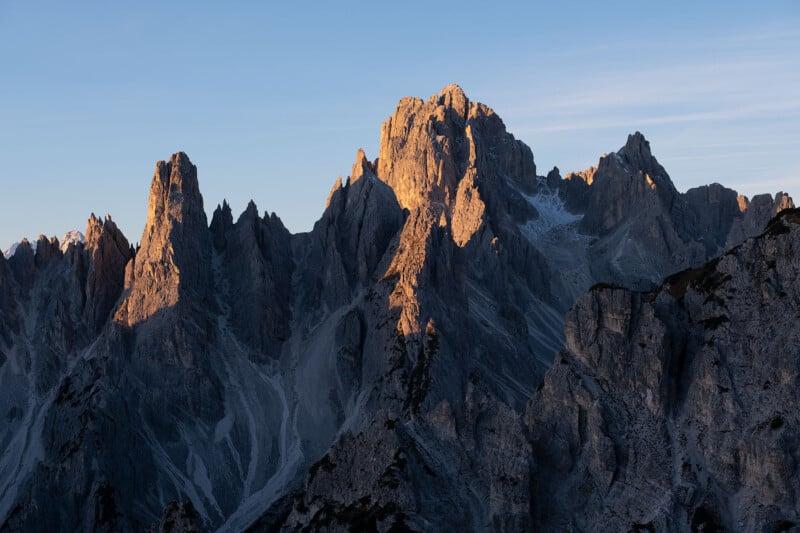
The last shot, taken at 7:52 a.m. during the sunrise, shows a beautiful alpenglow with the first direct light hitting the peaks. At the same time, the Earth’s shadow is vanishing completely below the horizon, and the sky gradually loses its vibrant purple-pink hues and starts shifting to pale blues.
Of course, everything we’ve seen so far happens in reverse during sunset.
Bare in mind that where you point your camera during this time significantly impacts the composition and colors you capture:
- Looking west before sunrise (or east after sunset), it is where the blue sky has a deeper hue, and the Twilight Wedge is most pronounced.
- Looking east before sunrise (or west after sunset), the colors transition from deep blue at the top to golden, orange, and sometimes red near the horizon as the sun’s first (or last) light scatters through the atmosphere.
Additionally, since the darkest part of the sky after sunset or before sunrise is always 180 degrees away from the sun, a composition that works beautifully for sunrise might not be ideal for sunset, and vice versa.
The sky near the sun’s setting or rising point has a distinct quality of light compared to the opposite side. And it’s very easy to miss great opportunities if you don’t move around to see how the light interacts differently with your subject from different angles.
Keeping this in mind, understanding exactly where the sun will rise and set in relation to your subject is absolutely crucial for planning your shots effectively.
Blue Hour: 3D Effect Light
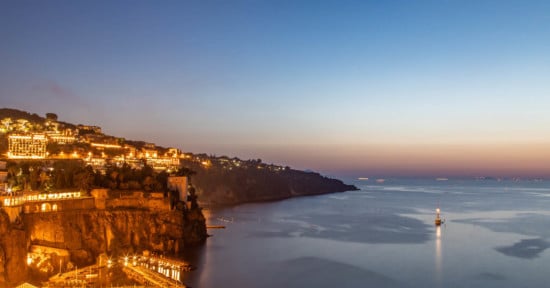
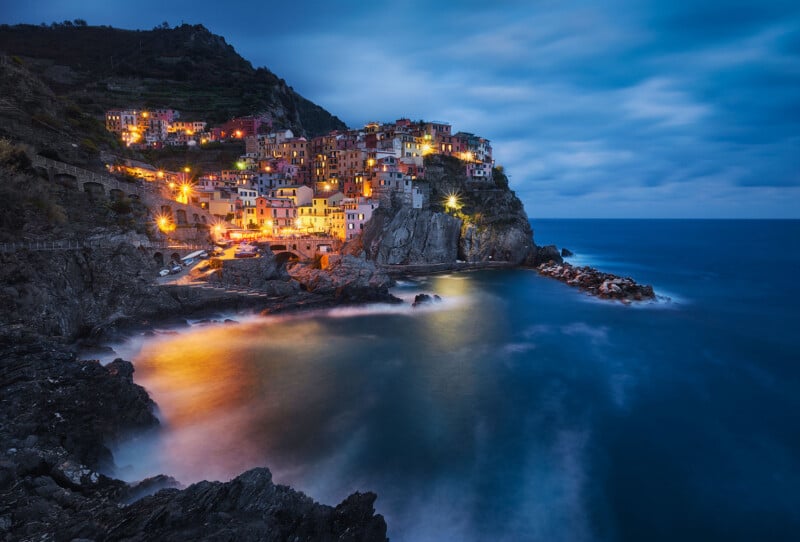
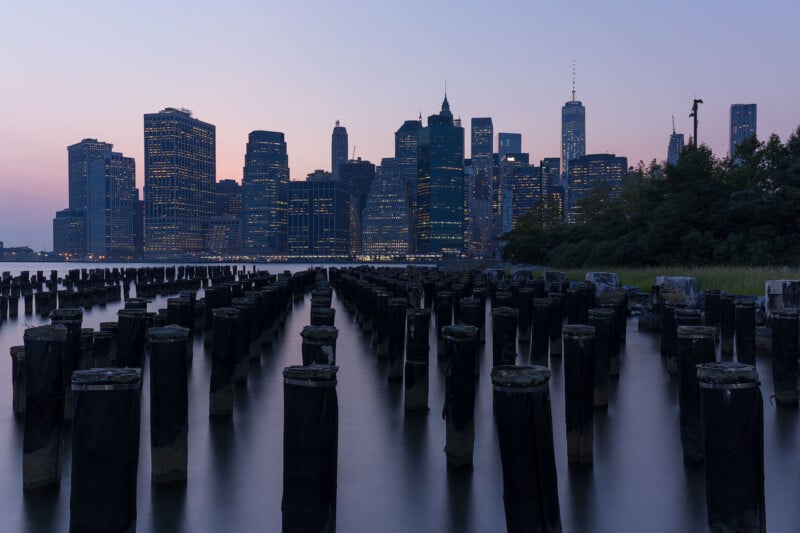
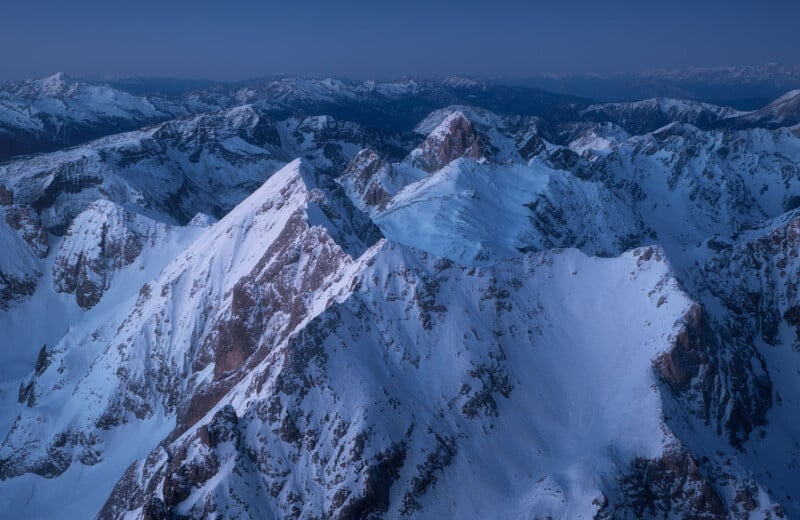
Here’s another quick example from a different location—this time, I was pointing my camera toward the south. You can tell because of the soft side light coming from the left.
This first shot was taken right at the end of the Blue Hour. You can see that the sky is still uniform, but the color is already shifting from deep blue to more of a purple tone. I love the directionality and how soft and diffused the light is here. It has beautiful contrast and dimension. The shadows and highlights are well-balanced, so we can see all the details clearly.
A common mistake that I also made myself early in my landscape photography journey was thinking that Blue Hour light is just soft and even, without any direction. But that’s not really the case—it still has directionality, just in a more subtle way than Golden Hour.
In the second shot—taken fifteen minutes later, during the golden hour when the sun already crossed the horizon—the light has changed completely. The shadows lose some of their 3D effect, while the highlights become brighter, increasing the overall contrast.
And finally, in the third shot, we’re still in the golden hour, but now the contrast is even stronger. The shadows are deeper, and the entire scene has a completely different mood.
Now, you might have heard people say that the Blue Hour lasts the entire twilight period, but that’s not quite right. As we’ve seen, Blue Hour is just one specific part of it.
That said, it doesn’t mean you can’t capture beautiful shots throughout the entire twilight period. Personally, I love shooting all the different phases because each one brings something unique to the landscape. The light changes constantly, and it gives you a chance to experiment with different moods, contrasts, and atmospheres. So, planning ahead is key if you want that soft, dimensional light. And, again, the timing really depends on the location and the time of year.
Tips for Photographing the Blue Hour
A few considerations about capturing the Blue Hour:
- 1. As we’ve seen, the first one is to know where the sun will be setting. There are some really useful photography planning apps that help you check where the sun will be and when it will rise or set. I’ve been using PhotoPills for years to plan my shoots. It costs about $10, and it’s worth every penny. Other good options include The Photographer’s Ephemeris, which has a web version with some free features, or you can get the full mobile app for around $10.
- 2. Camera settings-wise, there is no magic formula for camera settings during the Blue Hour. Exposure is usually pretty straightforward since we don’t usually deal with a super extreme dynamic range. Just remember that in low light, you’ll need longer shutter speeds—a few seconds or even minutes—to capture enough detail without noise.
- 3. That’s why a solid, sturdy tripod is essential to avoid camera shake and keep your images sharp.
- 4. To avoid any extra tiny vibrations that could blur your shot, I always use a remote shutter release or just set my camera’s 2-second or 10-second timer. (Remember to turn off the self-timer beep, please!)
- 5. Another important thing. Low light can really mess with your autofocus, often giving you slightly soft images. I prefer switching to manual focus and using focus peaking to make absolutely sure everything is tack sharp.
- 6. For white balance, I stick with the Daylight preset to get those beautiful, natural blue tones that stay consistent across all my shots. I’ve got a whole video about my approach to setting white balance for landscape photography on my channel.
- 7. Lastly, my go-to accessory is the polarizer filter – it darkens the sky to add drama and cuts through haze to boost contrast. I use it for 99.9% of the images I take with the telephoto lens. Just be careful not to overdo it, or your sky will look unnaturally dark. I always recommend capturing a few versions of the same scene with different levels of polarization, so you can easily choose your favorite one later on your computer. Personally, I use the Maven Magnetic Polarizer Filter—it’s by far the best I’ve ever used in terms of polarization strength without introducing any color cast. So, I highly recommend it.
About the author: Andrea Livieri is a Venice-based professional photographer, educator, musician, and spirited adventurer. He started exploring the photography medium by capturing images of fellow musicians, their families, and other friends and acquaintances in the music industry. As he continued honing his craft, he merged his love for photography and exploring the outdoors, enabling him to amass lots of photographic work of delightful scenery, rugged mountainscapes, and exhilarating terrain. He also leads photography courses, workshops, and tours to teach other photographers his methods and help them to bring out their own visions. For more from Livieri, you can follow him on his website and Instagram and subscribe to his YouTube Channel. This article was also published here.