PhotoPills: A Photographer’s Guide
PhotoPills is a planning tool to help you create images of the Sun, Moon, stars, meteors, and more. It can help you decide the best place to focus for maximum depth of field and calculate the correct exposure when using a neutral density filter to blur water, clouds, and other subjects. What’s more, you can use it from anywhere in the world with an Internet connection to plan a photo shoot anywhere else in the world.
In this article, I’m focusing on the key features to get you started. Once you get some experience with those you’ll be able to dive into the rest on your own. The article is split into three parts:
I. Getting Started. This covers a quick setup and basic navigation through PhotoPills.
II. How to Plan Photographs with PhotoPills. This section is for people who want to jump right in and get started and learn how to do some of the cool things you can do with PhotoPills. It takes you step-by-step through the planning process for some of the most popular types of photos, including Milky Way, Sun/Moon, meteor shower, star trails, and more.
III. The Planner. The Planner is the heart of PhotoPills. The Map, Panels, Timeline, and Buttons have a lot of useful features and information buried inside. This section details what they are and how to use them.
Table of Contents
Part One: Getting Started with PhotoPills
I suggest you open up PhotoPills and follow along. Doing is the best way of learning.
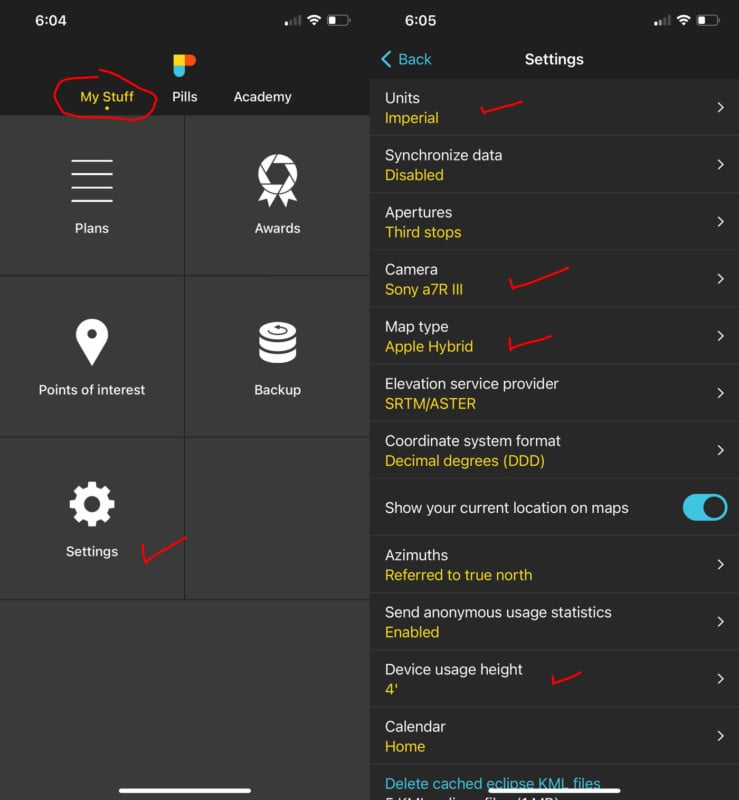
1. When you open PhotoPills you’ll see the PhotoPills logo at the top of the screen and three menu items right below it: My Stuff, Pills, and Academy. Click on “My Stuff” and then “Settings”.
The only things you need to check now in My Stuff are the options for Units, Camera, Map Type ad Device Usage Height.
- Units. Choose either Metric or Imperial. Most of the world uses the metric system. The U.S. uses the imperial system.
- Camera. Select your main camera. You can change this when using some of the other Pills.
- Map type. Pick which map you want to use: Google, Apple, satellite, etc.
- Device height. Enter the typcial height of you’re phone when using it. This helps calibrate the Augmented reality options.
Cycle through the other options under Settings, but there’s no rush. The default settings won’t hurt you.
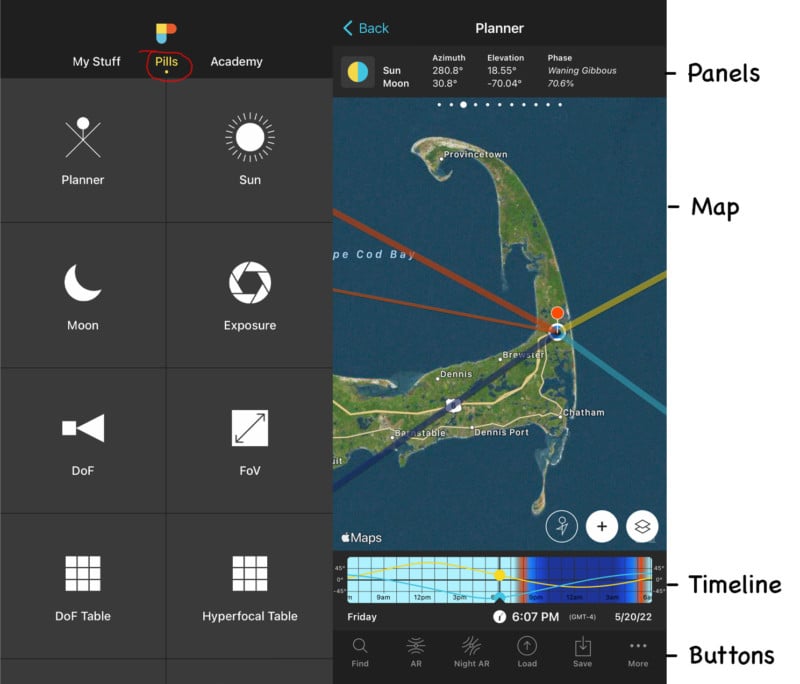
2. Next, tap the Pills menu button under the PhotoPills logo.
The name PhotoPills comes from the idea that there’s something ailing your photography. Each of the modules under the Pills menu is called a Pill, and the idea is that there’s a pill to cure every problem.
The key Pills are the Planner, Sun, Moon, Exposure, DoF, Meteor Showers, and Star Trails pills. How to use them all is covered in the “How To Plan” section below and in Part Three. Except for the Planner, the Pills are more or less self-explanatory once you open them. The Planner is covered in detail in Part Three.
Part Two: How to Plan Photographs with PhotoPills
Each of the plans below shows you how to create a plan to photograph the Sun, Moon, Milky Way, star trails, and meteor showers. For each of those events, you need to know where and when it will happen and if you’ll be able to make a good photograph from your chosen location. For Milky Way and meteor images, you also need to know whether moonlight will affect their visibility.
PhotoPills makes it easy to get the information you need, bear in mind that many of the Pills duplicate information found in other Pills, so there is more than one way to do things. These plans are just one way. If you’re just starting out, they’ll guide you through the steps to plan your shot. Once you get the hang of it you’ll probably figure out your own approach. If you’re experienced, you might pick up something new.
Also, weather is a key issue with any night-sky photography. Unfortunately, PhotoPills doesn’t include weather information. There are many great weather apps. I use Clear Outside, Astropheric, Weather & Radar, and Dark Sky most often to help plan night shoots. The plans assume weather conditions are good. Obviously, you have to check for yourself.
How to Find the Milky Way Tonight (or Any Night)
1. Open up PhotoPills and tap “Pills” at the top of the screen beneath the PhotoPills logo.
2. Tap the “Moon” Pills. This shows you moon and Sun rise/set times, moon phase, and when the Milky Way’s galactic center will be visible. If it’s a new moon (no moon) or crescent moon, you’re good to go. Avoid nights with a full or half moon because the sky will probably be too bright to see the Milky Way. There are a couple of exceptions, however. Check the moon’s rise and set times. If half or full moon rises well after the galactic center or sets before the galactic center rise, you’re still good to go.
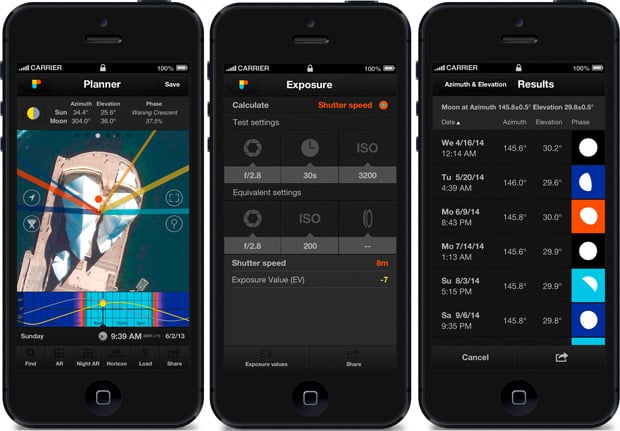
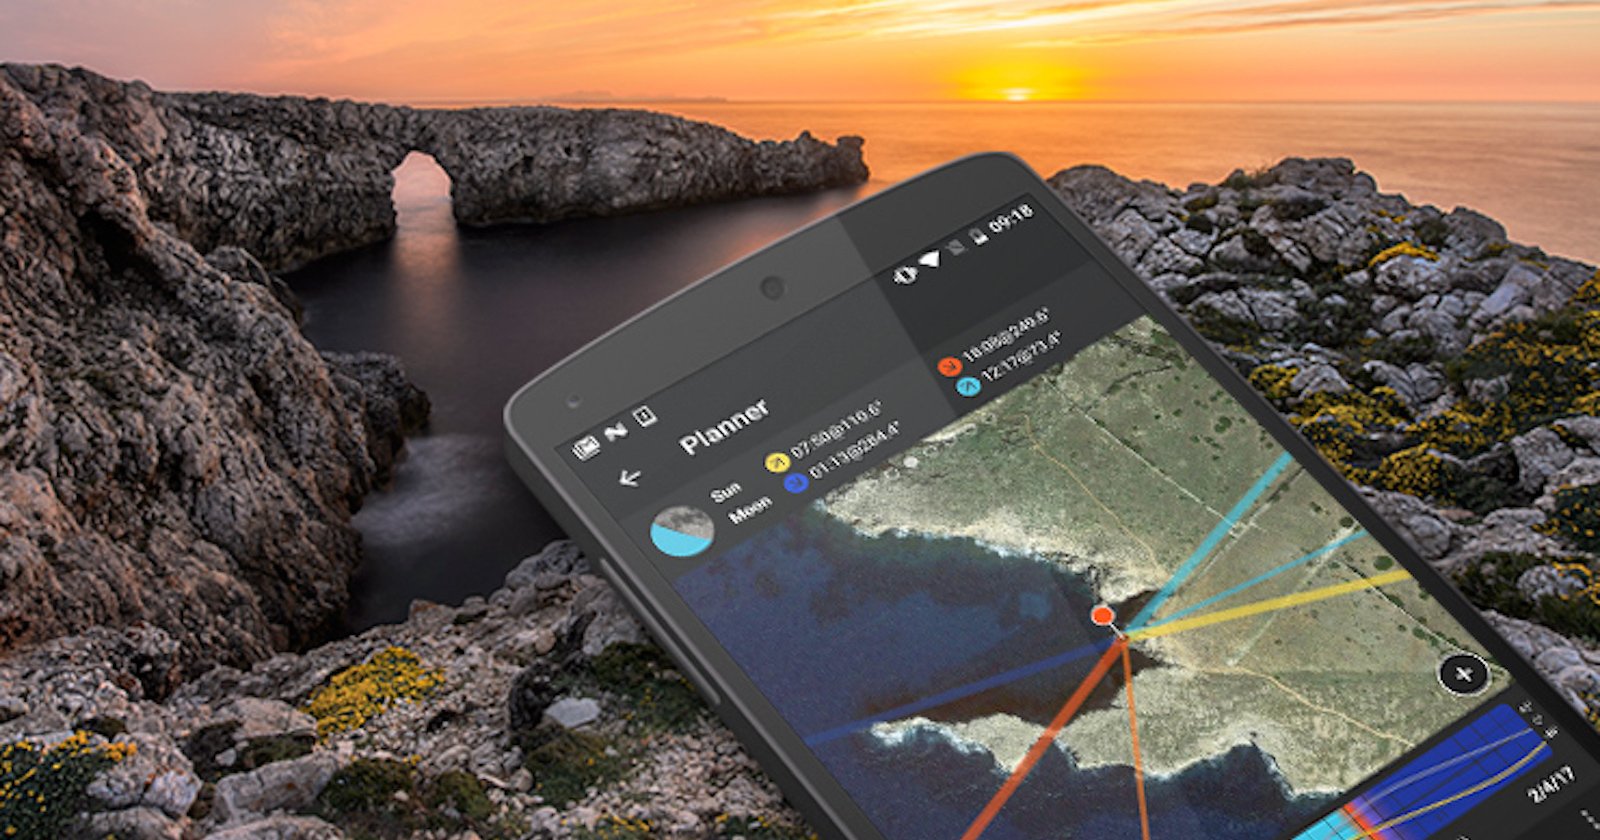
3. Tap the Planner in the Pills menu. The Planner has four parts: the panels at the top, the map, the timeline, and the buttons at the bottom.
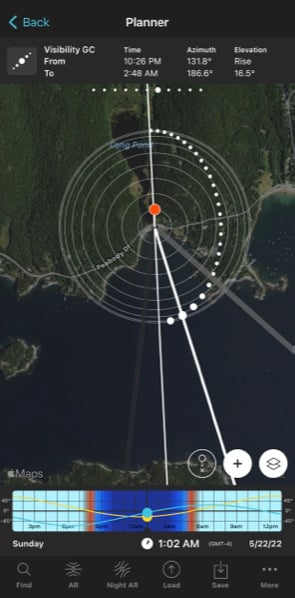
4. Go to the top panels and swipe to the seventh panel – the Galactic Center (GC) Visibility Panel. It shows when the galactic center rises and sets, its position (azimuth), and elevation.
Then swipe to the next panel, the Milky Way Quality panel. The blue “energy bar” next to the Milky Way icon in the panel tells you if moonlight will wash out the Milky Way. If the bar is all blue, then it’s a new moon and the sky will be dark and the Milky Way will shine. If there are no blue bars, then the moon is full and the moonlight will wash out the Milky Way.
Tap the Milky way icon and it moves the date to the next new moon. So if the date is correct, don’t tap it. This panel shows the azimuth (position) and elevation of the Milky Way for the given date.
5. Set the red pin on your current location. Go to the map and tap the “+” button in the lower right corner. This brings up your red pin buttons. Tap the GPS pin on the far left to drop a red pin on your current location.
6. Set the date. Go to the timeline and tap it twice. Enter the date and then hit Done to get back to the Planner.
7. Set the time. Swipe left until you reach the time when the galactic center starts to rise. You’ll see an arch of white dots. These represent the arc of the Milky Way. The biggest dot is the GC. If you don’t see the white dots, you are either on the wrong day or time.
8. Find a good location to photograph the Milky Way.
If you’re shooting at a nearby location, tap the “+” sign again. Tap the Move pin, which is the second pin from the left. The red pin on the map will pop up and an “X” will appear beneath it. Move the red pin to the location you want to use by dragging the map around until the X is above the spot. Pinch the map with two fingers to zoom to get the target area quickly and then spread two fingers apart to zoom back in. Tap the map once to drop the pin on your chosen spot. You can decide if it looks like a place for a photograph based on the location of the pin and the white dots You’re basically done, but you could try one more thing to seal the deal.
9. Use Night AR to confirm the Milky Way’s position. Once the red pin is on the spot for your planned shoot, tap the Night AR button at the bottom of the screen. You’ll see an overlay on a live-view scene of your current position. Don’t worry about live view. Pay attention to the overlay.
Calibrate the view by moving your phone in a figure-eight pattern a few times.
Now, note the date and time in the upper left corner. Swipe the screen left to move forward in time or swipe right to move back in time and set the time for when the galactic center will start to rise. Now face the direction in which the Milky Way will first appear, usually east or southeast. Compass points are marked on the screen. The thick white line is the horizon. You’ll see the Milky Way when you are facing the right direction. Based on this visualization you should be able to confirm that your chosen location will work for a shot.
Advance Milky Way Planning for Home and Travel
Let’s say you want to travel to a particular part of the world and want to make sure it will be a good spot to photograph the Milky Way and then create and save a plan to do it. Here’s what you do:
1. Load a location into the Planner. Go to the PhotoPills Planner. At the bottom, tap the Load button. Type in the name of your location. It can be pretty much anywhere in the world. The name will appear in a list. Tap it and it takes you back to the Planner and drops a red pin on the spot.
Refine the location by moving the red pin onto a precise location. Just tap the “+” sign in the lower right and the red pin on the map will pop up and an “X” will appear beneath it. Move the red pin to the spot you want by dragging the map around until the X is above the spot. Pinch the map with two fingers to zoom out and get to the target area quickly, and then spread two fingers apart to zoom back in. Tap the map once to drop the pin on your chosen spot.
Shortcut: You could also skip the “load location” step and simply move the red pin to a chosen location and then activate the Visibility GC panel (Milky Way panel) to see if it might work for an image. I do this a lot. I just look at the map and drop the red pin on any spot that looks promising and see what happens.
2. Pick a date. Tap the Planner’s timeline (located below the map) once and enter the date for when you want to photograph. Tap Done to get back to the Planner.
3. Find the Milky Way. Go to the top panel and swipe left until you get to the Visibility GC panel (seventh panel). It tells you the time when the galactic center rises and sets, its azimuth (position), and elevation. An arc of white dots will appear on the map showing the position of the Milky Way. The biggest dot is the galactic center. If you don’t see any white dots it’s because the timeline isn’t set to the correct time. If so, drag the timeline to the left until you are at the time when the Milky Way appears. The position of the red pin and white dots will give you a good idea if the location will work for a shot. However, there’s one more step you can take to double-check the viability of the location.

4. Visualize the scene. Tap the Night AR button at the bottom of the screen. You’ll see an overlay on a live-view scene of your current position. Don’t worry about live view. Pay attention to the overlay. Calibrate the view by moving your phone in a figure-eight pattern a few times. Now, note the date and time in the upper left corner. Swipe the screen left to move forward in time or right to move back in time and set the time for when the GC will start to rise. Now turn so that you are facing the direction that the Milky Way will first appear, usually east or southeast. Compass points are marked on the screen. The thick white line in the overlay is the horizon. If you are facing the right direction at the right time and the Milky Way is above the horizon, you’ve got a good shot. Take a screenshot for future reference. Remember that the overlay is based on the position of the red pin, not your current location.
5. Save your plan. Tap the Save button at the bottom of the screen. Next tap Plan and then on the next screen tap “New Plan.” Give the plan a name, hit save, and you’re done. To call up the plan, tap Load at the bottom of the screen and then select the plan.
6. Share your plan. If you want to email or post your plan, tap the More button and follow the prompts.
On Site Planning
The best way to plan is if you can scout a location in advance during the daytime.
1. First, confirm the Milky Way will be visible the night of your shoot by going to the Moon Pill and noting the phase of the moon and when the galactic center will be visible.
2. Go to the location of your shoot and drop a red pin on the spot (tap the “+” sign in the lower right corner of the map and then tap the pin at the far left).
3. Go to the Planner and set the date and time of your shoot. (Tap the timeline once, set the date, and then hit Done to return to the Planner. Then drag the timeline to the correct time for the shoot.
4. Tap the Night AR button at the bottom of the screen. Move your phone in a figure-eight pattern five times to calibrate it. Point your camera in the direction of the Milky Way. You should see it appear in the overlay.
5. Frame up the photograph. Tap the Action button at the bottom to take a screenshot and save or share the image
6. Save your plan. Go back to the Planner and tap Save at the bottom of the screen and follow the prompts. You can then load your plan at a later time using the Load button.
Make Your Stars to Look Like Points, Not Dashes
To get your stars to appear as points of light rather than little dashes you need to calculate the best exposure time.
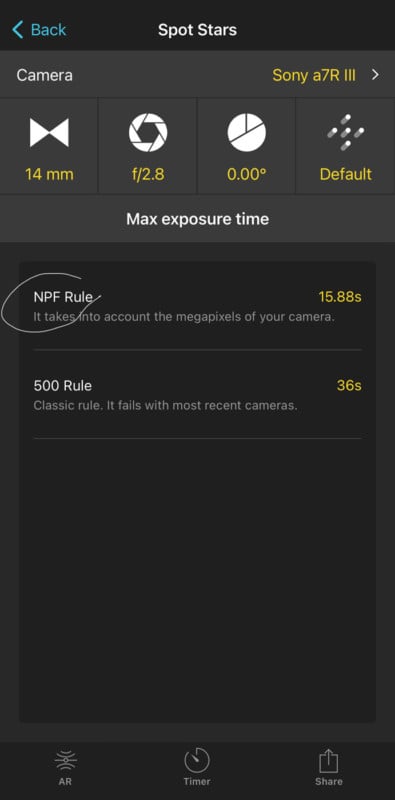
1. Go to the Pills menu and tap the Spot Stars pill.
Enter the focal length of your lens, f-stop, and declination. Declination is the point north of the celestial equator. Don’t worry about it. PhotoPills has a way to automatically calculate the declination using AR, which I explain below.
2. Decide if you want the most accurate exposure, which will give you pinpoint stars, or the default calculation, which will give you slight but barely noticeable star trails. There’s a big difference in exposure time between the accurate and the default methods. For example, with a Sony a7R III and a 14mm lens at f/2.4, the accurate method says the exposure time should be 7.28 seconds. The default method says it can be 14.57 seconds. I usually use the default method because the shorter method will result in too much noise.
PhotoPills also gives you the choice to use one of two formulas to calculate the exposure time. One uses the NPF rule and the other uses the 500 rule. Use the NPF rule. The 500 Rule is for older, lower resolution cameras and calculates exposure times that are way too long for today’s cameras.
3. Check the exposure length in real-time with Night AR. First enter your focal length and aperture in the Spot Stars pill. Then tap the AR button at the bottom of the screen. Frame the shot with your phone and down at the bottom of the screen you’ll see the maximum exposure time to use. PhotoPills is using your phone to figure out the declination.
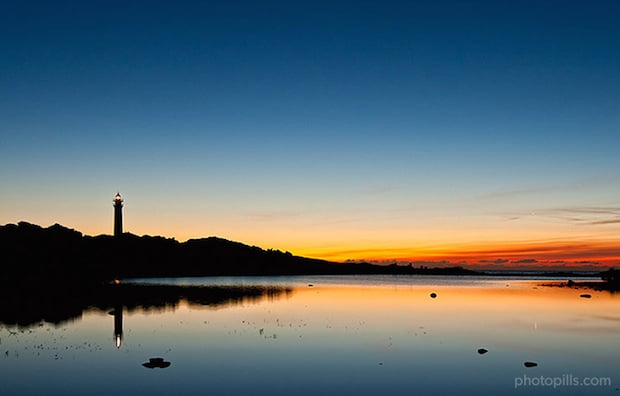
Planning a Sun/Moon Photo
Planning a sun or image is very similar to the Milky Way process described above. There are just a few different buttons to tap. Here’s a process using a full moon rising over the horizon as an example. It can easily be adapted for moonset, sunrise, and sunset images.
1. Pick a date. Tap the Moon pills and then tap the calendar button at the bottom of the screen. Full moons will be circled on the calendar. Sometimes you can get a more detailed picture if you photograph the moon just before or after a full moon because the sun is hitting it at a slight angle, creating richer shadows. Regardless, note the date you want to shoot. Then go to the Planner, tap the timeline and enter the date of your shoot.
2. Find the Moon. Go to the Planner. In the panel bar at the top of the screen, swipe to the Sun/Moon panel (third panel over) and tap the icon until the light blue and dark blue lines appear on the map. The light blue line is the direction of moonrise and the dark blue line is for moonset. Drag your finger across the timeline and a thinner light blue line will move across the map, showing the azimuth of the moon as it moves across the sky.
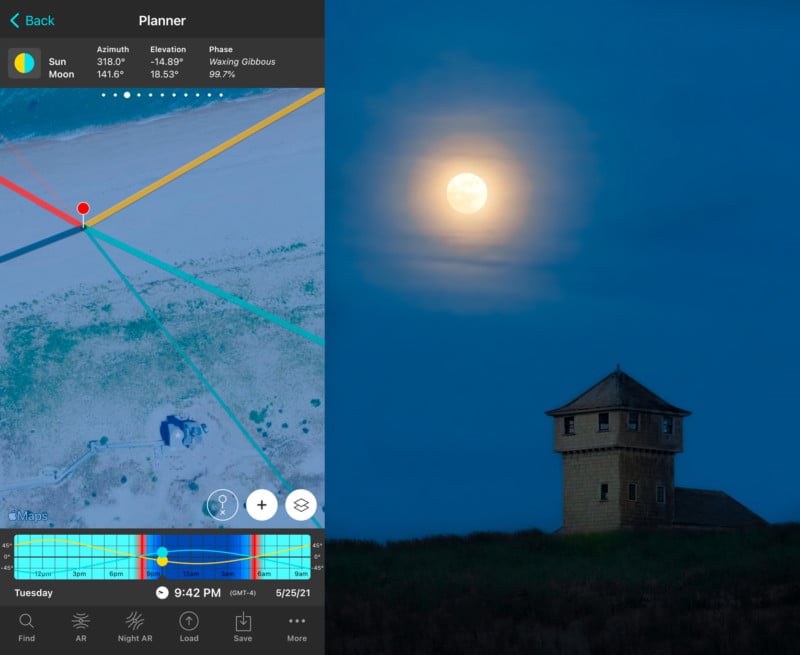
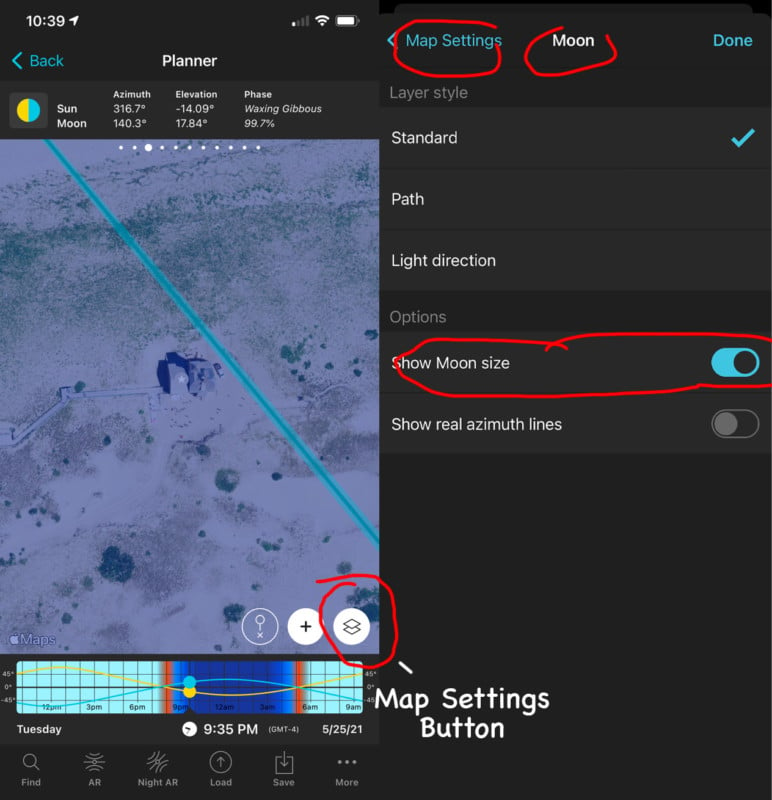
3. Show the size of the Moon. Tap the Map Settings icon in the lower right corner of the map. Under map layers, turn on the “Show moon size” option. Back on the map, the light blue azimuth line now also represents the size of the moon. To see this, zoom in on a foreground object that intersects the azimuth line. The width of the line represents the size of the moon in relation to the object. Zoom out to see how the line widens with distance. You need to be very far away – thousands of feet – from a foreground object for the moon to appear large behind it. It depends, of course, on the size of the foreground subject.
4. Load a location into the Planner. Go to the PhotoPills Planner. At the bottom, tap the Load button. Type in the name of your location. It can be pretty much anywhere in the world. The name will appear in a list. Tap it and it takes you back to the Planner and drops a red pin on the spot. Refine the location by moving the red pin onto a precise location. Just tap the “+” sign in the lower right and the red pin on the map will pop up and an “X” will appear beneath it. Move the red pin to the spot you want by dragging the map around until the X is above the spot. Pinch the map with two fingers to zoom out and get to the target area quickly, and then spread two fingers apart to zoom back in. Tap the map once to drop the pin on your chosen spot.
You could also skip the “load location” step and simply move the red pin to the chosen location, activate the Sun/Moon panel so you can see the moon’s azimuth lines, and evaluate the spot for a photograph. I do this a lot. I just look at the map and drop the red pin on any spot that looks promising.
5. Save the plan. Once you’re done, save your plan. Tap the Save button at the bottom of the screen and follow the prompts. You can re-load the plan by tapping Load and selecting your plan.
How to Make the Moon Look Big Behind a Subject
There are a few ways to figure this out.
1. Turn on “Show Moon Size”. This is pretty simple. Go to the Planner and tap the map settings icon in the lower right corner. Tap “moon” and then turn on “moon size.” Go back to the planner and tap the Sun/Moon panel and bring up the moon azimuth lines. Place the red pin on your shooting spot and then swipe the timeline until the moon lines up with your subject. The light blue line shows the apparent size of the moon in relation to your subject. Zoom in close to for a good view. Move back to make the moon appear larger or closer to appear smaller.
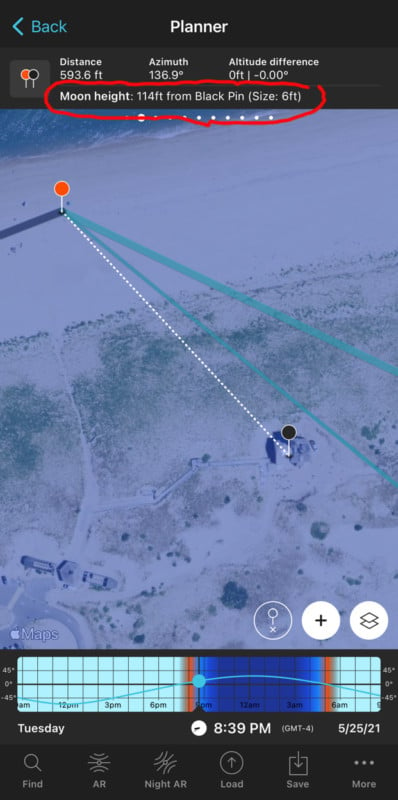
2. The Black Pin method. Place the red pin on your shooting spot. Tap the black pin panel (second from left) and place the black pin on your foreground subject. Press and then drag to move the black pin around. The panel shows you how high the moon will be and how wide it will appear in relation to your subject. If you want the moon bigger you’ll have to move further back. If you want it smaller, get closer.
3. PhotoPills Rule of 100. Want to know how far you have to be from your subject to get the moon to appear the same size as the subject? Multiply the width of the subject by 100 and the result is your answer. For example, if a building is 20 feet wide and you want the moon to appear the same size as the building, multiply 20 by 100 and you get 2000. You need to be 2000 feet away to have the moon appear the same size as the building.
How to get the Moon and Foreground in Focus
One of the big challenges with moon photography, particularly when using a long lens, is that atmospherics get in the way. There’s a lot of air between you, the foreground, and the moon, and it can soften your image. So the first thing is to forget about “in focus” and go for acceptably sharp, especially if you’re going for a large moon.
The solution is to use the hyperfocal distance. Don’t panic. It’s easier than it sounds.
1. First, use the black pin to figure out how far you are from your subject. You do that by placing the red pin on your shooting spot. Tap the black pin panel (second from left) and drag the black pin onto your subject. The panel will tell you how far you are from the subject.
2. Next, go to the main menu and open the DOF pill. Enter the focal length and f-stop you will use, and how far you are from your subject. PhotoPills calculates the hyperfocal distance point, which is the spot where you need to focus to maximize your depth of field. Check the numbers for:
- Hyperfocal distance.
- DoF near limit. This is how much of the area in front of your subject will be acceptably sharp.
- DoF far limit. This is how far beyond your subject will be sharp. You want this to be infinity. If it’s not at infinity, you need to shorten your focal length, increase your f-stop, and/or move further away from your subject. Change the settings until your DoF Near Limit is infinity.
3. Once that’s set, you’re ready to shoot. Focus on the hyperfocal distance point and everything from there to infinity will be acceptably sharp. In the field, tap the AR button and the overlay will show where the hyperfocal distance point is in your field of view.
How to Make Star Trails
What’s it take to get an awesome star trail image? You can figure this out a couple of ways with the Star trails pill. Go to the Pills menu and tap the Star trails pill. Across the top you’ll see three options for exposure time, length of the trail measured in degrees, and your hemisphere.
Tap the exposure time button and enter the total exposure time in hours, minutes and seconds. Hit done and you’ll get a simulation of what the trails will look like. Don’t be disappointed if you chose a relatively short exposure and the simulation looks unimpressive. The simulation only shows a handful of stars. The sky has billions. You can still get cool-looking star trail shots with just a 30-60 minute total exposure.
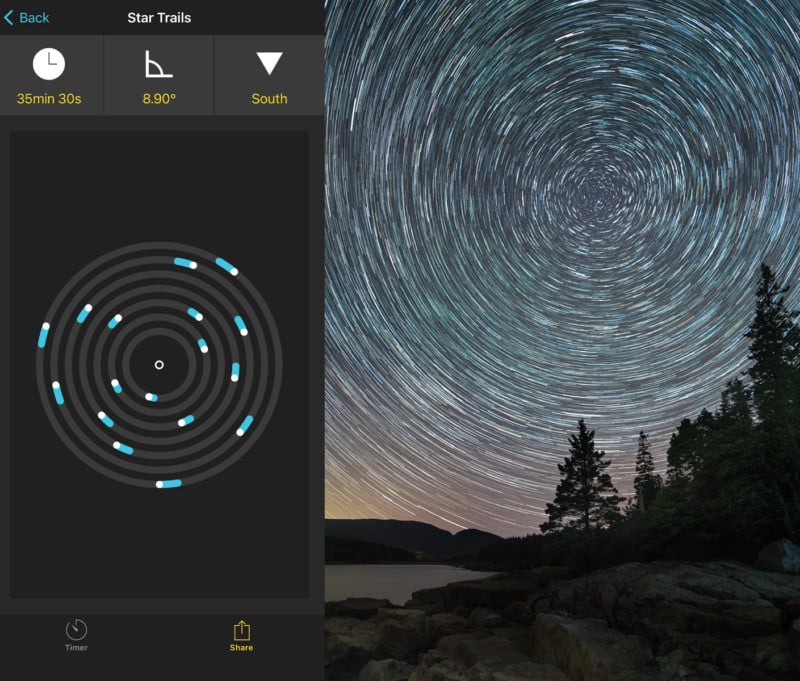
An alternative method to create a simulation is to enter the length of the trails you want as degrees of a circle. For example, 10 degrees is a short dash while 180 degrees is halfway around and 360 is a complete circle. Instead of entering a number, you can just press and drag your finger around the simulation to create the trails you want and PhotoPills will give the exposure time needed to make it happen.
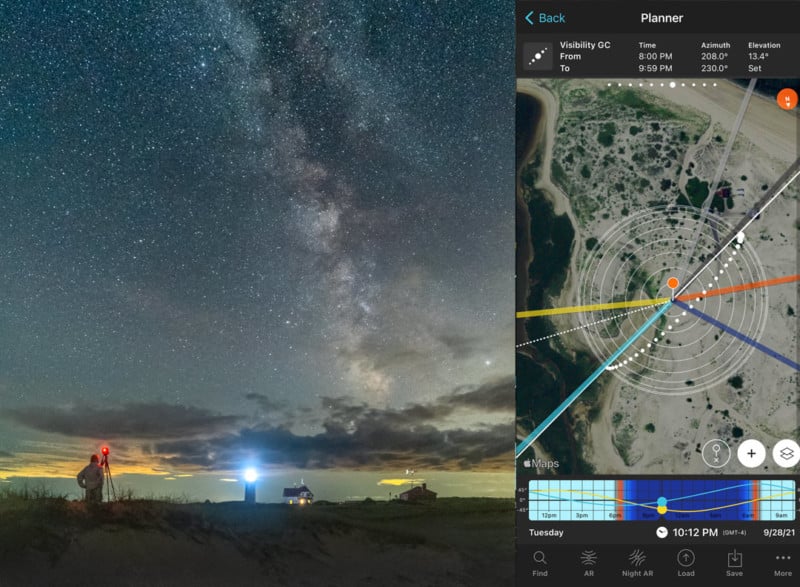
To plan a star trail shot, think of a location with a good foreground element. If possible, go there and use the Night AR function in the Planner to find the North Star. Tap Night AR and hold your phone up to the sky until you see the small circle where all of the lines converge. That’s celestial north. It’s not quite the same as the North Star, but it’s close enough for star trails.
Plan to Photograph a Meteor Shower
1. Go to the Planner and swipe over to the last panel on the right. Tap the meteor icon to get a list of this year’s meteor showers. The also shows tells you when the peak will be, the rate of meteors per hour, and the phase of the moon. Less moon means darker skies and you’ll see more meteors. Check the moonrise/set times, too, because that will affect the brightness of the sky. The blue energy bar shows the activity level. More blue means more meteors.
2. Tap the meteor shower your want to photograph and it’ll load the information into the Meteor Shower panel in the Planner. You’ll see the dates of the shower, its peak date and time and rate per hour, and the azimuth and elevation. It also sets the Timeline for the date and time of the peak.
You can also load the information into the panel by tapping the Map Settings button in the lower right corner of the map and then selecting the meteor shower that you want.
3. Back in the Planner, you’ll see a meteor icon, an arc show the width of the shower, and a thin grey azimuth line pointing to its position at any given time. The dark grey azimuth indicates where and when the shower disappears.
4. Move the red pin or use the Load button to place the red pin on a location for the shoot.
5. Tap the Night AR button to see the meteor shower icon in position in the sky for the given day and time.
Maximize Your Depth of Field for Day and Night Landscapes

Traditional landscape photography tries to maximize depth of field so the image is basically sharp from front to back. You do this by using the hyperfocal distance point. The term is kind of a mouthful and can be confusing if you haven’t heard the word “hyperfocal” before. Breathe easy. PhotoPills makes it easy to figure out where the hyperfocal point is, how much depth of field you’ll get, and even how to see it when you’re out shooting.
1. First, calculate the hyperfocal distance point. Tap the DOF Pill in the Pills menu. Enter your camera model, the focal length of your lens (include the teleconverter if using one), and the distance to your main subject. PhotoPills then gives you:
- The hyperfocal distance point. This is where you focus for maximum depth of field.
- The hyperfocal near limit. This is the point halfway between you and the hyperfocal distance point. Everything from here to infinity will be acceptably sharp.
- DoF near limit. This is the point where things will first appear acceptably sharp when focused on the subject.
- DoF far limit. This is as far as the depth of field extends beyond the subject when focused on the subject.
- Depth of field. This is the size of the depth of field when focused on the subject.
2. In the example above, I’m shooting a Sony a7R III with a 14mm lens at f/2.4. My hyperfocal distance point is 8 feet and 11 inches away, which is about the distance to the tree. This means that if I focus on that point everything from about halfway between me and the tree to infinity will be acceptably sharp. Focusing there means the tree, rocks, mountains, and Milky Way are acceptably sharp.
3. If you don’t have enough depth of field, move further away from your subject, use a higher f-stop and/or a lens with a shorter focal length.
4. To know exactly where to focus when you’re in the field, tap the AR button. Tilt the overlay until the feet are over your feet. The red line and camera over your subject. The tree icon represents the hyperfocal distance point.
The “Inverse” button flips the calculations so that you enter the depth of field you want and then PhotoPills tells you what setting to use. The “Advanced” button lets you adjust the size of the Circle of Confusion.
Experiment by entering different focal lengths and f-stops to get a sense of where the hyperfocal distance point is in various situations. You’ll soon see that when working with wide-angle lenses you have a lot more depth of field than you might realize and that the “focus one-third of the way into a scene” rule to maximize depth of field doesn’t really work that well with short focal lengths.

Part Three: The Planner in PhotoPills
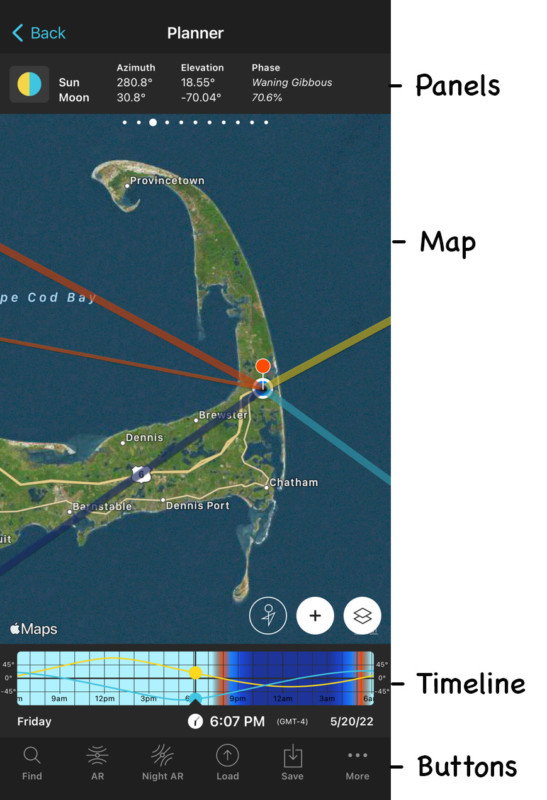
Planner: Top Panels
These 11 panels help you visualize and plan where and when the sun, moon, Milky Way, meteor showers, and eclipses will appear, and even the length of the shadow an object will cast at any given time. Swipe left-right to move from one panel to the next. Let’s go through the panels one by one from left to right. Swipe to the far left for the first panel.
1. Sun/Moon Shadow Length Calculator. Put a red pin on a spot such as a lighthouse, building, or whatever. Enter the height of the object and PhotoPills will tell you how long its shadow will be at any given time of day or night (if there’s a moon).
2. Geodetic Pin/Black Pin. Drop the black pin on a location or object like a building and PhotoPills tells you how far you are from that spot, the elevation difference between the red and black pins, how high the sun or moon appears in relation to the black pin and how wide the sun or moon will appear.
3. Sun/Moon Position. Use this panel to see the azimuth (position) and elevation of the sun or moon. Tap the icon on the left. Yellow, orange, light blue, and dark blue lines appear. These are the azimuth lines for the sun and moon. Simply, they point to the position of the sun or moon. The azimuth is represented by degrees. North is 0 degrees, east is 90 degrees, south is 180 and west is 270. So if the sun’s azimuth is 135 degrees, then the sun is in the southeast.
The yellow line points to where the sun rises. The orange line points to where it sets. Drag your finger across the timeline and a thin yellow line will move across the landscape, tracking the position of the sun throughout the day.
The light-blue line points to where the moon rises, and the dark-blue line points to where it sets. Drag your finger across the timeline and a thin light-blue line will move across the landscape, tracking the position of the moon throughout the day.
The panel also includes the azimuth and elevation of the sun at any given time of day. Drag your finger across the timeline and you’ll see the numbers change. The panel also gives you the phase of the moon.
4. Sun/Moon Rise Set Times. This tells you when the sun and moon rise and set and their azimuths for each event.
5. Twilights. Gives you the twilight times for Civil, Nautical, and Astronomical twilight for a given date.
- Civil twilight is when the sun is just below the horizon and about to rise or set. The sky has a red/orange glow with a bit of blue at the top.
- Nautical twilight is when the sun or moon is between six and 12 degrees below the horizon. The sky is dark blue, bright stars are visible, the ocean’s horizon disappears and you need artificial lights to see.
- Astronomical twilight is when the sun is 12-18 degrees below the horizon, roughly 90 minutes after sunset. The sky is basically dark and stars are visible.
6. Golden Hour/Blue Hour. It tells you when golden hour and blue hour occur on any given date.
7. Galactic Center Visibility. This lets you visualize where and when the Milky Way and the galactic center (GC) will appear, including the azimuth and elevation. Tap the Milky Way icon in the panel and the Milky Way overlay appears as white dots on the map. The timeline has to be set to a time when the Milky Way is visible for the dots to appear.
- The concentric circles represent the Milky Way’s elevation in degrees. The outer line is zero degrees (on the horizon) and the center is 90 degrees above the horizon (straight overhead).
- The thick white azimuth line shows you where the galactic center appears in relation to the red pin. The thin white line is where the Milky Way dips below the horizon.
8. Milky Way Quality and Position. This panel shows the azimuth and elevation of the Milky Way for the given date. The blue “energy bar” next to the Milky Way icon in the panel shows how moonlight will affect the visibility of the Milky Way. If the bar is all blue, then it’s a new moon and the sky will be dark and the Milky Way will shine. If there are no blue bars, then the moon is full and the moonlight will wash out the Milky Way. Tap the Milky way icon and it moves the date to the next new moon.
9. Eclipse Panels. Panels 9 and 10 are the eclipse panels and work together.
Panel 9 is the Eclipse Selector panel. Tap the icon and it takes you to a list of upcoming eclipses that gives you the date, type (lunar or solar), and if it will be a total, partial, or not visible eclipse. Tap the eclipse to load the information into the panel, which displays the date, magnitude, phase, and length of totality.
Where will it be visible? Zoom way out and you’ll see wavy blue, yellow, and orange lines that either drop down from the north or sweep up from the south. The lines show you where the eclipse will be visible. The example above is for the lunar eclipse of May 15, 2022. The eclipse will be visible at any location between the lines marked P1 and P4. There’s also a tag in the area that says “Eclipse visible”.
10. Eclipse Phase Time. Panel 10 gives you the time for each phase of your selected eclipse.
11. Meteor Shower Info. Tap the icon and then select a shower from the list to load information about that shower into the panel. Information includes the date range, date and time of the peak, azimuth, elevation, and rate of activity.
The Map
Orientation. The default orientation of the map is north at the top of the screen. If you see a little compass icon with the letter “N” and an arrow, the arrow is pointing north. Tap the icon and the map will rotate so that the top of the screen is north. The compass will disappear.
Navigation. Place your finger on the screen and drag it around to move the map. Zoom in and out on the map by using two fingers. Spread your fingers apart to zoom in or pinch them together to zoom out.
Buttons. There are three buttons in the lower right corner of the map: the pin button, “+” sign, and map settings button. Tap the “+” button to open the various pin options. Read the descriptions below and tap each button as you go to see the effect. From left to right, the pins are:
- GPS Pin. Tap this and a red pin drops on your current location. It also displays your GPS position and elevation.
- Move Pin. Tap this and the red pin pops up and a small “X” appears. Use your finger to move the map and place the “X” over a different location.
- Undo and Redo Buttons. The “Undo” button moves the pin back to its previous location. The “Redo” button moves it back to where it was – it undoes the undo.
- Expand Map Button. Tap this to expand the map by hiding the top and bottom panels.
- Swap Pins. Swaps the red and black pins.
- Extend Sun/Moon Azimuth Lines. Adds a dotted line to extend the azimuth line of the sun and moon.
- Show Current Position. Tap this and a blue dot appears on your current position.
- Change Map Type. Select a different map type. Options are standard, satellite, terrain, or hybrid.
- Compass. Auto rotates the map so that north is at the top.
- Block Map Buttons. Hides the buttons.
Tap the button again and the red pin drops on the new location. Using this and adding sun, moon, Milky Way, or meteor overlays to the map will help plan shoots at different locations.
Map Settings and Layers
Tap the third button in the lower right of the map to open the Map Settings and Layers panel. Just go down the list and choose the settings and overlays you want for your map.
Camera or Drone. Use the camera mode when making images with your camera. Select “Drone” mode when you’re using a drone. In Drone mode, enter the drone model and focal lens of the lens you’re using. You can also select a composition grid. Use the “Visible” button to turn the drone pin and sun/moon lines on or off. You can also select either landscape or portrait view. This option also estimates what you need to get the field of view shown on the map. To adjust the height/field of view, use your fingers to zoom in or out on the map.
Map Tools. This set of tools allows you to visualize your field of view, depth of field, and the distance you need to get the sun or moon a specific size against your foreground subject.
Map Type. You can select either Apple’s or Google’s version standard, satellite, terrain, or hybrid maps. You can also select OpenStreetMap’s standard classic or landscape maps.
Layers. Select which layer overlay you want to appear on your map. The sun, moon, Milky Way and Meteor Shower layers will show the path of those events at the appropriate time. You can also activate these layers using the top panels of the Planner module.
The Eclipse layer is linked to panels 9 and 10 in the Planner. Select the solar or lunar eclipse you want and then switch to the Planner module to plan your shot.
The Twilight layer adds a cover overlay based on the time of day. Daytime is neutral, golden hour is orange, twilight is light blue and night is dark blue.
The Shadow layer lets you visualize the shadow an object will cast at any given time. This is the same function as Panel 1 on the top panels of the Planner.
Layer Styles. With the sun and moon layers, you also have the option to include different styles: Standard, Path, and Light Direction. Standard shows the standard yellow/light blue and orange/blue line that show the rise/set directions of the sun/moon. The Path option adds an extra line showing the path of the sun/moon at any given time. Light Direction adds arrows to the overlay to show the direction of light coming from the sun/moon at any given time.
There’s also the option to select “Show Sun/Moon Size” and “Show Real Azimuth Lines”. The show size option displays the width of the sun or moon against foreground objects. Distant objects will appear smaller against the sun or moon. So if you want something to appear small against the sun or moon, you need to be far away from it.
Timeline
The timeline shows you the position of the sun and moon relative to the horizon at any given time. It also shows you the color of light. Cyan is daylight, orange is golden hour, light blue is twilight, and dark blue is night.
The blue dot and line represent the moon and its path. The orange dot and line represent the sun and its path.
The dark horizontal line in the middle is the horizon. The thin black line above represents 45 degrees above the horizon or about halfway between the horizon and directly overhead. The top bar is straight overhead.
Changing the Date and Time
Put your finger on the timeline and drag it left to move forward in time. As you do this, you’ll see the sun and moon move along their respective paths.
The timeline displays a 24-hour period. Thin black vertical lines represent an hour. Press and hold the timeline and the view changes to a 15-minute period. Press and hold again to get back to the 24-hour view.
Tap the timeline once and you can enter a specific date, time, and time zone. Tap the timeline twice and it will reset the timeline for the current day and time.
Bottom Options
The bottom panel includes options for Find, AR (Augmented Reality), Night AR. Load, Save, and More.
Find. The Find option lets you figure out the date and time the sun or moon will be at an exact spot – position (azimuth) and elevation. For example, let’s say you want to take a shot of the sun setting just above a bridge. Here’s what you do:
- Go to the Planner and place the red pin where you’ll stand to make the photograph.
- Tap the “Find” button. Then tap “sun at azimuth & elevation” or “moon at azimuth and elevation” if you want to do a picture of the moon.
- Tap the yellow pin (blue for moon), and place it where you want the sun to appear. In this case, behind the bridge. You’ve just set the azimuth.
- Set the elevation. Tap the elevation panel. At the bottom of the screen, you’ll see three ways (four on an iPhone) to set the elevation.
- If you can get to the site for a planning visit, use AR to accurately set the azimuth and elevation. Go to the site and place the red pin on your spot. Tap “Find” and then select “AR”. Hold your phone up and tap the screen on the spot where you want the sun to appear. This will automatically set the azimuth and elevation.
- Save your plan using the “Save” button.
1. 2D: drag the yellow line up or down to set the elevation.
2. AR: This works great if you are on-site or not. If you’re on-site, select AR, hold your phone up to frame the scene, and tap the screen where you want the sun to be. This sets both the azimuth and the elevation.
3. Numeric: Enter the height you want for the sun. Then enter your margin of error. It’s best not to use zero. Using zero will yield few results.
Augmented Reality (AR). This creates a sun/moon position overlay on a live-view image of wherever you are. The overlay shows the position of the sun/moon rise/set in relation to the red pin for a given date and time. It also shows the path of the sun/moon. To be clear, the live-view scene is of whatever is in front of you at that time, but the overlay is in relation to the position of the red pin. Therefore, the sun/moon display may not correspond to your current position. For example, if I’m in New York and the red pin is on Japan, the sun/moon information will be for Japan.
– Date and time. To change the date and time, drag your finger across the screen. Drag left to go forward in time and right to go back in time. To move forward one day, tap the right side of the screen. To get back to the current day, tap the center of the screen twice.
– Calibrate the display. To calibrate the display, tap “Visual calibration at the bottom of the screen” and follow the prompts. Refresh the calibration by moving your phone in a figure-eight pattern five times.
Night AR. This works just like the regular AR except that it also lets you visualize the position of the Milky Way and the radiant point of meteor showers. Like regular AR, the background scene will be whatever is in front of you, but the overlay is based on the position of the red pin. Don’t forget to calibrate using the figure eight routine.
Load. Tap the “Load” button, type in a location and PhotoPills drops a red pin on the spot. You can also load a pre-saved plan, saved Point of Interest, Latitude/Longitude, or even a geotagged photo and a red pin will bed dropped on the spot. See the next section “Save” for how to create and save plans and points of interest.
Save. Tap the “Save” button to save a plan or point of interest. Let’s say you’ve created a plan for a date when the moon will appear large behind a lighthouse. Tap “Save”, then “New Plan”, type in a name for your plan, and hit “Save”. Tap “Action” at the bottom of the screen and you can then add it to your calendar and program an alert to remind you when it is coming up.
More. Under the “More” button you can set the date, altitude, horizon, and actions such as saving a plan to your calendar.
Conclusion
The best way to learn anything is by doing, so go plan some images using PhotoPills. Keep it simple at first. For example, a first step might be to use the Planner to figure out when and where the moon will rise. Little by little start to add more details by choosing a different location and putting the moon behind a building or other subject.
For more information and for inspiration, check out the PhotoPills website. There are also a lot of good videos on YouTube.
Happy planning.