College Student Makes 3D-Printed Movie Camera That Takes 35mm Film
Photographer and computer science undergrad student Joshua Bird has created a 3D-printed movie camera that uses “normal” photo film canisters, with the goal of letting him enjoy the nostalgic look of film video without paying for expensive motion picture film.
Bird has been experimenting with custom camera accessories for a few years, including a DIY camera flash made by reusing ones salvaged from disposable cameras, but this time went above and beyond and designed, 3D printed, and built a custom film movie camera.
“I’ve been obsessed with the warm & fuzzy look of film videos. Maybe its just my gen z brain being nostalgic of a time before I was born, but film really does just feel special compared to the sterile digital videos of today,” he writes on his blog.
Unfortunately, shooting movies with film is an expensive proposition.
“Motion picture film is in short supply and it’s almost impossible to find someone willing to develop and scan your videos,” Bird explains. “All in all, you would probably need to wait months and pay around $250 for just 10 minutes of footage – not exactly the best value proposition!”
To address this, Bird decided to try and build a film video camera that uses standard 35mm film instead. But since standard film rolls only have at most 36 shots each, he needed to come up with a solution that would result in more than three seconds of video per roll.
“To try [and] squeeze more footage into these rolls of film, I reduced the image size by a factor of 8, giving us 36*8 = 288 photos per roll,” he says. “This brings us to about 16 seconds of video per roll of film.”
An Incredibly Complex Project
Bird says that this project was a perfect combination of all of his interests: CAD modeling, 3D printing, embedded programming, film photography, camera design, machine vision and so much more.
“It’s honestly pretty incredible how well this project aligned with my rather random skillset. At every phase of the project I was working on something new which is honestly the only reason I was able to work on it for four months straight,” he says.
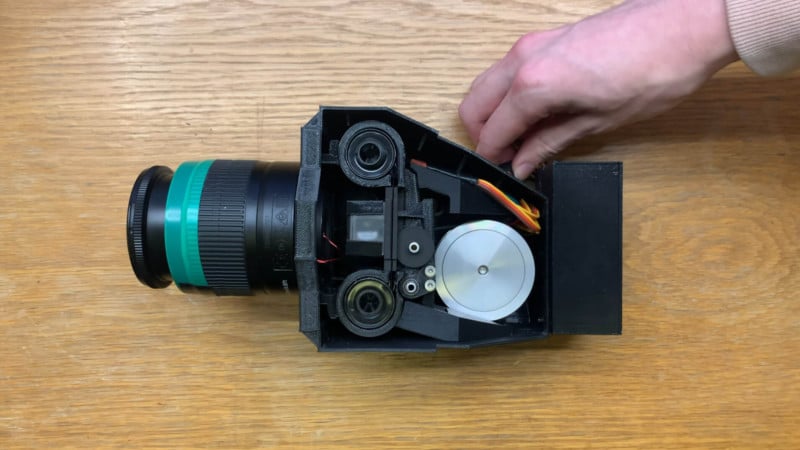
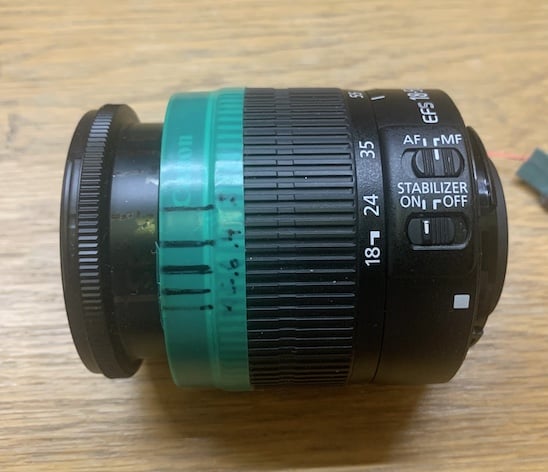
Bird built the entire camera from scratch, including the design for the gear that moves the roll of film and pulls it behind the shutter and the shutter itself as well as the viewfinder. His camera uses a Canon EFS 18-55mm kit lens because it was, quite simply, one of the cheapest lenses he could find online.
He actually even managed to get his camera to control the lens aperture by using a massive 100-page PDF that reverse engineer’s Canon’s EF lens protocols — a document that was originally in French and needed to be translated.
“So I sent the pdf through Google translate and read over all 100 pages of poorly translated documentation,” he says.
“With these resources, I was able to write my own implementation of the Canon lens protocol in C++ to control the aperture and active image stabilization of the lens.”
Even after the camera properly worked, getting the film scanned and turned into a movie posed yet another challenge.
“If everything has gone properly, the developed film should contain a couple hundred thumbnail-sized images. Now we have to do the most tedious step: digitally scanning all of these photos,” Bird says.
“To do this, I placed the film on top of a strong backlight and used a macro lens to take photos of the film with my digital camera. This is essentially a DSLR scanning setup, which is quite common in the film photography world. The images are far smaller than normal 35mm frames however, which means you need to use a macro lens with a very high magnification factor and a camera with a small sensor size. Make sure to also set the camera exposure to manual so it isn’t changing from photo to photo.”
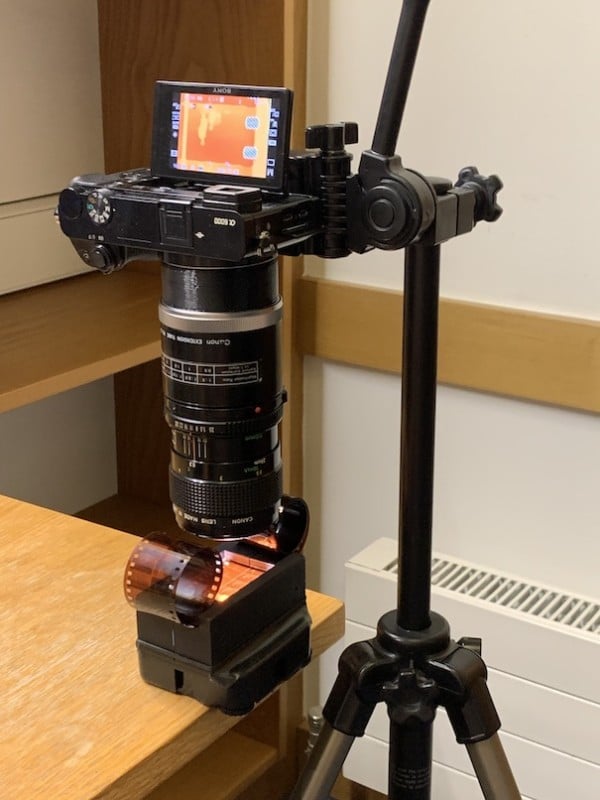
Ironically, Bird had to purchase his first-even digital camera to complete this step. Each roll of film has about 280 image on it, which took him about 30 minutes to scan without a custom made automatic machine (which he did contemplate building).
Once the negatives were scanned, he inverted them to positives and then used machine vision to align the images.
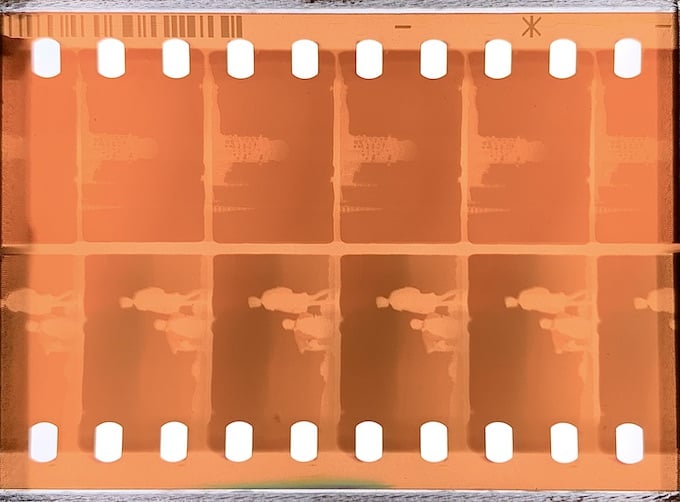
“Since we manually took all these photos, the frames are all going to be misaligned. If we were to simply string the images into a video it would be a jumpy mess. Therefore, we need to align the images so the sprocket holes are always in the same place,” Bird explains.

“I wrote a little OpenCV Python script to do this. The code is in the GitHub repo, and it explains how to run the program. The code quality is pretty horrific (I threw it together in an afternoon), but it works!”
Painstaking but Worth It
The process for making the camera was far from perfect, however. Bird describes multiple times over the last summer where he would try and use the camera only for it to fail, which really puts into perspective how incredible cameras are — even the analog ones.
“It would always be some stupid issue, like a motor driver dying or wire snapping, but there were so many moving parts and absolutely no redundancy so even the smallest failure would render the entire camera useless,” he says.
Bird was so excited to work on the project, he neglected to do a bit of math on the cost of using his DIY solution compared to going with a standard film movie camera.
“At a cost of about $600 for 10 minutes. That’s over two times worse than just using a traditional motion picture film camera but I didn’t bother to do the math before starting this project and by the time I realized how expensive it was going to be I was already too far in to stop,” he says.
Despite this, he’s still pleased with what he created.
“This was definitely one of my biggest projects yet. I spent four months and hundreds of dollars on film and parts, so I’m extremely happy that I was able to get such great results in the end.”
To see his entire build along with everything needed to replicate it, check out Bird’s blog and the project on GitHub.
Image credits: Joshua Bird