The Best Way to Sharpen Your Photos in Lightroom vs Photoshop
The good folks over at PHLEARN have put together a really useful comparison and tutorial that shows you all of the different ways you can sharpen your photos in Adobe Lightroom vs Photoshop.
For many photographers, deciding where and how to sharpen your photos can be a real Sophie’s Choice. If you never pull your images into Photoshop, the decision might be easy: just sharpen in Lightroom. But if you’re going to do both, is it better to use global sharpening in Lightroom, or use one of the popular techniques available in Photoshop?
That’s exactly what Aaron Nace explains in the video above. As he puts it:
In today’s episode, we’re answering the age-old question: is it better to sharpen in Lightroom, or in Photoshop? So we’re gonna go over a couple of different sharpening tools in Lightroom and in Photoshop and see which results win the test.

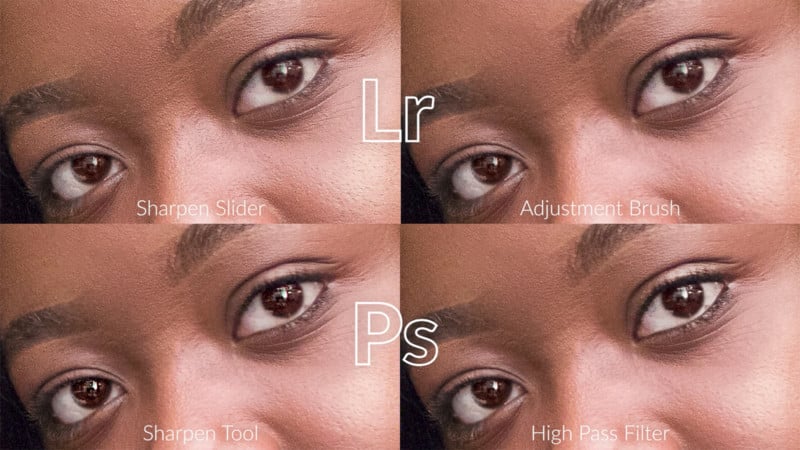
To test this, they used the sample image above (which you can download here) and tried out four different sharpening techniques across Lightroom and Photoshop.
In Lightroom, Nace used the good-old-fashioned Sharpening slider and all its attendant options like Detail, Radius, and Masking first. Then, he tries out the Sharpness slider available under the Local Adjustments brush to only paint in the sharpening effect on the eyes.
In Photoshop, Nace first shows you how to use the High Pass filter on a desaturated copy of the background layer. This allows him to sharpen only the details and leave the color untouched. By using a layer mask, it also allows him to paint in sharpening only where it’s needed. Finally, he also uses the (faster but far less effective) Sharpening brush in Photoshop, just for good measure.
You can see all four methods compared in the screenshot below:
To dive into all of the methods mentioned above and see the results for yourself, check out the full video up top. Even if you don’t necessarily care about the comparison, Nace’s method for High Pass sharpening in Photoshop is worth your time all on its own—it’s both effective and highly versatile.
And, of course, if you want to see more photo editing tutorials, guides, and comparisons like this one, PHLEARN has lots more to offer over on its website and YouTube channel.
Image credits: Sample photo courtesy of PHLEARN.