How to Keep Your Gelled Backgrounds Perfectly Lit in Studio Portraits
In a recent article, I spoke about the best ways to perfectly light your background with colored gels. We covered the best things to keep in mind if strong and vibrant colors across your backdrop are your objective. It turns out that gelling your background is actually relatively simple — it’s keeping those strong vibrant colors that’s actually the tricky part.
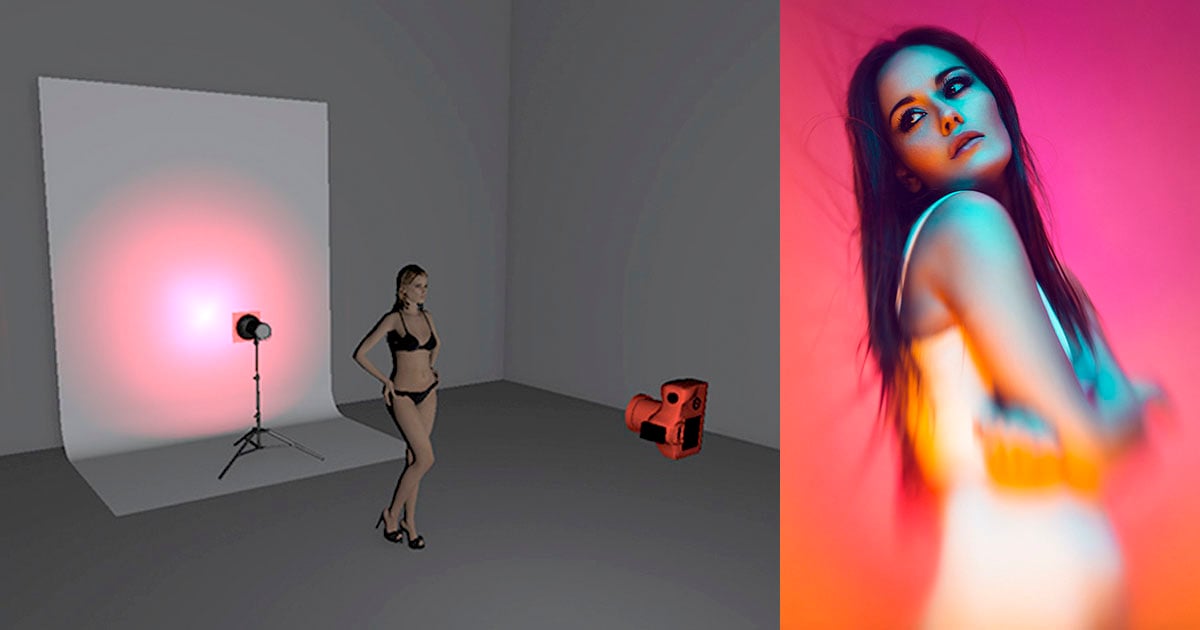
What happens next is that we set up the gelled background light, take a picture and see that the background gel color behind the model looks pretty washed out and insipid. There’s no rich color saturation back there and it’s not giving you the color that is promised on the marketing of gel packs at all!
The model looks great though, she’s evenly exposed but the background has no saturation whatsoever… so what do you do? Well it’s clearly not the key light, as the model is looking great, so we go to the gelled background light and faff about with that by turning the power up and down and start moving it closer and further away but to no avail. Obviously the gels must be broken.
Thankfully, no, the gels aren’t broken and there’s a relatively easy solution that simply requires you to turn off your key light that’s lighting the model and setup up your gelled background light first. Getting a great looking gelled background is pretty straightforward, but once you’re happy with your gelled background do not touch this light again.
Yup, getting the gelled background is easy, it’s keeping it that’s the real problem. The reason this is strange is because we always set up our lighting with a key light first and then add and adjust the other lights around it. Key light, fill light, then hair lights and so on, but we need to rethink this process with a background light and treat it like a completely separate setup.
Think about it like two different lighting setups in one shot rather than one big one. This way you can clearly separate the two, the background gel shouldn’t affect the model and the model lights shouldn’t affect the gelled background.
Ok, so let’s assume we’ve followed all the steps to getting the perfect gelled background. We’re in love with the color we’ve achieved behind the model, it’s looking great with all its saturation and strong color, and we know that once we’re happy with it not to touch that light again. What are the things we need to know when setting up our key light on our model to avoid ruining that beautiful colored background?
Let’s look at the 5 key reasons your gelled backgrounds may be getting ruined and some ways to avoid them.
1. Modifiers: Soft light modifiers and hard light modifiers on key lights
2. Directionality of Key Light: The angle of key light in relation to the model
3. Distance of Key light to Model: The inverse square law effect
4. Light Control: Flagging and controlling light spill
5. Distance of Model to Backdrop: Where in relation to your backdrop to place the model
Modifiers
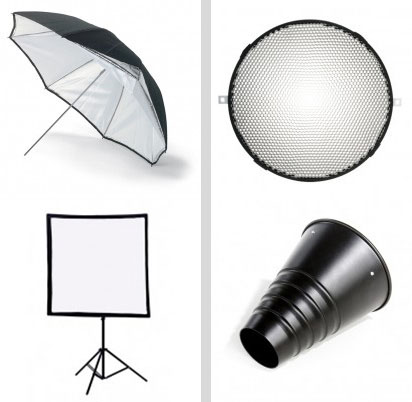
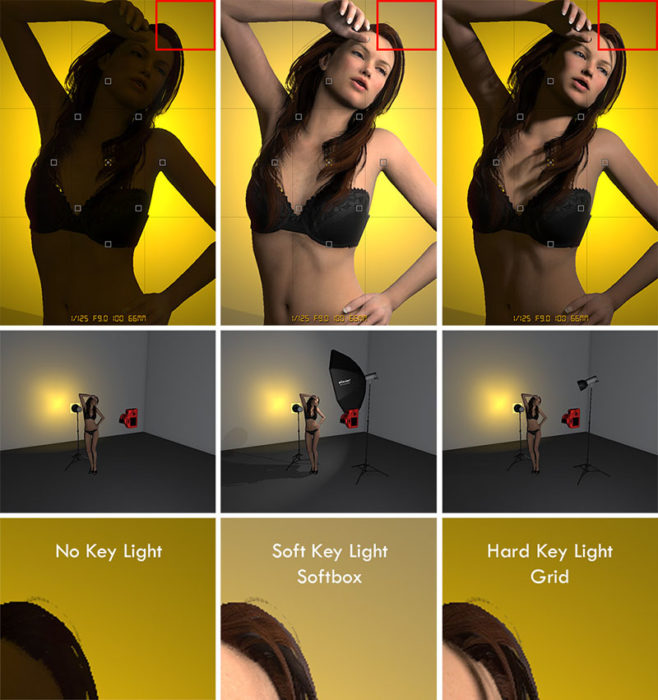
The modifiers I’m referring to are the modifiers that are attached to your key light. I’ll keep it simple by breaking them into two groups; hard and soft light modifiers. The soft ones are obviously the softboxes and umbrellas, these spread the light over a far wider area and the hard light modifiers are the ones that provide a very directional light like the grids and snoots.
If you light your model with a soft light modifier you need to be aware that your light will quickly and easily spill onto your gelled backdrop unless you take great care to control it properly. Using hard light modifiers is a lot easier to control but will obviously give you a very different look to the key light and how it affects your models appearance.
Choosing your key light modifier shouldn’t be dictated by whether or not you’re using a gelled background but you should be aware of what effect each one has so you can plan your setup accordingly. If you’re using a hard light then you can afford to be a little more relaxed with its placement whereas if you want to use soft lights like soft boxes you need to pay careful attention to the other factors I’ll be going over to ensure your background doesn’t get washed out.
Directionality of Key Light
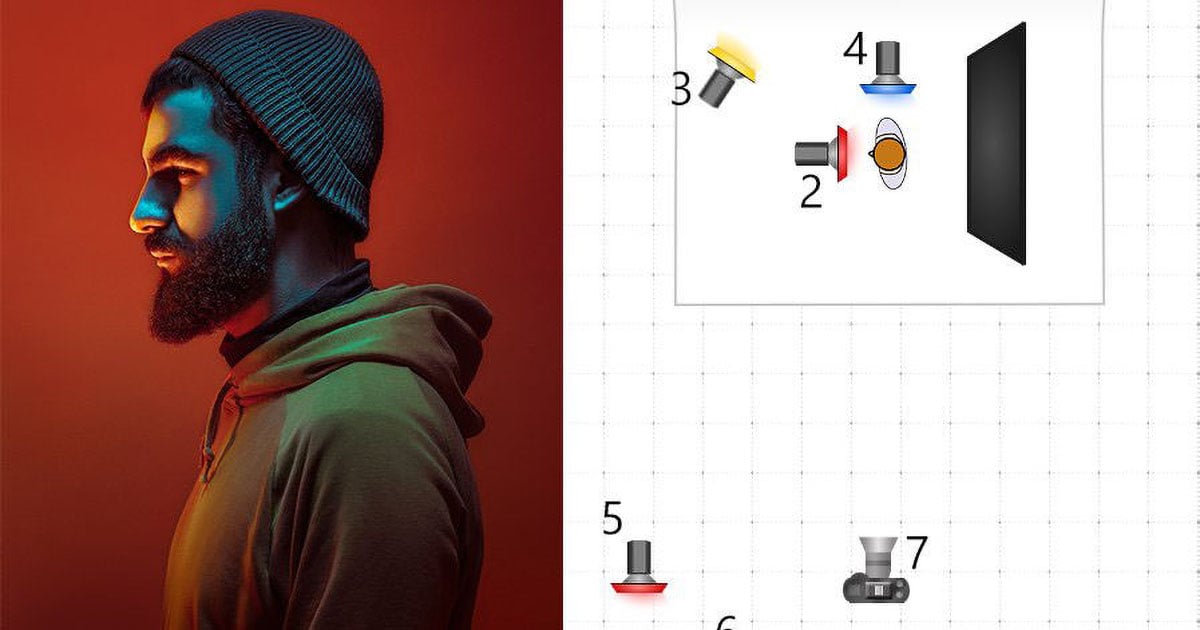
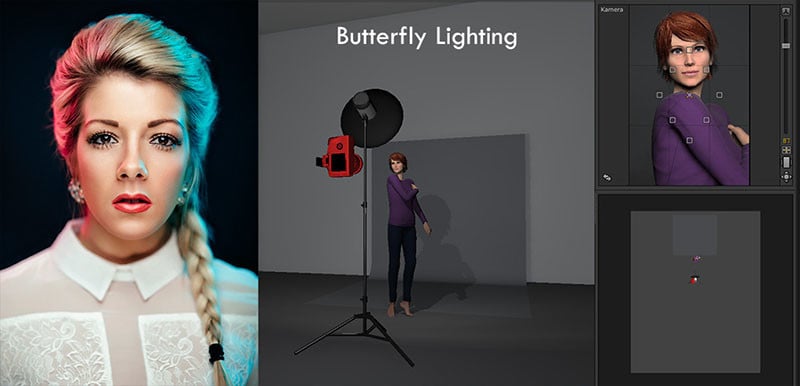
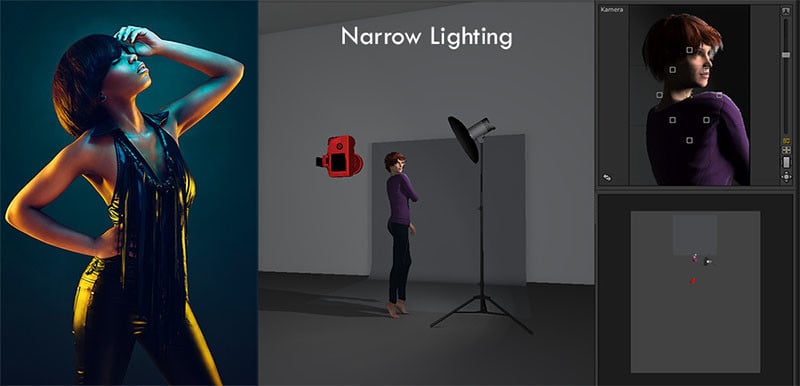
The directionality of your key light refers to which angle you place it in relation to your gelled background. A lot of us like to use varying lighting styles on our subjects like narrow lighting, butterfly lighting, broad lighting, split etc, etc. Some of these lighting styles will lend themselves to gelled backgrounds more than others, though.
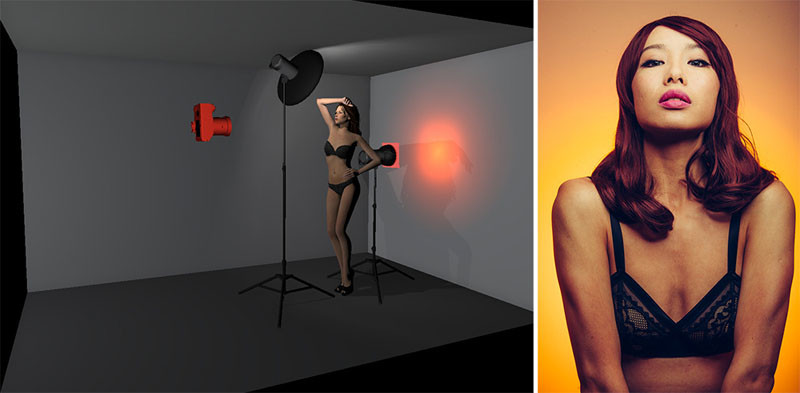
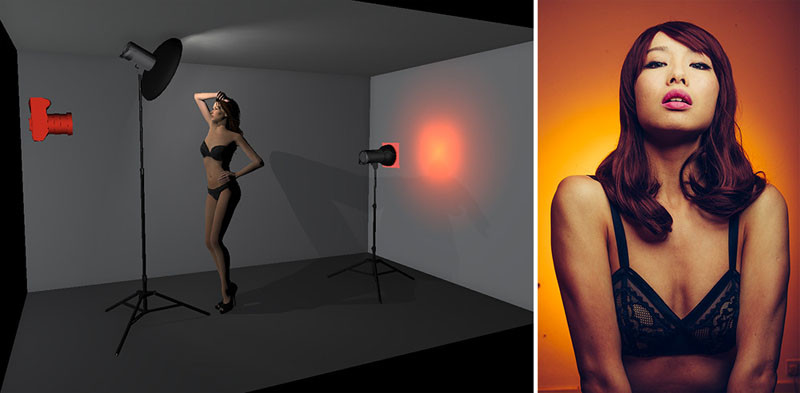
For example, butterfly lighting is a beautifying lighting technique that requires the light to be directly in front of the model, thereby accentuating symmetry within the look. Conversely narrow lighting highlights shape and form by placing the light to the side and uses directionality of light to cast shadows on the model in relation to the camera.
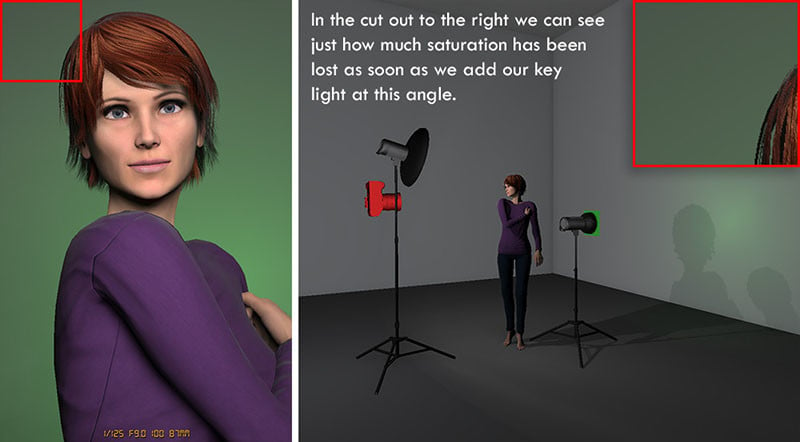
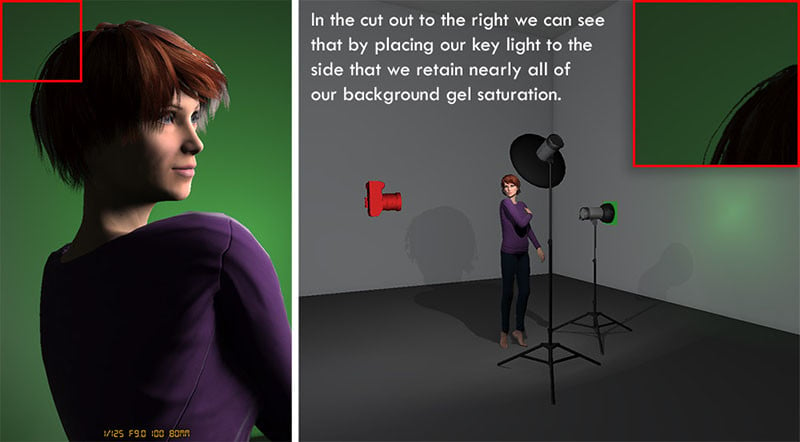
Butterfly lighting usually requires you to point the light straight at the model which unfortunately means you often wash out the gelled lighting behind her. Narrow lighting on the other hand requires you to place your light to one side in relation to the camera and model and usually means that it isn’t pointing towards the background. As a result it doesn’t wash out the colored gel nearly as much. Take a look at the following diagrams to see exactly what I mean.
It doesn’t mean that you can’t ever shoot butterfly lighting when using gelled backgrounds. It just means that you may have to employ other techniques and workarounds mentioned here to achieve the desired look.
Distance of Key Light to Model
Utilize this technique properly and it may well be the most powerful tool in your lighting arsenal. The distance of your key light to your model is crucial to getting uncontaminated gelled backgrounds and it’s a common problem that is often overlooked. This is tricky to explain with mere words but essentially the closer the key light to the model, the less light that actually falls onto the background. The principles of this are based around the inverse square law theory, which is a whole other article, but essentially as you bring your key light closer to the model the more you have to turn your key light down to compensate.
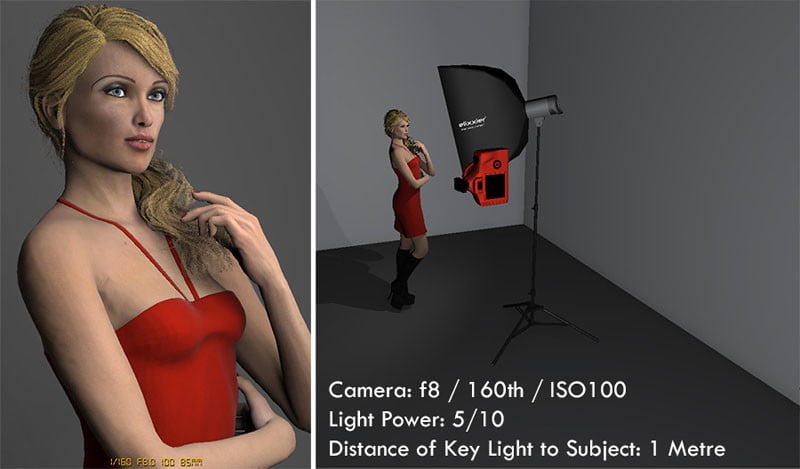
For example, if your key light was 2 meters away from your model and you took a correctly exposed picture at f/8 (we’re assuming a constant shutter speed of 1/160th and an ISO 100 for a normal studio setup) and we moved our key light closer so that it was now 1 meter away from our model (half the distance) and took a shot it would now be one stop overexposed (one stop equals double the light). We don’t want to change the settings on the camera because remember our gelled background light is set to those settings so we turn the power of our key light strobe down one stop (half the light to match half the distance moved). If we take a picture now the model is correctly exposed again.
Like I said this is a real pain to explain coherently with text alone so let’s take look at a diagram below to elaborate on what I mean.
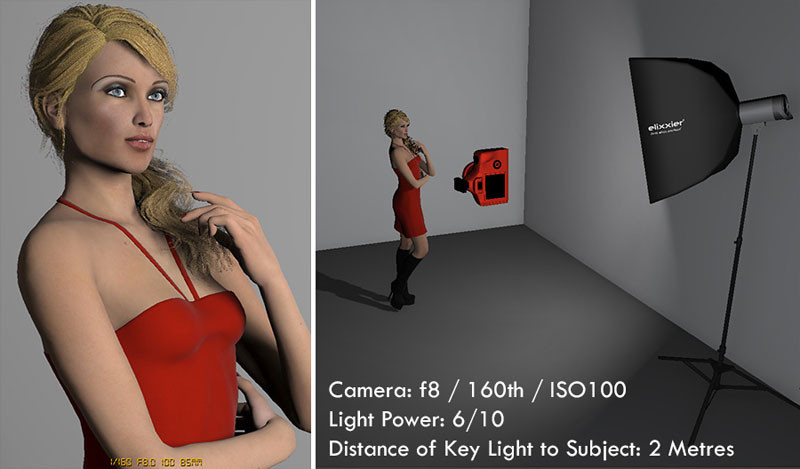
So we can see that by moving the light away and upping the power of that one light that we can still correctly expose the model without having to change any settings on our camera. The same applies if we want to move the light closer, we just have to turn the power of the light down to compensate, we don’t have to adjust the camera.
Now lets see what happens when we introduce our gelled background light that we already had perfectly set up before. How does this technique affect the colors of that gel we so painstakingly got right previously.
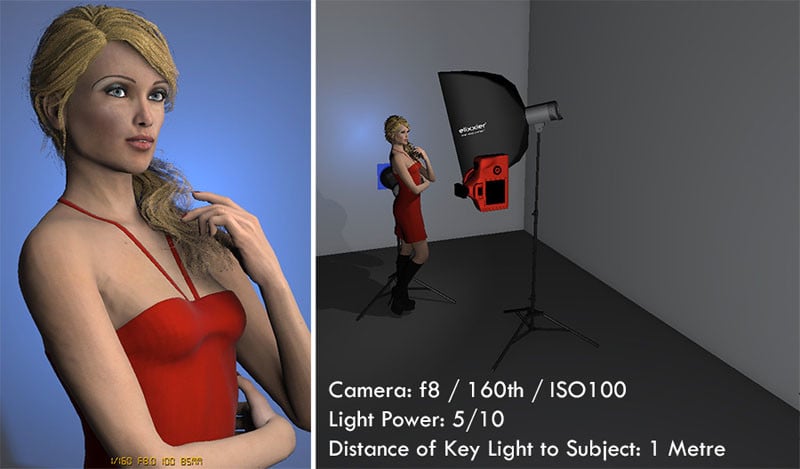

As I mentioned a moment ago, if you get your head around this concept your mastery of lighting will go through the roof because it is an incredibly powerful tool if you can utilize it to your advantage. I know it’s tricky and a little counterintuitive as when I was teaching this to new photographers in the studio where I worked this was always the hardest part for them to get their heads around. I think the reason for this is because when you move your light further away from the background you’re actually adding more light to the background whereas normally you’d think that by moving it further away you’d get less light back there. Granted you’ve added more power the to the light but it still seems odd when you’re starting out that this happens.
There are of course downsides to this technique and that is that by moving your key light closer to the model you change the effect the light has on the model as well. This is something that you’ll have to play with but if you’re happy with how your modifier looks when it’s quite close to the model then this may be the technique you need.
Light Control
The term light control has many connotations but in this context I’m referring to controlling the light after it has left the modifier. If you have complete control of your light after it has left the light source then that means no light is spilling onto your gelled backdrop. This is a little easier said than done but there are a few little studio tricks that you can employ to ensure your light is only going where you want it to and this technique is often referred to as flagging the light. Still-life photographers are absolute masters of this as they are often working with very small objects like food and bottles etc but their light sources are still the same size as ours when we light larger objects like people. As a result they need to be extra careful of where their light is going and spend a long time before shooting begins ensuring no unwanted light spills anywhere where it shouldn’t.
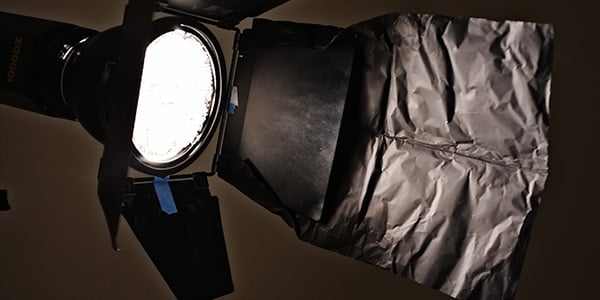
I’ve used Cinefoil here to mould onto my barn door to create an extra large flag to control the spill of light.
I’ve used Cinefoil here to mould onto my barn door to create an extra large flag to control the spill of light.
One tool we can use to control the light is Cinefoil or Black Wrap. This is essentially matte black, heat resistant and extra thick tinfoil that we molds onto our lights to control any spill.
It’s relatively inexpensive and although more popular in the film and movie industry it’s invaluable to have a few sheets in your bag in case you need it. Simply mold it into any shape you want and when you’re done, flatten it back out and return it to your bag for next time. I’m sure the benefits of this speak for themselves but if you’re using a hard light source like a snoot or grid a few well placed sheets of this you can make sure that no light from your key light spills onto your gelled background even if your quite close to it.
There are going to be occasions of course when you want to use larger lighting modifiers like softboxes. Flagging unwanted light on a softbox would require either a huge amount of Cinefoil or a larger and easier to manage alternative. One option is black poly boards, these are present in most studios and they are usually about 6ft high by 4ft wide and painted matt black on at least one side. Simply maneuver these into place next to your lights and angle them so that they funnel the light away from the background but still onto your model.
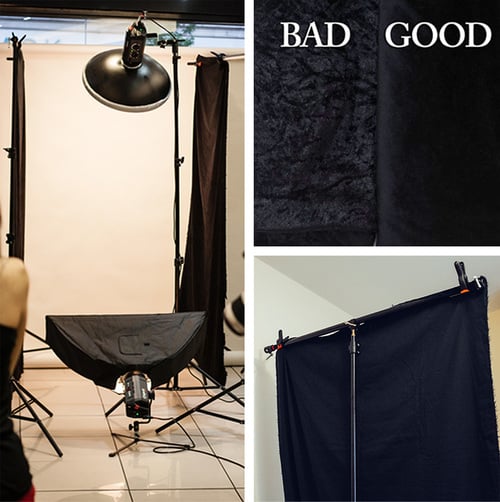
I’ve used these a lot but I also use a cheap and portable alternative when I’m on location too, it’s simply a couple of large sheets of black velvet. I hang them from spare light stands and they give me complete control of the light after it has left the modifier. It might seem silly at first but black velvet is great at soaking up unwanted light thanks to its deep texture. Be sure to get the cotton based version though as the synthetic one is shiny and renders it useless as a light flag.
Distance of Model to Backdrop
You’re nearly there and I’m sure you’ll be pleased to know that I’ve saved the easiest till last. This last solution refers to how far away your model is to the background. Now I know this seems obvious but you’d be surprised as to how many people place their model right next to their gelled backdrop even though they have the whole studio to play with. Essentially this technique is your “do whatever you want” card to play. Set up your background gel and then place your model far away from it and you can set up whatever lighting you want with her.
In fact you can even use the practically forbidden softbox with butterfly lighting from 2 meters away technique if you really want!
The point is that you’re treating this as two completely different lighting setups, each of them being so far apart that they have no influence whatsoever on one another regardless of what you do in them. Obviously there are limitations and you still need to tie the model and background together in one frame with a slightly longer lens but it’s certainly possible in most studios. Up until now I’ve been dealing with issues that most of us have encountered but we’ve only really encountered them because we’re dealing with a smaller space like a home studio. Eliminate that space issue and you’re free to do as you please.

All joking aside, the same principle applies even in smaller spaces too. I even tried this in my front room to see if I could force the effect in a small space as well. The result is that yes, even in small spaces by simply moving your model as little as 3 feet further away from the background like I did in this test can have a dramatic effect on how washed out your background gels look.
In Conclusion
Here are the points to remember:
1. Set up your background light first before you set up your model lights.
2. Once you’ve set up that gelled background light correctly do not touch it again.
3. Soft light modifiers on your key light are harder to control and more likely to ruin your gelled background versus hard light modifiers .
4. Certain lighting techniques like butterfly lighting are harder to implement in small spaces when using a gelled background. Instead, opt for more of a side-lit look like narrow lighting to make it easier to control the spill of light.
5. By bringing your models key light closer to her and turning the power down you can actually eliminate any spill of light onto the background.
6. Use Cinefoil, black velvet sheets, or poly boards to control and flag the light. Use these tools to ensure no unwanted light falls onto your gelled backdrop.
7. If you have the space for it, don’t be afraid to move your model and key light well away from the gelled background.
Well done. You made it to the end and my apologies for the long article on this but I do honestly believe that all the points I’ve raised here are valid in the pursuit of maintaining clean and saturated gelled backgrounds.
P.S. I also teach all these things in person in my Gelled Lighting Workshops in the UK.
About the author: Jake Hicks is an editorial and fashion photographer based in Reading, UK. He specializes in keeping the skill in the camera and not just on the screen. You can find more of his work and writing on his website, Facebook, 500px, Instagram, Twitter, and Flickr. This article was also published here.