A Practical Guide to Creating Superresolution Photos with Photoshop
We’ve seen it in plenty of thriller/crime solver TV shows and movies: upon reviewing some grainy and very low-resolution surveillance footage, someone inevitably asks the technician, “can you zoom in on that and enhance it?” Then, with the quick press of a few masterfully placed keystrokes and bleepy computer sounds, the image is suddenly enhanced with vastly increased resolution and a key plot device is revealed.
But there actually is a practical means of increasing the spatial resolution capability of a camera. It’s called superresolution, and it’s possible with the camera you have right now.
In this tutorial, I’ll show you how to enhance images just like (actually, not at all like) in the movies. I’ll show you how it’s possible to make visible what were previously indiscernible details and break the resolution bounds of your camera.
Much more than a few carefully placed keystrokes, superresolution is both a shooting technique and a post processing method and there are limitations in its application. It’s not very suitable for moving subjects. Because of this limitation, it’s best for static scenes like landscape photography or certain studio/product photography.
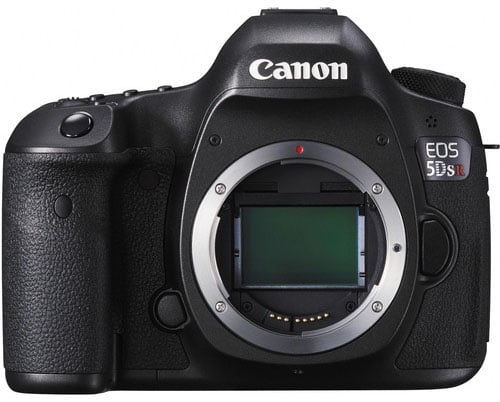
While not quite as simple as just buying a Canon EOS 5DS R, this tutorial shows you how to actually enhance the resolution of your camera to levels upwards of 40 megapixels without spending a dime on new equipment. If you’re the pixel peeper looking to create extremely fine detailed, high resolution images for print work, or if you just want to learn about an actual method to create extremely high resolution and cleanly detailed photos, keep reading.
A Primer
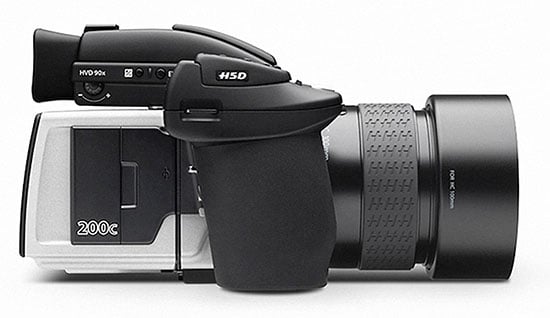
I was first introduced to the concept of superresolution when Hasselblad announced their H4D-200MS, an obscenely expensive medium format camera capable of 200 megapixel (MP) images (it has since been superseded by the Hasselblad H5D-200c). The thing that intrigued me most about the H4D-200MS was that it made these extremely high resolution images with only a 50 MP sensor. Using a special sensor-shift mechanism inside the camera, the H4D-200MS was able to make 6 separate images, each with slightly different sensor positions with only a pixel of difference between each shot. The camera would then automatically re-align those images and combine them together to produce a photo with 4x the amount of resolution.
The current generation H5D-200c costs more than most mid range cars at $45,000. I knew that I’d probably never be able to lay my hands on such an expensive camera, but I knew that I want the same technology in my (much more modest) compact system camera.
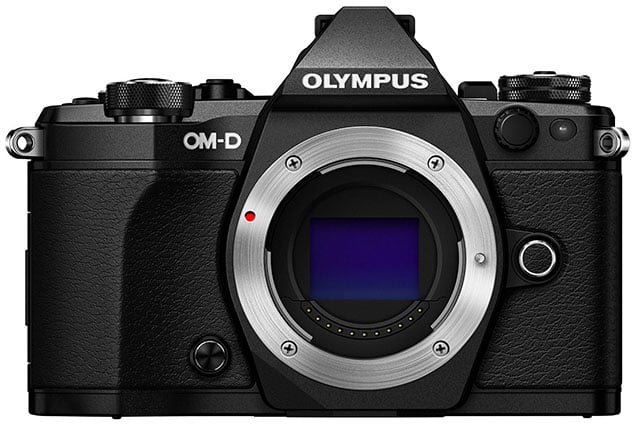
Now it’s 2015. In the four short years since Hasselblad announced the 200 MP beast, sensor shift technology is starting to see its way into more affordable cameras. The recently announced Olympus OM-D E-M5 II is the first consumer level camera to feature this technology. Similar to the H4D-200MS, the OM-D E-M5 II makes no less than 8 consecutive photographs with its 16 MP sensor.
After shooting these 8 photos, each with a different sensor position, it then combines the data from all 8 images into a 40 MP image (or up to 65 MP in RAW). It’s a little more modest than the ridiculous level of detail capable by the Hasselblad but the E-M5 II is a compact system mirrorless camera with a much much smaller 4/3″ sensor. At 40 megapixels, it’s right on par with some of the highest resolution DSLRs currently available like the Nikon D810 (36 MP) and the Sony a7R (36 MP).
Now I wouldn’t really call myself a pixel-peeper, but the thought of making an ultra-high resolution photo intrigues me. My question has always been: Can we achieve a similar kind of superresolution without the need for a special sensor shift mechanism? The answer is yes and the technique is stupidly simple.
By taking a burst of numerous consecutive photographs by hand and cleverly combining them in post processing, we can noticeably improve the resolution capability of any camera. It’s a simplified geometrical reconstruction technique using the concept of sub-pixel image localization.
It’s easier than it sounds, I promise. Here’s what to expect and how to do it:
What to Expect
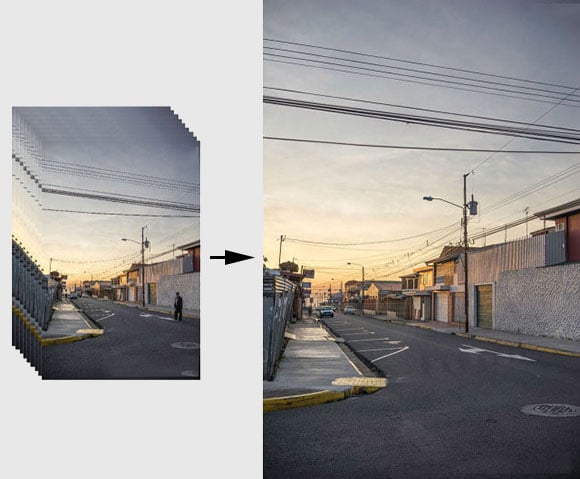
I happened to be staying near San José, Costa Rica while writing this article so I shot a bunch of street photos for this tutorial example. The mix of moving cars and fine detail in the streets of the Costa Rican town will allow me to demonstrate both the benefits and limitations of the technique.
The superresolution method here relies on statistics. We’ll gather a high quality dataset by shooting a collection of about 20 consecutive sharp images. The real trick is that we’ll shoot this set of exposures completely hand held. The subtle motion of our hand will actually act just like a sensor shift mechanism and allow different pixels to capture different parts of the scenes. It sounds simple but it actually works.
Once we’ve gathered all our images (I recommend shooting several scenes to get the hang of shooting so many photos at once) we can stack them, up-sample them, realign them and then filter their data with a statistical filter.
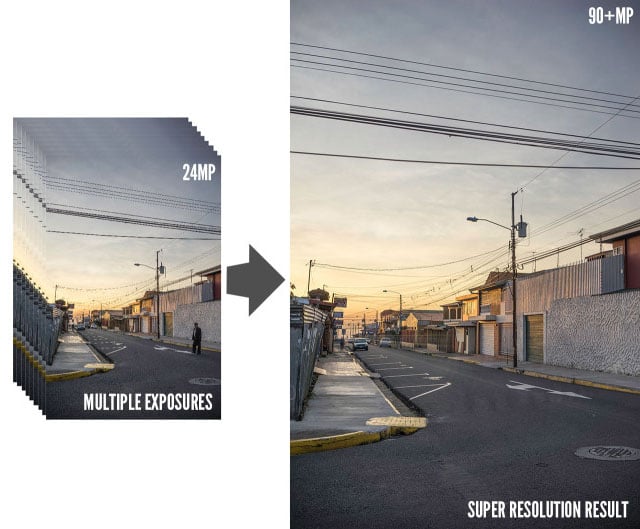
We’ll use a simple averaging (mean) filter, which will allow us to resolve detail at up to 1/4 of our original pixel size. So when we upsample, we increase the image to 4 times its original size. A 12 MP image can become nearly 48 MP, a 24 MP image almost 96 MP. There’s always a little cropping necessary because our photos will never perfectly overlap. My stack of 24 MP photos made a final image with 94 megapixels.
Now I don’t want to get your hopes too high: the difference in perceived resolution between a 24 megapixel image and a 94 megapixel image is actually less drastic than you might think. Even though it’s nearly four times as large, the increase in resolution will only be apparent in the areas of the image with the finest detail. As a result, the technique here only shows tangible returns on very highly detailed scenes. This is a pixel peeper’s method.
The benefits are very real, but the results might be less drastic than numbers would initially indicate. Also, unless you print your photos billboard size and stand really close to see every little detail, 94 megapixels is overkill in just about ever kind of application I can think of. Even the highest resolution computer monitors have only about 15 megapixels.
But let’s make a huge image just because we can:
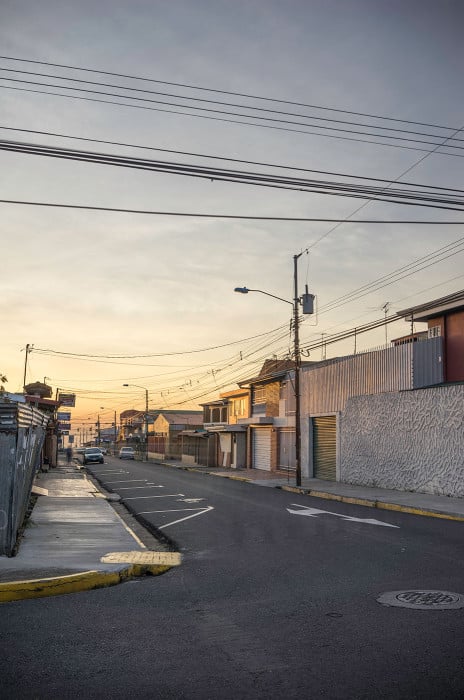
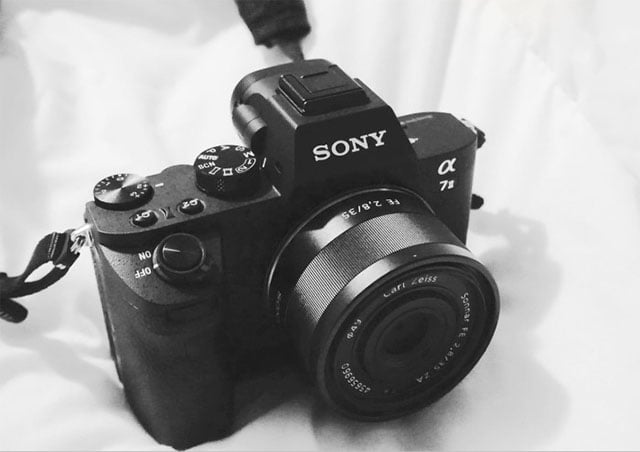
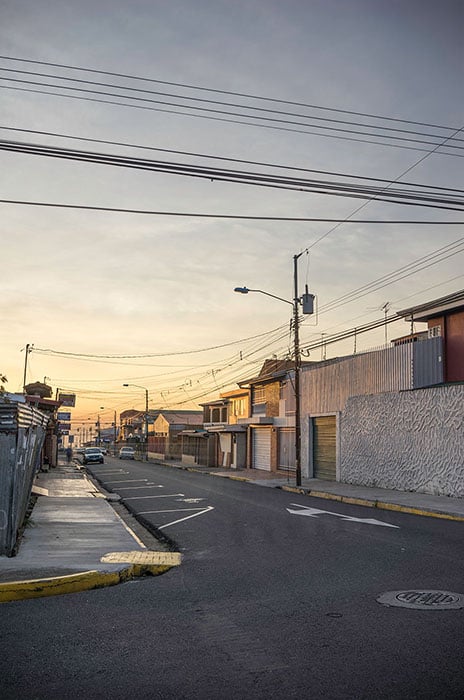
The photo here was made on my Sony a7II, with a Zeiss Sonnar T* FE 35mm f/2.8 ZA lens. I made the exposure at ISO 100, f/8.0 and 1/100th.
I’d like to use my example image to point out some of the benefits and limitations so that you can get a better idea of what to expect from this superresolution technique. Here’s the example image again, this time with some boxes labeled with letters to demonstrate the location of each of the following example images. Each area is a 200px by 200px square (100px by 100px on the original), magnified to 700% so that you can more easily discern the differences.
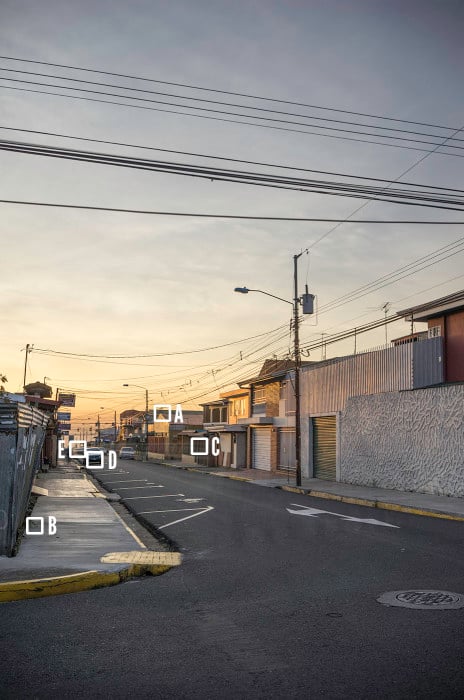
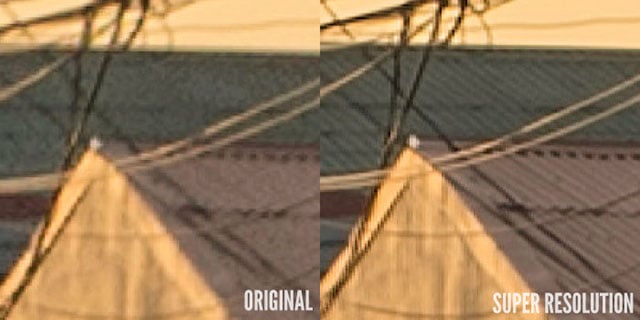
A: Up to 4x Spatial Resolution Increase
While there is a very apparent and measurable resolution increase, it’s limited. Even if we used hundreds of stacked frames (not recommended), we probably would not be able to increase the actual spatial resolution of the image past about four times the original or 200% on each edge, length and width.
This limit is due to a number of reasons: the imprecise and random nature of our “sensor movement” (hand shake), inaccuracies in our layer alignment (pushing the limits of Photoshop’s auto-align function) and the fact that we’re simply averaging the pixel level details rather than writing a sub-pixel level demosaicing algorithm specifically geared toward multi-image superresolution.
That said, the process does uncover some extra fine detail that would have otherwise been imperceptible. Check out the detail at point ‘A’ where the details in a corrugated steel roof are nearly invisible in the original image but obvious in the superresolution stack:
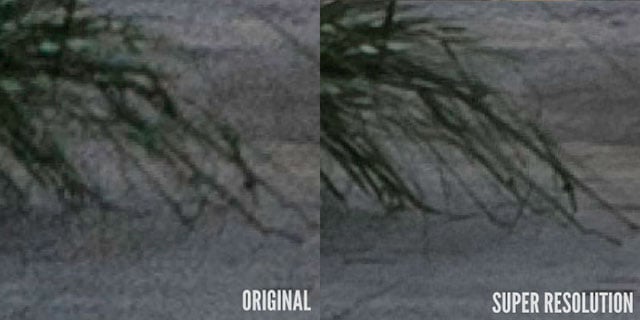
B: Noise Reduction
Another major benefit of this technique is the reduction of both random and fixed pattern noise. Because of the random nature of the camera motion when shooting a continuous photo sequence handheld and due to the random nature of the sensor read noise, stacking and averaging the value of each pixel essentially filters out most of the noise.
This technique also eliminates the influence of fixed pattern noise because our random hand movements ensure that any hot pixels or consistent noise patterns are averaged away by the data from the rest of the images. In the example from point ‘B’ you can see both a drastic increase in spatial resolution and a noticeable decrease in overall noise and grain.
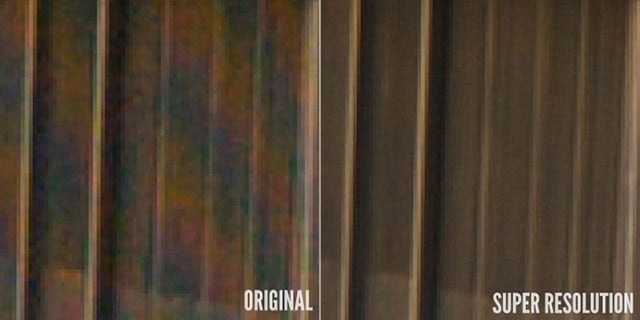
C: Moiré Elimination
One of the most distinct benefits is the elimination of almost any color moiré or color aliasing. This phenomenon can be especially problematic when shooting very finely detailed subjects with repeating patterns such as textiles. It shows as colored or zebra-striped patterns on these surfaces. Superresolution stacking usually eliminates the problem entirely.
That means this method is particularly beneficial to cameras without an optical low pass filter (OLPF) like the Sony a7R or an OLPF cancellation filter like the Canon 5DSR and Nikon D800E. These cameras are particularly susceptible to moiré and aliasing and that actually makes them some of the best candidates for using this method. By the fact that they’re already very high megapixel cameras, using this technique should be able to deliver some very high resolution results while also reducing or eliminating their inherent aliasing and moiré problems.
The example from point ‘C’ below was selected from an alternate superresolution image from the same example scene that happened to show more moiré on the repeating vertical lines of the front gate of one of the buildings.
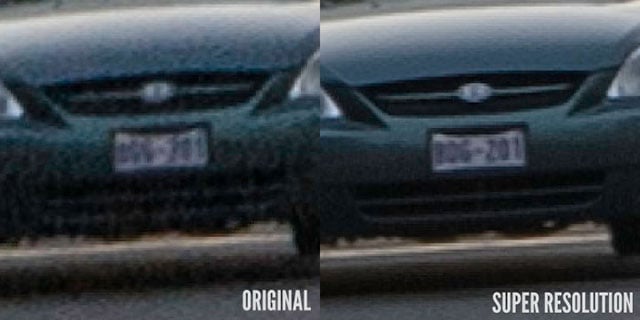
D: Increase Legibility
The sensor shift mechanism has a distinct advantage over our method here because the position of the shift is known so it can treat each recorded pixel location as part of a larger than native resolution image, rather than relying on averaging. This means that the sensor-shift technique should result in details that are sharper than those available from this method.
That said, it’s still possible to make certain details, like an unreadable license plate, “less unreadable.” It’s not up to the standard Hollywood would make us believe is possible, but there is still a noticeable improvement. In the example from point ‘D’ below, the license plate of the car parked in the distance is nearly impossible to read in the original image but the superresolution image is slightly clearer, probably reading “BDG-201″ or perhaps “806-201.” Not 100% clear but it’s better than the original, that’s for sure.
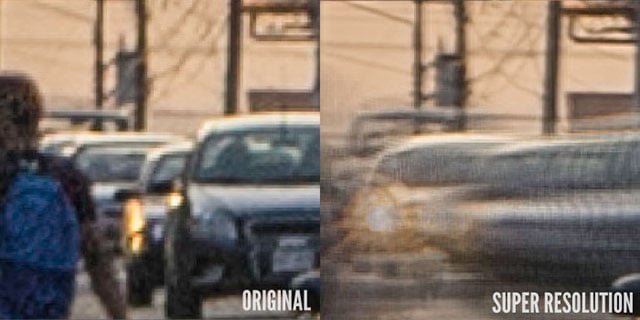
E: Not Suitable for Moving Subjects
Both the method outlined here and the sensor shift superresolution method have distinct problems with subject movement. If there’s any relative movement in the scene such as trees swaying in the wind, moving traffic or people walking, there will be apparent blur in those areas.
In my example scene at point ‘E’ below, there were cars driving in the distance and they show obvious ghosting/blurring due to the average stacking method. This is probably the most major limitation of superresolution stacking as it makes it impractical to shoot moving subjects without them looking like a blurry mess:
Alright, now that you know what to expect from a 94 megapixel superresolution stack, let’s go over how to make one.
What You Will Need
You’ll need nothing but a camera (preferably capable of burst mode), a reasonably steady hand, and Adobe Photoshop for the processing. We absolutely should not use a tripod for this technique as the subtle motion of our hand is actually beneficial to making a superresolution image. Our hand, in essence, is like our very own sensor shift mechanism.
- A camera
- A reasonably steady hand (don’t use a tripod)/li>
- Adobe Photoshop
When I first tried this technique, I tried using a tripod, taking a single image, and then tapping the tripod just the slightest bit to “shift” the “sensor” (i.e. the entire camera) before taking another image. Rinse and repeat. The problem with this technique is that, while it works, it takes a long time to take a lot of images and it’s difficult to keep the movements small enough.
I found it’s actually much easier and more practical to just set your camera to continuous burst mode and rattle off a bunch of handheld images. We don’t even need to try to intentionally move the camera to emulate the sensor shift as the natural instability of our hands is enough to make make the small shifts needed for superresolution compositing.
Shooting for Superresolution
In order to achieve the best results for this technique, it’s necessary to shoot a scene with high enough detail. It’s also essential that it’s a shot of a static scene. Expect any movement in your scene to produce blurry results. As such, this technique is best applied to still landscapes or maybe even studio shots (assuming you’re using continuous lighting or that your strobes can recycle fast enough to prevent you from moving too much between shots).
So for your first try, I highly recommend going outside to shoot a highly detailed scene with a lot of distant, static foreground detail.
Camera Settings
There isn’t one best setting for this technique (it depends partially on your equipment) but we should do everything in our power to make every image in our burst as sharp as possible. I recommend shooting with your lens stopped down to f/5.6 to f/11 to maximize sharpness.
Additionally, it’s probably best to use a shutter speed that’s fast enough to handhold without blur. A good safe guideline for shutter speed is 1/(2*focal length). So if you have a 50mm lens, 1/100th would be a fairly safe shutter speed.
It’s also important to use a fairly low ISO so this technique works best in well lit scenes, but it really should just be set as your f/number and shutter speed dictate for a neutral exposure. Auto ISO is helpful in this case.
We’ll want to use continuous burst mode as I’ve already said. I recommend taking at least 20 images. Technically the more images, the better, but 20 is a nice round number and I have found that trying to process more images can really slow down the post processing, even on a high-end computer.
Finally, it’s very important that we shoot our photos in RAW so as to maintain the best detail in the shot. When the camera processes JPEGs it often applies noise reduction and smoothing to the image which can reduce our efforts at achieving the best superresolution result. JPEG will work, but RAW will be better.
- Handheld
- f/5.6 to f/11
- Hand holdable shutter speed – 1/(2*focal length) recommended
- Lower ISOs are preferable, set as f/number and shutter dictate for a neutral exposure or set Auto ISO
- Continuous burst mode – minimum of 20 images
- RAW
When shooting, try making several sets of images. Remember that we’re not looking for very much hand movement between photos. We need only one pixel of motion between each shot. It’s likely that you won’t be able to handhold better than one pixel anyway, so just stay as still as you possibly can when firing off your burst of photos.
Check and double check your focus too; it might be possible that your camera may shift focus between photos. If that occurs, switch to manual focus to prevent it from shifting while shooting, but be extra careful to make sure everything is tack sharp before firing away. This method won’t work with blurry photos.
Processing
If you would like to try using my 20 RAW a7II files to test out the processing, feel free to download them here (500MB ZIP). You’ll need at least Lightroom 5.7.1 (Win / Mac) and/or Adobe Camera RAW 8.7.1 to read the files.
There’s a specific order of operations in processing that will allow us to combine our stack of photos into a final image with noticeably finer detail. We’ll import our photos into a stack of layers in Photoshop, upsample the photo (usually 200% width/height) with a simple nearest neighbor algorithm, re-align the layers, and then average the layers together.
- Import all photos as stack of layers
- Resize image to 4x resolution (200% width/height)
- Auto-align layers
- Average layers
1. Import the Images as a Stack of Layers
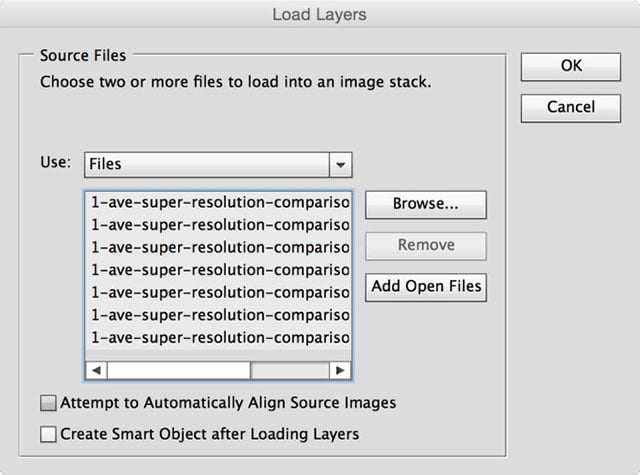
From Photoshop: File>Scripts>Load Files into Stack…
From Lightroom: Select All Photos. Right Click and choose Edit In>Open as Layers in Photoshop…
· Click Browse… to navigate to your photos
· Make sure “Attempt to Automatically Align Source Images” is unchecked (This is essential. If you align first it won’t work.)
· Click OK
2. Resize to 200% Width/Height

· Choose Image>Image Size…
· Set Width/Height to 200%
· Use the “Nearest Neighbor” resample algorithm. You can also use “Preserve Details” but I prefer “Nearest Neighbor” as it does not oversharpen
· Click OK
3. Auto-Align the Layers
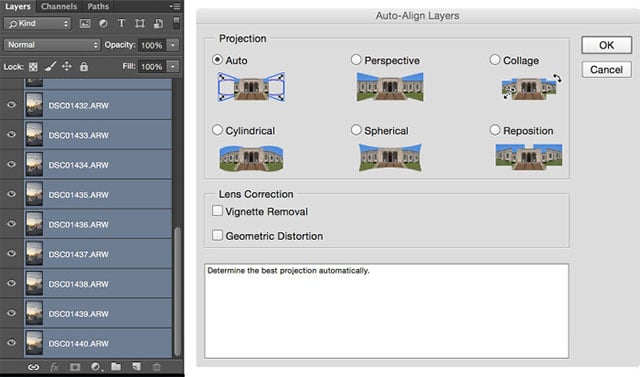
· Select all the layers in the Layers Palette
· Choose Edit>Auto-Align Layers…
· Use the “Auto” Projection Setting and uncheck “Geometric Distortion” and uncheck “Vignette Removal”
· Click OK
· Once aligned, check that each layer looks properly aligned with the bottom layer. If there’s one or two that didn’t align as well as the others, consider deleting them. You can turn on and off the visibility of each layer with the eye icon to the left of the layer. Just remember to turn them all back on before you continue.
4. Average the Layers
The fastest way to do this is to change the opacity of each layer from bottom to top such that the opacity = 1/(layer number). For example, if you have 20 layers, make the bottom 1/1 = 100%, the second from the top should be 1/2 = 50%, the third 1/3=33%, the fourth 1/4=25% and so on until the top layer which is 1/20 = 5%. Photoshop can only do integer opacities so there will be some rounding error and repeat integers as you get close to the last layer but it won’t matter too much.
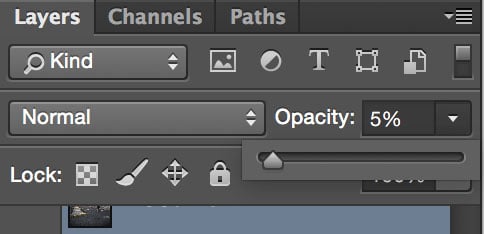
· With 20 layers, opacities from bottom to top are roughly: 100%, 50%, 33%, 25%, 20%, 17%, 14%, 12%, 11%, 10%, 9%, 8%, 8%, 7%, 7%, 6%, 6%, 6%, 5%, 5%
· Once opacities are set, select all the layers, right-click and choose Flatten Image
Averaging can also be performed by selecting all the layers and turning them to a Smart Object and setting the Smart Object’s stack mode to “Mean” or “Median” but this is can be slow when working with a stack of twenty 90+ megapixel photos just as a warning. The “Median” stack mode is particularly good for removing ghosting in moving objects. Smart Object stack modes are only available in CS6 Extended and CC versions of Photoshop.
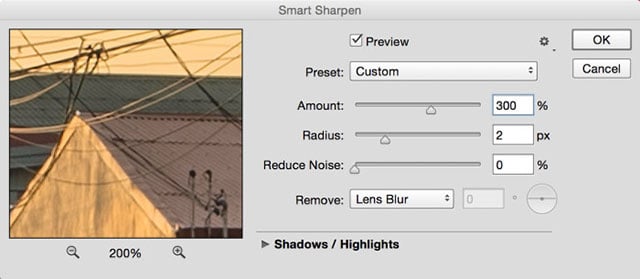
Optional: Apply Smart Sharpen
I usually like to use a smart sharpening filter of about 2px radius and about 200% to 300%. Because of the nature of our method, hard edges will likely look a little soft and will need some sharpening up.
A two-pixel radius works well with our 4x increase in resolution and should keep everything looking natural without noticeable halos. You might find that some alternate settings could work better depending on the content of your photograph.
· Filter>Sharpen>Smart Sharpen…
· Amount: 300%
· Radius: 2px
· Reduce Noise: 0%
· Click OK
After sharpening, you may want to crop out any extra unfinished edges before saving. That’s it! You now have a nearly noise free, super high resolution photo!
Conclusion
I think superresolution technology is here to stay. Whether it’s using sensor shifting, color filter array shifting, vectorized polygonal interpolation, some combination of these methods or others, superresolution will likely be implemented on every kind of camera from smartphones to DSLRs and compact system cameras. We’ll start seeing plenty of cameras that will be able to output images with more resolution than their sensor’s pixel count would otherwise indicate.
The technique outlined in this article is a practical, albeit special-use, way to achieve tangible increases in resolution from the digital camera that you already own. While not particularly as optimized as the latest in-camera methods, the underlying methodology is the same and the benefits are nearly identical. Elimination of color moiré and aliasing, increase of spatial resolution, and noise reduction are all benefits of this technique.
I predict that cameras will likely implement much faster superresolution methods in the future that do not have the current problems with motion blur from moving subjects. Faster methods will likely be done by shifting the color filter array or sensor at a much faster rate during a single exposure, rather than making multiple separate exposures as we did in this article. These techniques require much faster internal computer processing to be practical for things like sports photography so we will probably not see it implemented on sports-oriented cameras like the Canon 1D series.
One of the biggest questions surrounding the new megapixel war is whether we really need 50+ megapixel photos. Personally, I’m perfectly happy with images I’ve made years ago on the original 6.3 megapixel Canon EOS Digital Rebel. One of my current favorite cameras is the Sony a7S at only 12 megapixels and I absolutely love the results from the 16 megapixel sensor on the Fujifilm X-T1. At times I even feel like the 24 megapixel sensor on my Sony a7II can almost be too much. That said, there’s always a push towards bigger and better things and I still welcome the new influx of high resolution cameras like the Canon 5DS R.
Resolution, however is a single variable in the success of your image and in my opinion it’s a really low priority one. Lighting, composition and technique are all significantly more valuable to the success of a photograph than its pixel count.
Just keep in mind that some extra detail on a roof almost 500 meters away doesn’t make your image a better photograph and in pretty much every contemporary medium on which you’ll display your photos short of extremely large prints, no one will notice the difference between a 12 megapixel photo and a 100 megapixel photo. Unless they look really really closely.
Rest assured that you don’t actually need to throw money into a new ultra high megapixel camera body to get higher resolution photos. If you really want to delve into the world of many pixels, try some superresolution stacks first.
A Video Version of this Tutorial
About the author: Ian Norman is a photographer, engineer and entrepreneur based out of Los Angeles, CA. He is deeply passionate about photography and takes great joy in teaching others what he has learned over the years. He recently started a new website called The Photon Collective, a new community for photographers. This article originally appeared there.