How to Resize an Image in Photoshop
Resizing images in Adobe Photoshop sounds like it should be a trivial and simple operation, and for many uses and users, it is. It’s when one starts looking closely at the details in a resized image that it becomes apparent you should be looking into the options of the resize image dialogue box.
Table of Contents
Why Resize Images
In the past resizing to larger sizes was often performed on image files in order to make large prints. With the higher pixel count of current cameras and high-end mobile devices, resizing larger might not seem that necessary and maybe it isn’t for many users. If, however, you’re looking to produce the best quality prints from your image, resizing before printing might be in order and it doesn’t necessarily mean increasing image size.
Another resize scenario that I personally run into nearly every day is prepping images for posting to social media. In this case, I’m reducing the size of images in Photoshop before uploading them to social media and my own website. Other reasons for resizing images include submissions for publications, insertion into videos, and many more.
How to Resize an Image
First, we’ll start with a basic, barebones step-by-step look at how to resize an image. The steps are as follows:
- Open an image in Photoshop
- In the top menu, go to Image > Image Size
- Make sure Constrain Proportions (the vertical chain link icon) is enabled if you wish to preserve aspect ratio
- Input your desired Width/Height and units of measurement for the resized image
- Change the Resolution value and unit of measurement if desired
- Choose a Resample method, or uncheck the option to change image size without changing total number of pixels
- Click OK to complete the resizing
Now let’s do a deeper dive into the options available when resizing any image.
Image Resize Dialog Box
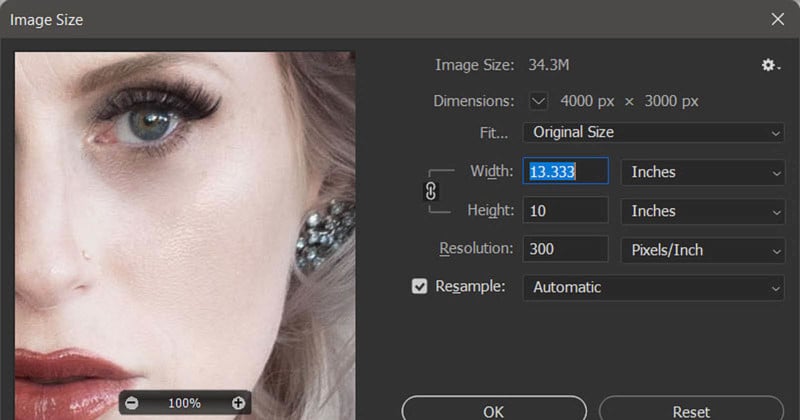
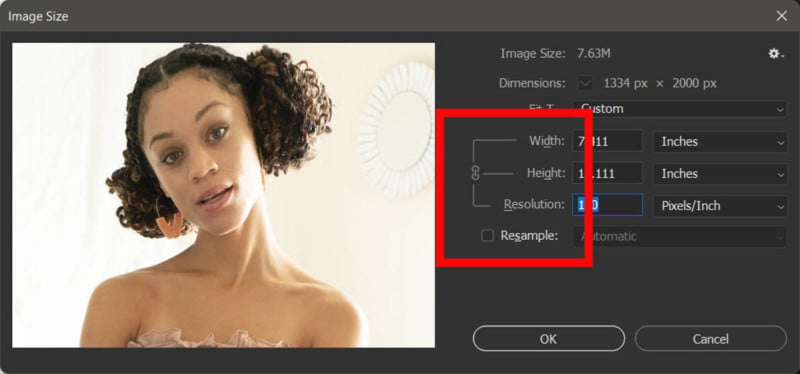
The Image Size dialogue box (Figure 1) looks pretty simple but there’s a bit more here than meets the eye. Let’s take a tour of the settings and options starting with the preview window.
In Figure 1 we see the Image resize dialogue box as it normally appears in Photoshop. It can be called by going to the Image > Image Size item in the main menu or by pressing Control+ALT+I in Windows or CMD+ALT+I on Mac.
Preview Window
Starting at the left we have the preview window which by default shows a 100% view of the image being resized. This view will update as one changes the parameters of the resize action to be performed. I highly recommend leaving this setting at 100% as it will provide the most accurate preview of the image quality after the resize is completed.
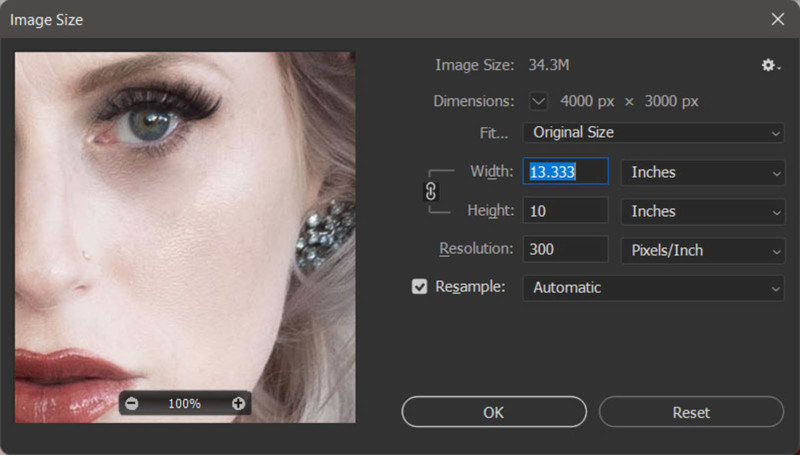
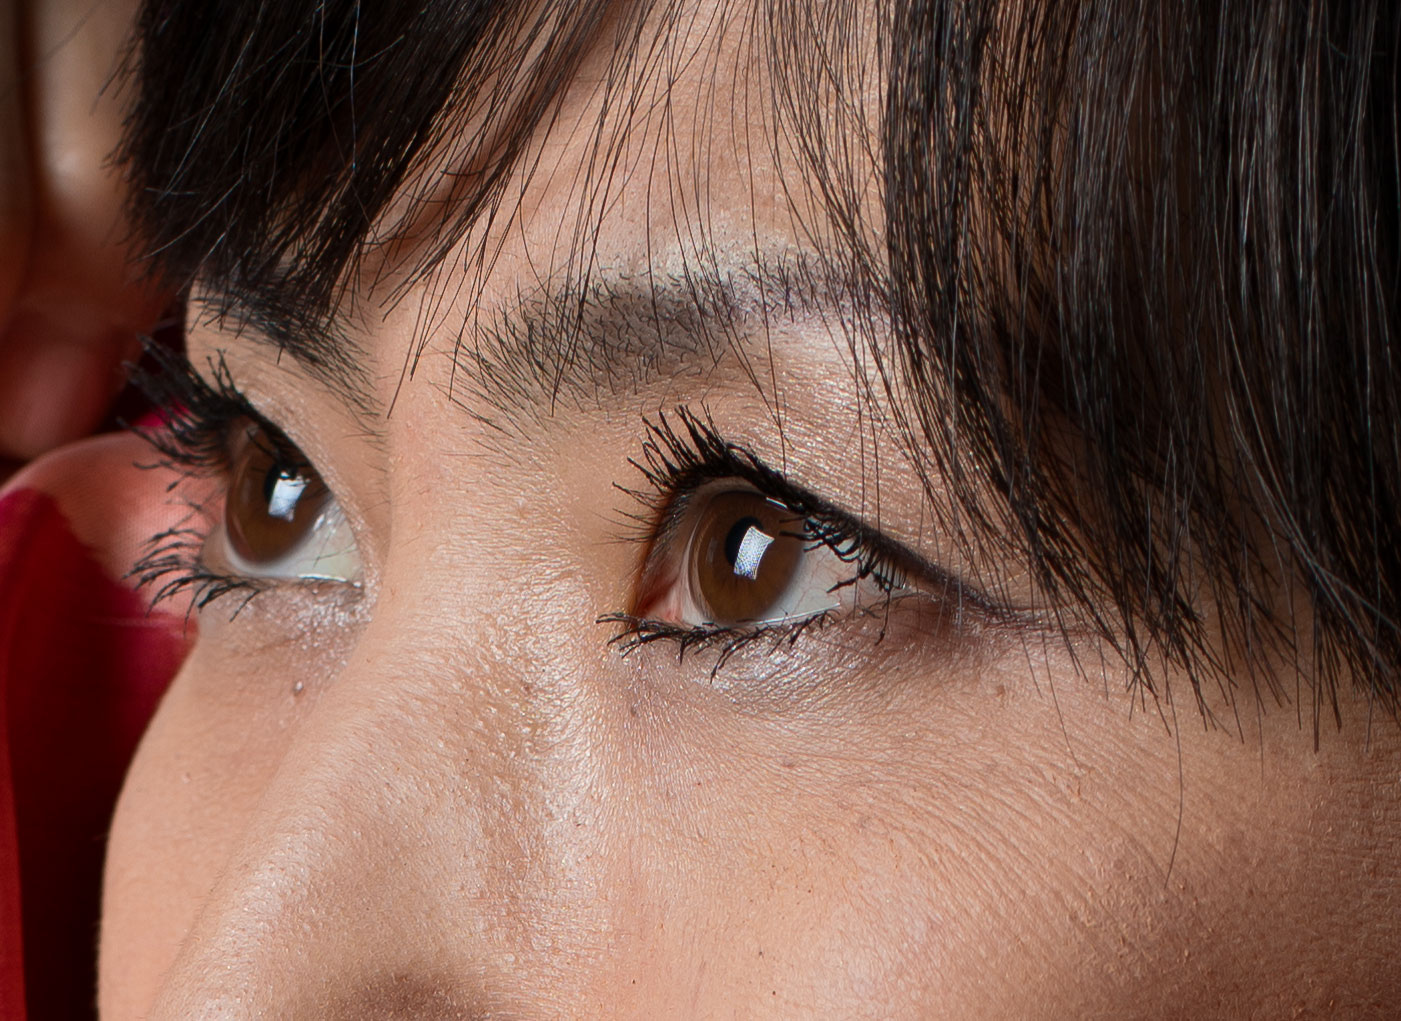
This preview window by default is a bit small but since 2013, Adobe added the ability to enlarge the entire Image Size dialogue box. It is not readily apparent but you can grab the sides and corners to enlarge the view. You can see in Figure 2 how I’ve enlarged the view so now at 100% we can see all of Stephanie’s face instead of just the small portion visible in Figure 1.
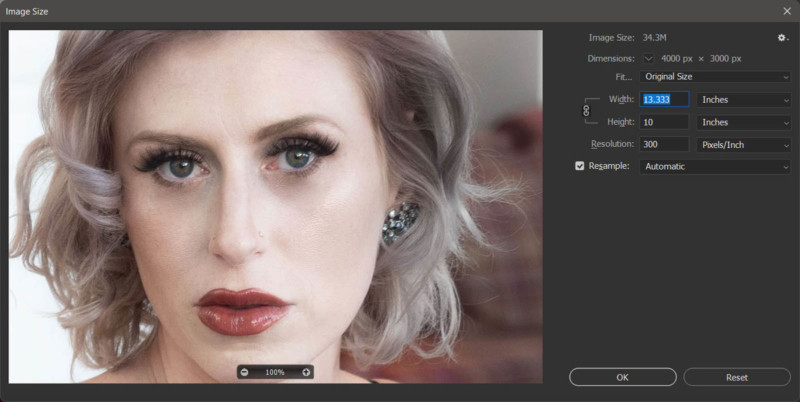
Image Details
To the right of the preview window are some details about the image starting with the image file size. In this case, the file size is based on an uncompressed file so if you were to save this file as TIFF with compression turned off, it would be 34.4Megabytes in size. Obviously, when the image is exported as a JPEG it would be much smaller in size.
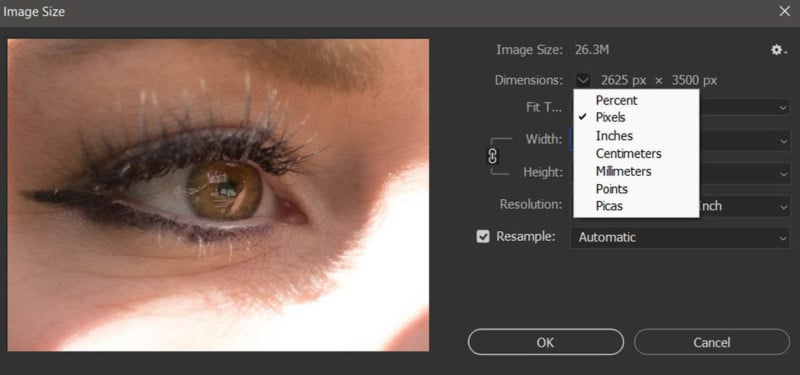
Below this, we have the image dimensions which are by default displayed in inches but might be different if you have changed this in the past. I usually size by pixels which can be seen as my default dimension setting in Figure 3. Other options are percent, inches, centimeters, millimeters, as well as points and picas. The latter two are most familiar to the desktop publishing crowd
Fit To
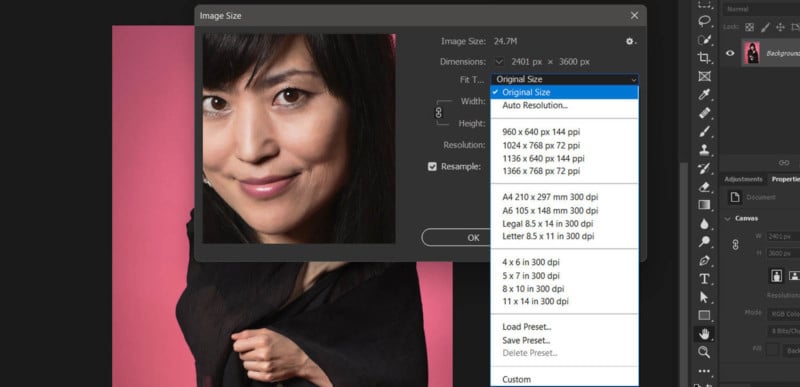
Next we have the Fit To options seen in Figure 4. This is a pull-down list with some commonly used image sizes for web use, desktop publishing, and photo print sizes. Keep in mind these presets will not crop an image so if you, for instance, use the preset for 5 x 7 inches and the image doesn’t match those proportions it will only match one of the dimensions and let the other adjust to fit the original proportions of the image.
Just below the Original Size option in the pull-down list is Auto Resolution. It might sound like Photoshop will somehow be able to guess the desired resolution for which you are needing. However, it is not reading your mind (yet!). Figure 5 shows the settings that are displayed when selecting this option.
Auto Resolution is basically there to do some math for you when your image will be output via the color separation process (or halftone in the case of grayscale images). If you are having to resize your image for high-quality book publishing or other similar types of output, the printing service will likely provide you with the lines per inch setting you should use. Of course outside the United States you may find they use lines per centimeter and thankfully Photoshop provides this option.
It may also be that you have a printer in your office/studio/lab that might provide a lines/inch type setting recommendation, so check your manual to see if this is the case for the best quality output from your printer.
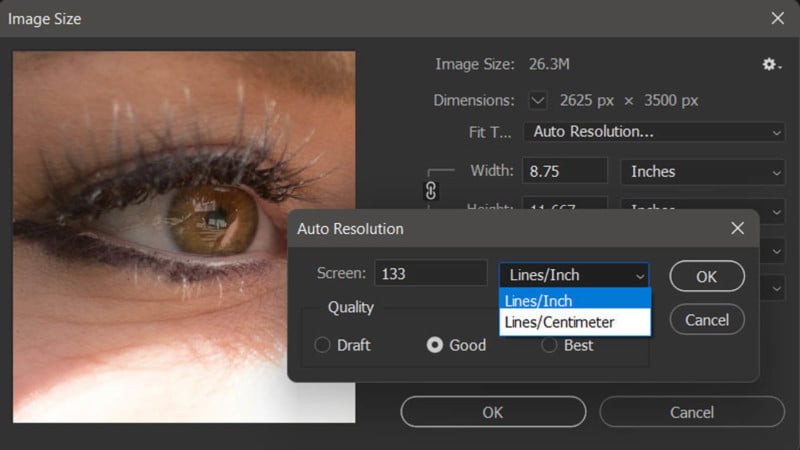
Three base options are available for draft, good, and best quality. For the final output, I would certainly choose the Best option. Again your service provider might request a draft quality version for testing.
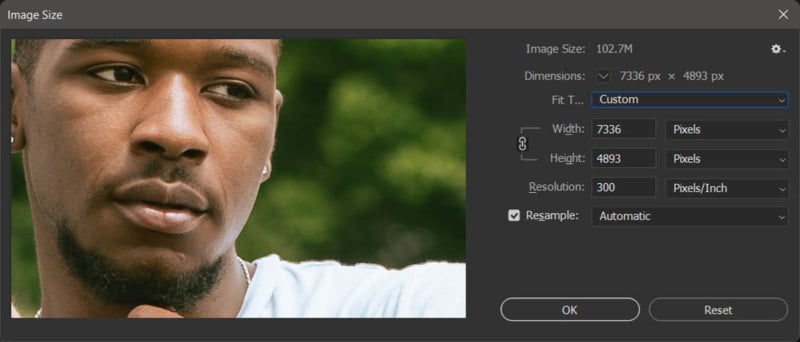
If you have a setting that you need to use frequently but isn’t listed in the default options you can use Custom to create one using the Save Preset option. Saved settings can be recalled using the Load Preset option. You will see that if you change the width/height settings the Fit To dialogue will change to Custom (Figure 6) and then this setting can be saved as a new preset.
Width and Height
Now we’re getting to where the real action is. The width and height fields are where you will make the changes to the image size. In Figure 7, you can see that to the left of the width and height input fields there is a vertical chain link icon (outlined in red). Clicking this icon toggles on and off the link between the two dimensions.
When locked, changing one dimension will cause the other to be changed in order to maintain the original proportions, or aspect ratio, of the image. When turned off these two dimensions can be changed independently. This is often not desirable as it will distort the newly resized image but there are times you might want to do this, thus the option to do so.
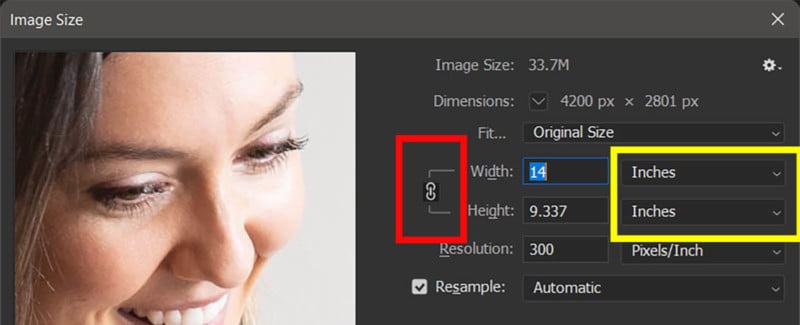
Before making changes to the values in the width and height fields you may want to change the type of value you’ll be modifying. You can do this using the pull-down menu highlighted in yellow in Figure 7. You can see how the options will appear in Figure 8 below.
One thing you might find a bit redundant is that despite the fact that there is a separate pull-down list for both the width and height dimension type, they will almost always be the same. For instance, you cannot have one display in inches and the other display pixels even if you unlock the values using the link icon. The exception is the columns option, which we’ll look at shortly.
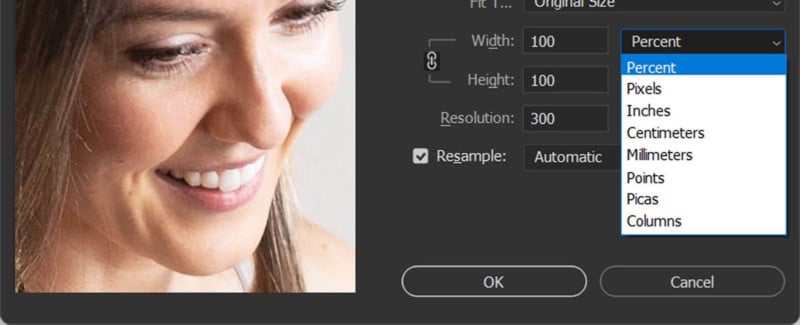
Of course, now comes the part where you need to decide which of those values shown in Figure 8 you need to use. Percent is pretty self-explanatory as it simply increases or decreases the image dimensions based on the percentage you input. Keep in mind that there are limits here and you can’t set a percentage that will increase the pixel dimensions larger than 300,000 pixels on the long side.
It may seem like the percentage option is rather limited in scope of use as you often need specific pixel/inch/cm dimensions. However, years (and years) ago it was used quite often to enlarge images. Many Photoshop users swore by the method of using successive 10% image size increases to create cleaner and more detailed image enlargements than simply jumping to say 150 or 200 percent image resizes. The more advanced algorithms that are now in Photoshop do a pretty good job. Still, you might try that technique out for yourself and compare the results.
Resizing by pixel dimensions probably runs neck and neck with inches (or centimeters) for the most often used parameter. This certainly is related to needing specific output sizes for viewing on webpages, mobile applications, and other electronic displays.
Note that when resizing for electronic displays, the Resolution parameter will generally have no effect on how the image will look on your computer or mobile device screen. This is because a 400×300-pixel image displayed at 100% on a screen will remain 400×300 pixels (see Figure 9). It doesn’t matter if the resolution is 72ppi or 600ppi. This is because your screen has a fixed number of pixels and as such, the resolution figure means nothing in this case when viewing images, usually.
Some desktop publishing and layout applications may display an image differently based on resolution because they are designed to preview the output to print. As such, Pixels Per Inch do make a difference in this case. The same applies when outputting to print in Photoshop.
This brings us to the remaining value types available for resizing. These include inches, centimeters, millimeters, points, and picas. Using any of these values allows you to resize to a specific output size for printing. For output to a printer, you would typically use the inches or centimeters options. Millimeters could be used here as well. Points and picas are going to be typically used by those in desktop publishing and other publication development tools.
When using these physical print/output values, resolution does become important. While 300ppi is often used for a lot of printing situations, it may not necessarily be the best. 300ppi will often provide very good results for print sizes like 4×6 up to 16×20 inches and maybe even a bit larger. However as output size grows, the expectation is that the viewer will be further away from the image. This is often why large prints, 30×40 inches in size, for instance, can be printed at 180ppi and even much less for billboard size prints. Unless someone gets very close to the image, the quality will be very difficult, if not impossible to see.
If you are sending your work to be printed, the service will often offer recommended output resolutions as well as some other settings. If you are using your own printer, the manual might offer some preferred settings based on the output size.
The last item in the list of values is “columns”. I mentioned columns earlier as the one value you can set in width or height that can be different from the other dimension type. Like picas and points, columns are going to be something familiar to those who layout documents and work in desktop application tools like InDesign. Ok, so what is the actual value of a column when using this value? So glad you asked.
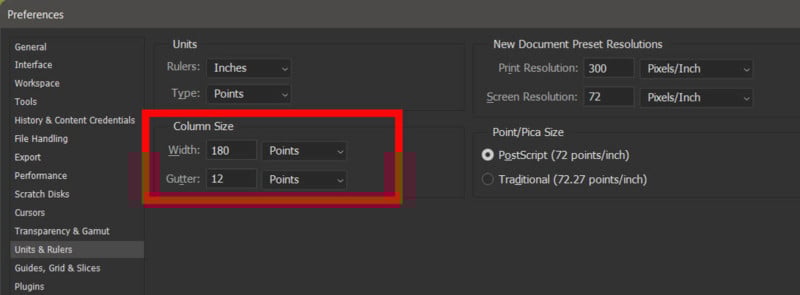
Column size is set in Photoshop’s preferences and can be found under the Units & Rulers section. By default, the column size is set to 180 points (2.5 inches). Column and gutter width can be adjusted in the area highlighted in red in Figure 10.
This dialogue box also offers some other settings you might want to adjust to suit your workflow. For instance, I prefer to have my rulers set to pixels and you might want to have new images default to a different print resolution than 300ppi.
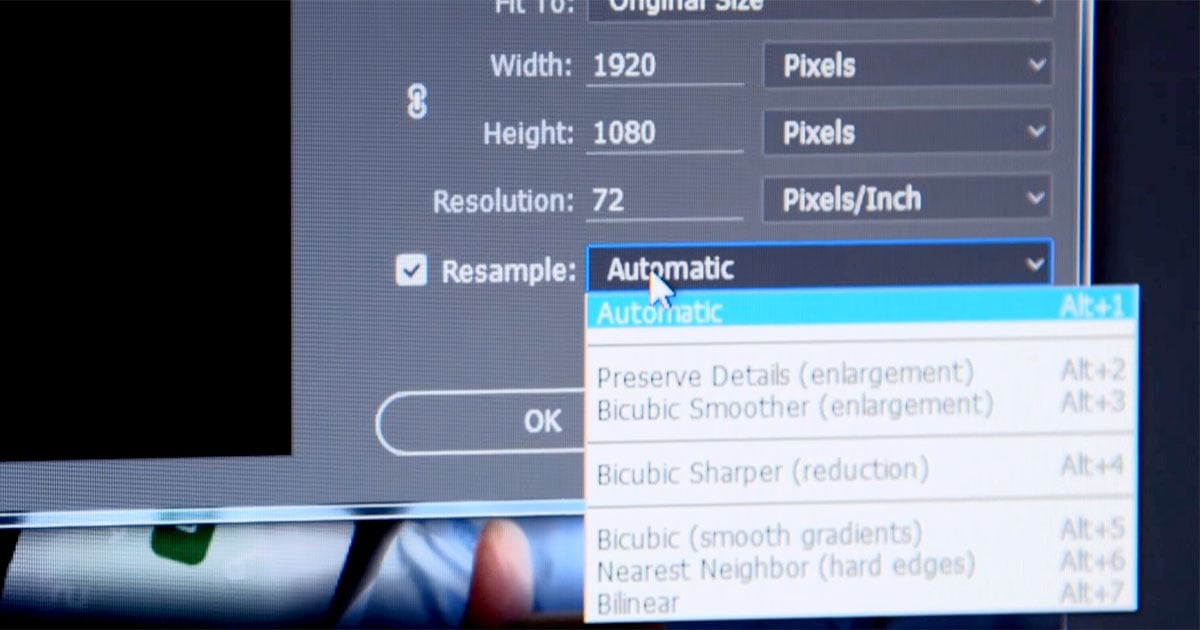
Resampling
Before we get into the various resampling options, I want to point out that the terms “resize” and “resample” are not necessarily interchangeable. Technically, resizing is simply adjusting the printable output dimensions and as you change the size in inches, the resolution is simply adjusted to “fit” all the available pixels into the new printable area. You can see this by unchecking the resample box and adjusting the inches value. The resolution will change to fit.
Likewise, you can change the resolution value and the width and height will change accordingly. You will even see that once you uncheck the resample box, the Width, Height, and Resolution labels are all “linked” and the ability to unlock is not possible. This is because pixels are not being added or subtracted from the image. Of course, if you do need to adjust the actual pixel dimensions of an image, then you’ll need to check the Resample box if it isn’t already.
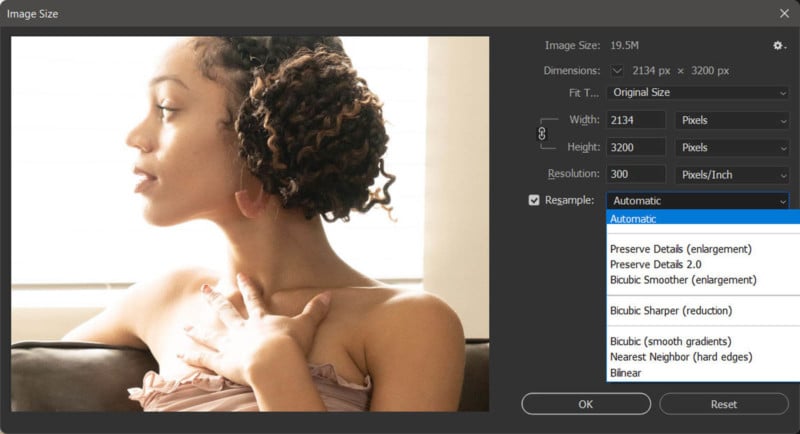
Here is a brief overview of what the different resampling methods do:
- Automatic. Photoshop will choose the best resampling method based on what type of document you are working with and whether you are scaling up or down.
- Preserve Details (enlargement). Selecting this option adds a Reduce Noise slider that allows you to choose the amount of noise reduction that is applied to smooth out the upscaled image.
- Bicubic Smoother (enlargement). An image enlarging method based on Bicubic interpolation but with smoother results.
- Bicubic Sharper (reduction). An image reduction method based on Bicubic interpolation but with enhanced sharpening to maintain detail in the resampled image.
- Bicubic (smoother gradients). A resampling method that examines the values of surrounding pixels to create new pixels. This algorithm is slower but more precise, using complicated calculations to produce smoother tonal gradations in results than Bilinear or Nearest Neighbor.
- Nearest Neighbor (hard edges). A fast and less-precise method in which new pixels based on the nearest pixel in an image without averaging or calculating based on multiple surrounding pixels. The result is a resized image in a relatively smaller file size that preserves hard edges that are not anti-aliased, meaning there can be jagged edges.
- Bilinear. Bilinear interpolation creates new pixels by averaging the color values of surrounding pixels. Compared to more advanced resampling techniques, the results are mediocre.
By default, Photoshop will choose what it feels is the best resample algorithm for the resize type you are performing. For enlarging, or adding more pixels, Photoshop is defaulting to Preserve Details where reducing image size uses Bicubic Sharper. The settings Automatic uses could change at any time with future updates so when you get a new update I would check to make sure.
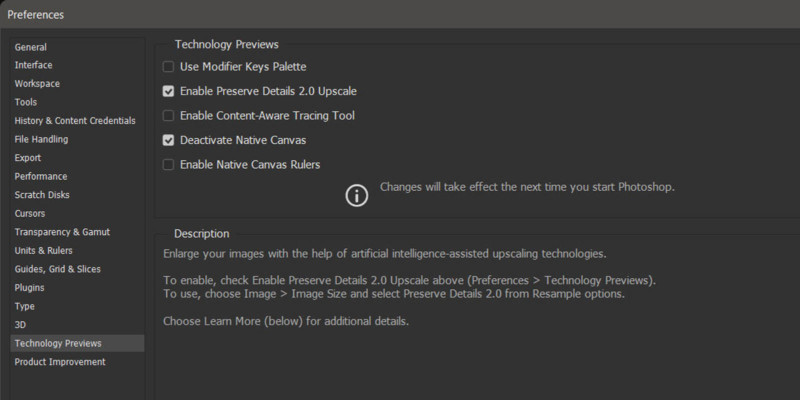
Note: If you don’t see the option for Preserve Details 2.0 this could be because you have not enabled it in the preferences. First introduced in Photoshop CC 2018, the Preserve Details 2.0 feature falls under Technology Previews in Photoshop’s preferences (Figure 13). This is still the case in version 23.4.1 which I’m using at the time of this writing. Perhaps in a future version this will get moved into a regular feature.
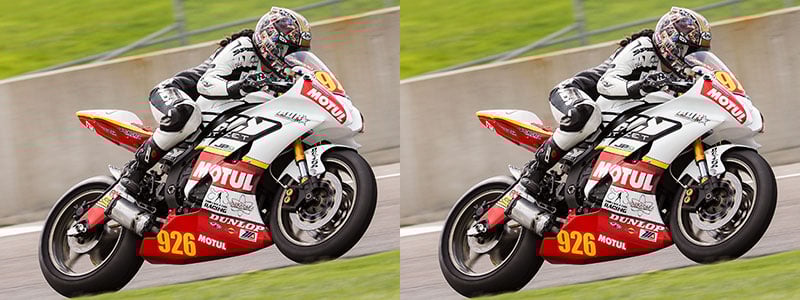
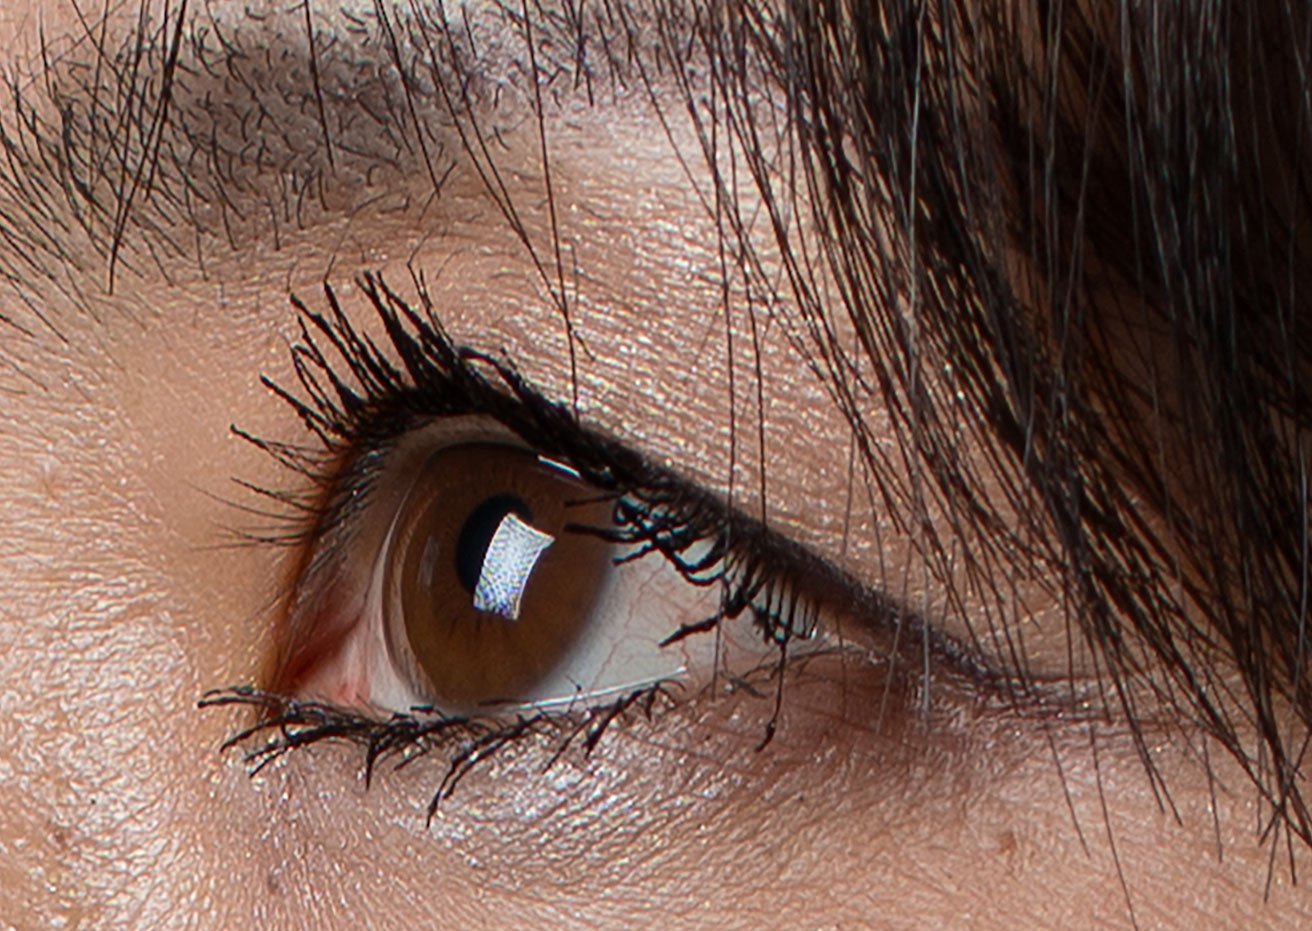
To take the ambiguity out of the result I would set the method I use manually from the pull-down list. In Figure 14 I have an example image where I doubled the pixel dimensions of the photo using the three different options for enlargement. The large image is a crop at 100% of the original image. The three images below are 100% views of the same point in the image after doubling the pixel count. You can click on the images to see a full-size view of each. At the reduced size to fit into this article, the images are too small to see much if any difference.
I find that Preserve Details 2.0 does the best overall job for clean and natural-looking output. The original Preserve Details does a good job but it tends to over-sharpen a little which creates some halos if you look closely. Bicubic Smoother is no slouch itself and without having the other options side by side for direct comparison. It looks very close at first glance to the Preserve Details options but the fine details are a little “mushy” and looking at the softbox reflection in the eye you can see some detail in the softbox grid is lost.


For reducing image sizes the Bicubic Sharper does a good job but I have to say most of the options look very good when reducing an image’s size. If you find that Bicubic Sharper is a little oversharpened, you can try the regular Bicubic option. However, I would still look at Preserve Details 2.0 when the reduction is only between about 1 to 30% of the original dimensions. As always you might just experiment as the content of your image may look better in one approach or the other.
The Bicubic options (Smoother, Sharper, and regular) have a distinct advantage over Preserve Details in that they are much faster to process. If you are needing to resize a large batch of images for proofing or have any other situation where the absolute highest detail isn’t necessary, I would use the bicubic options. On my Dell XPS 15 9500 (i7-10875H), upsizing a 42MP image by 200 percent took six seconds with Preserve Details 2.0 and two seconds in the original Preserve Details. Using Bicubic Smoother was pretty much instantaneous.
For illustrations and similar types of images, Nearest Neighbor can do a good job at preserving the solid colors and crisp edges you may find in those types of files. However, it can produce some strong aliasing so watch out for that. Bilinear uses a weighted averaging based on nearby pixels and is the least accurate option. It is also very fast but with modern computers, this advantage really isn’t relevant.
Scale Styles

One last option in the Image Size dialogue box is in the upper right-hand corner and is just a small gear icon as seen in Figure 15. Scale styles might not sound interesting but if you work with layer styles such as drop shadows, strokes, etc, this option is huge. Layer styles such as drop shadow contain their own set of parameters that dictate their appearance. If the Layer style isn’t properly scaled to match the resampled overall image, the effect of the style can be ruined. Having this option for Photoshop to automatically adjust, or not, the Layer Styles in the resampled file is very useful.
PPI vs DPI
Before wrapping this up I wanted to touch on the use of the terms PPI and DPI. These often seem to get used interchangeably but they really shouldn’t. PPI refers to the number of pixels per linear inch. This determines how many of the image’s pixels will be present in the physical space of a print. PPI as it applies to a digital image being displayed on an electronic display doesn’t have a specific meaning. In most cases, it has no bearing on how the image is displayed on a screen since when it is viewed at 100% size, it will display the image pixels at a one-to-one ratio to the display’s pixels.
Why does this matter?
Sometimes people feel the need to match the PPI setting of their image to the DPI specification of their printer. With printers capable of outputting at DPI levels like 2,400 or 4,800, it can seem like a good idea to upsize your image PPI to match the printer DPI. The fact is that there is usually not a direct correlation to output resolution here. These high DPI output printers use very tiny dots of ink to mix together to create more accurate colors and a wider variety of ink density. As such this is typically not going to help and can actually make the output worse. Plus it can have the detrimental side effect of creating huge file sizes that can be difficult to work with. Instead, stick with your printer manual’s recommendation.
Conclusion
So it turns out that resizing images may not be as simple as it appears. Of course, this depends on how important the quality of the final output is to the image usage. I regularly hear from fellow photographers that they are often disappointed in the quality of the images they upload to social media sites like Instagram and Facebook. Often this comes from the fact they are uploading very large images and letting the servers at these services resize the images as they upload. This is usually due to the fact those servers use simple and fast approaches to resizing the images since processing time is money.
Remember earlier how I pointed out how resampling using Preserve Details 2.0 took several seconds vs Bicubic which was nearly instant? If you had to process 350,000,000 photos a day like Facebook does on average, you’d probably want to go for the fastest option too. By resizing your images to the recommended size(s) for the site you are using, you improve the quality of the images after they upload.