Digiscoping: A Look at Using a Spotting Scope as a Telephoto Lens

I’ve always been a bit fascinated by digiscoping. For those who are out of the loop, digiscoping involves taking images through a spotting scope rather than a camera lens. The advantages are obvious. A spotting scope provides magnification equivalent to a lens of 1,250 to 3,000mm. Who wouldn’t want that?
Of course, there is no such thing as a free lunch. A telescope’s optics are designed for the human eye to look through, not to be captured on a flat sensor. (The human eye has a curved sensor, obviously, and human vision sees images more like video than photos.) Things like a curved plane of focus, chromatic aberration and small apertures are less critical to telescopes than camera lenses.
Because telescopes are designed to be looked through, digiscoping traditionally involves some less-than-elegant contraptions to hold a camera over the eyepiece. Most spotting scope manufacturers make adapters that, with some variable degree of difficulty, allow you to attach a camera to their scope. Once that’s set up you basically take a photograph of a picture – the camera lens focuses on the image in the scope’s eyepiece.
Historically, people who digiscope are people who have a spotting scope anyway, like birders or wildlife watchers. They can take very nice online-JPEG-size images and video clips to share with their friends, but not what most of us consider ‘photographic quality’ images suitable for medium- or large-sized prints.
Despite the fact that digiscoping really has different purposes than photography, I’ve always been a bit fascinated by it; what gear head wouldn’t be interested in a 3000mm lens you can carry in one hand? I’ve found the practice too clumsy compared to photography, though, so I’ve never really explored the learning curve of digiscoping.
But when Clay Taylor of Swarovski Optik called and wanted to do some head-to-head tests between Swarovski’s best scopes and top-end telephoto lenses, you know I couldn’t turn that opportunity down.
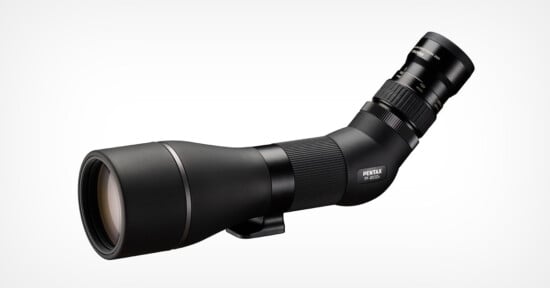
Looking at the New Swarovski Scopes
I was surprised that Clay wanted to compare his new digiscoping system to the best telephoto camera lenses, rather than other scopes. But in true Swarovski fashion he simply said, ”We want to see how we stack up against the best.” They feel that their new scopes, having been designed with digiscoping in mind, are simply better than any digiscoping sets and they want to try moving in the fast lane.
A quick glance at the new TLS APO adapter system for ATX/STX modular spotting scopes quickly shows he has a point. Digiscoping has matured. The scopes are entirely modular so you can put your choice of a 95mm, 85mm, or 65mm front objective with either a straight or angled eyepiece.

The LS APO camera adapter is a 35mm apochromatic lens that mounts directly over the scopes eyepiece. It is a T-ring adapater and T-rings are available to mount to almost every SLR and mirrorless camera. The camera focuses and operates normally, just as it would with any other manual focus lens (it can autofocus in live view).

This design moves the zoom ring down and away from the camera mount on the ATX/STX scopes, which makes setup and use extremely simple. You look through the scope and focus on your subject. Your camera, which already has the LSO adapter mounted, simply slips over the scope’s eyepiece when you’re ready to take a picture or video. The set up is simple, quick, and intuitive. So far, I’m impressed.
Comparing the Equipment
I wasn’t coming unarmed to the gunfight, so I brought the Canon 800mm f/5.6 IS and 500mm f/4 IS lenses mounted to an Induro CT313 heavy-duty tripod and a Wimberley II gimbal head. Clay mounted the Swarovski ATX 95mm modular objective and eyepiece, along with LS APO adapter. We shot both systems on the same Canon 7D (the scopes don’t cover a full-frame sensor), swapping it back and forth to assure the camera wasn’t a variable.

For those keeping score at home, here’s a quick comparison: the Canon 800 is 18.1″ inches long with the hood, weighs 9.9 pounds, and costs $13,899. The Swarovski system is 16.8 inches long, weighs 4.75 pounds and costs $5,107 (including the LS APO adapter). The Canon 500mm f/4 IS II, which we also used, is 15.1 inches long, weighs 7 pounds, and costs $10,499. The Swarovski system is equivalent to 900mm to 2100mm focal lengths.
One other notable specification: the Swarovski is submersible to 13 feet. The Canon, not so much. So the tale of the tape is dominated by the Swarovski system. It’s smaller, less expensive, has longer focal lengths, zooms, and swims.
Some Test Target Comparisons
These things like to work at distances a little too long for our testing lab, so we took them out to the parking lot and taped an Edmunds Resolution chart to the side of the building.

We then set up the Canon 800m f/5.6 IS at about a 90 foot distance so that the target exactly filled the frame of the shot (shooting at 1280m equivalent distance on the 7D) and took shots with both it and the Swarovski system at its widest zoom on the 7D. The we put a 1.4X teleconverter on the 800, moved the setup back to frame the target at the new 1920mm equivalent focal length, and shot it again.
We shot multiple images with each setup and selected the sharpest of each for comparison. Given the very bright, sunny day that we had exposure times were in the 1/2,000 range for most shots, although at longer focal lengths the Swarovski system did occasionally get exposure times nearer 1/1,000. Delayed shutter release, very good tripods, etc. were used to minimize vibration (mirror lock up was not used).
Below I’ve reprinted the center target for each combination. On the top row are the Canon 800 (left) and 800 with 1.4 TC (right). On the bottom row are the Swarovski at 30X (left) and 40X (right). We moved shooting distances so the targets was framed similarly in both shots.

The above image has been downsized, but the resolution provided quite a shock. The Canon 800 resolved at about 1-3 (marked by the red arrow) in the center and the 800 with 1.4X converter at about 1-2. The Swarovski resolved almost exactly the same. The Canon has better accutance (contrast) and purple fringing is beginning to show even here in the center of the 40X Swarovski image. But the fact that it can resolve as well as the Canon combination in the center made my jaw drop.
Up until now we’ve been moving our shooting spot and changing the Swarovski’s zoom so that the entire target exactly filled the image frame. One other thing we could do with the scope that we couldn’t try with the lenses was to zoom in on the target. To give you an idea of how much more zoom there was, here’s what the Swarovski framed at full zoom, at the same distance the 800mm and 1.4x exactly fit the target (as shown above).

Here is the target center fully zoomed:

So in the center of the image, checking resolution, the Swarovski digiscoping set was very, very impressive. At higher magnifications the purple fringing is fairly significant (you can see above), but that’s easy to remove in post-processing.
Away from the center, though, there was a more dramatic difference. The image below shows some text from the left side of the chart (see image above) shot with the Canon 800 and 1.4X converter (left) and the Swarovski at just 30X (right). This is not the extreme corner by any means; it’s perhaps 1/3 of the way to the edge of the frame. So the scope is able to keep up with the big Canon telephotos in the center, but despite having a field flattener, it loses some significant ground off center.

So here Takeaway Point #1: Even with the very best digiscoping set up, keep your subject right in the center of your image.
A Few Real World Images
Test targets in the parking lot are nice and all, but I wanted to see how actual pictures turned out, too. We were pushing our time limits so we weren’t able to actually go out birding. Instead we walked across the street and took lovely images of tree branches. I figured this would be a reasonable thing to do, since most birders are fairly used to seeing what tree bark and branches look like in their images.
We started off with some images of where a branch used to be, shooting in-camera jpgs since we were using the same camera to test both setups. I took the 500mm f/4 IS II, cause, well, we were walking across the street and all, the 800 is heavy, and I’m fairly lazy.

Even at its widest setting, 30X, the scope is zoomed in a bit more. But that seemed fair — if we were shooting in the real world, chances are we’d be shooting from the same place and the digiscoper (digiscopist?) would have that advantage.

Notice how the two images, resized as online jpgs, both look good. Now lets look at some 100% crop from near the center of the trunk and from the leaves off center to the left. First, from the Canon 500mm f/4 Mark II:

Next, from the Swarovski:

The Swarovski shot is more magnified, so I had to crop tighter to fit it on the page, but I wanted to show 100% pixels. Let me show it again downsized to the size of the Canon so you can see it both ways. I’ll just do the tree trunk, it has more detail and is in the center where things are more even.

There’s no question at ‘large print’ resolutions, the photo lens has a lot more detail than the scope, even when the cameras were the same. In fact, the differences were much larger than I expected given the results from the resolution tests we did earlier. So we reshot these several times. And compared some other branches.


Compared side to side, we see about the same results as the knot hole images.

A hint of what’s going on is shown if we increase the Swarovski’s magnification to 60X.

Despite markedly increasing the magnification, there is really no increase in detail. In fact, it may lose a bit as we zoom in more. The most likely reason is apparent when we look at the effective apertures we’re shooting at. (Note: these were supplied to me by Swarovski with the addendum they may not be perfectly accurate.)

Even at 30X magnification, the combination is flirting with diffraction softening and extending the magnification further reduces aperture to ranges where we’re certainly going to see some diffraction softening. While it’s certainly possible that vibration, air currents, etc. are limiting sharpness (we were using IS on the 500mm images), diffraction softening is certainly contributing.
Again, though, if we’re simply viewing the images as reduced-size online JPEGs, they look very good. Even the 70X image of the tree branch looks nice.

Summary
Like so many things I write, the summary is obvious: use the right tool for the job.
If you want to make prints or present large images on large screen, there is no substitute for a good telephoto lens. Digiscoping, even with the best equipment, doesn’t come close.
However, if you want to record telephoto images to show as online jpgs or video, digiscoping provides many advantages: smaller size, greater magnification, and lower cost. If you’re really roughing it, where exposure to weather and water is possible, the scope’s sealed, waterproof construction is a huge advantage.
The new Swarovski system makes it incredibly easy to use an existing SLR to accomplish it, too. There are adapters available to hook the system up to any brand of SLR or mirrorless camera.