How to Scan Film Negatives with a DSLR

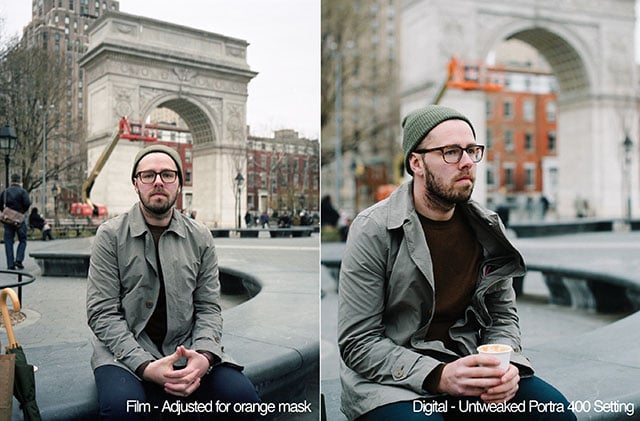
Well, lets just say I’ve gotten better at this over the last couple of years. The left image was one of the first I’ve “scanned” with my DSLR, and the one on the right I’ve just rescanned using the techniques described below (higher resolution available here). Right now I can get higher resolution and better image quality that what street labs give you on CD.
First of all: Why?
- Street labs can usually scan the film but I’ve got bad scans and missing/cut frames more than once. Also, when you scan, you make some artistic decisions over contrast and colour that are often definitive. By leaving these decisions to a machine or someone else, you are losing control over your creative freedom.
- I often develop film myself and I don’t own a film scanner. Even if I did, good film scanners cost a fortune and I get better quality from scanning the film with my DSLR than I would if I used an average scanner.
- Very precise control over colours, highlight and shadow curves, while making use of the vast film dynamic range.
These are my reasons, you may obviously have different ones. Some people do this because it’s faster than using a scanner, but that depends on how much time you spend post-processing, and I do spend a bit more than I would like to admit, but it is a time spent doing something that gives me pleasure, not pressing buttons on a poorly designed software and waiting for a tedious scan.
All the following instructions have the objective of achieving the best possible resolution, colour depth and dynamic range out of the film, while keeping image noise as low as possible. Also, I aimed at keeping the whole process as quick as possible. I think each time I’ve made a scan I’ve got better results than the time before, because I keep improving the process and now I’ve got to a stage I’m quite happy with the results.
What You Will Need
- Ideally, you need a DSLR (any would do) because of the higher colour/bit depth. But the same basic principles would apply to even a point and shoot if that’s what you’ve got;
- Again, ideally you should either use a macro tube with a prime lens or a macro lens, but if you don’t have any of these, your kit lens will also do the job, with a bit of loss in usable resolution, due to cropping. Kit lenses work just fine for medium format;
- A light source, preferably a flash wirelessly triggered, but a well lit wall, the sky or even a computer monitor will work;
- A white translucent, clean surface, such as an acrylic board. This is only needed if you’re using a very close light source, such as a flash;
- A piece of cardboard or wood and a couple of clamps are useful.
- If you’re using a flash, you will need either a cable or a wireless trigger. You could set up your flash as slave and trigger it with the in-camera flash but you would have to do it in a way that it wouldn’t get any light reflecting off the film surface, which may be a bit hard.
Setting Up the Hardware
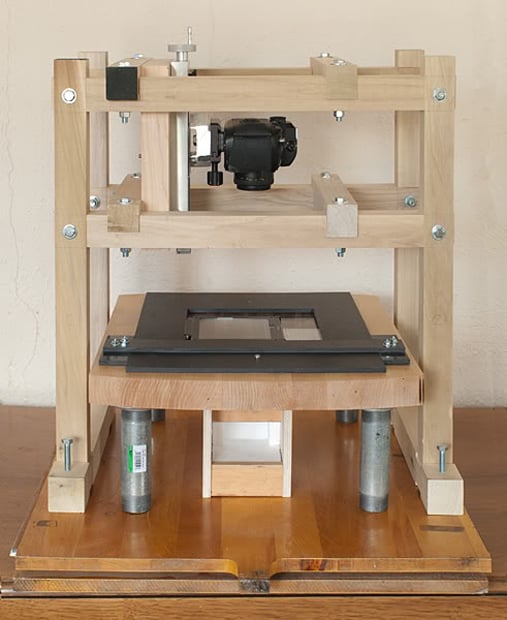
The basic idea is pretty simple, you need a diffused, homogeneous light source, a way to hold your film, and a digital camera focused on the film. Because you’ll be focusing at a very close distance, the depth of field will be very narrow, so focusing precisely and keeping the distance between the film and the camera exactly the same throughout the scanning. In order to achieve this, several people developed different techniques, such as using a shoe box, simply a tripod and a glass table, or even a tube made from toilet paper rolls. I have tried variations of these in the past and ended up developing my own film holder using laser cutted mdf (schematics for hand or laser cutting can be found on thingiverse, with instruction of how to build it). I’ve designed this because it allows me to setup and scan a whole roll very very quickly, with very high precision! The instructions below are broadly independently of which type of film holder you are using.

Setting Up the Camera and Flash
What you need is to pick the sharpest lens you’ve got, and make it focus close enough so that the picture in the film, fills up the camera sensor as much as possible. The combination of equipment that works best for me is a 35mm 1.8G Nikon lens with a small 20mm macro extension tube. You can find very cheap extension tubes on ebay for whichever camera brand/lens mount you’ve got. I’m using a tube with auto-focus controls to let me use the focusing motor on the lens, which saves me some time and some headaches when finding out all the film I’ve scanned is just so slightly blurry (which did happened to me once or twice).
After making sure that the camera is focusing precisely on the film, you must keep everything stable enough not to bump into some of the parts during scanning. This is one of the main reasons I’ve designed the scanning tool: to make sure the distance between the camera and the film stays precisely the same. Having focused the lens, you will want to configure a couple of things in the camera:
- Turn auto-focus off. This makes sure that the camera won’t try to change focus every time you take a picture.
- Set the white balance to the warmest possible colour (such as incandescent or candle lighting), for colour negative film. Some cameras let you manually configure the light temperature so push it all the way to the warm side. This is because colour negatives have a brown film backing, so we want to neutralize it’s colour as much as possible. We could also do this in post-production, but it’s a good idea to do it at this stage to avoid unnecessary noise, and use as much of our camera’s colour depth as possible.
- Set the exposure mode to Manual and set the aperture to f8 and the exposure time to around 1/125. Most lenses have their sharpest aperture at around f8 and we do want the sharpest possible image, don’t we? I set the speed at 1/125 because it’s about the slowest I can use in order to sync my flash properly and it’s fast enough that all the room light is “blacked out” in the photo (which means no weird reflections on the film).
- Select the base (usually the minimum) ISO. This lets us avoid noise as much as possible. It’s usually either 100 or 200.
- Set the flash to manual and select a medium strength.
- Shoot in RAW! This allows you to use all the available colour depth, which will be much needed since we will increase the contrast of the final image quite a lot later on (which is the main cause of noise, and that’s why the above settings and some hints I’ll talk about later are so important).
I usually place the flash at about 30cm away from the film and make it shoot through a cardboard box so that the light doesn’t splash all over the room and cause unwanted reflections on the film. I have also cut a small hole in the cardboard box and place a lamp above it to have some light shine through the negative and make my life easier when focusing.


Scanning the Film
This process is pretty much straightforward, once you’ve set up everything correctly, you just shoot, slide the film to the next frame and shoot again. Just make sure you have put the film in the right way and not inverted, as it will make your life easier later on.
One thing I usually do is to try to “expose to the right” which means to make the picture as bright as possible without blowing out the highlights (make them completely white, thus loosing image data/detail/texture). The way I do it is to set my camera to show the pictures on “Highlights” mode, which makes it obvious when I’m making a mistake. You may also use the Histogram for that. So what I do is to keep the flash at its highest strength as long as it doesn’t blow out the highlights and when it does, lower it by a stop or two, and then raise it again for the next picture.
You should end up with something that looks like this:

Post-Processing
You may use any RAW development tool such as Lightroom, Aperture, Camera RAW or Capture One. I usually use Adobe Camera RAW (the RAW development tool that pops-up when you open RAW files on Photoshop) and occasionally Capture One when I just can’t reach the desired colour in Camera RAW, such as with underwater shots (Capture One has wider envelopes for white balance values, for some reason). The screenshots were taken from Adobe Camera RAW but you can do pretty much everything I explain here with any other package.
Crop
The first two steps affect all the images in the same way, so we start by selecting all images. We can now crop out the black borders. I like to leave the rough border to act as a frame but that’s obviously optional.
Invert Colours (for negative film)
While keeping every image selected, the next step is to invert the colours, to get a positive image. This can be done going to the Point tab of the Tone Curve Settings in Lightroom and moving the left point of the curve to the upper left corner and the right point to the lower right corner. In Capture One I do this by going to the Exposure Tab and under Levels, and moving the lower left point to the right and the lower right point to the left.

White Balance
You can now select a single image at a time and as a starting point, use the auto white balance tool to get a good approximation of the original colour. You should use the tool on the greyest point you can find in the photo. In the example photo, I’ve chosen to pick the white band of the dress. You may try several different points until you find one that more closely matches the correct colour. You may now use the colour temperature sliders to reach better colour settings. Just remember that because you have inverted the curves, the slides now work in the opposite way, so if you think the image is too blue, move the slider towards the temperature slider towards the blue end. The same applies to the green-pink Tint slider.
Auto White Balance gave me the following, which I had to adjust slightly, for it’s a bit too green/blue. I won’t be able to correct for all the blue excess at this stage because Lightroom trims the white balance envelopes, but we can correct that afterwards in the curves panel, as you can see on the next step.

Contrast Curves
This is perhaps the most interesting and creative part of the post-processing as it lets you capture all the awesome dynamic range of film, with a great level of control over the tone, highlight and shadow curves.
Go back to the Point Tone Curve Panel now. Because we have inverted the colours, the left end of the curves represents the highlights and the left, the shadows. You can look at the histogram to check where each of these ends begins, and move the end points closer this image envelope, but not too close to the limits. This will allow us to reach a smoother curve. Keep an eye on the picture to avoid trimming highlights or shadows.

You can now increase the contrast at will by adding points in the middle, looking at how the curve affects your image. In this case I was mainly looking at the skin tones and how the parts in the shadows develop into sun lit highlights (which is one of the good things about shooting film, if this shot was taken with a digital camera, the highlights would probably either be blown out or have a bad-looking yellow tint). I usually end up with something like this:

You may notice that even after moving the temperature slider all the way towards the blue end, I still get a blue tint. This can be corrected by changing the curves on the different Red, Green and Blue channels. We can do that by selecting the appropriate channel in the Point Tone Curve panel. Notice that inside the channels, the curve is not inverted, so the darker end is on the left side and the brighter, on the right. So, in this example, to achieve the image on the top, I moved the left end of the blue and green channels a bit to the right and added one or two middle points in each channels to control the middle of the curve. Do this until you’re happy with the final image. You may want to go back to the RGB curve to make some final adjustments. In the end, I got the following curves to produce the image on the top:

After changing the curves for the individual channels I got to this:

As you can see, the greenish blue tint is gone because I’ve moved both G and B curves down. After that I also noticed the image had a slight undesirable red shadow but overall it could use a warmer tone so I added one point in the lower half of the R channel and moved it below the diagonal, and another in the upper half and moved it a bit upwards. In the end I made slight adjustments to the RGB channel to accommodate the colour changes I’ve made.
This process takes some time (although you’ll get quicker with experience, and it definitely takes more time explaining than doing) and it’s probably the one where you will loose the most part of the whole process but for me, it’s also the most creative and rewarding step!
After this you may want to use the Spot Removal tool to remove blemishes, dirt or scratches and then select all the images and hit “Save Images…”. It’s also a good idea to select sRGB instead of the default Adobe RGB colour space by clicking those blue parameters on the bottom of the window. Adobe RGB (or aRGB) was supposed to cover a broader colour space but due to poor implementations, it brings some problems when printing or showing the image on the web.
Have fun and tell me about your results or any doubt you may have related to this process!
About the author: Paulo Ricca is a photography enthusiast and computer science PhD candidate based in London. You can visit his blog here and his Flickr photostream here. This post was originally published here.