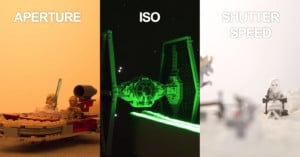
This short video tutorial shows how you can shift the color balance of sunlight to create a blue background that looks like moonlight.
I wanted a night time look to this 20′s scene. Shooting later was not an option. This was a way to give a night time look to the sunlight streaming in the window. This technique can be applied to all types of photography. I saw a wedding photographer using this technique by putting a small amount of warm gel on his strobe which allowed him to let the background behind the bride and groom go slightly blue. This adds depth and interest. I have used it in corporate portraiture to create a cool background out of what was a boring scene. The blue becomes a unifying layer that pulls a background together into one element.
Here’s a nifty Photoshop tip by photographer Alex Wise on how you can use a Threshold layer to approximate black and white points in a photograph, and then use those points in the Curves tool to remove color casts from photos.
Here’s a quick tutorial in which photographer Lee Morris shows how you can wirelessly tether your camera to an iPad using an Eye-Fi card. Previously, you had to jailbreak your iPad to get this setup working, but now you can quickly set up a connection for transferring images to your iPad as you shoot them.
Hayashi Natsumi’s levitation photos have received a lot of publicity as of late (check out her blog here), prompting Kai over at DigitalRev to create this short video tutorial teaching the technique. Could be a fun weekend project if you’re looking for something to shoot.
Here’s a step-by-step video tutorial teaching how to develop your B&W film using instant coffee and powdered vitamin C instead of actual developer. You’ll still need some darkroom gear and some fixer, but it’s a neat way to experiment with film photography. Photo geeks call this solution Caffenol, and there’s even a special Flickr group dedicated to making homebrew developer.
If you’ve never learned how to process film, this is also a great introduction to how it’s done.
Vignetting is often viewed as a bad thing when discussing lens quality, but it’s sometimes desirable to add artificial vignetting to a photograph to draw attention to the center of the image, separating the subject from the background. Here’s a helpful tutorial that shows how you can add vignetting using a curves adjustment layer in Photoshop.
Just because you use the built-in flash on your compact camera doesn’t mean you need to live with harsh, direct lighting. Here’s a quick video tutorial teaching how to use any small white card (e.g. a piece of scrap paper or a business card) to easily bounce your flash and soften the lightning.
Photographer Ben Canales created this great video tutorial teaching the basics of shooting the night sky. He goes over how to shoot quick test shots to set up your composition before discussing more in-depth tips and tricks for capturing the final shot, including the “Rule of 600″:
[...] the quickest way to determine the longest exposure that is possible for any given focal length lens, without the stars streaking, is to divide that focal length into 600. (This is the formula for 35mm. Larger formats are laxer, smaller formats more unforgiving). [#]
For example, with a 50mm lens on a full frame camera, you can only expose for 12 seconds (600/50=12) before the stars turn into star trails. It’s a good rule of thumb to keep in mind!
Here’s an awesome post-processing tutorial by photographer Sean Armenta teaching how to clean up skin in a portrait using three Photoshop tools: the Healing Brush, Patch Tool, and Clone Stamp.
Have you always wondered how to use the Pen Tool in Photoshop but have never gotten around to learning it? f stoppers published this uber-informative video tutorial by Sean Armenta teaching how it’s used and why it’s a tool that everyone should learn. The teaching is done on a Mac, so if you have a PC, just substitute CTRL for CMD and ALT for OPT.