Old School: How to Meter and Expose for Any Lighting Situation
![]()
It’s time for a long overdue post. Looking back through my archives, I realized that I’ve covered topics like film selections and scanning film but to date I’ve skipped one really important part: metering and exposing color film.
This is something I get quite a few questions about so bear with me while I try to be very thorough and cover topics from different lighting conditions and how I would meter with the various film types, both color negatives and slides. While graduated neutral density (GND) filters deserve an entire post for themselves, I’m going to have to touch on that topic as well since they are a critical part of my film exposures.
As a disclaimer, I’m going to be covering my methods for metering. These may not be the methods you’ll read about in most books but I’ve found them to be both effective and extremely quick which is crucial when the light is changing dramatically.
It’s come to a point where metering is mostly second-nature to me and takes up a very small portion of my workflow. When using large sheets of film, every mistake gets very expensive so my goal is to nail each exposure in one try and only take “duplicate” images as the incredible light show progresses throughout sunrise or sunset. Very rarely do I bracket exposures—only if the light is some insane condition I haven’t yet encountered—instead I count on proper metering, film choice, and filter usage to produce an image. My goal here is to help you do the same.
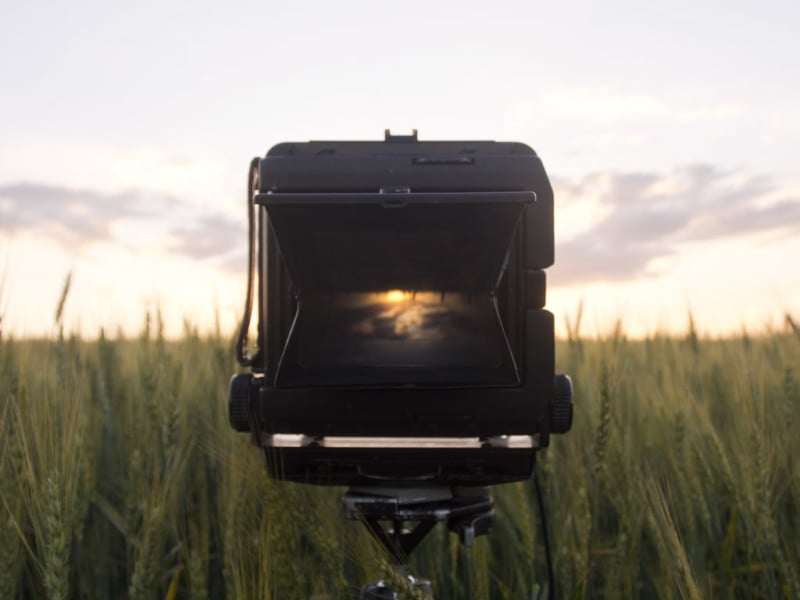
While I may be a die-hard film user, I think this process has been sped up greatly with the help of a small digital camera to meter light with. Yes, that’s right, I may never show any images from a digital camera but for the past 5 years it has played a very important role in my exposure. Just as some traditional photographers would have used a Polaroid to check exposure on the scene, I have become a big fan of using the histogram and LCD display on a digital camera. I’m not going to encourage anyone to go spend a chunk of money on a digital camera, but there’s a good chance many of you already have one.
If you don’t want to carry a digital paperweight in addition to your film camera, you can use one of many smartphone apps that also meter light. I have used LightMeter for Android and found it to be accurate and quick. There are many others and some that cost just a few bucks will also show you a histogram so you can check exposure. You can also use the old tried-and-true spot meters from the film days to make your measurements. Maybe you’ve got a fancy enough film camera that it even has a light meter built into it. Perfect! I’m all about using what you have and making the best of it!
If you don’t have a light meter and have come to this article looking for advice on a purchase, then I will make a few quick arguments for using a small digital camera.
I started metering with an Olympus EP-1 Micro 4/3rds camera years ago. Previously I had been using a 35mm camera for metering so this thing was a huge step down in size for me. At that time, the EP-1 had already been out for a few years and they were only a couple hundred bucks used so I picked one up. Today, they can be had for about $100 with a lens on KEH.com which is cheaper than you’ll likely find a spot meter for and also about the same size/weight. You could even use a newer model if you desire, but the main features I would look for is something that lets you choose exposure settings manually and a lens that lets you stop down to f22 or so.
I wouldn’t recommend getting a point and shoot camera because they don’t have great controls and won’t let you select smaller apertures like f22 that you’ll use a lot with medium and large format film. My biggest downside with using a digital camera is that I am really hard on photographic gear. In five years I have destroyed two of these cameras and the third one is on its way out. Don’t be like me and try to keep from smashing your cameras on rocks and you should be fine. I think that might be a big reason I’ve stuck with the old durable film stuff…
Ok, so we’ve got some sort of accurate light meter, now lets get to measuring exposure for film!
I’m going to break this down into several types of lighting conditions you might find while shooting landscapes and give you metering options for both color film types. Keep in mind that metering is an area where you have a lot of say in how you want the image to look. Do you want the bark on that tree to be dark or light in tone? Do you want realistic light or are you going for a certain mood that may call for a brighter or darker look? Do you want the snow to be bright white or would that take away from the colorful sunrise sky above?
Don’t go from my word on all of this, look into your own artistic vision and decide from there. All of that is up to you but I’m still going to give you all sorts of advice to help you meter quickly in any condition. Alright then, here we go:
How to use your meter
I tend to think in aperture priority. I don’t really care if that’s your personal preference or if it’s right or wrong, it’s just been how my mind works ever since I’ve started in photography. It just makes sense with landscapes because aperture is the aspect of exposure control that affects your image the most when you’ve already got the camera on a tripod. We need to know how much of the image we are going to get in focus, and since we’re on a tripod it typically does not matter if the shutter speeds get slower unless you’re dealing with wind, water, or other moving subjects.
Using large format film I tend to be in the f22 or f32 range, which will always result in a relatively long exposure. Since I know my desired aperture, I like to set my digital light meter camera to that aperture and have it tell me the proper shutter speed. I then use the exposure compensation dial for artistic adjustments such as making sure snow is white or a shaded rock is dark, and I use a little bit of simple math to determine the needed GND filters.
If you have a different method you use that is completely fine, as long as you’re able to get a good result in the end. To help clear this up for everyone, in the rest of the article I will use some visual samples that show you what my light meter camera would have read while metering around the scene.
Color Positives vs Negatives
I wanted to make a quick note about film types here, for a more in depth look take a look at my film choices article.
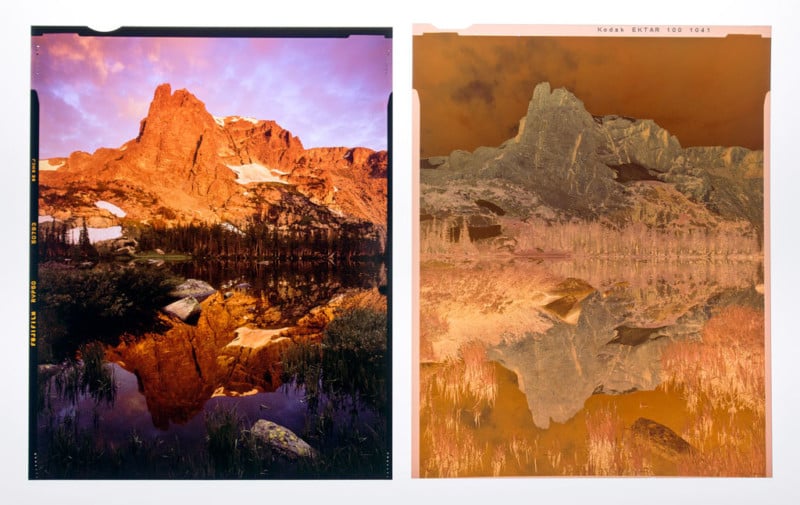
Color positives (also called slide or transparency film) will give you a positive image with the real colors that you saw when shooting the image. Color negative film (also called print film) will give you a negative where highlights are dark and shadows are light and the colors are all inverted and wacky. You then invert negative film during scanning or traditional darkroom printing.
The main differences for the sake of this article is that color negatives (like Kodak Portra or Ektar) will give you a significantly higher amount of dynamic range, or the amount of contrast the film can handle between extremely bright areas and the darkest shadows. While they can handle a huge amount of contrast, they will have softer colors than slide film. Slide film (like Fuji Provia or Velvia) has a very narrow dynamic range and must be exposed carefully, but the results are an image with incredibly rich colors.
For that reason, there may be different times you would want to use positive vs negative film and you would likely want to meter them differently. I will also add that color negative film will get less color saturated as you overexpose it, and you can gain a little additional saturation (at the cost of some extra grain) by underexposing it a bit.
Back Lighting
Alright, I’ll start with the tricky one. The one I get the most questions about, the one that has the most room for artist interpretation. Furthermore, I’m going to break back lighting down into two categories: back light with open sky beyond the subject, and back light in a forest. These both need to be treated differently because you’ll likely be unhappy if you use GND filters in a forest.
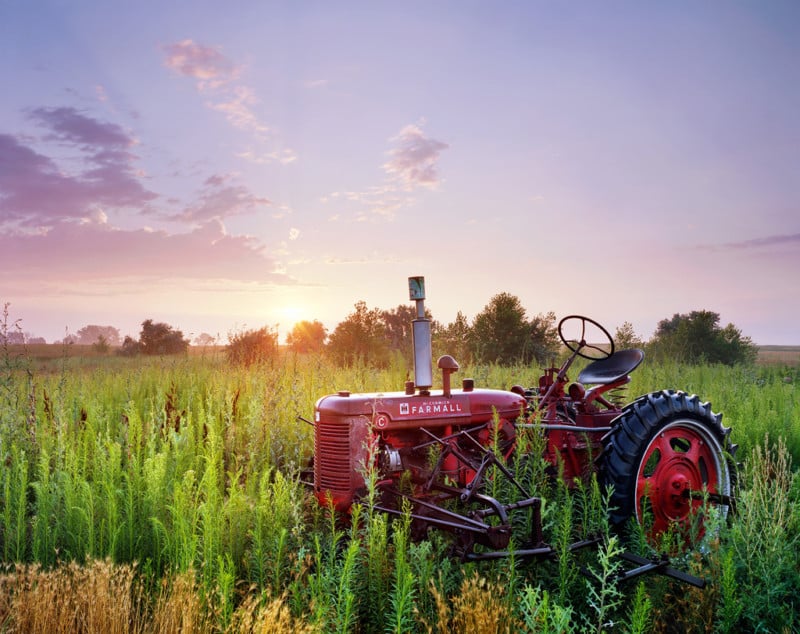
I’ll start with back lighting with open sky, like the example image above. With this scene I instantly knew the important part of the image, the tractor, and it needed to be exposed in a way that lets all the details show properly.
Within the tractor itself you’ll notice that there are many different tones from the white lettering to the red paint to the deep black tires. In this situation, I wanted all these to be exposed in a way that makes sense to your eye. It’s important to know that our eyes can see in a significantly greater range of brightness than any film or digital sensor can, so we need to choose the parts we want to be exposed “correctly” in high-contrast lighting situations. It’s also important to know that in even light, most subjects will have tones within the reasonable dynamic range of any film. It’s the variation in light throughout the scene that causes exposure problems, and not typically the variation of tones within a particular subject. Read that last sentence again if you need to.
With that in mind, the tractor and the majority of the foreground have the same light falling on it aside from a few hot spots like the where the sun is hitting the very top of the tractor’s hood. Our only extreme contrast in the scene comes from the sky, and that contrast is indeed a big difference in light—more than any film can handle.
What we need to do first is meter the most important part of the scene, the subject. Since my experience has shown that most subjects under the same light will fall into a reasonable exposure range, I’m a big fan of average metering. It’s quick and effective. If spot metering is your style then by all means continue that method. I will occasionally spot meter something that’s very important to make sure it’s within a film’s range, such as the brightest white water in a waterfall or the bright gap of sky between the clouds and horizon at sunset. For a scene like this I will average meter the entire foreground, pointing my meter downward and making sure that none of the sky is in the frame.
Remember I’m using a small digital camera as a meter so I will zoom the lens as needed for spot metering or point the camera to ensure only the area I want is average metered. If the sun is flaring into the meter, make sure to cover it with your hand so it doesn’t throw the reading off. If I’m concerned about excessive contrast within the foreground I’ll move the meter around a bit and check several areas.
In a scene like this with a good variety of middle tones in the subject, I would set my exposure to this reading. Sometimes it may be a good idea to underexpose the foreground by just a tad to keep the scene looking natural, our eyes want the sun and sky to look brighter than a field and a tractor.
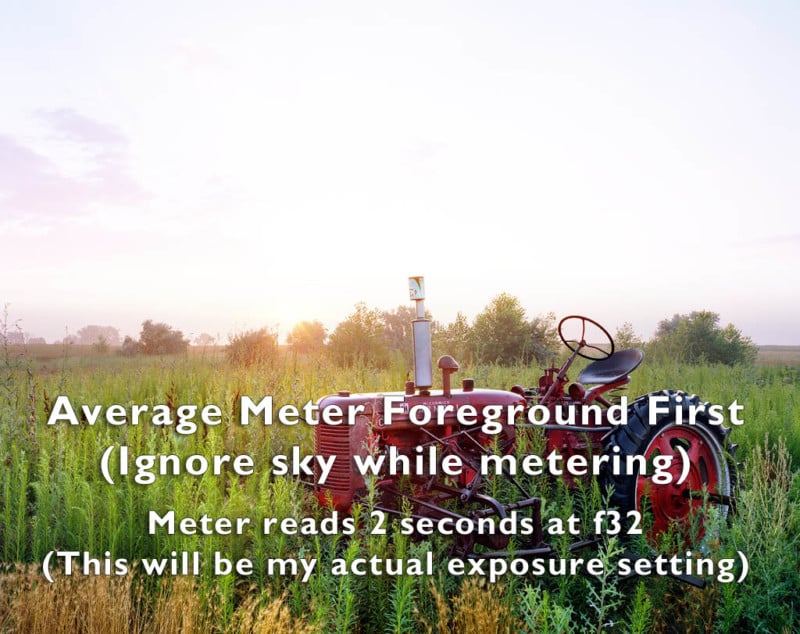
Now that I know how I want the exposure set, I will meter the sky and see just how much brighter it is than the subject. To do this, I will point the meter upward and ignore the ground for this reading. I’ve found in a typical back light situation like this, the brightest area of the sun and sky will be about four or five stops brighter than the average of the foreground. That’s a huge difference.
As you aim the meter higher away from the sun you’ll likely notice that this part of the sky is a actually bit darker than the area just above the horizon. This can make for a bit of a challenge with traditional GND filters because they are darkest on top and lightest on the bottom, but you can still make do if that’s all you have.
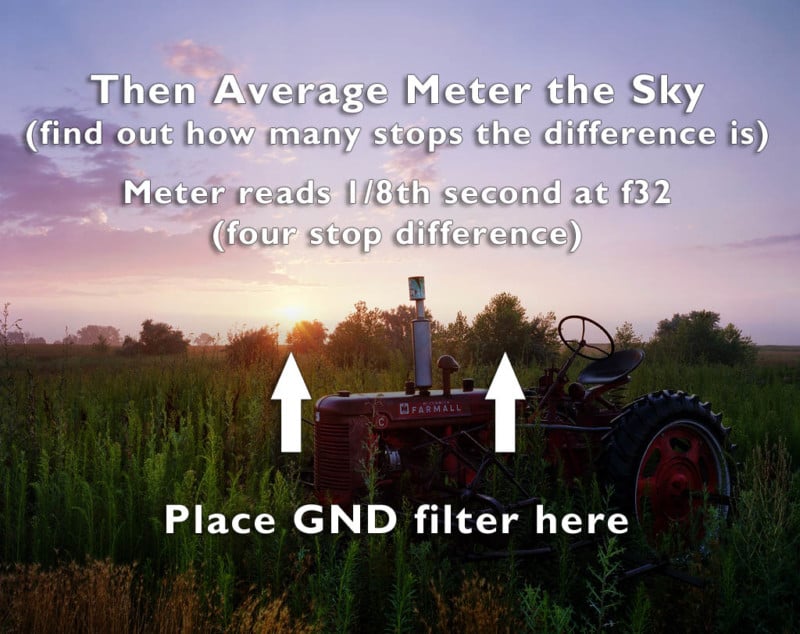
So we’ve measured about a four stop difference between our foreground and the bright sky, so we should use a four stop GND filter to make up for the difference, right? Not so fast! Remember that a bright sky with the sun beaming through it should look bright. To me, the point of a back lit image is that it appears very full of light and everything almost glows. We don’t want the sky to end up a middle tone so don’t over-filter it.
If I measure a sky that is about four or five stops brighter than the ground, I would use a 3 stop GND filter. If you have a flat horizon like this, grab your hard-edge three stop filter and place it carefully, making sure to stop the lens down to the desired aperture while fine-tuning the placement of the filter. Better yet, if you’re lucky enough to have a reverse GND filter, it’s time to pull it out for the one and only situation I use it in.
A reverse GND filter is darkest in the middle, clear at the bottom and less dark towards the top. This filter is specially designed just for shooting into the sun while it is near the horizon like this image. I find a three stop reverse GND to be the most handy and it’s the only reverse one I have. This means it darkens the area just above the horizon by three stops but gradually darkens the higher parts of the sky by less, leading to a very even and pleasant sky exposure.
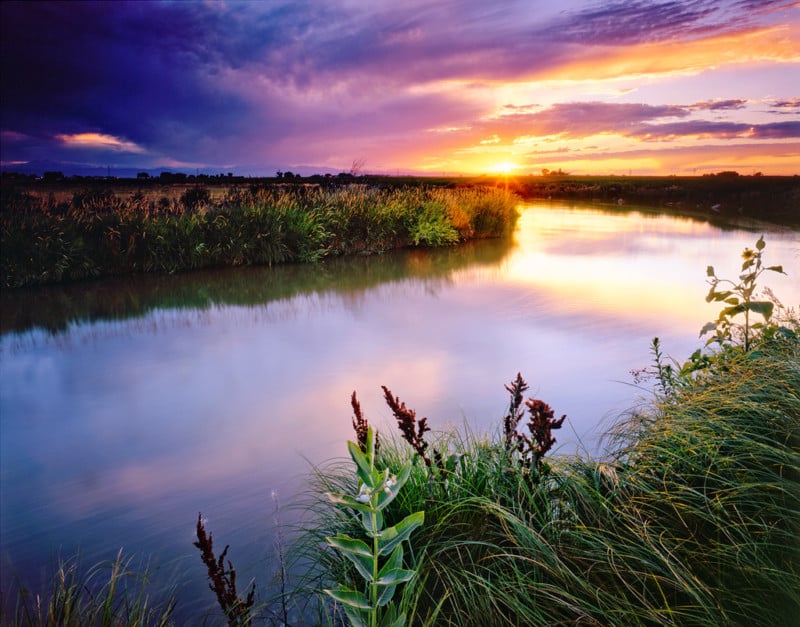
I would typically tackle a scene like this with a color negative film like Kodak Ektar (or Portra if you wanted more subtle colors). While you certainly can do this on slide film you’re going to have to give up some details, most likely in the bright spot around the sun.
In the image above I used Velvia 50, a wonderful slide film. This was before I had a reverse GND so I stacked my two 2 stop GND filters to darken the sky. While some of the highlights are a bit hot and some of the shadows a touch dark, the overall feel of the image works nicely and you can enjoy the rich colors of slide film.
I would meter and expose rather similarly for this situation between the two film types. Just keep in mind that slide film can’t handle as much in the highlights so be careful not to overexpose anything too greatly. Again, start by metering the foreground and setting your exposure, then meter the sky and decide how strong your GND filter needs to be.
Just to clarify, here’s a basic breakdown of my metering process for using GND filters:
- Average meter the foreground (the part that will not be darkened by a filter).
- Set the camera’s exposure to that setting.
- Average meter the sky, calculating how many stops brighter it is compared to the foreground. Photography is all simple math. Each stop brighter is one half the shutter speed. For example, if the foreground meters 1 second at f32, one stop brighter would be 1/2 second at f32. Two stops brighter would be 1/4th second at f32, and three stops brighter would be 1/8th second at f32.
- Decide on a GND filter based on that calculation and how bright you want the sky to appear.
- Place the GND filter on the lens, making sure to stop down the aperture before you place the filter. This increases the depth of field and makes the transition edge of the filter more accurate.
- Take the photo using the settings from step 2.
But I don’t have a set of GND filters, what can I do?
Don’t worry, I love to cheat the system and come up with hacks. A quality set of GND filters will cost you some money but there’s still some things you can do if you don’t have them handy. I’m using large format film so my apertures are commonly around f22 and f32 which results in exposures of several seconds around sunrise and sunset. Since this is a significant amount of time to work with, you can experiment with dodging a dark item in front of the lens over the sky area for a portion of the exposure time.
You could use a black cloth (or glove), but I like to use the dark slides that come out of the 4×5 film holder while I’m shooting. Whatever you use, just make sure to wiggle and move it continuously to keep it from showing up as an obvious edge in the image.
I actually use this trick a lot. Sometimes the light is changing so quickly that there’s no time to fiddle around with filters, or sometimes I want to darken a sky that is in a shape that filters don’t come in. Think of the “V” shape in a valley or if there’s a mountain protruding into the sky, you can use your dark object to dodge over the lens in that shape.
Just keep some simple math in mind when calculating how long to dodge for. If your foreground exposure is calculated at 8 seconds, then dodging over the sky for 4 seconds would darken it by one stop. If you held it over the sky for 6 seconds, then it would have been darkened by 2 stops. This trick has a lot of potential and can help you out while you decide on a GND filter system.
Back light in a forest
Now this can be a very special lighting condition. Back light will make foliage glow brilliantly and just fills the whole scene with pleasant tones. It can also be a bit tricky to expose for. You will typically be looking at a lot of contrast in this situation, so I would typically go with a color negative film that can hand it all. Here’s an example on Kodak Ektar below.
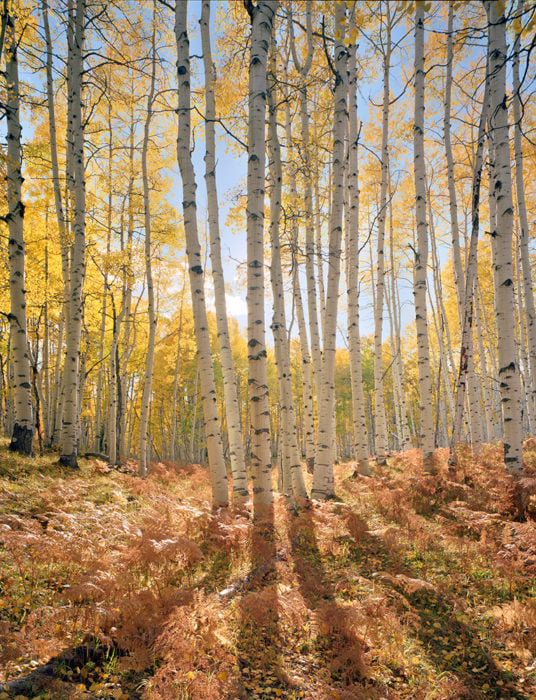
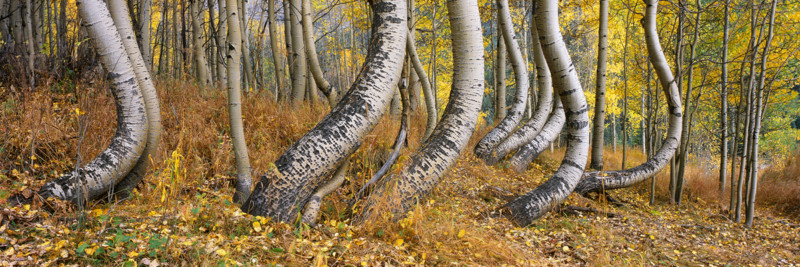
Notice that the sky still holds blue, the aspen trunks appear bright white, and the leaves are still full of color and not blown out. Part of this is due to the magic of films like Ektar but it’s still a good idea to meter very precisely.
Again, you must think about what aspects of the image are the most important to you. How bright do you want certain parts of your image to appear?
In the above example, I knew it was crucial that the aspen trunks appear bright because they are a brilliant white tone in real life. Now I knew this would be a challenge to make them appear white against a backlit blue sky, but I wanted to do my best. Notice that if you compare them to the pure white of this web page, they are actually nowhere near that bright. But that’s ok, they still appear naturally brilliant compared to the rest of the scene. The aspen trunks would become my metering anchor for this exposure and everything else would fall into place naturally.
Since I knew that I wanted the aspen to be brighter than just a middle grey, I metered them for about a half stop of overexposure. This put the foreground shadows about one stop underexposed which was perfect. But as I spot metered the shimmering yellow leaves and the blue sky behind the trunks things got tricky. The leaves in the sky were about two stops overexposed and the sky near the center of the image metered out to be at least 5 stops over.
You can’t use a GND filter in this situation so you just need to have faith in a color negative film like Ektar, it can handle this situation. The overexposed blue will be pale and low on saturation but still very pleasant to they eye.
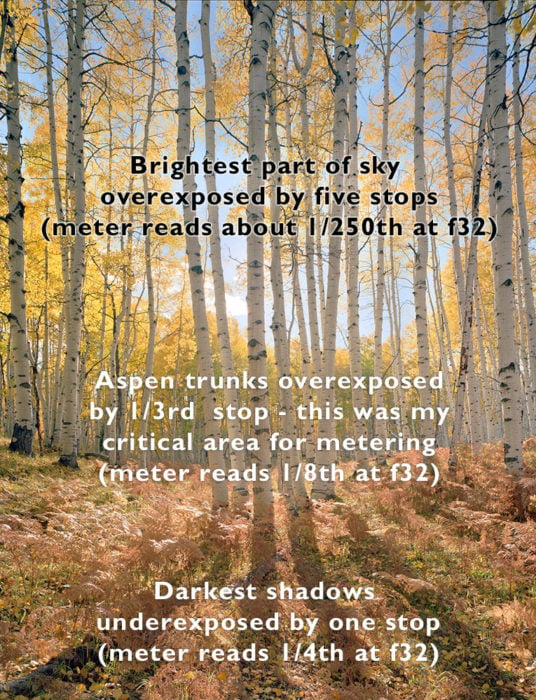
For this scene I would started with an average metering of the area where the aspen trunks hit the ground and added a half stop or so. Then I would have zoomed in the lens on my “light meter camera” to take closer readings of the aspen, the sky, and the shadows. This works similarly to putting a meter on spot mode but is a little easier than fiddling around with menus in a camera.
The image above gives you an idea of what I would have seen while metering. I still wouldn’t have spent too much time on metering. The average readings give you a good start and a few spot measurements usually reaffirm what I suspect will be a correct exposure. From there, you must trust the film and take the shot.
Back light in a forest with slide film
You can most definitely create some stunning backlit forest images with slide film even though it has a much lower dynamic range. Don’t expect a blue sky behind your trees, so look for different situations where there may be less open sky in the image and you’ll be rewarded with wonderful colors and the rich contrast of slide film. I think Provia can typically handle these situations better than Velvia so keep that in mind.
In this example image below, you can see I chose a scene where most of the bright areas are leaves and not open sky. Unless you underexpose the image excessively, there’s no way you’re going to have blue sky behind a tree like this. However, you can end up with bright and properly exposed leaves so choose a scene where your sky would be filled with foliage. Also notice how the extra contrast of slide film makes the backlit grasses in the foreground really glow.
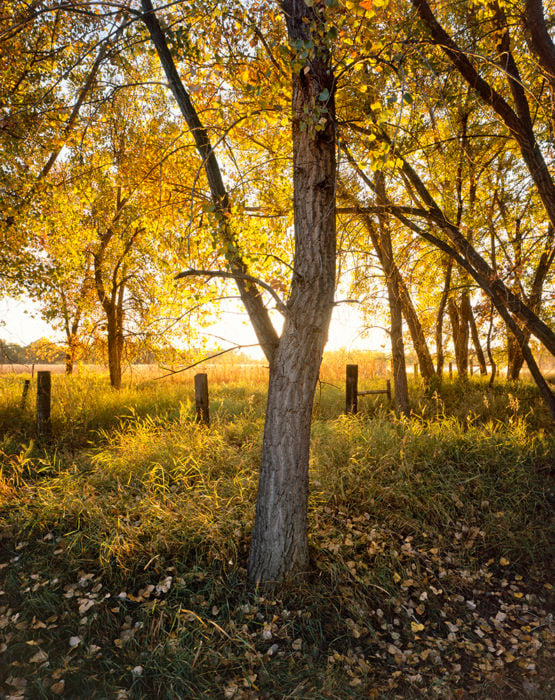
I would meter a scene like this rather similarly to the last image. Once again, the tree was my critical metering point because I wanted it to look accurate. After that, the bright golden leaves were my second priority because I wanted to keep them from getting overexposed to the point where they disappear into the sky.
For slide film, you’re going to want to keep any important highlight details from being more than two stops overexposed. Some of the brightest leaves are even more than that but that’s ok, this is supposed to be a very bright image. This cottonwood tree trunk is a good bit darker in nature than an aspen, so make sure to expose accordingly.
I spot metered on the tree and set it at a half stop underexposure. From there, I metered around the scene to make sure nothing would be too bright and that everything would fall into place. The shadows in the bottom were a full stop or even more underexposed, but the backlit grassy areas were a great mix of contrast. Don’t worry about the brightest parts of the sky. There’s no saving them, they are going to be pure white.
Side Light
It doesn’t really get much easier than side light, especially if it’s during the day while the sun is still high up in the sky. Either film type will be just about the same in these conditions, I would most likely make my film choice based on the types of colors I’m going for in this situation, or if there was significantly high contrast I would lean towards negative film.
In the image below, I happened to take an exposure on Ektar and on Provia. They both turned out rather similar in tones and color but I preferred the clouds and light on the Ektar version.
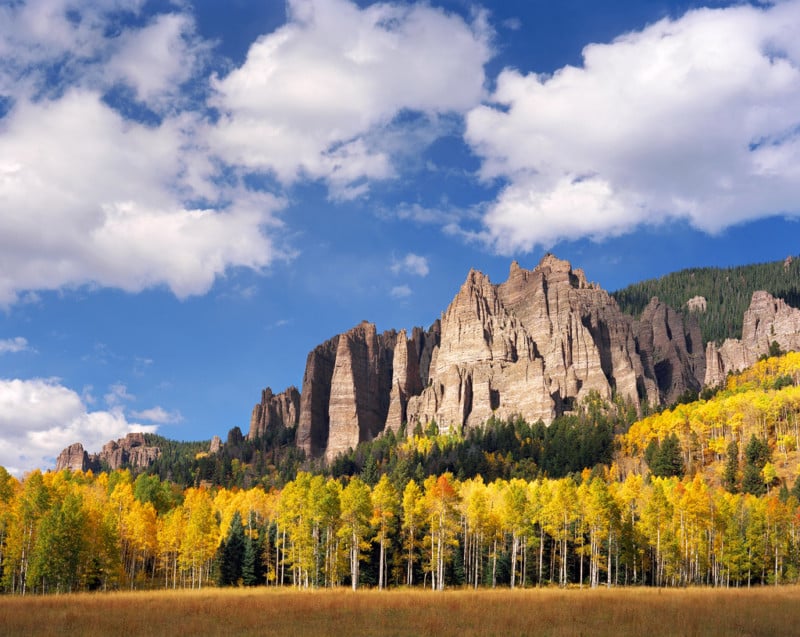
When metering for something like this, I would pretty much just point my light meter at the scene and average meter the whole thing. I added about 1/3rd stop to keep things like the aspen looking properly light, but you can’t go too bright or you’ll lose the deep blue sky. Sure, you could point a meter all around the place and take notes and measurements, but in the end it all just works out nicely. Using the histogram display on the back of my digital camera really helps to make sure that nothing will be too far out with exposure so I didn’t need to check the entire scene. I did give a quick look at the sunlit rocks, but they fell nicely into about a stop brighter than the sunlit aspen so they would appear properly brilliant.
A quick note about polarizing filters. I like to put one on my light meter camera so I know what the exposure should be. If you’re using a handheld meter you’ll need to add the proper amount of exposure for the filter, usually about 1 and 2/3rds of a stop.
Soft side light – sun below the horizon
This is a very common situation when shooting north or south during sunrise and sunset. While the sun is still below the horizon you will likely have a sky that is full of colors but quite a bit brighter than your foreground.
This is another time to pull out the GND filters. I still consider this condition to be side light, because you’ll notice your subjects glow softly on one side compared to the other. Most of the light is coming from the sky, especially from the clouds that are glowing strongest from the sunrise. This creates soft shadows and colors that spill onto the landscape. I will likely try to use slide film during these special moments to really take advantage of the soft light and bring out the intense colors. This is a great time to pull out some Velvia if you want the strong sunrise hues to shine.
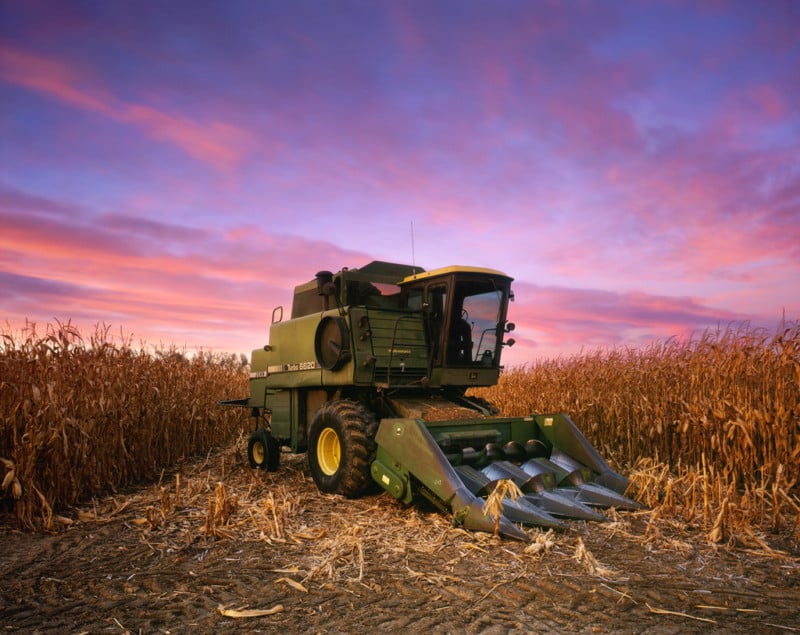
Metering is going to be rather easy for this and similar to my very first section on back lighting. First I will meter the subject and foreground, this will be my exposure. In a scene like the one above, the combine makes a good midtone reading and the dried up late harvest corn should be about 1/3rd overexposed. I will then set my lens to this exposure. Now it’s time to meter the sky.
Quick tip: I’ve found that during sunrise and sunset, the sky is almost always two stops brighter than the ground. In nearly 99% of the times of metered this situations a 2 stop GND filter almost always does the trick. I’ve found that a soft edged GND filter is best because I usually have my subject sticking up into the sky.
Where in the backlit scenes I wanted the sky to appear a whole stop or more overexposed, I may try to avoid that during a side lit sunrise. I try to maintain the maximum color in the sky during these crazy sunsets, so I’ll likely just have it about half a stop overexposed to protect the saturation. Again, if you don’t have any GND filters try the trick I mentioned earlier about dodging a dark item in front of the lens over the sky. Do it, I dare you.
Snow!
Snow is bright, and you need to make it bright. No matter what kind of light meter you’re using, it doesn’t care that you’re pointing it at snow. It wants it to be a middle-grey which would just look horrible when you’re going for a bight wintry scene. However, snow comes in many flavors especially as the light changes during sunset and twilight so there is some careful things to consider. I’m going to touch the surface on this topic but it may require a blog post of its own.
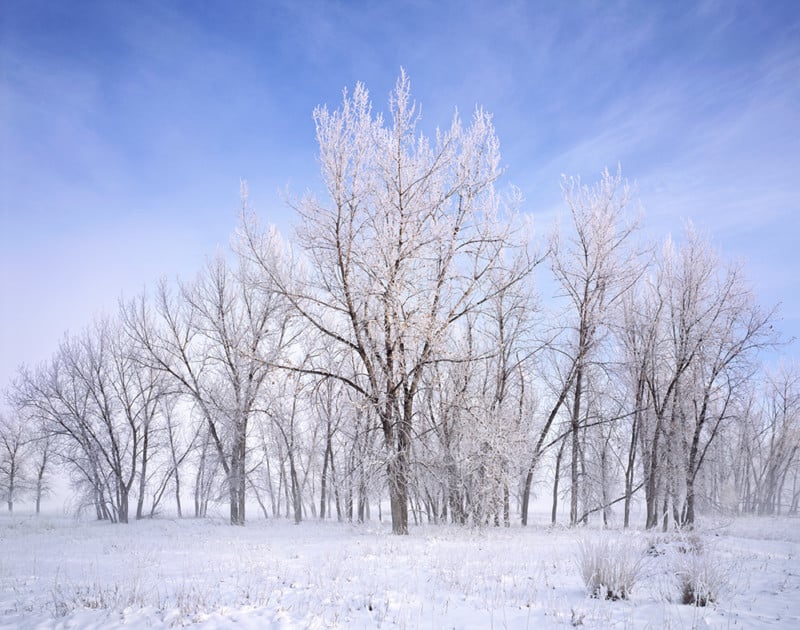
When the sun is above the horizon, snow should generally look bright white or perhaps with a hint of blue. By bright I mean about a full stop overexposed for slide film, sometimes even more with negative film. If the scene is mostly full of snow and frosted subjects, then metering is typically quite easy and a quick average meter reading set to +1 stop of overexposure will typically do the trick. That’s exactly what I did for the image above.
I love Provia for these types of scenes because it tends to render them a pleasant blue which brings out the winter feel for me. Be careful that it doesn’t get too blue particularly in open shade lighting, I use the daylight white balance setting on my digital camera to check if I need to use a warming filter. Your eyes can fool you when it comes to color.
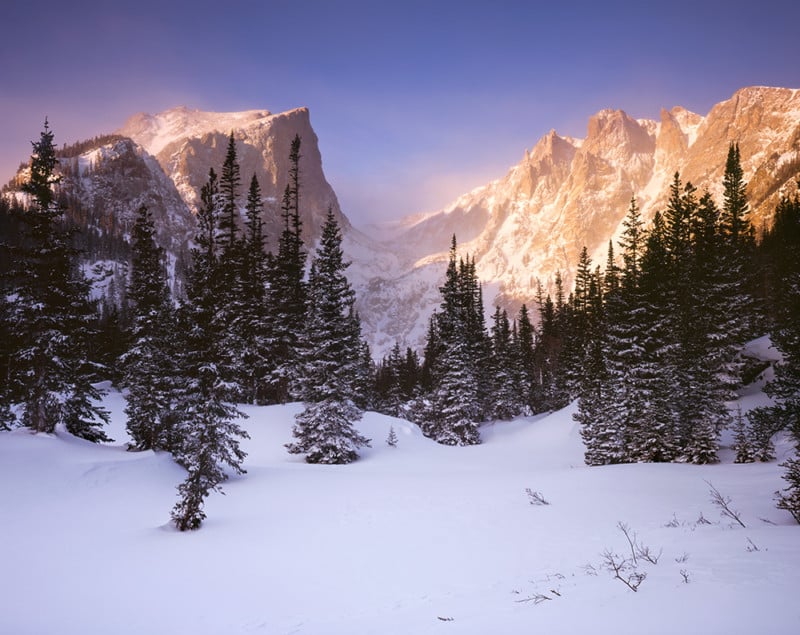
Snow around sunrise and sunset can be a different challenge. Since it’s so reflective, it tends to pick up all sorts of hues from the colors in the sky along with the blue tones from being in shade. You’ll likely lose some of the reflected colors if you add the full stop of overexposure in these conditions, so I tend to tone it down a bit and only add half a stop.
In these scene above you’ll want to spot meter around the scene a bit. An average reading would likely get you in trouble here because the trees are so dark compared to the snow and sunlit peaks.
My personal preference is to have the pine trees appear dark so the rest of the scene can fall into place. I would have started by metering the snow in the foreground and adding half a stop, then checking the brightest part of the peaks and making that a full stop brighter as they are in sun. With a difference of 3 stops between the foreground snow and the sunlit peaks, I used a two stop GND filter to allow the peaks to be a full stop brighter. Again, I like the extra color and contrast you get from slide film for these types of images. Slides really pick up on the reflected sunlight colors that bathe the snow in unique hues.
Snow with negative film
I would most likely shoot a snow scene on negative film if it doesn’t have much color but a lot of sunlight and contrast. A scene like this would be all about the subtleties and should overall appear high-key and very brightly exposed. I may even not have any true blacks in the image and even the shadows may be close to a “middle exposure.”
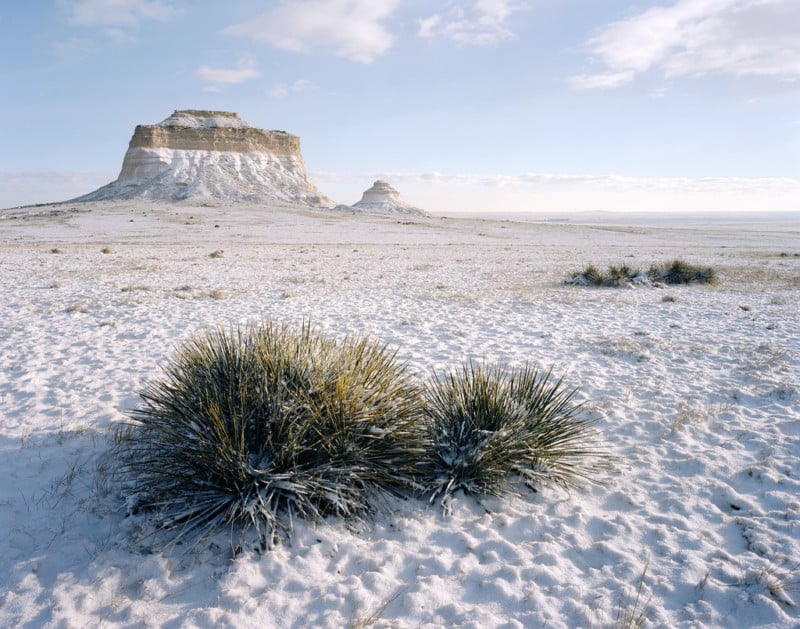
If you look at the image below you’ll see it is incredibly bright, much of the image falls very close to a pure white. This was a very simple scene to meter. I didn’t want to fiddle around with spot metering as I was using Kodak Portra, a film that can handle a ton of contrast so I knew everything would expose. The Portra I was using is ISO 160 speed film, but I always meter it at 100 which is already 2/3rds of a stop overexposed. I think this gives it a very pleasant look that is soft on saturation and has tones that fade into highlights wonderfully. I then added an additional stop exposure to really make sure the snow was bright.
I did not spend more than ten seconds metering this scene, it was a no-brainer and completely easy with average metering.
Silhouettes
Almost every time I post a silhouette image I get a question about how I meter for such a scene. Silhouettes are actually incredibly easy to meter for.
First, you need to look for a scene where a shape is jutting up into the sky and said shape is significantly darker than the sky. You don’t need a meter to determine how dark it needs to be, you’re eyes will know right away. I’m talking about dark rocks jutting up into a coastal sunset like the image below. A scene that you can silhouette is going to be very obvious.
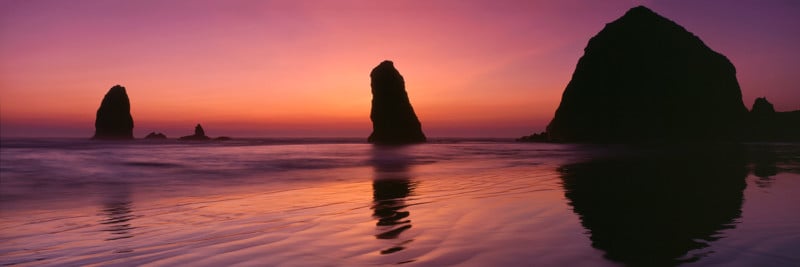
As far as metering goes the principle is no different than any other image. You meter the most important part (which in this case is the sky) and decide how bright you want it to be. A sunset is supposed to be bright, but typically a silhouette is all about the color. If you overexpose that sunset by too much you’ll lose some of the saturation so keep it close to a standard exposure.
I usually add about 1/3rd or a half stop to make it a bit brighter while maintaining the deep colors. You typically won’t need a GND filter for silhouettes, but I did use one for the above example because I wanted the sunset to appear equally bright in both the sky and the water. Either way, the rocks are pure black and have no detail whatsoever. The image below shows you how I metered this scene.
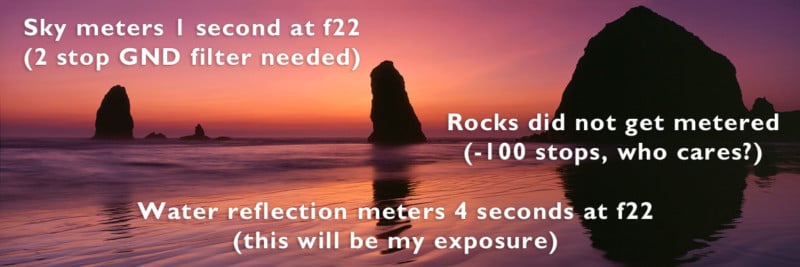
I would typically use slide film for a silhouette. The colors are stronger and the dynamic range narrow so you know the rocks will be black. If you decided to use negative film I would meter just the same, but possibly underexpose a tad to make sure the rocks don’t end up with detail and bring some extra color into the sky.
Water Reflections
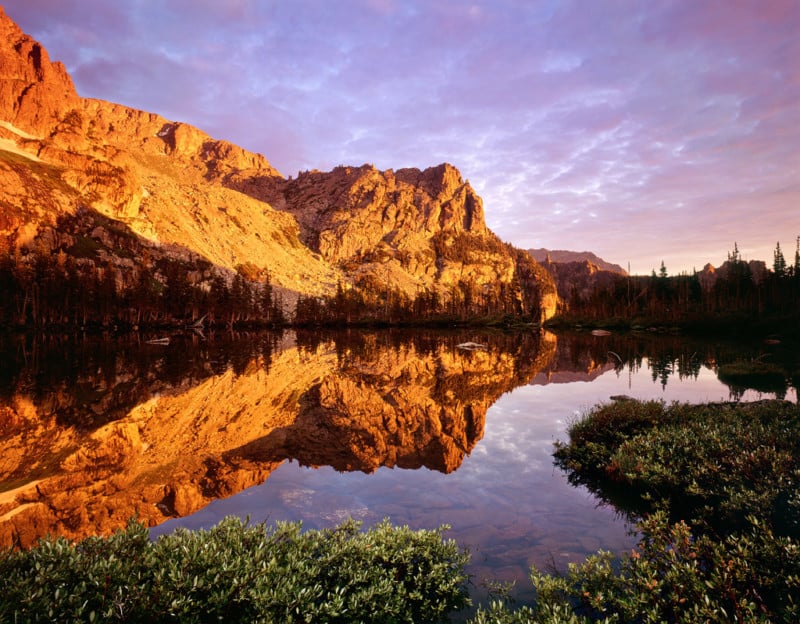
No matter what kind of film you’re using, I’ve found a GND filter to be handy for mountain lake reflections around sunrise and sunset. After metering a lot of reflections, you’ll likely come to the same conclusion I have.
Almost all reflections are two stops darker than than the actual object being reflected. A two stop GND filter works wonders in this situations, but be very careful not to over-filter. If you have a bright sky you may be tempted to use a three stop filter and you’ll quickly end up with an image where the reflection of the mountain is brighter than the mountain itself which will instantly look unnatural. If you want to meter for yourself (which is still a great idea), just average meter the reflection and then average meter the mountain or sky and you should come up with a 2 stop difference.
Be careful not to overexpose your reflections, there are limits with these types of images and you may have to let the vegetation or rocks around the lake appear dark.
Soft light
These types of scenes are where you can go crazy with making sure everything is perfect! The light typically isn’t changing fast so you’ll be able to play around with your meter and make measurements around the whole scene, really dialing in the key components.
I would typically use slide film in these situations because there won’t be too much contrast without any direct light and the color accuracy is phenomenal.
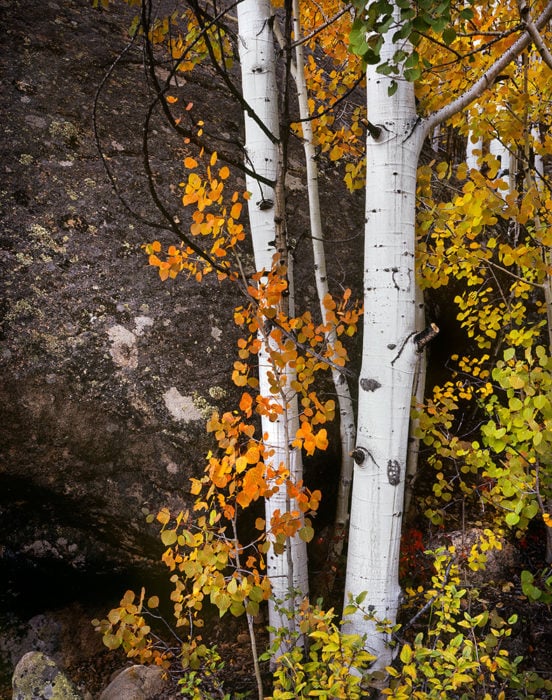
In this image of bright autumn aspen against a dark boulder, I had lots of metering choices. First of all, it was important that the aspen trunks be brighter than anything else, about one full stop overexposed. After making this measurement, all I had to do was make sure all the other elements fell into place. They did, and they did very well.
The colorful leaves metered out to be about 1/3rd to 2/3rds over which ensured they would be bright and colorful, while the large bulk of the boulder was about 1/2 a stop underexposed which made for a great dark background that really made the leaf colors pop. I was lucky that all the tones fell into place so well, but you’ll often find this is the case with soft light.
Just determine your most critical area and the rest should work well. You would meter this just the same if you decided to use negative film.
Bonus Tip: The Night Sky
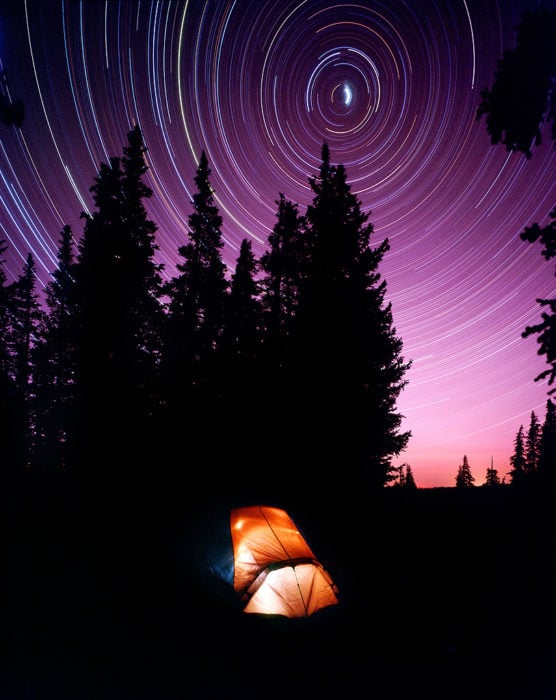
I’m just adding this one because I get a lot of questions about night sky star trail exposures. First of all, you’re not going to meter this. Good luck with that. All I can say is that it takes a lot of light to really make a good star trail image.
I’ve found that if there is no moon, just do the exposure for the entire night at f8. Start an hour after sunset and close the shutter an hour before sunrise. Even if the moon will come up halfway through the night, I would recommend giving the exposure another hour with the moonlight unless it will be directly in the lens.
It’s quite hard to overexpose night shots on film so really go for it!
I believe that covers most of the metering challenges I get questions about on a regular basis. If you have any questions or thoughts please leave a comment below! Perhaps I’ll even make another blog post to cover some of these situations in greater detail.
About the author: Alex Burke is a large format landscape photographer from Greeley, Colorado. You can find more of his work on his website, or by following him on Facebook, Instagram, 500px, and Flickr. This post was also published here.