
A Hands On Comparison of the 50mm f/1.8 Lenses by Canon and Yongnuo
Photographers Tony and Chelsea Northrup shot a hands on test video that pits …
Photographers Tony and Chelsea Northrup shot a hands on test video that pits …

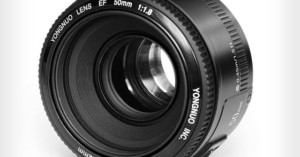
I recently did a simple review that compared Yongnuo's new $40 clone of the Canon 50mm f/1.8 II. Today I will dive a little deeper into how the two lenses stack up optically.
There’s only so much that can be tested in home without fancy gear (MTF charts and the like) so I did a few tests that gauge common aesthetic qualities, using techniques that are often recommended for testing at home.
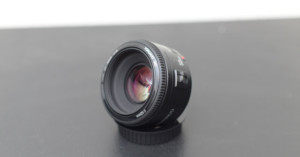
I will be the first to admit that I am not a street photographer, not a wedding photographer, and don’t generally shoot in low light, but I wanted to get a review out since I just received my two copies of Yongnuo's $40 clone of the Canon 50mm f/1.8 II.
Back in September, we reported that Chinese manufacturer Yongnuo has expanded its cloned gear business to include copycat lenses, starting with the Canon 50mm f/1.4. Now a new clone has emerged: the super popular "thrifty fifty" Canon 50mm f/1.8 II (also known as the "nifty fifty" and "plastic fantastic").
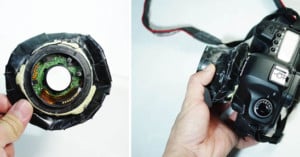
We've shared in the past how a broken lens can be used for "freelensing," or taking tilt-shift-esque photographs.
Photographer and lens hacker Witono Halim did this by buying a broken 50mm f/1.8 online for $25, sawing a piece off, and combining everything into a ugly-yet-functional lens with $2 of duct tape.
Photographers commonly place UV filters on the front of their camera lenses in order to protect the glass front element. Aside from preventing dust buildup, the filter also takes the brunt of any impact seen by the front of the lens. If you have to have some glass shatter, you'd rather it be a relatively cheap filter compared to an entire lens, right?
But how easy is it to damage or destroy the front element of a lens? Photographer Richard Choi had the opportunity to find out a few years ago when he found a bricked lens on his hands.
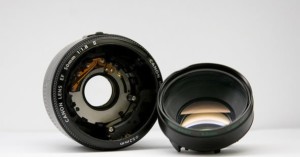
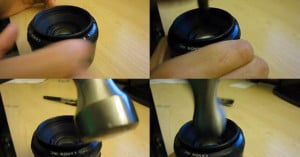
Canon's 50mm f/1.8 Mark II is a terrific lens for its price, but its build quality definitely leaves something to be desired. Do a quick search, and you'll find legions of broken-hearted Canonites who had their 'Nifty Fifty' split into two pieces after accidentally bumping or dropping it. Flickr user tastygiant is one such Canonite, but he subsequently discovered an awesome use for the broken lens:
Being a geek, I figured I could use the broken pieces in the future, so I shelved it and bought a new 50mm 1.8 Canon lens. One day, while taking shots around my apartment, I stumbled across the broken lens again and decided to reverse the "barrel assembly" onto the front of my intact 50mm. Everything was blurry of course, but I noticed if I got very close to an object the detail came into view. After adjusting the aperture to around f5.6, I had a clear image.
It's important to note that you should switch to Manual focusing and rotate the focusing ring to "infinity".