technique

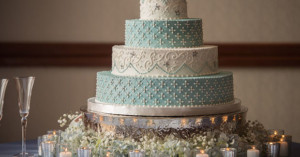
My One-Shot, Zero-Setup, Sure-Fire Guide to Photographing Wedding Cakes

This guide is what I do during wedding days, and I typically photograph the cake right when I enter the reception location. Overall, I take 4 shots of the cake: 1 vertical, 1 horizontal, 1 detail of topper, and 1 detail of the base or whatever is the most interesting on the cake.

This process takes me literally 30 seconds. That’s it; done. Move on to centerpieces. This guide is for photographing real cakes on real wedding days for wedding photography professionals.

A Complete Guide to Star Trailing

Ever see those pictures where the stars streak across the sky in a big arc? Or maybe the whole sky looked like it was spinning? What you saw was star trails. The streaks were light left behind on the sensor or film from the star as it traveled across the sky in front of an open camera shutter. In fact, what are being recorded are stationary stars and the rotation of the earth as it spins past them. For me, the images seem to have a certain magic or mystery about them.

You must have heard a photographer talking about capturing that perfect moment in time. Well for capturing star trails you will need to capture the perfect hour or two in time. For such amazing looking images, the technique used to capture them is really quite simple. Keep reading for a complete set of instructions from start to finish.

Stop Motion Musical Tours Through a City and a School

Photographer and director Greg Jardin made this creative music video for the song "New York City" by Joey Ramone. It's a stop-motion video that features 115 people (some of them random pedestrians yanked off the street) traveling backwards through various locations in New York City.

Freelensing: Make a DIY “Poor Man’s Tilt-Shift” by Breaking a Cheap Prime Lens

Freelensing. It’s been around for a while. It’s essentially the “poor man’s tilt shift.” All the technique requires is disconnecting a lens from the camera body and floating it around in front of your sensor to shift the focal plane in weird directions. It takes practice to get accurate with it, but overall the technique is pretty straightforward.

I wanted to take it a bit further.

How to Retouch Portraits Without Losing Skin Texture with Frequency Separation

Here's a great introductory retouching tutorial by photographer Sara Kiesling, who writes,

Basic skin retouching using frequency separation and dodging & burning. I use this process on every photo that I do, and I usually spend about 4-5 minutes on headshots like this (and less time on full body shots when there is obviously less detail in the face). This is not intended to be a high-end retouching tutorial, but techniques that can help people who want to do natural-looking retouching while maintaining most of the natural skin texture!

Frequency separation is a technique that allows you to give skin a smooth-yet-sharp look.

Weekend Project: Use the Harris Shutter Effect for Colorful Photos

Looking for a photo project to play around with this weekend? Try exploring a technique known as the Harris Shutter. Invented in the days of film photography by Robert Harris of Kodak, it involves capturing three sequential exposures of a scene through red, green, and blue filters, and then stacking the images into a single frame. This causes all the static elements within the scene to appear as they ordinarily would in a color photo, while all the moving elements in the shot show up in one of the three RGB colors.

Create Beautiful Surreal Photographs by Stacking Your Film Negatives

We've shared a number of examples of surreal images created using multiple exposure techniques or by combining images using Photoshop, but did you know that you can also create beautiful images by stacking actual film negatives? Photographer Laina Briedis did some experiments with 35mm film stacking, and achieved some stunning results. She combined photos of stars and sky with pictures of people, creating images that look like they were plucked from someone's dreams.

Supercut of One-Point Perspective Shots from Stanley Kubrick Films

A one-point perspective photograph is one in which there exists only a single vanishing point. Parallel lines in the scene all converge on that single point, leading away from the viewer. It can be used for interesting compositions, especially if that vanishing point is placed at the intersection points of the rule of thirds.

Filmmaker Stanley Kubrick has a habit of using one-point perspective for dramatic effect, often with the vanishing point in the dead center of the frame, disorienting the viewer and creating tension for his scenes. Film enthusiast kogonada recently took a bunch of Kubrick films, collected the shots showing this technique, and created the interesting supercut seen above.

Creative Firework Photographs Shot by Refocusing During Long Exposures

Photographer David Johnson recently captured a beautiful series of firework photos while attending the International Fireworks Show in Ottawa, Canada. During the Spanish fireworks performance, Johnson decided to deviate from the standard long-exposure style that pretty much everyone uses when shooting firework displays. Instead of fixing his focus at a certain point in space, Johnson introduced refocusing as part of the equation.

Forced Perspective Shots with a Moving Camera in Lord of the Rings

Have you ever wondered how Lord of the Rings director Peter Jackson made Frodo Baggins the hobbit so much smaller than Gandalf the wizard? Aside from using CGI and child body doubles, the filmmaking team also employed brilliant forced perspective techniques that tricked viewers with optical illusions.

How to Compose Shots When Shooting Skateboarders

Here's a tutorial by skateboarding photographer Michael Burnett in which he discusses various composition tips and techniques. His area of expertise is in shooting skateboarders, but the tips are very applicable for other types of photography as well.

Old Gadgets Taken Apart, Photographed, and Reassembled Digitally

The photographs in artist Max de Esteban's Proposition One project might look like X-Ray images, but they were actually captured with an ordinary camera. They were created by carefully deconstructing old gadgets, photographing them in "layers", then "reassembling" the gadgets digitally. You can see them on display through December 9th at Klompching Gallery in NYC