A Portrait Photographer Puts 6 Common AI Retouching Myths to the Test
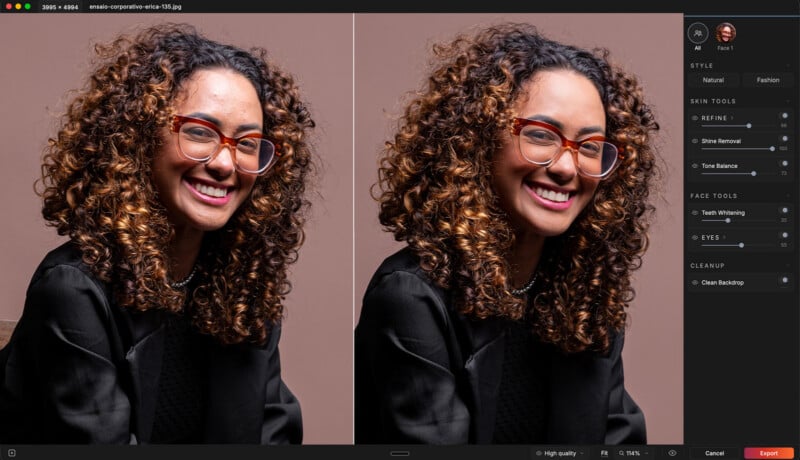
Photographers have plenty of reasons to distrust automatic retouching. We asked Joe Fraga, a portrait photographer in Salvador, Brazil, to test six of the most common ones on real client work and see which still hold up.
DisclosureThis article is brought to you by Reblum.
Joe Fraga is a portrait photographer based in Salvador, Brazil, who specializes in professional headshots and has worked professionally for nine years (@joefraga on Instagram). Fraga has been a Reblum partner since August 2026. All images in this article are Fraga’s own client work, published with permission.
Few tools divide portrait photographers like AI skin retouching. To some, it is the only way to deliver a fully retouched gallery on time, from a company headshot day to a family session or a wedding. To others, it means plastic faces, data sent who knows where, and software that only knows what lighter skin looks like.
Some of those beliefs come from experience: early beauty filters and automated tools did earn them. But software changes faster than reputations do. So we asked Joe Fraga to take six of the most common objections and test each one against Reblum, a desktop retouching software for macOS and Windows.
The images are Fraga’s, and so are the verdicts. Most of them come from his corporate and headshot work, but the same questions apply to family, fashion, event, and wedding photography.
Myths At a Glance
- AI retouching makes skin look plastic
- It only works well on lighter skin
- It means the cloud, per-photo fees, and extra exports
- Group photos confuse it
- It only retouches faces
- It’s a black box that replaces the retoucher
Myth 1: AI Retouching Makes Skin Look Plastic
This is the big one, and it has history. Plenty of retouching software has smoothed faces until the pores vanished, leaving skin that reads as fake from across the room.
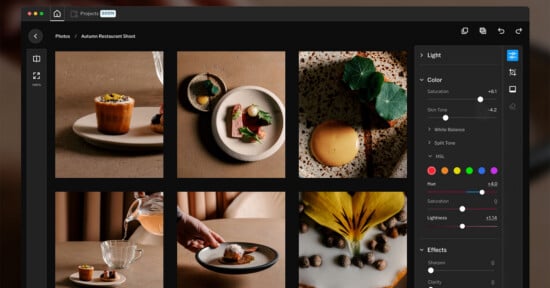
Reblum is built on frequency separation, the technique professional retouchers use to avoid exactly that. It splits an image into a layer for color and tone and a layer for fine texture, so blotches can be evened out without touching pores, freckles, and fine hair. In Reblum, the General slider removes blemishes and the Texture slider works on the fine texture itself.
The Test
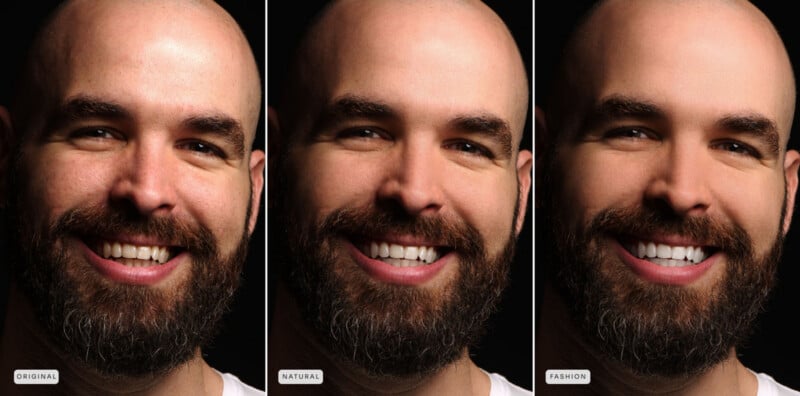
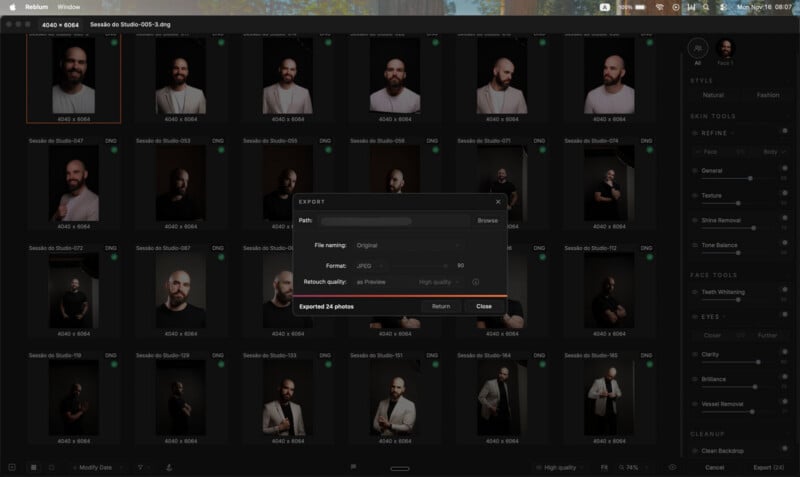
I ran a 24-portrait headshot session through Reblum twice: once on the Natural preset at default settings, and once on Fashion with every slider at maximum. Then I compared both versions at 100 percent.
On Natural, I got the result I need for corporate headshots. The hotspot on the forehead is muted, the redness around the nose and cheeks is calmer, and the pores and the fine lines around the eyes are still there. The beard and eyebrows keep their detail.
Fashion at maximum goes further than most of my clients need. At 100 percent the grain is still there, so it is not the plastic skin this myth describes, but I keep this look for the occasional job that needs a polished finish. For most sessions, I set the sliders at about half and adjust single photos where needed.
Myth 2: It Only Works Well on Lighter Skin
This criticism is serious and well earned. Retouching tools trained or tuned mostly on lighter skin have flattened deeper skin tones.
The usual failures are easy to spot: hotspots that turn gray or matte instead of matching the skin around them, and a tone tool that pulls every skin toward one lighter average. Reblum’s Shine Removal blends in color from the skin next to the highlight, and Tone Balance shifts hue, not luminance, so it does not lighten the skin.
The Test
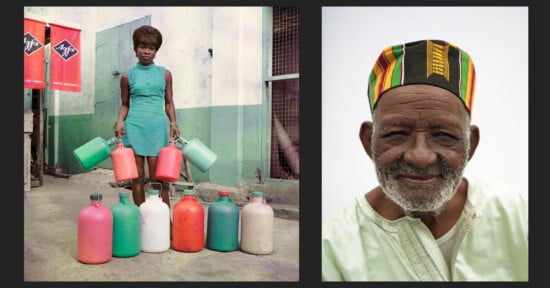
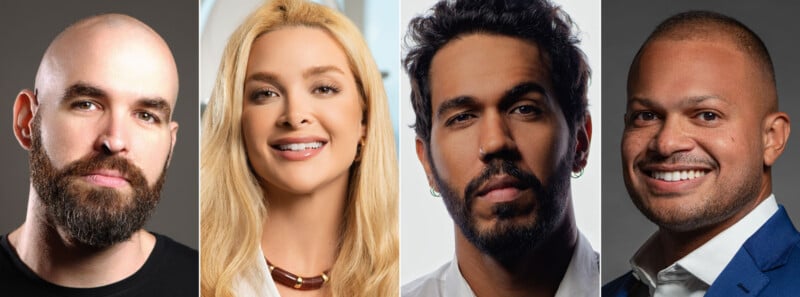
I ran four client portraits across a range of skin tones through Reblum (below), plus the portrait at the top of this article.
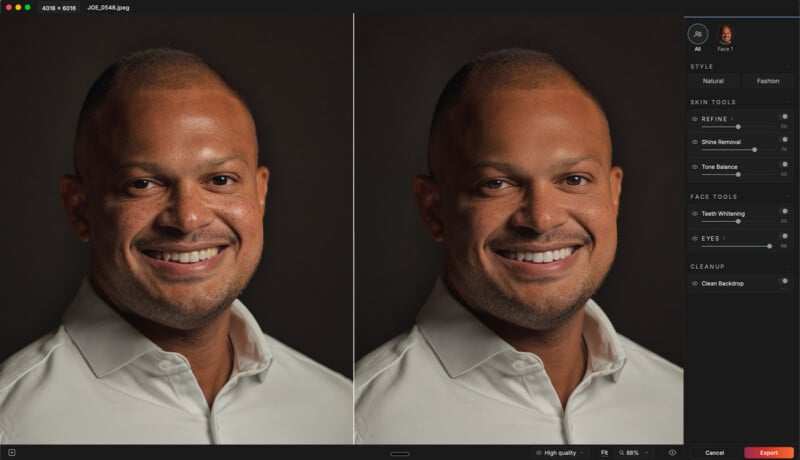
The fourth portrait is the hardest case in the set: deep, warm skin with strong hotspots on the forehead, nose, and cheekbones. With Shine Removal and Tone Balance, the hotspots came down without turning gray, the skin kept its warm brown, and his freckles are still visible.
Myth 3: It Means the Cloud, Per-Photo Fees, and Extra Exports
This objection has three parts, and all three come from real tools. Many AI services process images on remote servers, so photographers ask where client faces go and whether they train someone’s model. Some charge per image or sell credits, which turns any large job, such as a company headshot day, an event, or a wedding, into a bill. Others make you export everything, edit in a separate app, and import the files again.
Reblum runs on your own computer. Photos are not uploaded, and after a one-time download of the AI model at first launch, it works with no internet connection. The company says client photos are not used to train its algorithms. That also means you can retouch on a plane, in a hotel, or on a studio machine kept off the network.
Batch processing is unlimited, with no credits and no per-photo fees, so one portrait and a full gallery cost the same. Reblum works as a standalone app or as a plugin where you already edit: Lightroom Classic, Capture One, Photoshop.
The Test
My workflow is simple. I adjust light and shadows in Lightroom Classic, send the selects to Reblum, and they come back retouched. A typical shoot for me is around 20 photos.
For this test, I took the 24-portrait session from Myth 1 and turned Wi-Fi off. I set the sliders on one image, Reblum applied the same settings to the other 23, and the export took 4 minutes 58 seconds on a MacBook Air M4 at High quality.
Two things to know. Reblum opens DNG files, but it is not a raw processor and does not grade color, so my raw work stays in Lightroom. And batch settings are shared: when one photo needs a different treatment, I switch it to its own settings and adjust it by hand.
Myth 4: Group Photos Confuse It
A family portrait or a team photo has faces of different ages and skin types, at different angles and distances. Older tools either missed faces or applied the same heavy treatment to everyone in the frame, from a 6-year-old to their grandmother.
Reblum detects every face in the frame. You can retouch them all at once, or pick a single face and work on it alone, for example clearing a teenager’s skin without touching anyone else.
The Test
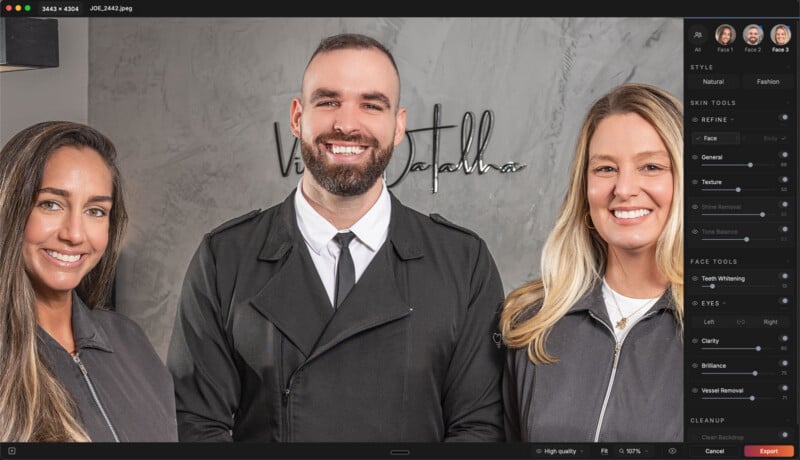
I tested it on a team portrait with three people. Reblum found all three faces; you can see them as Face 1 to Face 3 at the top of the panel. The three have different skin tones and different starting points, so I applied one look to the whole frame first and then went face by face. On the woman on the right, for example, I kept Teeth Whitening low, while another face needed more work on the eyes than on the teeth.
The limit: when you select a single face, Shine Removal and Tone Balance are grayed out, as you can see in the panel. They work on the whole frame only. With three different people in one shot, I would like to set shine for each person. Reblum says separate Shine Removal and Tone Balance settings for each person are planned for an upcoming update. That would solve exactly this problem. For now, I set those two in All mode at a level that works for everyone.
Myth 5: It Only Retouches Faces
Face-only tools leave a mismatch: a smooth, even face above shoulders, arms, and legs that still show redness and blotches. It happens in any shot with visible skin. Boudoir, swimwear, fashion, and wedding work show it most, but so do personal branding and corporate portraits like the one below.
Reblum evens skin on the face and the body. Its skin segmentation finds the skin and separates it from the backdrop, on close-ups and on wide shots. Refine can be set separately for the face and the body, while Shine Removal and Tone Balance work on all skin in the frame together.
The Test
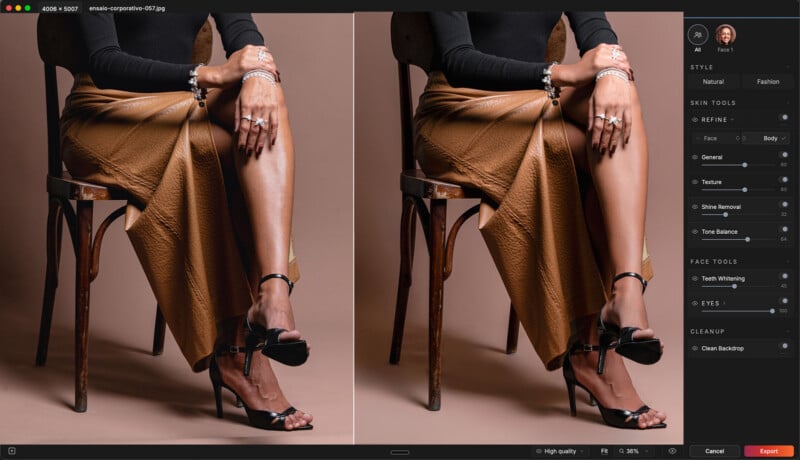
I retouched a seated portrait that shows hands and legs. The small marks on the shins and knees are less visible, and the skin on the legs is smoother. The leather skirt keeps its full grain, and the rings and bracelets stay sharp, so only the skin changed.
The hard highlights on the knee and the shin are softer, but the soft light along the legs stays, so the legs keep their shape. With Tone Balance, the red tones on the knees, knuckles, and toes are weaker, and the hands and legs are closer to one color.
What it did not do: the veins on the top of the foot are untouched. If a client wants them softer, that is still manual work.
I would like a separate body control for Shine Removal. The face and the body do not always get the same light: the forehead can have hard glare while the shoulders have only soft highlights. For Tone Balance, one shared control makes sense to me. The tool reads all visible skin together to set the target tone, so face and body match. Separate controls would work against that.
Myth 6: It’s a Black Box That Replaces the Retoucher
There are two fears here. One is a single button you can’t control. The other is software that makes the retoucher, and the retoucher’s craft, unnecessary.
On control: each tool described at the top of this article has its own slider. Tools can be used alone or stacked, and any of them can be switched off to compare. The two presets, Natural and Fashion, are starting points, not final looks.
On replacing the retoucher: Reblum says it handles about 80 percent of the most time-consuming skin work. The remaining 20 percent, a stray hair, a deep crease, very tight close-ups, still needs a person.
The Test
Before Reblum, I retouched every portrait by hand, in Lightroom and then Photoshop, at 30 to 40 minutes per photo. Today, in the same amount of time, I finish a whole shoot of around 20 photos.
The creative decisions are still mine, too. I handle the initial edits, including exposure, white balance, rough color grading, and the overall look of the images, before moving on to skin retouching in Reblum.
My manual work afterward is mostly on clothing. Sometimes I also remove a distracting detail from the background, or rebuild part of it with a generative tool in Photoshop. Reblum doesn’t currently have tools for clothing, and Clean Backdrop is made for studio backdrops, not location backgrounds, so that part of the job is still mine.
That gap is already starting to close. A clothing retouching tool is coming later this year, with flyaway hair removal planned after that. Both would help reduce some of the manual finishing work that still falls outside the software.
For now, the biggest change for me is time. The heavy skin work that used to fill most of my editing day is now done by Reblum, leaving me more time to focus on the creative decisions and finishing touches that make each image my own.
What It Doesn’t Do
Reblum is a retouching tool, not a full editor. Fraga’s tests also turned up a few limits worth knowing before you buy:
- It doesn’t adjust exposure, white balance, or overall color grading.
- It can open RAW files, but it’s not a dedicated RAW processor or color grading tool.
- Settings for individual faces are made by hand, photo by photo. They are not applied to each face automatically across a batch.
- It doesn’t currently have tools for clothing, stray hairs, or objects in location backgrounds.
Test the Myths Yourself
Reblum offers a seven-day free trial of the full app, with no photo limit and no credit card. That is enough time to run your own photos past every myth on this list.
After the trial, it costs $11.95 per month billed yearly, $24.90 billed monthly, or $249 for a lifetime license with all updates. Each license covers two computers, and the yearly and lifetime plans come with a 30-day refund. Download it at reblum.app.
Black Friday offer for PetaPixel readers: from November 17 to November 29, 2026, https://reblum.app/p/PetaPixel gives 50% off a lifetime license and 27% off an annual subscription.
Which myth did we miss? Tell us in the comments.
DisclosureThis article is brought to you by Reblum.
Affiliate Disclosure PetaPixel articles may include affiliate links; we may earn a commission if you buy through one.