6 Photo Editing Mistakes That Make Your Landscape Photos Look Amateur
The sky is a key element in landscape photography, as it can create mood and depth in your images. However, many beginners tend to overprocess the sky, making it look unnatural and fake.
Many of us seasoned photographers who have been doing this for a while can just look at an image and say: “Oh, the sky is too oversaturated, is too dark, there is too much contrast”, and so on.
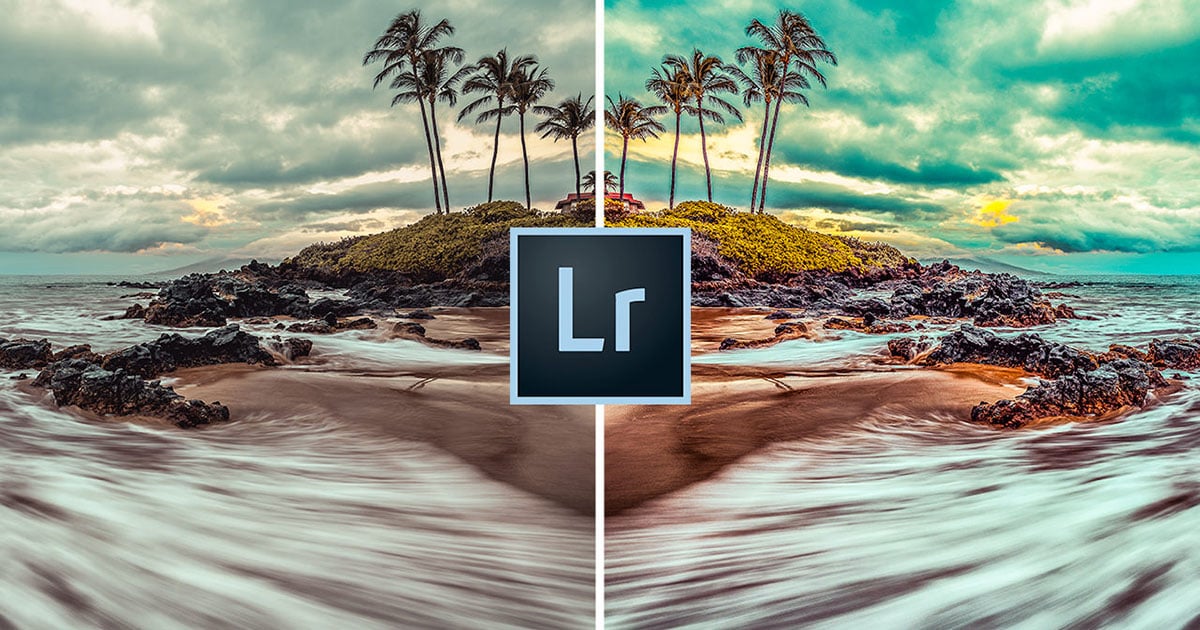
In this article, I will share with you 6 mistakes people make when editing the sky and how to fix them. Most of them are about finding the right balance between too much and too little of something.
So, by the end of this tutorial, you’ll know how to get a compelling and natural sky in your landscape images.
Table of Contents
Mistake #1: Over-Saturated Colors
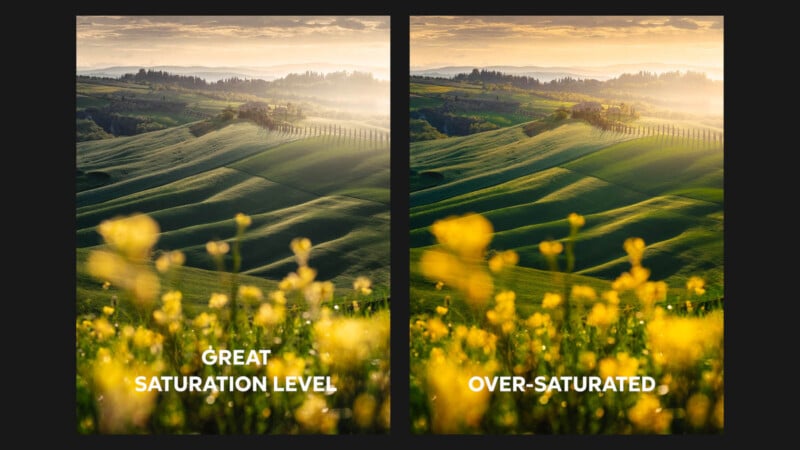
This is for sure the most common mistake I see, which is cranking up the saturation way too much, making the colors extremely intense, quite unrealistic, and almost overwhelming for the viewer.
Generally speaking, as a visual principle, images or parts of an image that have more saturation attract more attention. But when it’s not done with purpose and consciousness, it just becomes a chaos of colors.
So, how to avoid making the viewer’s eyes bleed?
The simple approach when adjusting saturation, is opting for subtle changes rather than drastic increases. Incremental adjustments allow you to enhance colors without making them look overly vibrant or unnatural. It’s often surprising how a little adjustment can go a long way in achieving a visually pleasing result.
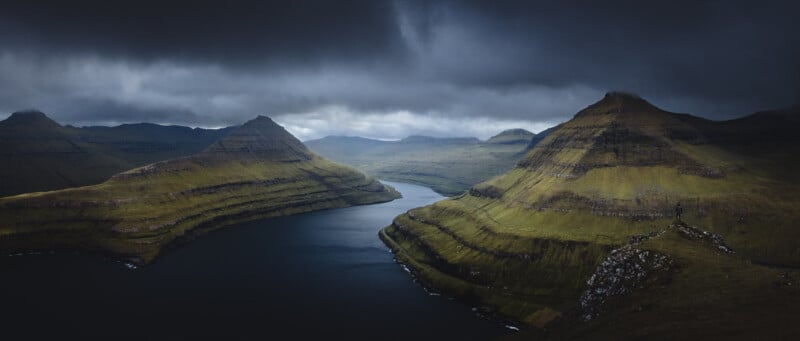
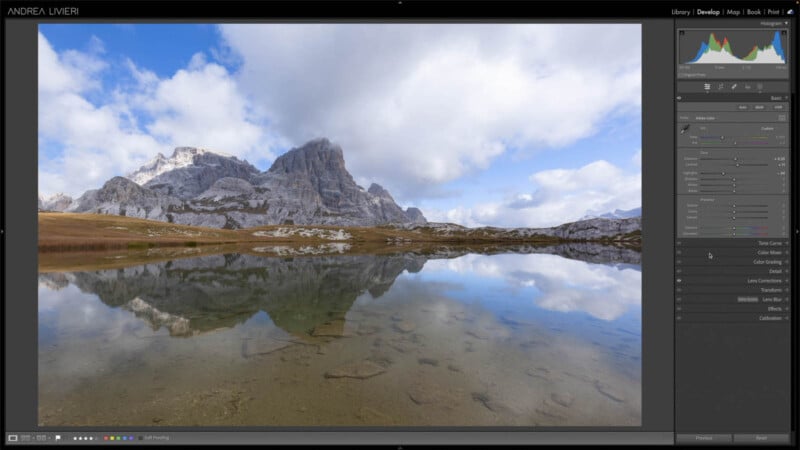
The sky in the following image, for example, doesn’t need many adjustments. We need to boost the saturation level a little bit of the entire image, and maybe another few points of saturation just on the sky using a selection mask that targets only the sky.
Another thing you need to consider is that when you increase the contrast in your image, by adjusting the tone curve, the shadows, and blacks, you are also increasing the saturation of your colors. So what I usually do after a substantial contrast adjustment, is honing back the saturation slider, usually between minus 5 and minus 10, depending on the image.
Of course, the over-saturation problem can be extended to all the areas of an image. So, the same principle works for any section of a shot.
Pro tip: Once you get to the point where you’re happy with the result, the best advice I can give is just to walk away from your image and come back to it later. This works for any type of editing you’ll make. Taking breaks during the editing session is a great way to refresh your eyes, and avoid really bad editing decisions.
Mistake #2: Ignoring the Color Balance
Another very common mistake is ignoring the color relationship, and that’s most of the time related to a poorly adjusted white balance.
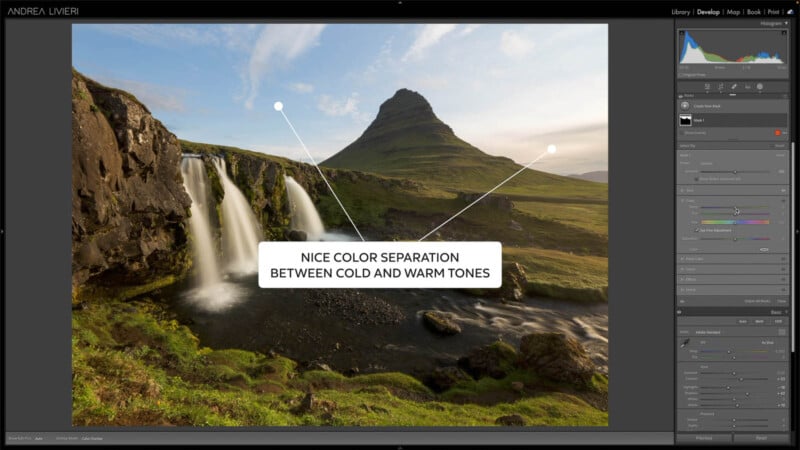
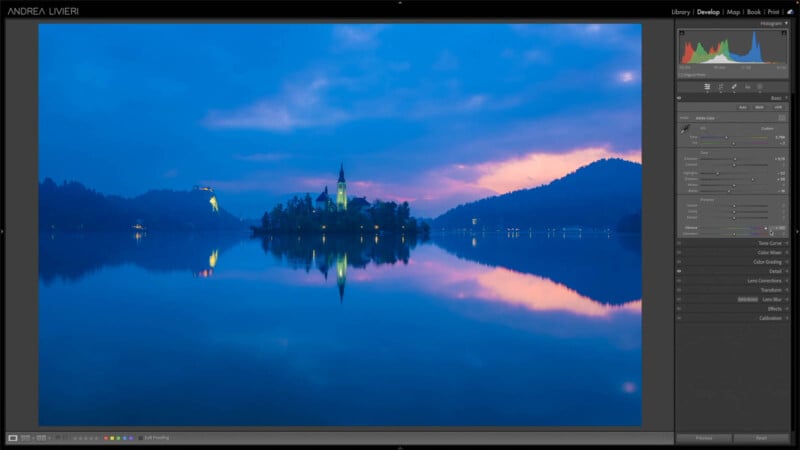
The reason why the white balance is so important is because it affects the color contrast. When you introduce a color cast to an image, you reduce the color definition. You lose the color separation, because all the colors become, like in this case, more yellow.
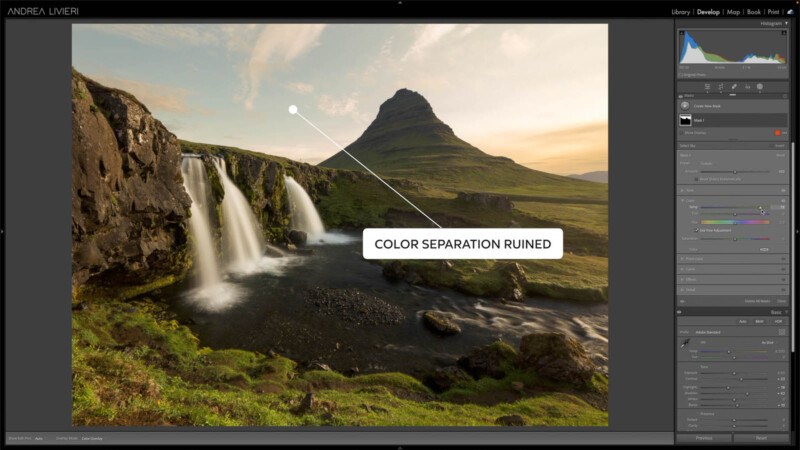
If I increase the warmth (image above), you can immediately see I’m blending the blue sky with the yellow tones here on the horizon. So they blend together, instead of standing out, and I’m gonna lose color depth and separation. You actually make the colors more similar.
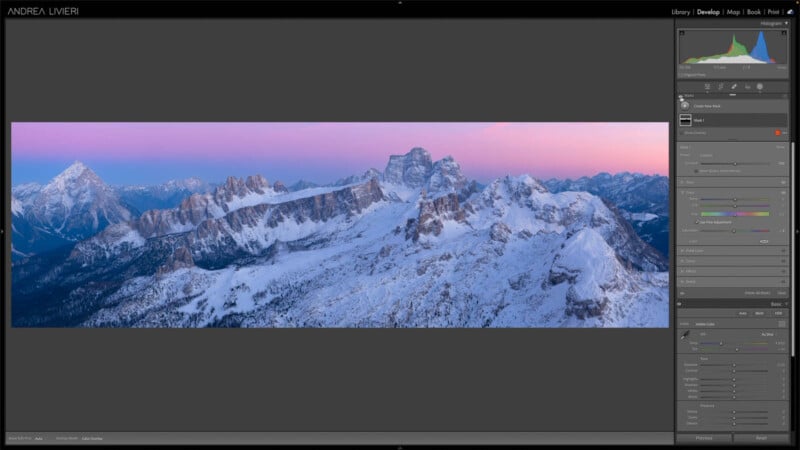
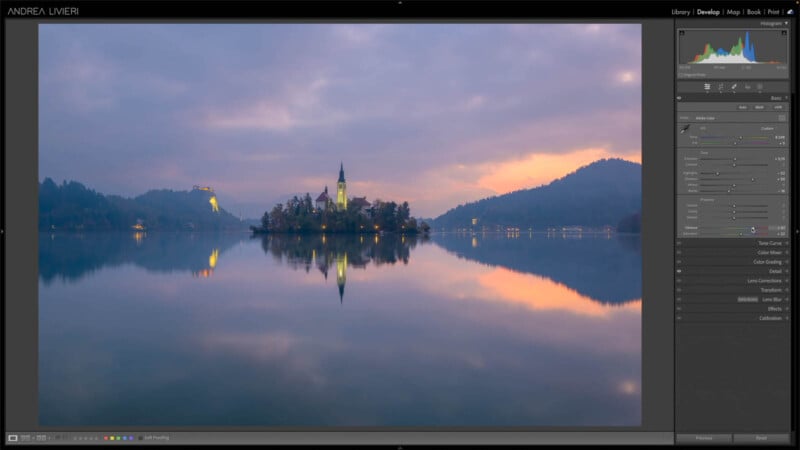
Here below is another example of a wonderful colorful sky with many different shades.
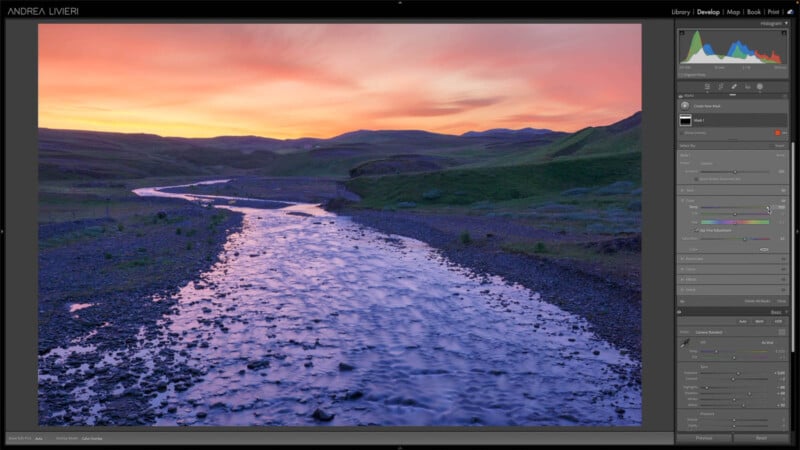
If I push the white balance too far toward one or the other direction (image below), I lose color separation. I lose all these beautiful cold color variations that make the sky so special.
So you want to try and find the sweet spot where all the colors harmonize. I typically adjust the white balance and tint sliders, moving them back and forth until I land in the ballpark where all the colors align.
Remember, when you add any color cast, it becomes more noticeable each time you boost the contrast. So, it’s crucial to pay attention to adjusting the white balance and tint.
When you have white clouds, they are also a good reference to use as a neutral tone.
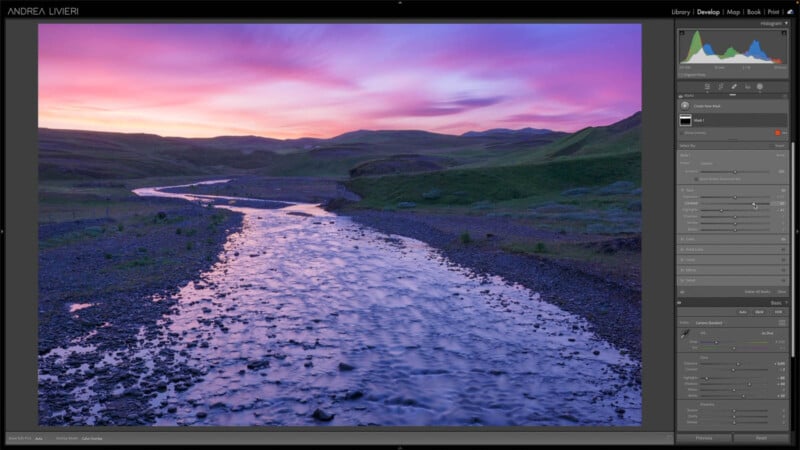
A really simple trick I use to adjust the white balance when there is not an obvious neutral point (image below), is to max out the Vibrance slider at 100%, so I can better see if there is any sort of color cast, and from here I tweak the white balance and tint sliders until I find the values that give me the best color separation.
Once I’m happy with the result, I reset the Vibrance slider back to zero. And now, I have a balanced neutral starting point for my color grading.
Mistake #3: Poor Sky Selection
Another very common mistake is a poor masking transition between the sky and the elements in the background or foreground.
Almost any software in the market nowadays has some sort of AI tool to create a selection of the sky. The problem is, even though AI algorithms are getting better and smarter, in many cases the results are way far to be perfect.
So, when you use AI tools like Sky Selection in Lightroom or any other software, 9 out of 10 it usually requires some extra fine adjustments. One common problem with these AI election tools is that they struggle a bit with areas where the sky meets other things.
Especially when things get a bit hazy or there’s some overlap, the results might look a little strange.
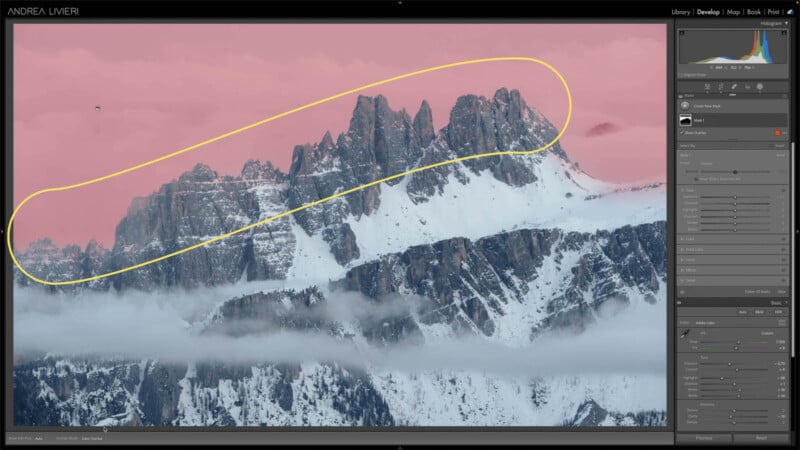
As you can see in the image below, we’ve got a poor selection with other elements in the background like the peak and trees.
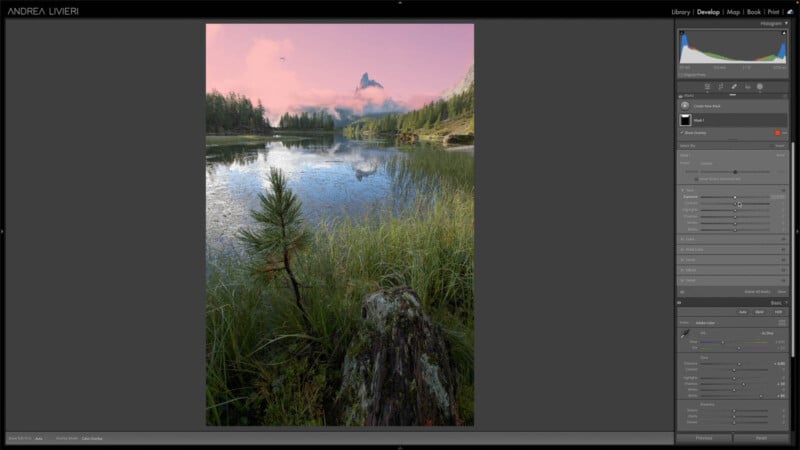
The technique I use to create a more organic and seamless transition is using the Sky selection tool in conjunction with the gradient tool.
We need to choose ‘Select Sky’ and Lightroom automatically creates a mask for the sky. Right off the bat is not usually perfect. For example, if we heavily reduce the Exposure we can see that there are some areas not affected by the adjustment.
We don’t have a nice and natural falloff, and it looks fake.
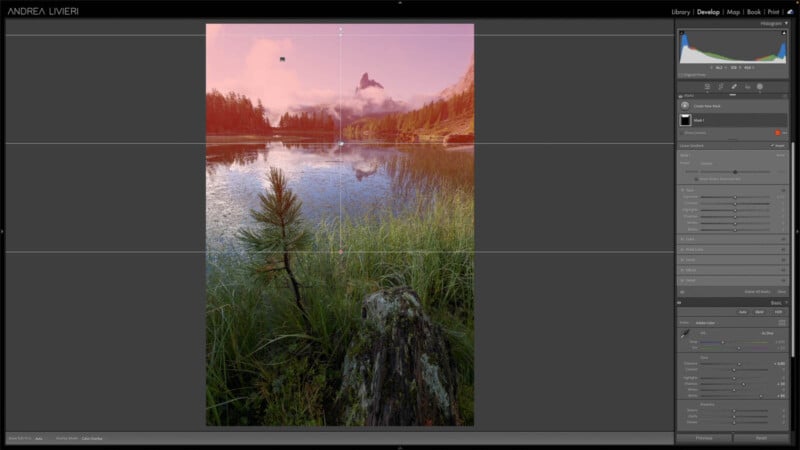
To address this problem is very simple. We need to use the intersect function which allows you to modify the mask by combining/intersecting the two masking selections.
In this case, we want to combine the Sky selection we’ve already active, with a linear gradient to create a soft transition in the sky from top to bottom. So, we need to select the three dots on the mask layer > Right-click > Intersect Mask with and select Linear Gradient.
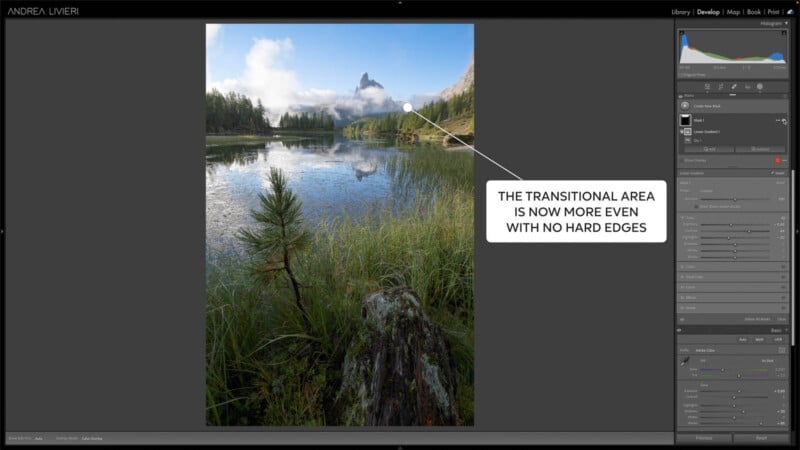
Then we need to create a linear gradient that will perfectly control the transitional area we want to improve.
With this simple adjustment now we get a much more natural transition in the sky and it doesn’t present any weird hard edges with the elements in the background area.
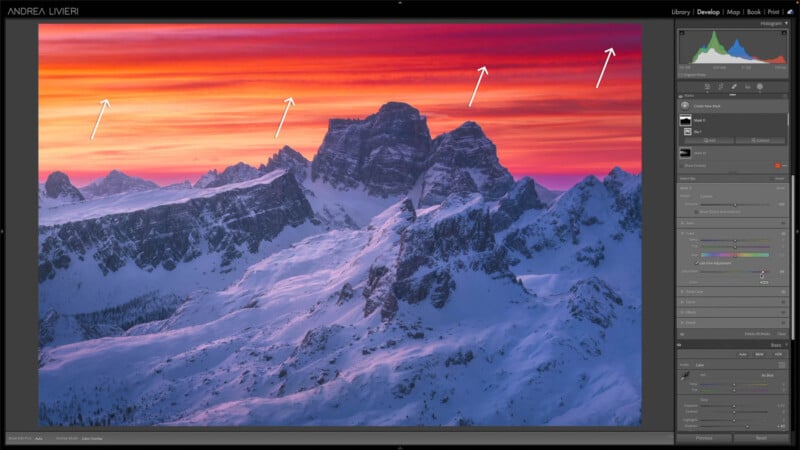
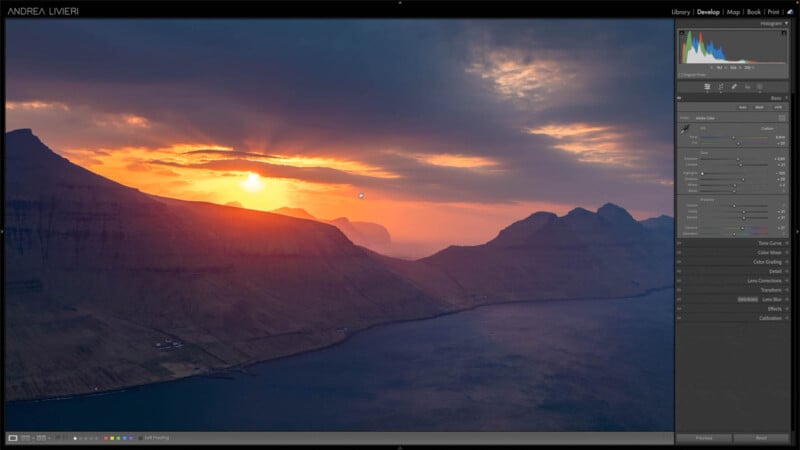
Mistake #4: Wrong Clipped Highlights Recovery
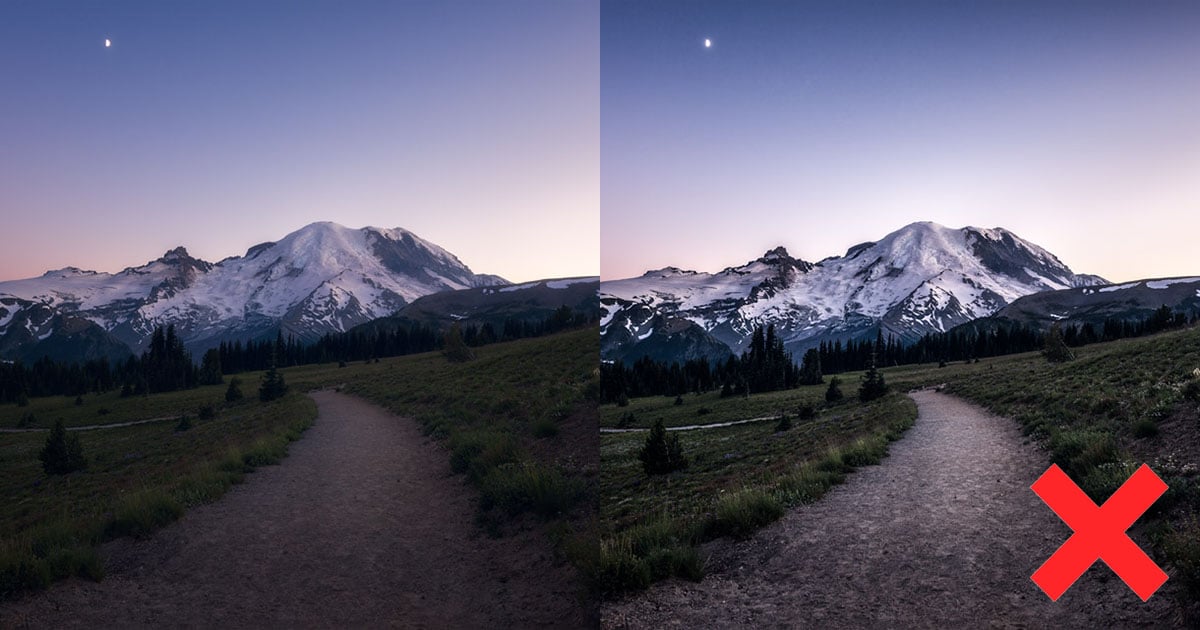
One of the things that landscape photographers usually avoid is having overexposed highlights. But sometimes, it is acceptable to have a small area of the image that is very bright.
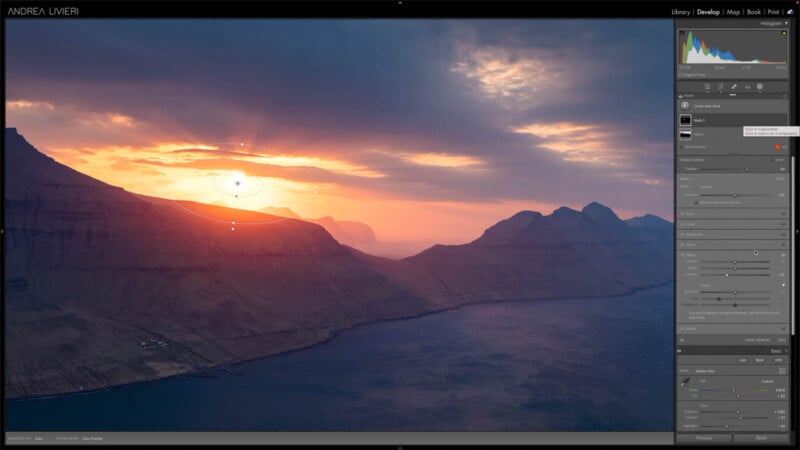
In the image below, for example, I don’t mind if the sun is blown out. It’s actually how it should be.
So, the problem is that a lot of beginners try to bring back highlights for everything including the sun, and the result is that the highlights look dull and gray.
In the image below, I shot into the sun, and it is totally fine having the sun blown out.
But, if I try to recover these bright areas by pulling down the highlights, I’m gonna get a horrible result that looks absolutely awful. I’m pretty sure you’ve already experienced something like this at some point.
Whenever you get this kind of dark muddy ring around the sun, that’s a clear sign you’ve brought down the highlights way too far.
What we can do, instead, is to try to recover the highlights just a little bit in the area around the bright sun to make the effect less on your face.
My rule of thumb is to bring down the highlights slider until I start to see the hard edges and that unnatural ring around the sun. Then I pull it back a notch. And that’s usually the right amount needed.
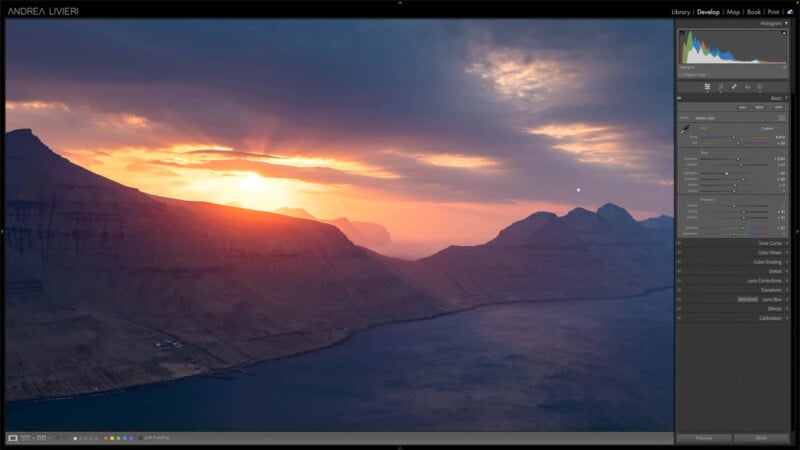
Pro tip: A quick tip to gain back more detail is to try to change the color profile. For this image, I want to select Provia, which is one of my favorite Fujifilm Simulations for landscapes. As you can see here below, I immediately recovered some detail in the area around the sun.
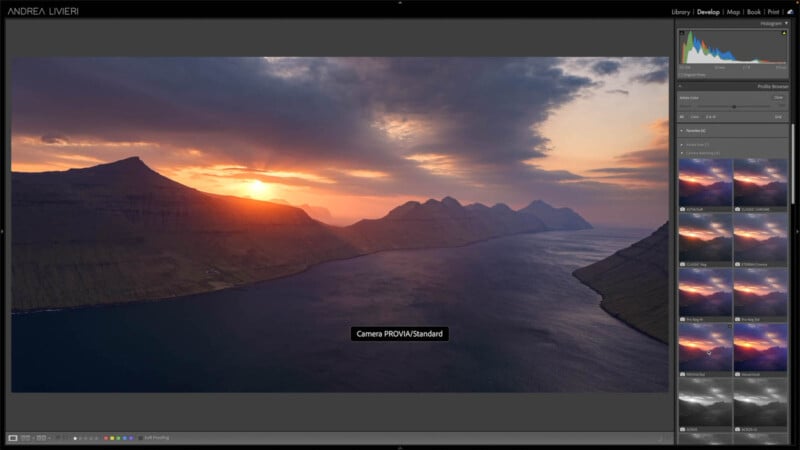
For people who don’t use Fujifilm cameras, you can select Adobe Standard which also gives great results. They both provide more flexibility in terms of dynamic range.
Of course, by changing the color profile, you’ll have a color shift. So, be aware of that and make sure it fits your vision for the image.
Pro tip: I also like to apply an additional small gradient filter right over the sun with a low amount of negative Dehaze just to smooth out any edges and give the highlights a soft glow.
As you can see, the result is much more dynamic and realistic.
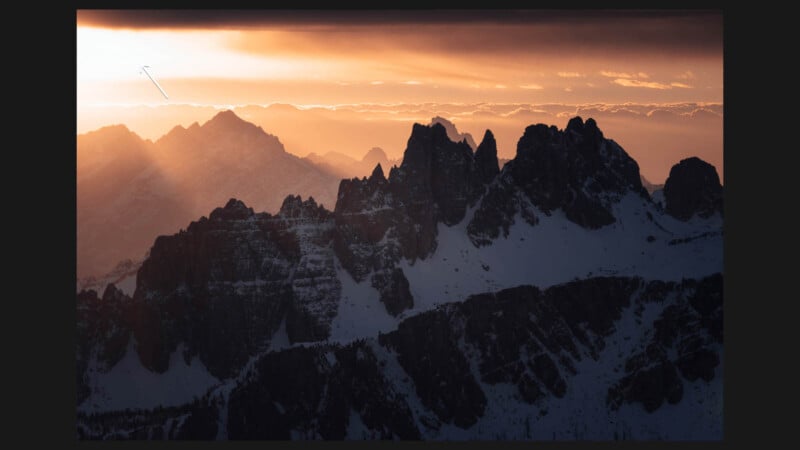
Mistake #5: Over-Contrasted Sky
This is probably one of the most difficult things to master, and sometimes I still struggle with getting it properly done. If you’re something like me, you can’t get enough of the dramatic skies.
RAW developers like Lightroom or Capture One give us a tremendous amount of tools to control contrast at different levels and make those skies really impressive and three-dimensional.
The reality is that you need to use them very carefully; otherwise, it’s almost guaranteed you’ll end up with a sky that looks over-processed and unnatural.
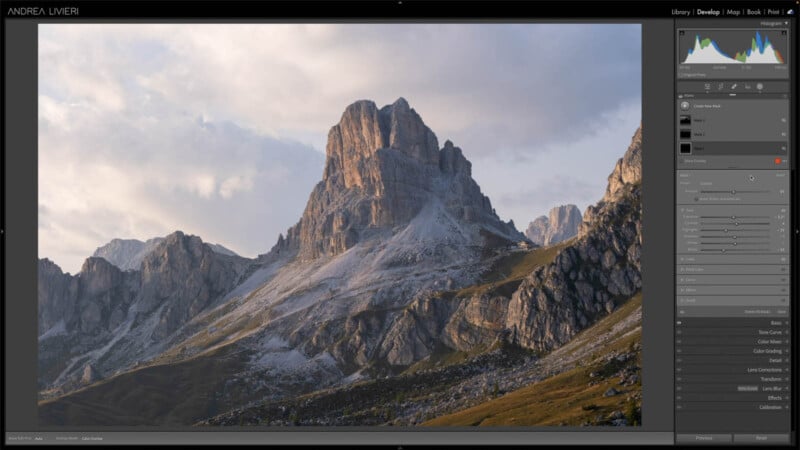
Let’s take the previous image as an example. The sky is a bit too bright and I want to introduce some contrast to give it more dimensionality. I’ve already selected the sky using the same technique I showed you before (AI Sky Selection).
Just for the sake of the demonstration, I cranked the contrast slider up. Same thing with the clarity slider. Clarity works similarly to contrast, but instead of affecting highlights and shadows, it targets the mid-tones.
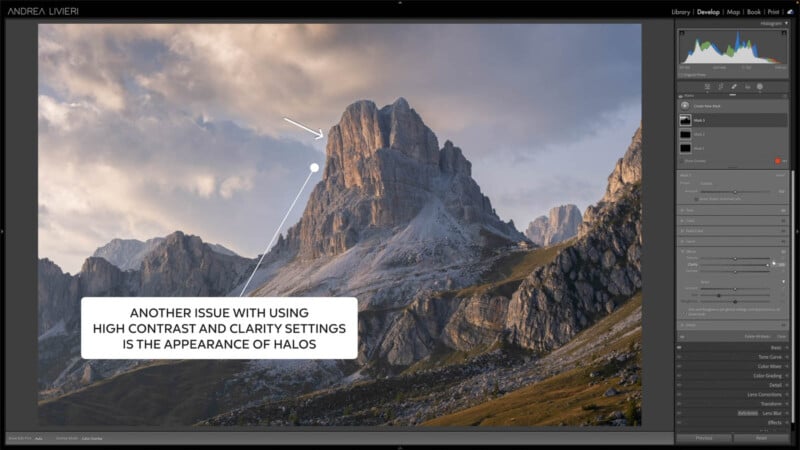
As you can see, we just killed the mood of the image. The sky now is too dark, and too contrasty, the saturation went to the roof, and it doesn’t match the foreground anymore. It looks off.
In general, the Clarity effect tends to be very aggressive. It increases the contrast of an edge over a few pixels in thickness and this is what gives this crunchy and over-edited look.
So, be subtle with these contrast-control sliders. Clarity-wise, a subtle increase can enhance almost any image, usually you’ll be fine when in the range between 5 to 20 depending on the image.
Since any increase in contrast affects the intensity of the colors, always make sure to dial the saturation back just a tad to compensate.
Something I always suggest is to create a virtual copy of the same edit where you use a lower or higher level of contrast and compare the two side-by-side to see which one works best. I find this technique very effective in always making the right choice.
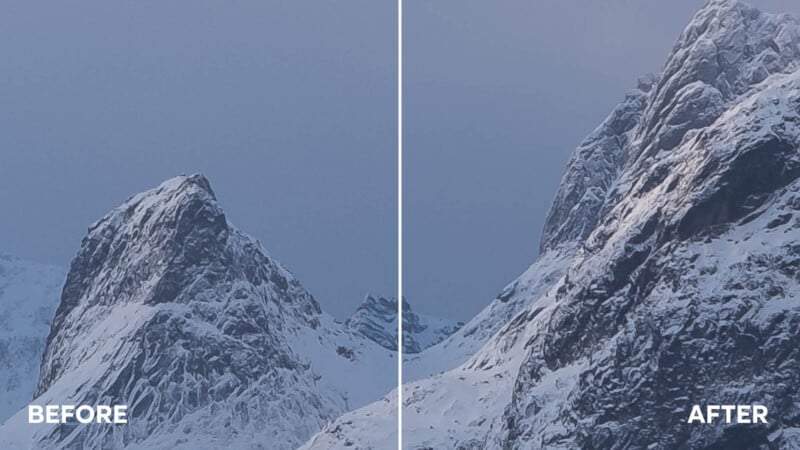
Mistake #6: Too Noisy Sky
The last mistake on the list that I see very often is noisy skies.
So, why do you end up with noisy skies? There are a few settings that are frequently overlooked. Let’s start by saying that I rarely add sharpening to the sky.
In the Detail panel, Lightroom has some default settings that are not helping you.
When you use the default settings, Lightroom sharpens your whole image and enhances even the finest variations in your picture. This means that any slight noise that you normally wouldn’t notice becomes more visible.
So, the sharpening effect increases the contrast in areas that don’t need it.

Let’s take a look at how we can change our settings to avoid those noisy skies.
On the Detail panel, if you look here for sharpening, the amount is at 40, which is the default setting Lightroom applies during the import. So, the default value is not zero.
(P.S. I increased the sharpening amount to 70 just for the sake of the demonstration.)
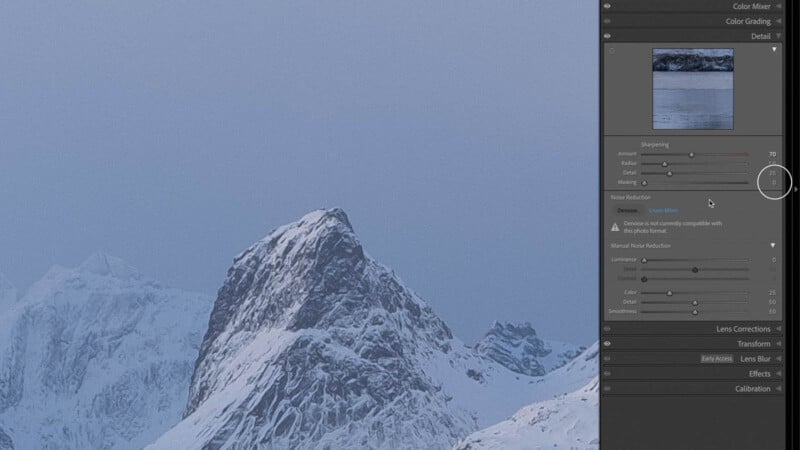
Below that, there is a setting called masking. And it is zero by default. This means that Lightroom sharpens everything in your photo, even the smallest details.
But, if you increase the masking value, Lightroom will only sharpen the areas that have a big difference in brightness, like the edge of the mountains and the sky. These are the areas that need more sharpness.
So, what we want is to get the masking value high enough to ignore the noise.
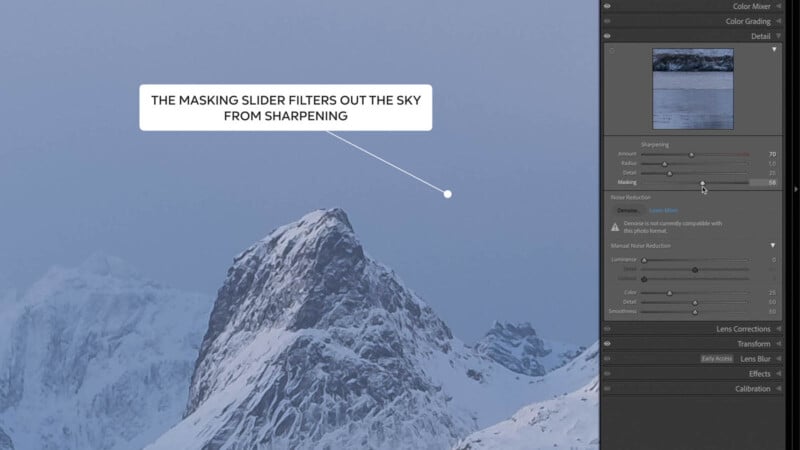
Clicking the masking slider while keeping the Option key pressed, Lightroom shows the mask that’s being used. In a mask, any white area indicates where something will be applied. In this case, our goal is to mask out the sharpening.

As we increase the slider, any area turning black will not be sharpened because, in a mask, black means hiding the applied effect. So, we need to raise the masking slider until the majority of the sky turns black.
At that point, the sky looks much better and cleaner without any visible noise. We are selectively applying sharpening only to the white areas of the mask, effectively excluding the sky.
Sometimes only this adjustment might not be enough. So, the trick I use is creating a selection of the sky. Then, under the Detail panel, we have a slider called Noise.
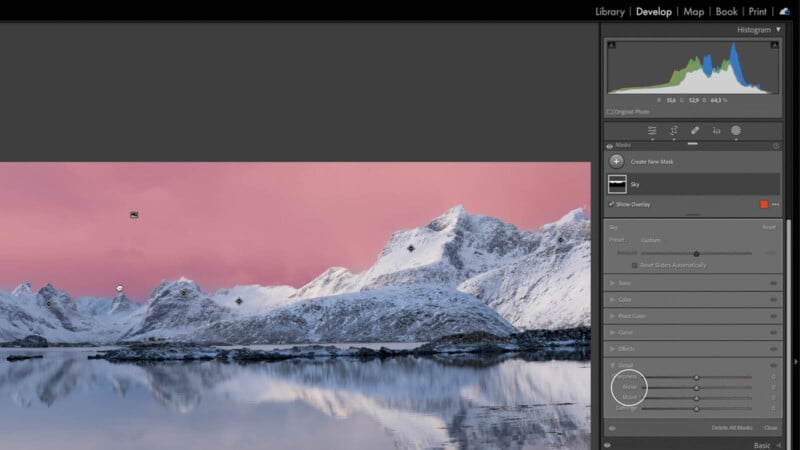
All we need to do is bring this slider up higher until the sky becomes smooth with no noise.
This is a nice trick to refine the sky cleaning if you find it still a bit too noisy.
You just have to be careful. Don’t make it too smooth that it just doesn’t fit in with the rest of the image, because the rest of the image is still going to have some noise.
Photo editing is a very personal and subjective process. There is no right or wrong way to edit your images, as long as you are happy with the outcome.