A Complete Guide to Capturing Gorgeous Photos of the Night Sky
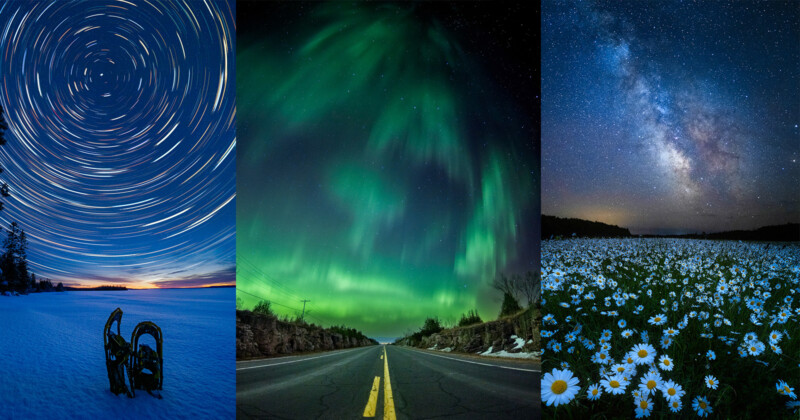
Peter Baumgarten is an award-winning nature photographer, educator, and OM SYSTEM Ambassador based on Canada’s Manitoulin Island. The island’s dark sky location provides Baumgarten with stunning nature and minimal light pollution, which allows the photographer to capture bright stars, the Milky Way, and northern lights from right outside his front door.
Full disclosureThis article was brought to you by OM SYSTEM Cameras
At a Glance
Peter Baumgarten has over 40 years of experience photographing on OM SYSTEM cameras. In that time, he has provided countless lectures, seminars and workshops on landscapes, wildlife, and astrophotography. Baumgarten sat down with PetaPixel to share the tips and tricks that have helped him capture incredible photos of the night sky.
Understanding the Night Sky
Even with over four decades of photography experience, Baumgarten’s passion for astrophotography didn’t begin until 10 years ago. “Even though I’d lived in dark sky conditions almost my entire lifetime, it was amazing how much I didn’t know about the night sky,” he says. “I didn’t even realize when the opportune time to photograph the Milky Way was, so when I first started actually shooting, it was in the winter.”
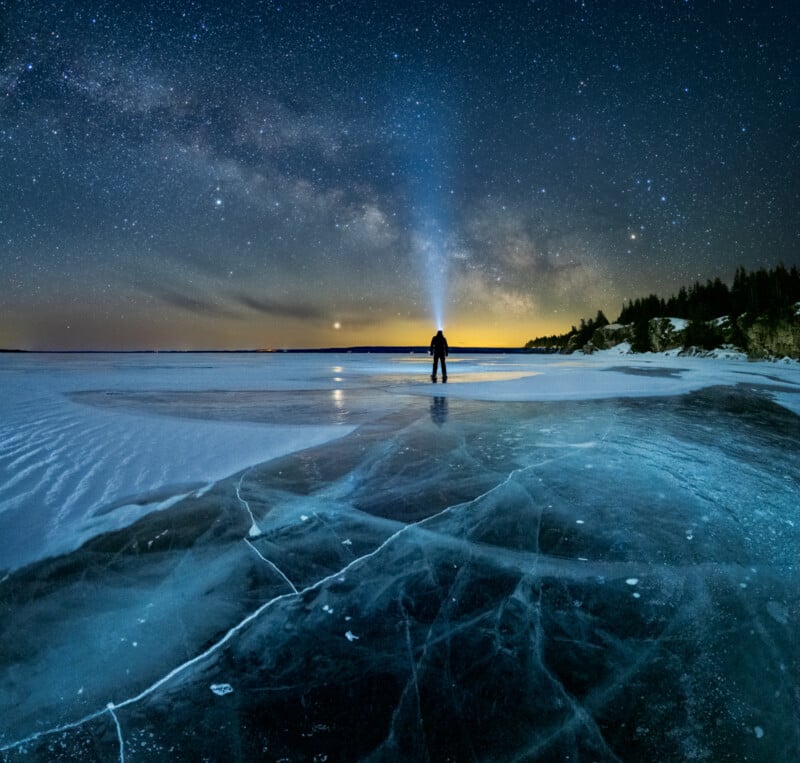
While Baumgarten stresses that winter is a beautiful time to photograph the night sky, those who choose to venture out into the cold night air won’t be rewarded with the Milky Way photos they see on their social feeds.
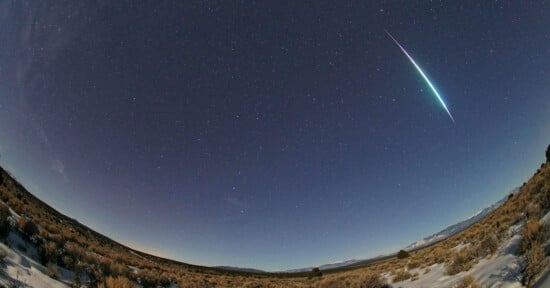
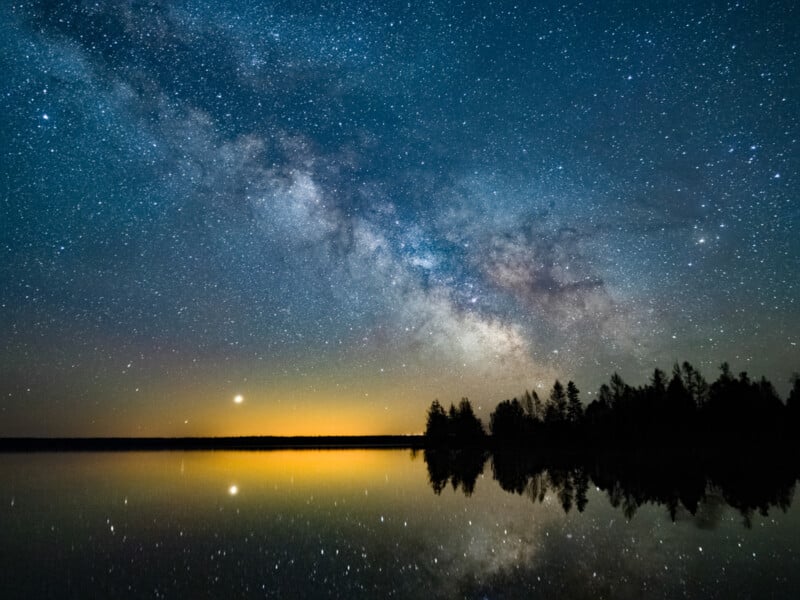
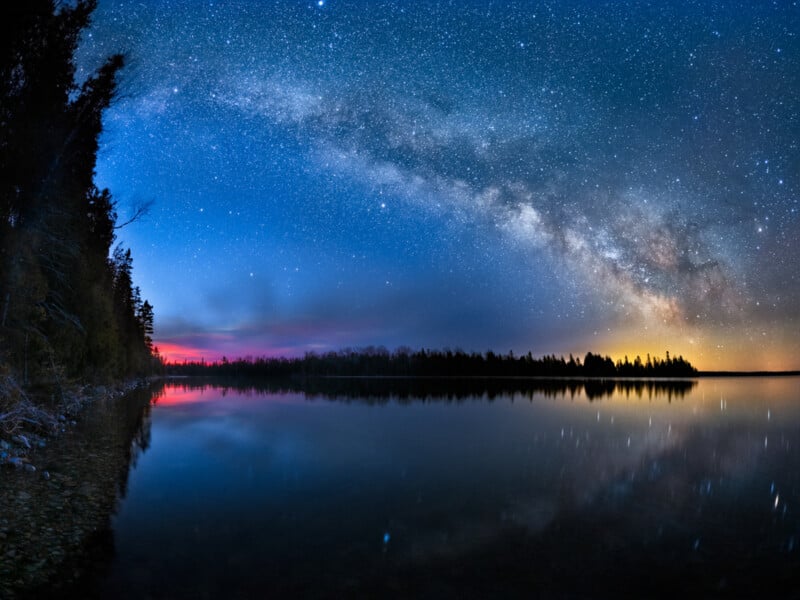
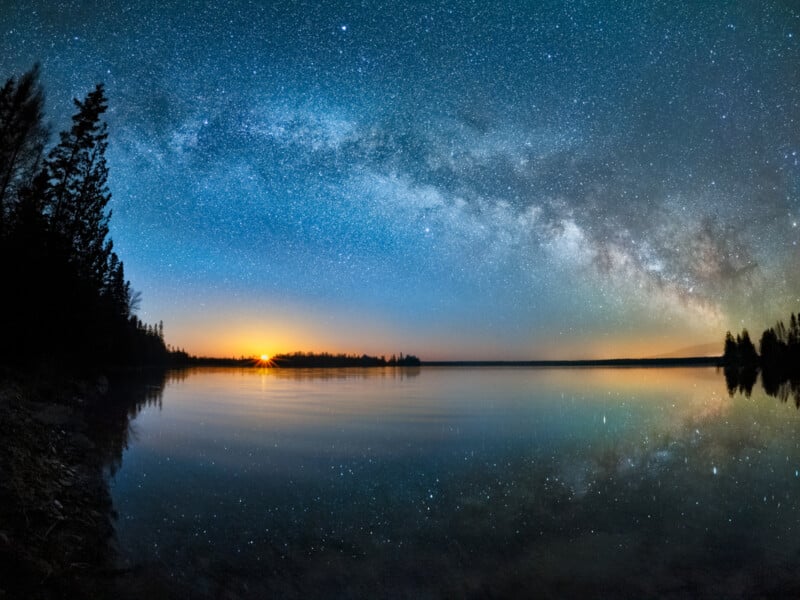
“The most photogenic part of the Milky Way is the core, and this core is not visible in winter, as it is below the horizon,” Baumgarten continues. “For me, here in the northern hemisphere, the core begins to make its first appearance in late winter and early spring. Just like the sun and moon, the Milky Way starts rising in the east during this time. And as it rises higher and higher into the sky, the core migrates towards the South. March and April are my favorite times to shoot because you get this beautiful arc. It’s kind of like a rainbow of stars. In the early spring the arc is fairly low in the sky, making it easier to include most of it in a single shot. However, in the summer months, you have to be prepared to be out early in the morning, about two or three hours before sunrise.”
As spring turns to summer, the Milky Way turns to its typical orientation, which appears more vertical in the night sky. Baumgarten says that once April passes, it is more difficult to capture the arc, so he recommends planning your Milky Way arc photos ahead of time to ensure that you are ready when the conditions allow. In summer and early fall, the Milky Way is visible as darkness sets in and is in a more vertical orientation, before the core migrates further south before it disappears below the horizon in November. Of course, the exact timing and position does depend on your latitude.
The Fight Against The Light
Unlike landscape photography, which is largely dependent on light and the conditions it creates, Baumgarten says that the secret to capturing compelling images of the night sky is to avoid as much light as possible.
“The first light that you need to fight is daylight,” says Baumgarten. “Night does not begin when the sun goes down, so you need to take the three periods of twilight into your planning stages. True night actually begins when the sun reaches 18 degrees below the horizon, which, in the mid-latitudes, is usually about 90 minutes after sunset, with each twilight stage lasting about half an hour each. It will stay dark until this process repeats itself in the 90 minutes before sunrise.”
Light pollution is a form of artificial light that is much more difficult to fight than daylight, Baumgarten says. Being that photographers can be limited to how far they can travel, he recommends using websites such as Dark Site Finder, which will help locate the darkest locations possible.
Moonlight is another light that needs to be taken into account, however, Baumgarten says not all moonlight is bad. “Moonlight, when captured at the ideal time, can actually add detail to your night images,” he says. “Capturing the Milky Way alone can be great, however if you can add a compelling foreground to the scene, that will take a good astro photograph and make it great.”
Depending on the scene, the amount of desired moonlight can vary, but usually a 30% moon can create a soft illumination of the foreground, while not washing out the Milky Way and the stars.

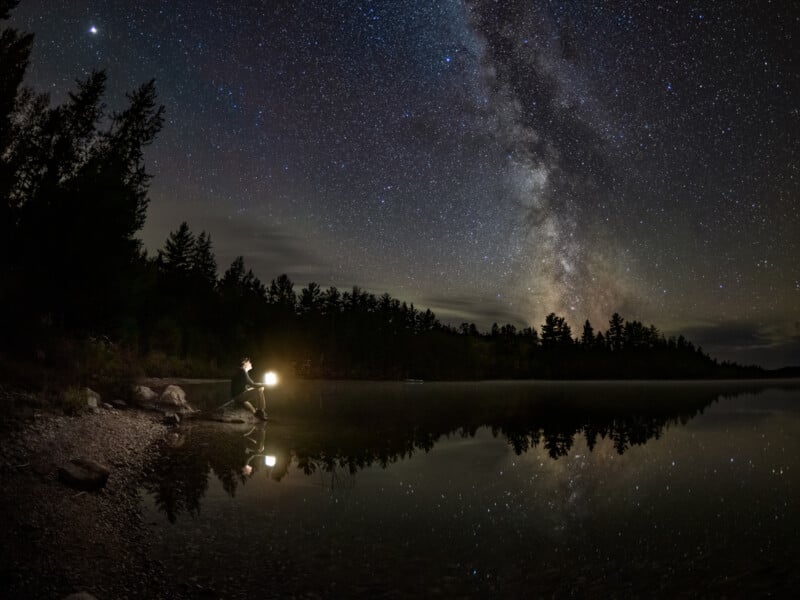
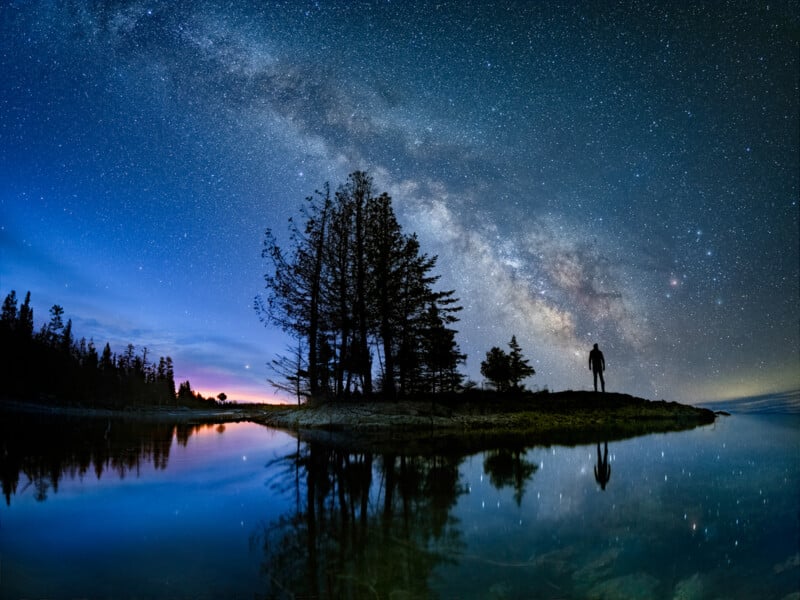
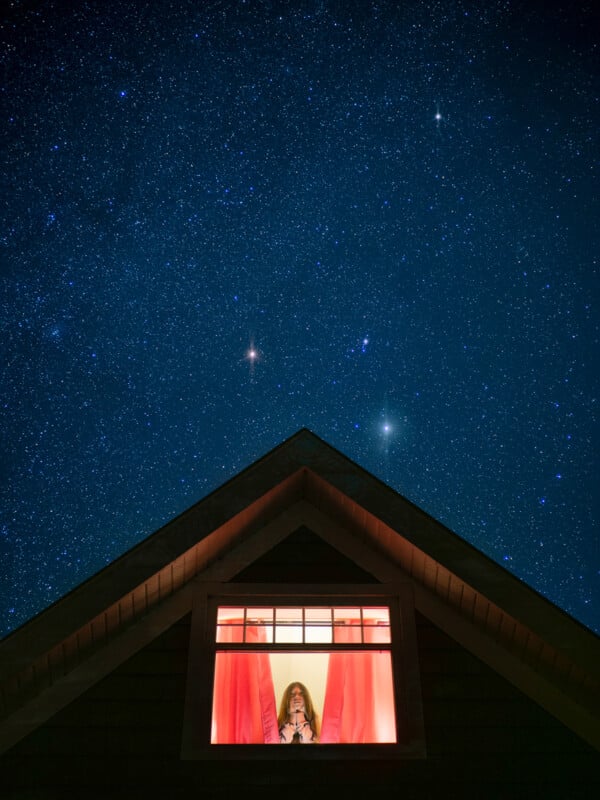
“You have to treat moonlight like you would sunlight,” Baumgarten says. “Obviously, the light in your photo is completely different if you are shooting into the sun or if the sun is behind you, lighting up the foreground in front of you. Look for situations where the moon is lower on the horizon behind you, like I had in this self portrait under a tree. The low moon will light up the foreground enough to provide detail in the objects in front of your camera, whether that be a lighthouse, trees, or a mountain. That is not to say that having the moon in front of you can’t be used to illuminate the foreground, however, you will lose a lot of the stars in the sky.”
Use the Internet and Apps and Generate a Plan to Photograph the Night Sky
Baumgarten suggests using websites like Time and Date to determine the moonphase, rise time and set time. Generally you want to avoid shooting under bright moonlit conditions. By planning around the moon rise and set times you will find that there are approximately two weeks each month with ideal shooting conditions. “There are so many easily accessible and detailed tools out there that can help your plan to photograph the night sky, but all of that research doesn’t do any good if you don’t research the most important factor of them all. The weather will have a profound effect on the night sky images that you capture, so it’s important that you keep up to date with moving clouds and precipitation. I use Zoom.earth, and I have found it to be incredibly accurate and a great planning tool to see what the current cloud cover looks like over the region I am trying to photograph.
For even more detailed information, Baumgarten also uses Clear Outside, a website created for astronomers, by astronomers. “I love that it shows you the Bortle of a location, which you can think of as a dark sky rating,” he explains. “A class 9 is an inner city sky, whereas a class 1 would be one of the darkest skies in the world. Any Bortle rating between one and four will give you a great view of the stars, the Milky Way, or northern lights. A live time forecast with an easy to read color-coded system lets you know if the area you are looking at is going to have good conditions. Much like a stop light, green means go!”
Almost every astrophotographer has heard of the apps PhotoPills and The Photographer’s Ephemeris, and for good reason. These powerful apps are critical for being in the right place, at the right time. “I am constantly using PhotoPills to plan my night shots,” Baumgarten says. “I can stick a pin anywhere on the planet and the app will tell me where the moon is going to rise and set. It will also give me an indication of where the Milky Way will be, which allows me to plan a specific date and time that will work with my pre-determined foreground.”
Once on location, the usefulness of PhotoPills doesn’t end there. The app’s augmented reality feature will allow photographers to aim their phone at where they are looking, and an overlay of the Milky Way will appear. Simply changing the date and time will allow photographers to plan a future Milky Way photo at the spot they are standing. “I find this a really useful tool, especially if I don’t know an area,” Baumgarten explains. “If I’m traveling somewhere new, I’ll go out during the day to do my planning for a shot that night, and I’ll use the augmented reality feature to know exactly when I need to return for the shot I have envisioned.”
Know Your Camera Gear and Settings for Astrophotography
While knowing your camera inside and out is important in all forms of photography, it is especially helpful in astrophotography. Baumgarten says that it is easier to get frustrated with your camera and settings when shooting the stars. “Many times, astrophotography is more physically and mentally demanding than landscape photography,” he describes. “It’s dark. It’s cold. It’s quiet. It’s lonely. It requires a fair amount of patience. And depending on where you are photographing the night sky, you might even have to worry about nocturnal creatures like bears. So it is important to know your equipment inside and out so you can quickly get into a groove and start capturing images right away.”
Baumgarten says that he will pack light, as a telephoto lens is usually not coming out of his bag once the sun goes down. “Every astrophotographer has a go-to lens,” he says. “There are two crucial requirements for an astro lens. Fast and wide. I shoot all of my astro images with the OM SYSTEM OM-1 and OM-5 cameras. My go-to lenses are the M.Zuiko Digital ED 12mm F2.0 and the M.Zuiko Digital ED 8mm F1.8 Fisheye PRO. Both of these lenses are wide enough to capture a large portion of the Milky Way with the foreground I have identified, and both are fast enough to capture photos under 20 seconds exposure time, even in the darkest conditions. Not only that, but they are razor sharp, which is especially important when you are trying to capture those tiny pinpoints of light, even if you have to raise your ISO in those pitch black nights.”
Unlike most other genres, with astrophotography, the aperture is usually set wide open to get the most light into the sensor. For Baumgarten’s preferred M.Zuiko lenses, that is either f/1.8 or f/2. He will usually pre set this before he even leaves the car. He recommends being comfortable with knowing how to quickly adjust your shutter speed and ISO, as those two factors will complete the exposure triangle.
Capturing the Astrophotography
Setting Up
With his bag packed light, Baumgarten will often arrive on location thirty minutes to an hour before his ideal shooting time. “Especially when you are planning a shot with a specific amount of moonlight at a certain angle, you don’t want to arrive late and be scrambling to set up in the dark,” he advises.
Baumgarten says that there is no such thing as auto mode in astrophotography, so it’s important to be early and know how to use your camera. “I can’t imagine many situations where you could get a good night photo without being in manual mode, so it is important to be comfortable in this shooting mode.”
Baumgarten also recommends shooting in RAW. “There is a massive difference between the editing power of RAW and JPG images,” he states. “JPG images are pre-edited in my OM SYSTEM cameras, and while the edits are very good, the camera is set to delete the RAW files. While there is nothing wrong with shooting with both RAW + JPG, it’s important to have the RAW file saved to your memory card to give the photo a detailed edit back home.”
Being that Baumgarten captures his night images in RAW, he can easily adjust the white balance when he edits. However, he will still manually set the white balance in camera. He finds that using Auto White Balance, no matter the camera, will usually return images that look warmer than what his eye sees. He recommends setting a manual temperature of 3800K. “Even though I know I can change the white balance on my RAW image in post, it really helps fuel my creativity when I see the final edited photo as I envision it on my OM-1 or OM-5’s LCD screen.”
As Baumgarten has stated, astrophotography is a game of patience, and this can be tested when using the camera’s noise reduction. “Many photographers underestimate the power of in-camera noise reduction when shooting the night sky,” he explains. “The OM SYSTEM cameras have fantastic noise reduction, so it is a great tool to have for astrophotography. Essentially, what the camera will do is take a ‘dark frame’ image immediately following your exposure. This image will always mirror the exposure time, so if you take a 20 second exposure, the noise reduction will take an additional 20 seconds, so patience is key for capturing clean and sharp night images.”
Baumgarten explains that using the OM SYSTEM in-camera noise reduction is valuable in most cases, except when shooting time lapse videos, as it is critical to have only 1 second interval between photos.
And lastly, having your camera on a tripod is necessary to capture the long exposures needed for astrophotography. While OM SYSTEM recommends turning off the in-camera stabilization while on a tripod, Baumgarten says that the technology is so advanced, he hasn’t noticed any difference in quality when he has mistakenly left it on. However, he says, it’s always best to follow the camera’s recommendation and turn off image stabilization while on a tripod.
Setting Shutter Speed, Aperture and ISO
As mentioned, for most situations, a wide open aperture is desired for astrophotography. With that out of the way, finding the ideal shutter speed and ISO to complete the exposure can be calculated quite easily using a simple math formula, the OM SYSTEM Ambassador says.
“Shutter speed is a very critical piece of the puzzle for creating clean astrophotography images. The earth is moving a lot faster than we might think, and that spin is what affects the speed at which those stars are moving through the sky. If your shutter speed is too slow, you’re going to start getting star trails. And if it’s too fast, you’re not going to let enough light in.”
Baumgarten explains that there is a very simple formula that can help identify what shutter speed should be used in order to eliminate star trails. “I use the 400 rule,” he explains. “Some photographers use 500, but I feel 400 works better for me and my M.Zuiko lenses. I take the true, 35mm equivalent focal length of the lens and divide that into 400. For instance, the OM-1 and OM-5 are micro 4/3rd cameras, so the 35mm equivalent of all its lenses is double. That means, the 35mm equivalent of my M.Zuiko Digital ED 12mm F2.0 is 24mm. I simply divide 24 into 400, which gives me a max shutter speed of 16.66. So quite simply, that means a shutter speed of 15 seconds should give me razor sharp stars with no movement in the stars.“
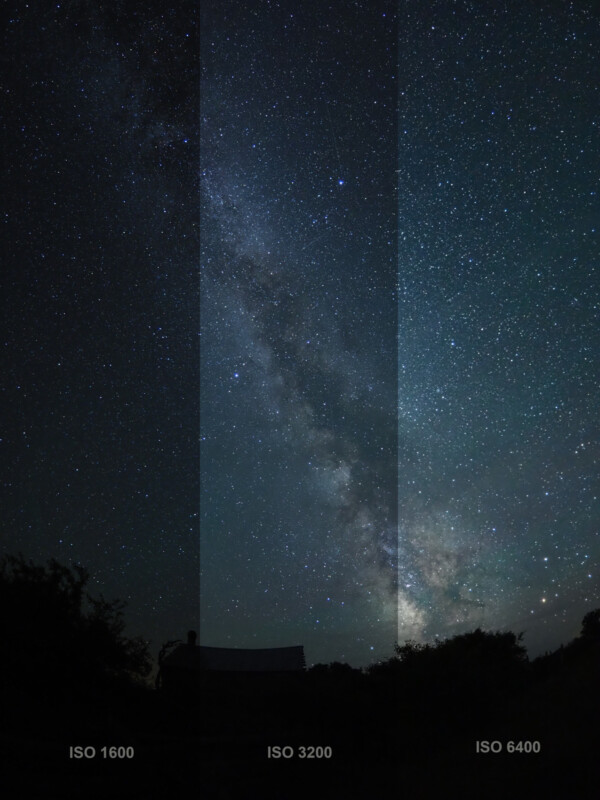
With the shutter speed and aperture set, now comes the trial and error of finding the right ISO to achieve a well lit exposure for the night sky. Depending on the moonlight or artificial light around him, Baumgarten starts with ISO 1600 and adjusts from there, depending on what his test shot looks like. With the OM-1 and OM-5 cameras, I have no hesitation about shooting at 3200 ISO or 6400 as need be, since those cameras handle high ISO noise beautifully. However, different cameras handle noise differently, so it’s important to learn your camera’s maximum ISO for capturing the night sky with manageable noise.”
“This is where you really start to see the benefits of using a fast lens, like my M.Zuiko Digital ED 8mm F1.8 Fisheye PRO and M.Zuiko Digital ED 12mm F2.0,” Baumgarten explains. “You can capture starry night images with an f/4 lens, but because the amount of light coming in through the aperture blades is less than f/2, much more ISO is required to compensate. With ISO comes noise, so you want to limit the ISO as much as possible for a crisp, clean image.”
While the planning for astrophotography requires more work than many other genres, Baumgarten says that the beauty of astro photography is that your settings mostly won’t change from day to day. “When I take out my M.Zuiko Digital ED 12mm F2.0, I know right away I am shooting 15 second exposures at f/2. All I need to figure out is which ISO I need to make that work.”
Baumgarten recommends saving these values into one of your camera’s custom settings buttons, which will allow for a quick start up on your next nighttime photography adventure. His OM-1 has four customizable buttons, however, most modern day cameras have at least one available, so he recommends using it to save time.
Focusing On the Stars
Perhaps the most important, and difficult, part of astrophotography is focusing. Baumgarten says that it can be challenging to get stars sharp in photographs. “When I first began my astrophotography, I would often feel like my stars were sharp. They looked sharp when I reviewed the images on my LCD, but the minute I got home and looked at them on the computer screen, I would be disappointed to see that the focus would be off. Even if it is off by a hair, the image quality is greatly reduced. I would nail the focus 90% of the time, but for the other 10%, it can be very disappointing to view your photos the next morning on your desktop machine only to find that the focus is soft. ”
“In most cases, auto focus will not work on stars, so it’s important to find the right focus point while on manual focus,” Baumgarten states. “One trick I learned back then was to focus my lens on the infinity symbol. However, each lens is different, and its true infinity may not line up perfectly with the infinity symbol. I began finding the infinity focus on the sky during the daylight and applying tape to the focus ring to lock it in for when it got dark.”
These days, however, most cameras have manual focus assist features. This allows photographers to digitally zoom in on the star and carefully adjust the manual focus until the star looks sharp. “This is a great way to manually focus on a star, however, it can be deceiving,” Baumgarten describes. “LCD screens are small, and when you digitally zoom into a dark sky, it can be hard to get a clear resolution of the star you are trying to focus on. It takes some practice, and a little luck. Focus peaking can also work well. A colored highlight appears around those objects that are in sharp focus.”
While these modes of focusing worked, Baumgarten’s astrophotography took a huge leap forward when OM SYSTEM introduced Starry Sky AF. The feature uses an advanced algorithm to offer focusing even on the smallest stars shining in the night sky. This led to ultra-high-precision autofocusing, eliminating the soft stars that came with manual focus. Starry Sky AF offers two modes for photographers to choose from. Speed Priority Mode prioritizes focusing speed and complete AF operations in a short period of time. Coupled with the OM SYSTEM’s powerful image stabilization and a wide-angle lens, this feature makes handheld astrophotography possible. Accuracy Priority mode uses a fine-tuned focus scan, and is especially useful when using a telephoto lens. Another added benefit of Starry Sky AF is that the focus will remain locked unless you change lenses or turn the camera off, ensuring that each image taken throughout the night remains sharp and in focus.
“Starry Sky AF really is a game changer for us astrophotographers,” Baumgarten exclaims. “It has made shooting the night sky far less stressful because now I was guaranteed to get the shot. No longer am I spending two hours out shooting, plus the time to get there and return, only to find out that I’d missed focus. It almost feels like cheating, but when I get home and I see those razor sharp stars on my screen, I am constantly blown away by how accurate Starry Sky AF is.”
Composition is Key
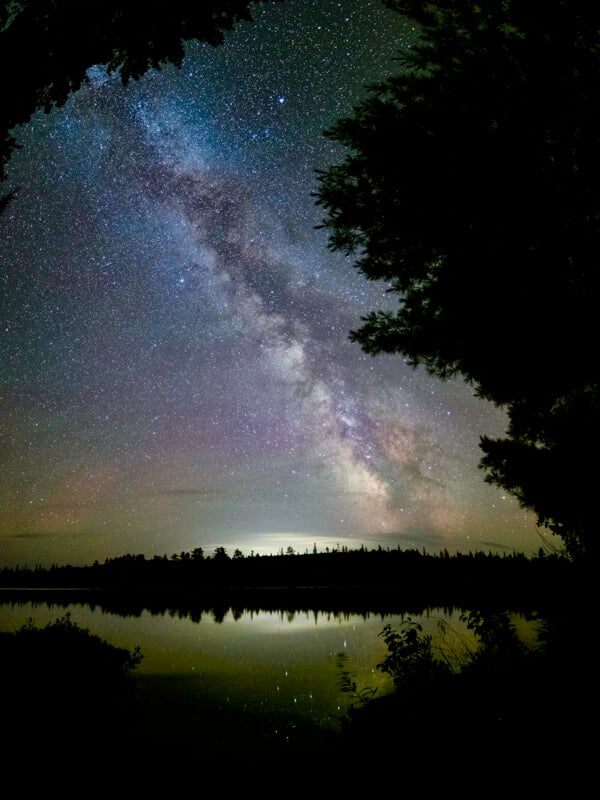
Once on location, the next step in capturing a compelling night image is establishing an interesting composition. While capturing the Milky Way alone can yield great results, Baumgarten says that the foreground is what can make a good Milky Way image into a great Milky Way image.
“I view shooting the night sky the same way I view shooting a landscape scene,” he describes. “If you’re out shooting a sunset, those brilliant colors are not enough to maintain a viewer’s interest. They’re just the backdrop for whatever scene it is that you’re shooting. It’s what you put in the foreground that is going to make or break your shot. And I think of shooting the night sky in exactly the same way. The Milky Way hasn’t changed in millions of years, so how do I frame it to make a unique image to my viewers?”
When Baumgarten arrives on location, he establishes his composition. Usually, he has already scouted the area in the daylight, so he has an idea of the shot he wants to capture. Although, re-establishing that same composition in the dark can be difficult.
“A fantastic feature that is included on my OM-1 camera is Night Vision. Usually, when you look through the viewfinder or the LCD screen at night, you mostly see all black. Night Vision, on the other hand, makes the night sky become remarkably bright and clear. You can see the core of the Milky Way, and with the way Night Vision brightens the foreground, it is incredibly easy to find my composition. No longer do I need to take endless ‘shots in the dark’ trying to get the perfect composition. I can simply find it on my LCD, even in pitch black conditions.”
Finding Light in the Darkness
Using Ambient Light to Your Advantage
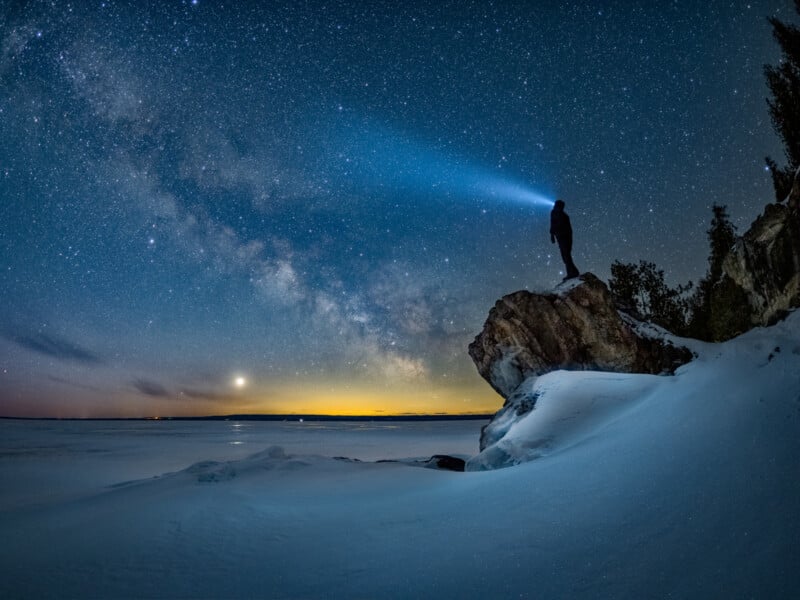
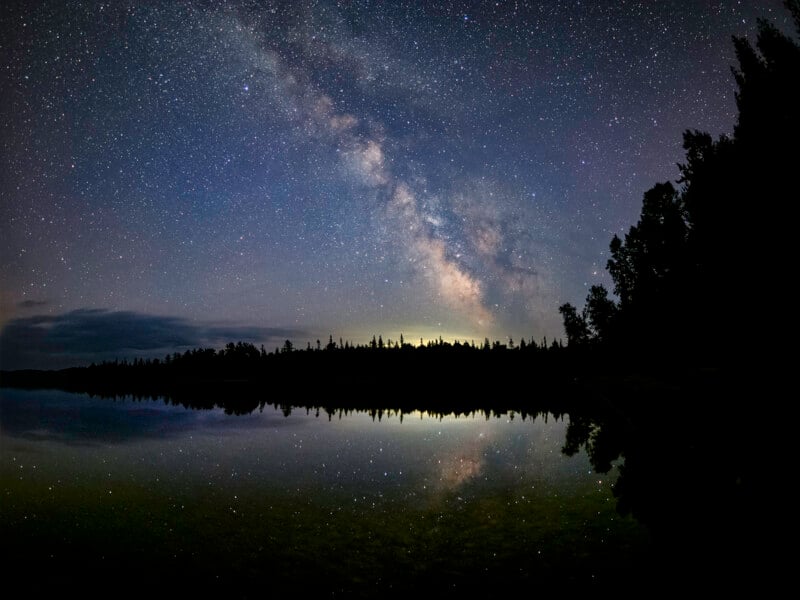
Baumgarten says that the first way to add an interesting foreground element is to look for interesting silhouettes. “This is especially useful if you don’t have any moonlight or artificial light to use in your foreground. And sometimes, even if you have those, you might find an interesting enough scene that you prefer using a silhouette.”
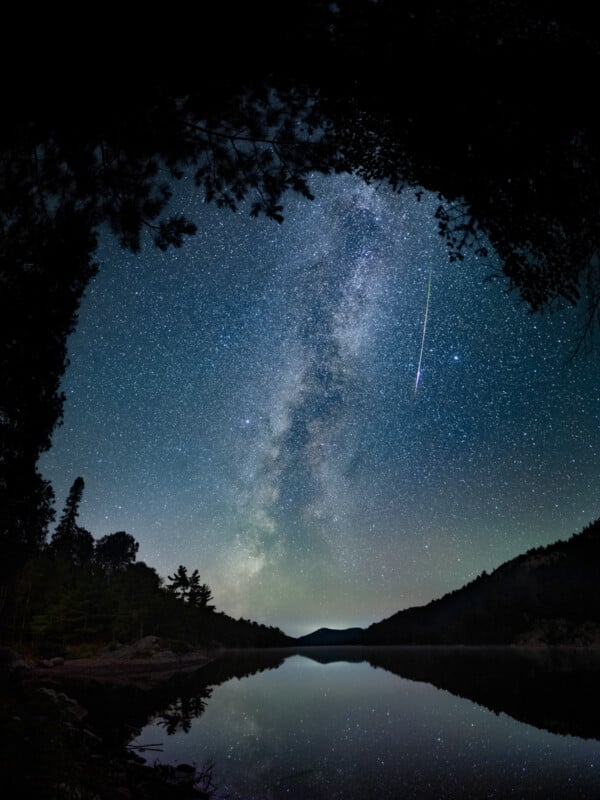
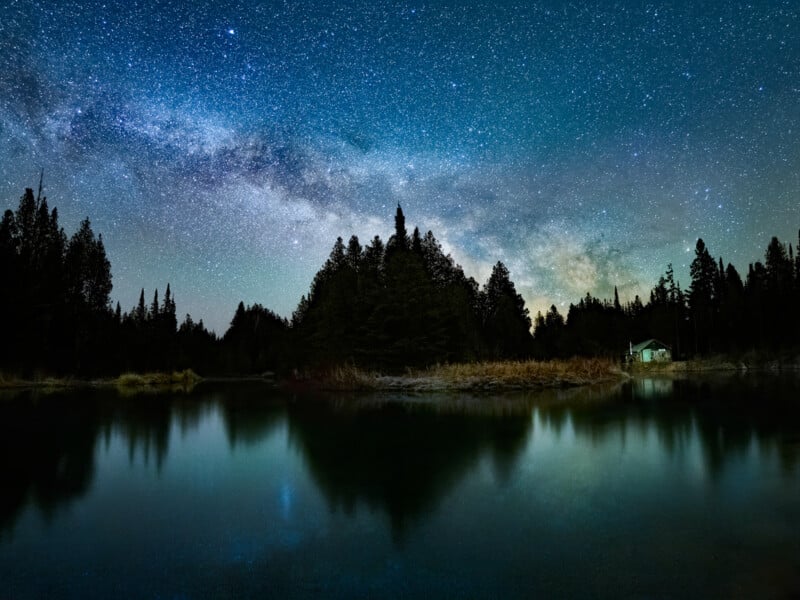
Ambient lighting can add a sense of place and adventure to your night sky images. Sometimes, Baumgarten says, these scenes can appear just by luck.
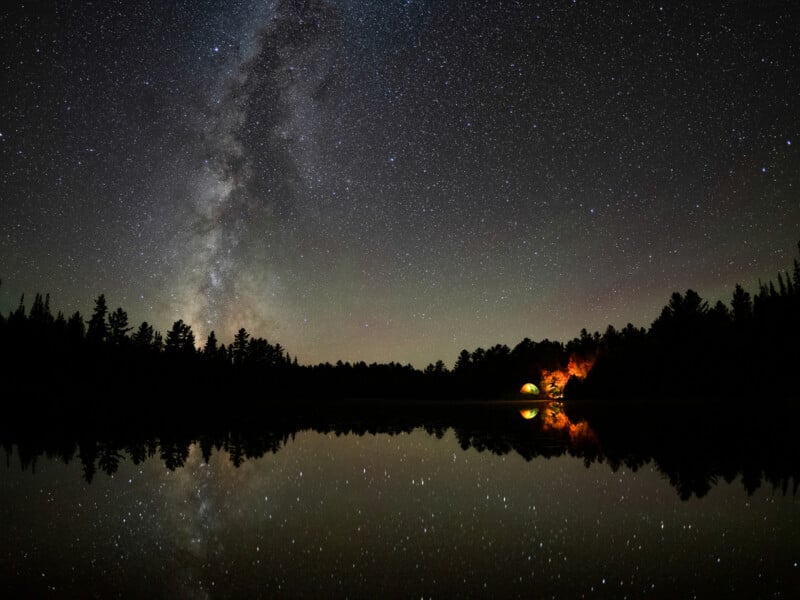
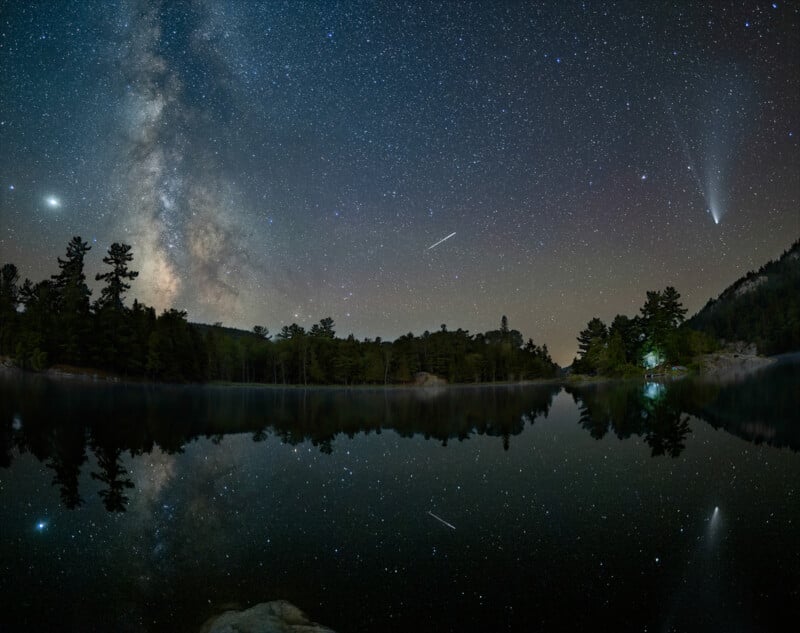
“I remember camping on this beautiful lake, with the Milky Way perfectly reflected on the water,” Baumgarten describes. “When I finally got my OM-1 out of my backpack to start shooting, I noticed a camper on the far end of the lake had lit a fire, and it had perfectly lit up their campsite. Just adding this lucky addition to the frame completely changed the image. No longer was it just a Milky Way shot, but the firelit campsite added a sense of scale and a feeling of adventure to the photo. It almost gives the viewer the feeling of camping in this beautiful and peaceful location.”
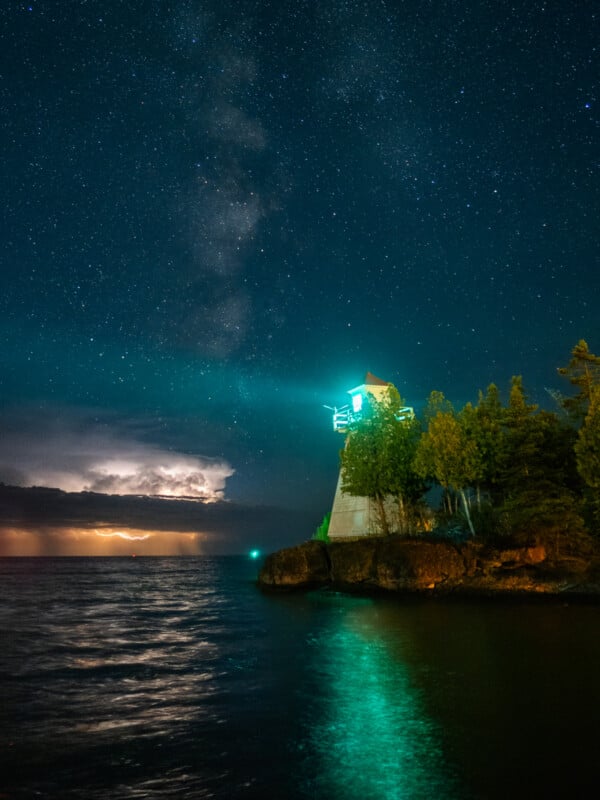
Using ambient light to your advantage just doesn’t have to come by luck. Living in such a remote location with dark skies, Baumgarten has found that even a simple streetlight can help add the lighting necessary to make interesting night images.

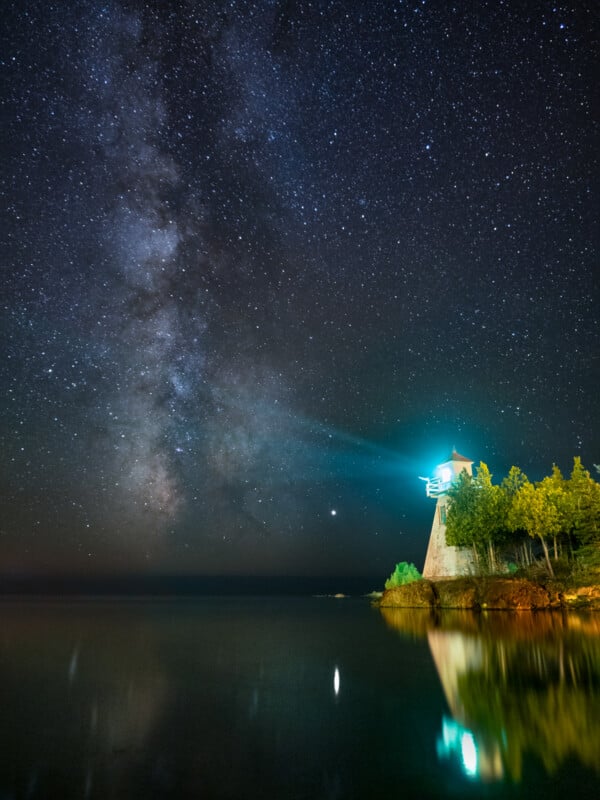
“Most people are shocked when I tell them that these images of a tree filled island and a lighthouse are actually being illuminated by a number of streetlights in a parking lot,” Baumgarten describes. “I learned long ago that having artificial light in your night sky images isn’t necessarily a bad thing, if you know how to use it to your advantage. “
Light It Up
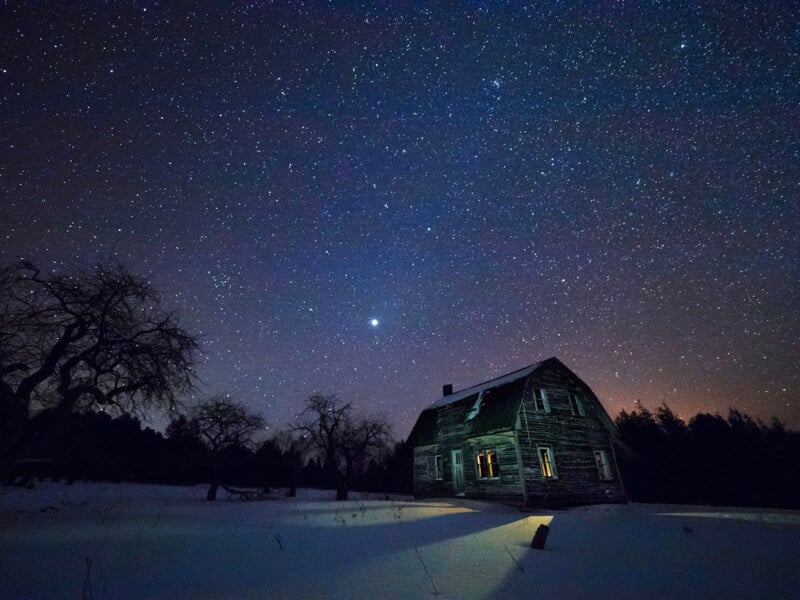
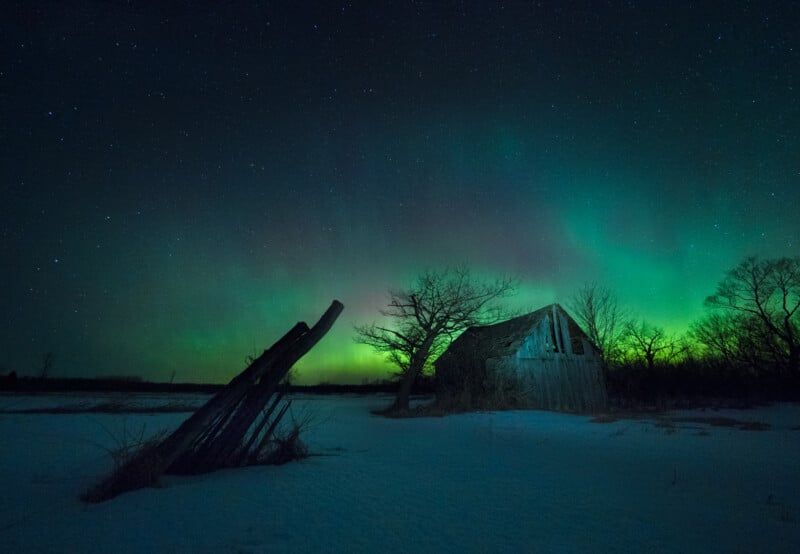
Even with as much planning as possible, there are still times when astrophotographers find themselves in situations without moonlight or ambient light. “If you aren’t trying to photograph a silhouette, and you don’t have an already established light source like the moon or streetlights, it’s still possible to add light to your scene using light painting,” Baumgarten says.
He stresses, however, that light painting is a difficult process to master, and if not done right, it can make your night sky images excessively bright and unrealistic looking. “All you really need to light paint is your headlamp,” Baumgarten explains. “However, it takes trial and error to get the light painting to look natural. Essentially, I will just slowly wave my headlamp at the object I am attempting to illuminate.”
For this 20 second exposure, Baumgarten states that he only had his headlamp on for roughly six seconds. Light painting the barn softly for just a fraction of the exposure time created a more natural looking scene.
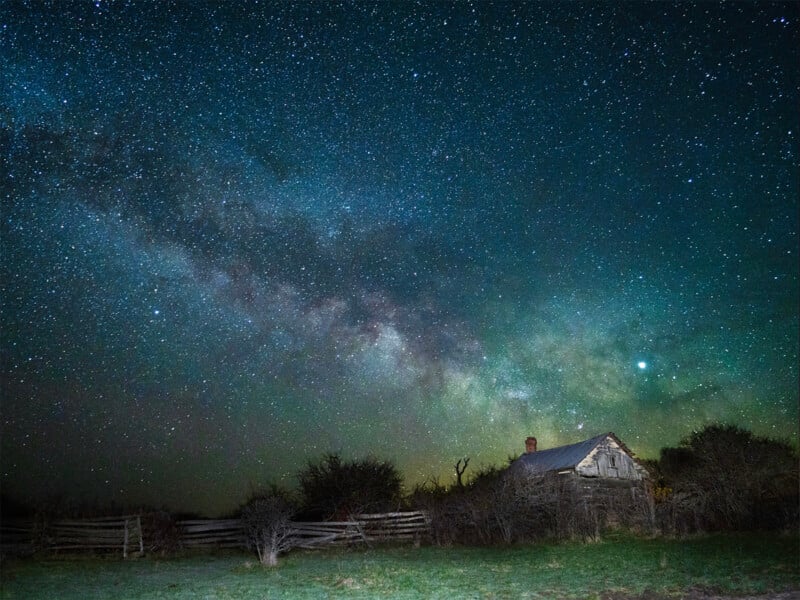
Baumgarten recommends thinking outside the box when it comes to lighting up your foreground objects. For this scene, not only did he light paint the abandoned farmhouse exterior, he also placed lanterns inside of the structure to create the sense that people lived in the house.
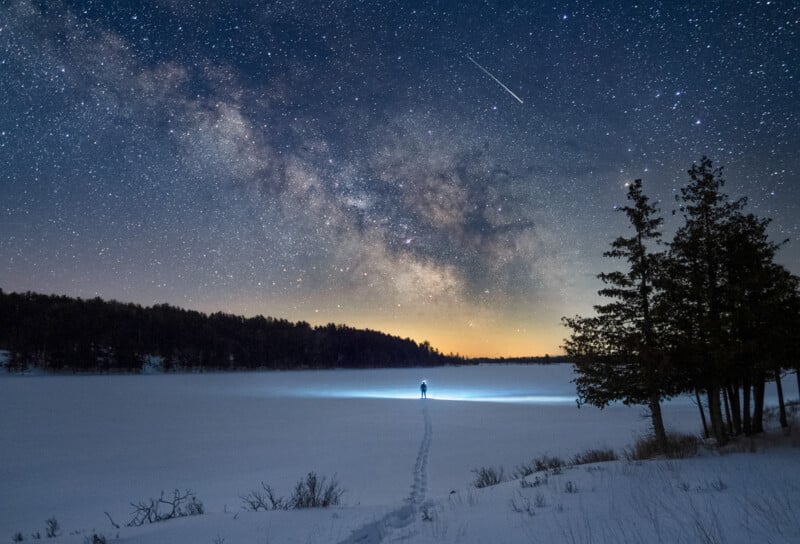
Once you master the basic principles of light painting, Baumgarten recommends upgrading to low level lighting. “With the advances in LED technology, lights have become smaller and easier to control,” he says. “So we can use dimmable LEDs to light up our foreground, like in this image, where I lit up the far shore of the river using just my phone screen.”
Baumgarten says that while a phone’s flashlight can be helpful in a pinch, the light emitted is often harsh and narrowly focused. Instead, he uses an app called Screen Flashlight on his Android phone. Alternatively, there are a number of similar apps on iPhone that can turn your phone screen into a configurable low level light source.
No matter which app you use, there are two important features Baumgarten recommends. “The first is the ability to dim and increase the brightness,” he says. “Usually, I need a very small amount of light for a 15 or 20 second exposure, so if I am using a screen flashlight app without the ability to dim, chances are my foreground will be blown out. The second thing I am looking for is the ability to control the hue of the screen light. There will be a fair amount of trial and error when trying to get the right light onto the foreground, however, it is so rewarding when you finally nail it.”
Baumgarten’s lighting doesn’t stop with headlamps and phone screens, however. During the deep winter in Canada, it’s not uncommon to come across frozen waterfalls.
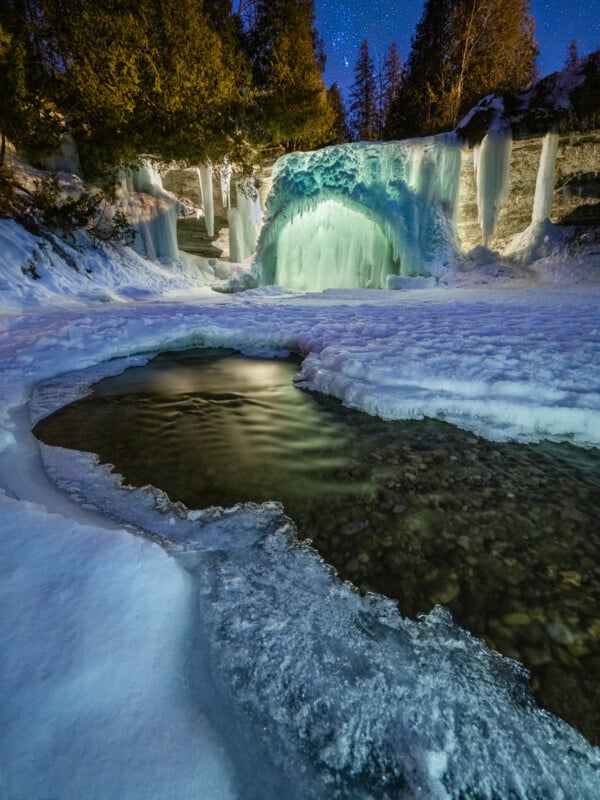
“While visiting this waterfall, I was blown away by how cool the area behind the waterfall looked,” he states. “I decided to return that night with some smaller LED panels on stands, and I placed those behind the frozen ice while I lit up the foreground outside with my phone screen. It really is incredible to see the results that you can achieve by just thinking outside of the box when the already present light isn’t enough.”
Time Blending
Photography, at its core, is a form of art. While most of Baumgarten’s nightscape images are single exposures captured in camera and lightly edited in Lightroom, he has found a unique way to merge his love of landscape photography and astrophotography.
Time blending is a technique where the photographer will blend multiple exposures in Photoshop, taken at various times. For Baumgarten, he has started to use time blending to add sunrise light with the Milky Way in the sky above.

“I have really enjoyed adding time blending to my astro photography,” he says. “It opens up a whole new form of art in my portfolio. Time blending is a pretty simple procedure to capture in camera. In my OM-1 and OM-5, I simply use the cameras built-in timelapse feature. After I set up my composition and exposure values, I input the amount of images I want to capture in the timelapse, as well as the interval between images. For a time blend, I could capture just a few images throughout the timeframe. One of the dark night sky, one of the Milky Way in its ideal position, and one of the sunrise lighting up the foreground. I opt to use the timelapse feature though, as then I have all the files needed to create a timelapse film clip. So I am getting two different forms of art to use for social media or my portfolio.”
Baumgarten says that he typically likes to capture time blended Milky Way images in the spring, as he feels the images look best when the Milky Way is in the horizontal arch, as opposed to the vertical summer orientation.
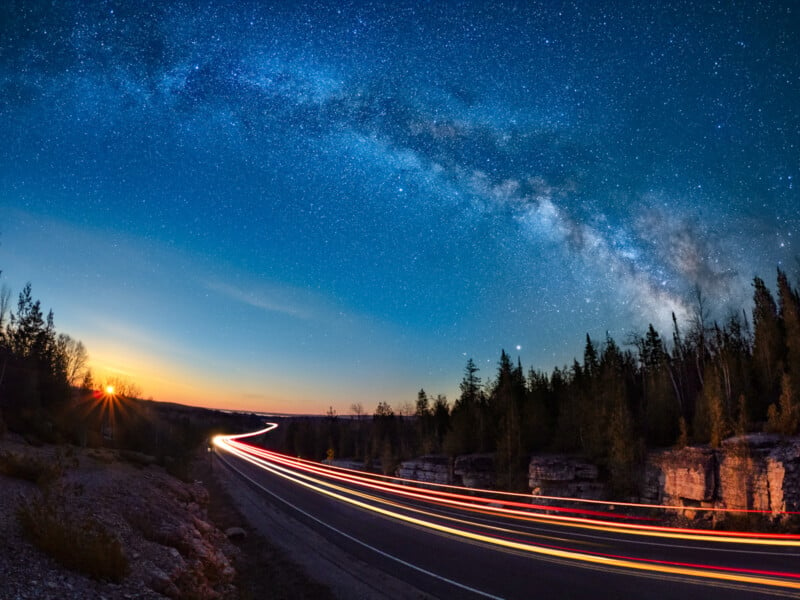
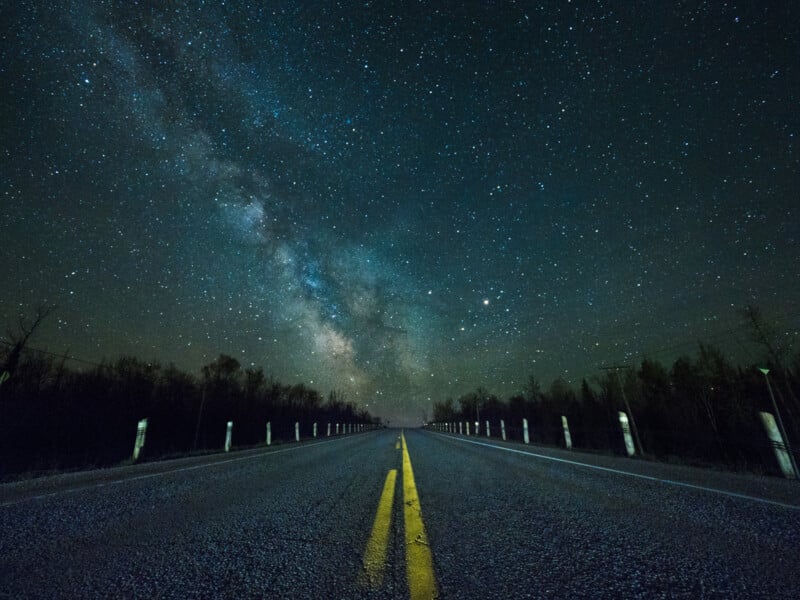
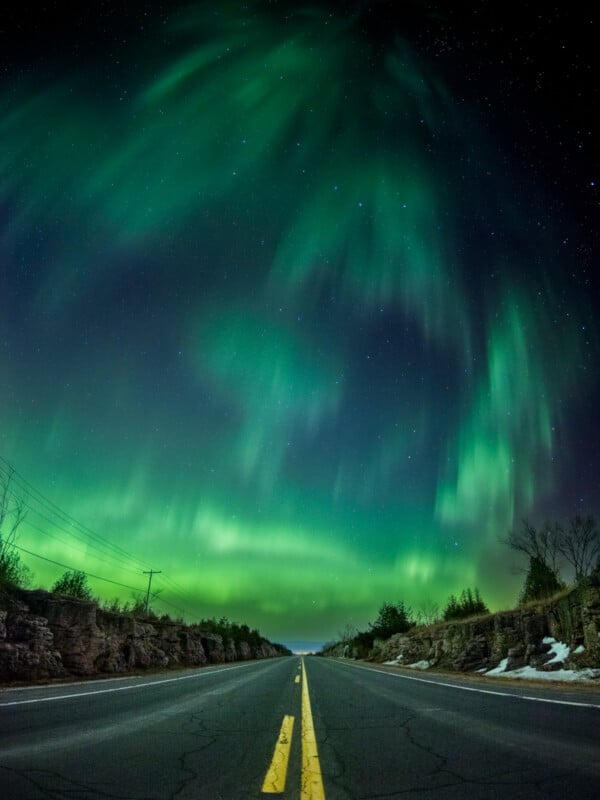
“The beauty of time blends is that you can use as many or as few images as you would like. In this image, I chose to blend four images, as I used one for the Milky Way, one for blue hour, one of the sun rising, and one of the car light trails.”
How to Capture Timelapse Video and Star Trail Images
While the night sky by itself can lead to some incredible photos, Baumgarten recommends adding movement to the night sky. This can be achieved through two means: Timelapse video and Star Trail images.
For timelapse, Baumgarten simply uses the built in timelapse feature of the OM-1 and OM-5. The tool’s simple interface makes it easy to set the desired number of photos to be taken, as well as the interval time in between shots, which Baumgarten recommends being just one second for astro timelapses.
For cameras without a built-in timelapse feature, photographers can purchase an external intervalometer remote, which will plug right into the camera.
“I love creating short timelapse videos for my social audience. While one angle on its own is great, I almost always start two timelapses together; one on my OM-1, and another on my OM-5. I will set one camera up with an ultra wide lens, usually my M.Zuiko Digital ED 8mm F1.8 Fisheye PRO. The second camera will have a narrower view of the Milky Way, which I will usually shoot with the M.Zuiko Digital 17mm F1.8.”
An additional helpful feature that the OM-1 and OM-5 have is their ability to create a timelapse movie clip directly in camera. “If a photographer wants to limit their time in post processing, this feature allows them to not worry about creating a timelapse video from a few hundred images, which can be a time consuming project. The OM SYSTEM cameras simply create the final timelapse videos in camera, and all they need to do is retrieve them off of the memory card and edit them together in an editing program such as iMovie. It is an excellent time-saving feature, and the results look incredible.”
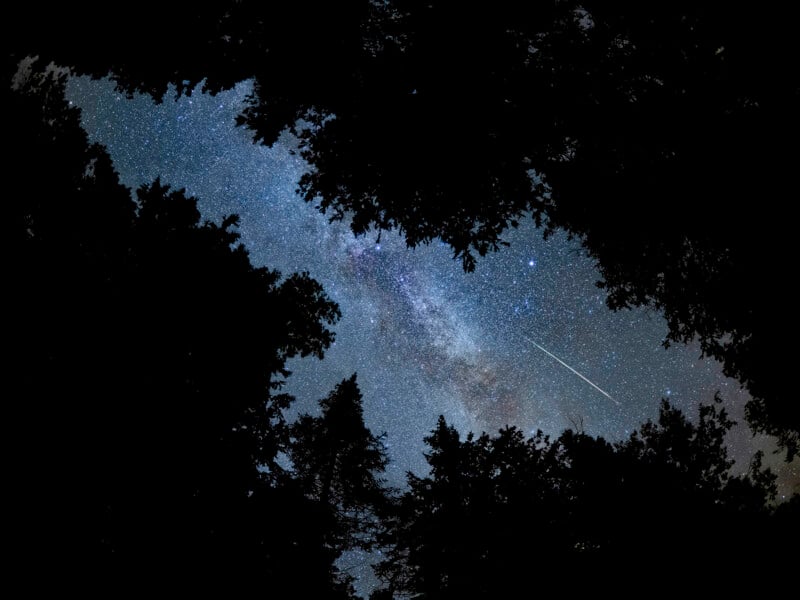
The timelapse feature isn’t just useful for timelapse videos, however. Baumgarten explains how he will use the OM-1 and OM-5’s timelapse feature to capture photos of meteor showers.
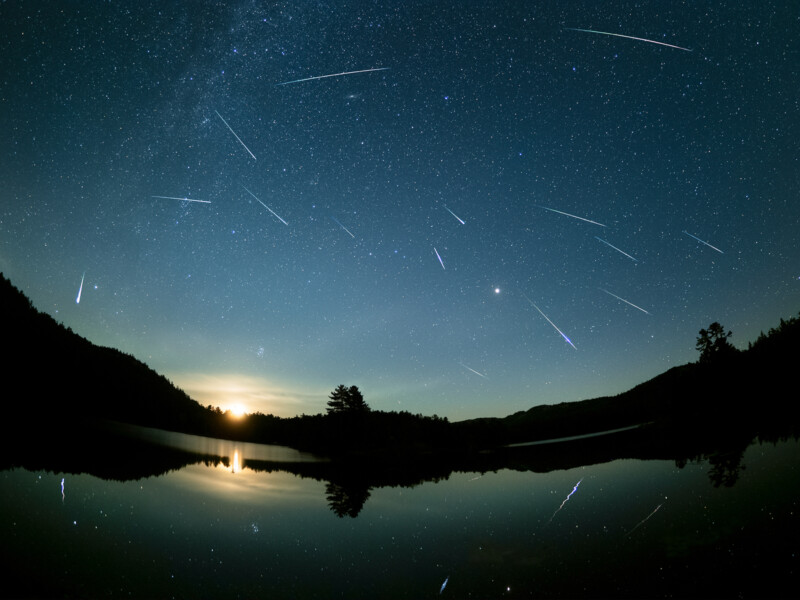
“I will set up my timelapse program in camera to capture and save RAW files instead of just saving a video file,” he says. “I will point my camera at the direction of the falling meteors, get my composition and settings dialed in, and just let it run for hours. When I get home, I will look through all of the RAW files and blend together the ones that include a falling meteor. The result is a dynamic and unique image that really wasn’t that difficult to capture.”
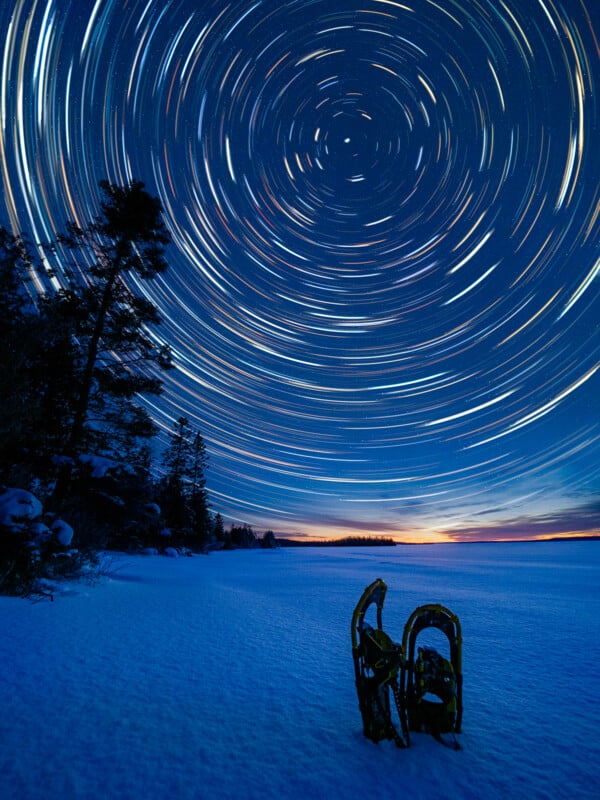
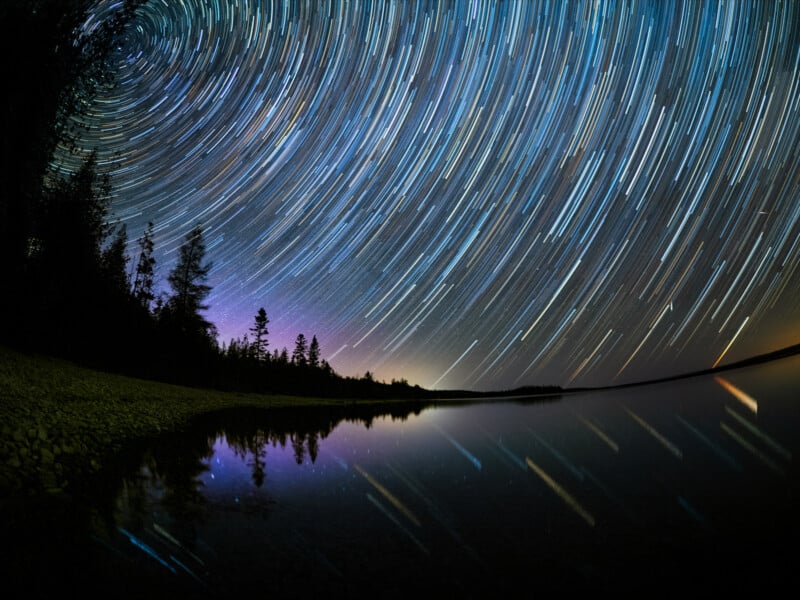
In addition to timelapse video clips, Baumgarten likes to convey a sense of movement in his astrophotography by creating star trail images. A star trail image is a composite of a large number of photos taken from the same exact location, one after another. After all of the photos are taken, the images can be blended together to show the movement of the stars in the sky.
For most photographers, star trails are captured in the same way as a timelapse video. If the camera does not have a built in timelapse feature, then an external intervalometer is needed. Afterwards, all of the files will be layered together in a program such as StarStaX. The process can be time consuming, but the unique look of well composed star trail images makes the effort worthwhile.
Luckily for Baumgarten, his days of capturing hundreds of photos and blending them together are over.
“Shooting star trails with the OM system cameras is so easy,” he states. “The OM-1 and OM-5 have an incredible feature called Live Composite mode. When you initiate Live Composite mode, you set your base exposure as you normally would. So for me, using a M.Zuiko Digital ED 12mm F2.0, I would set my exposure to be 15 seconds, based off the rule of 400. I then initiate Live Composite Mode, and the OM SYSTEM camera will take one 15 second exposure after another, but it will only add new highlights to the final image. Since stars are moving, each slight movement from one photo to the next is stacked on top of the base image. And the best part is, the original highlights that you captured, such as a porchlight, will never get blown out. You can actually watch the image being created as it happens on the LCD screen. This mode has taken all of the time consuming editing out of my workflow, leaving me extra time to plan for my next astrophotography adventure.”
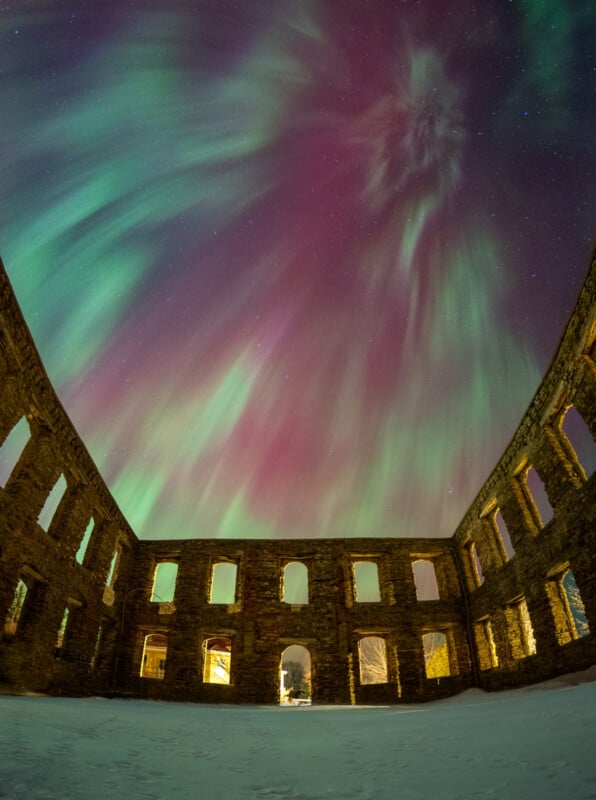
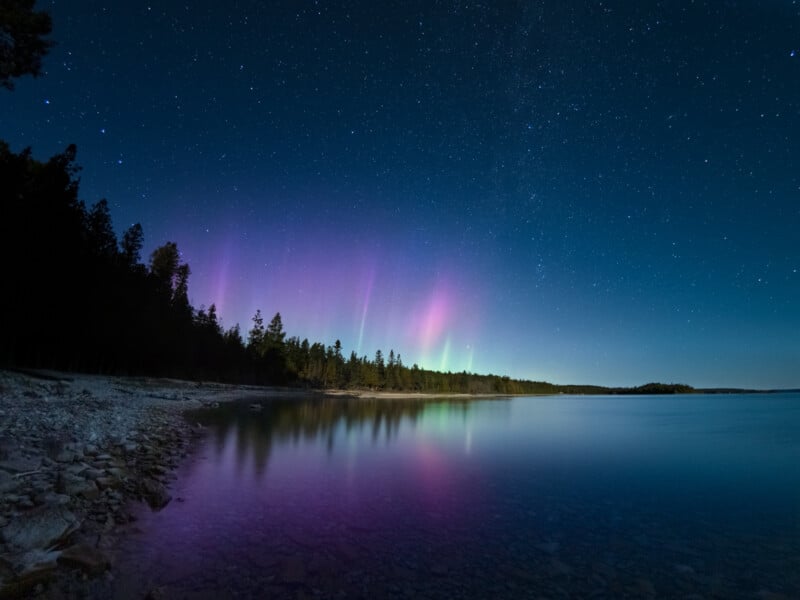
How to Photograph the Aurora Borealis
For Baumgarten, the crown jewel of astrophotography is capturing the aurora borealis. “The Milky Way is incredible to witness in person and capture in your camera, but in reality, it isn’t that difficult to photograph because like most astro phenomena, it is quite predictable as to its timing and location,” Baumgarten explains. “Sure, you might need to drive to a dark region, and you might need the weather to cooperate, but you can shoot the Milky Way from pretty much any region on earth. Capturing the aurora borealis, however, is a mission and it’s a mission that often fails. But, when the all the stars align (pardon the pun) it is true celestial magic.”
A number of factors come into play when looking to photograph the aurora borealis. Being that the phenomenon mostly occurs near the earth’s poles, you either need to be very far north or very far south to have a chance to see them. Usually, the north is the most visited region that photographers flock to, in search of the coveted northern lights. However, photographers will need to travel near to the Arctic Circle for their best chance. On top of that, a solar storm will need to occur for the most vibrant light shows to occur. And if that wasn’t enough, the locations where the northern lights are most visible are notorious for unpredictable weather and thick cloud cover.
If you are interested in photographing the aurora, Baumgarten recommends doing your research, and clearing your schedule.
Baumgarten says; “Most people do not live near a place where the northern lights are common, so you most likely will need to hop on a plane, or get ready for a long road trip. First, identify the location that makes the most sense for you. If you are US based and limited on time, Fairbanks, Alaska is a good home base to chase the northern lights. If you have a little more time and financial flexibility, Iceland, Greenland or Arctic Norway are beautiful locations on their own, but they also are hot spots for aurora photography. And of course, there are many beautiful places here in Canada.”
Once you have your location identified, it’s important to research the best time to view the northern lights. “While there is aurora activity year round, you can’t see them in the land of the midnight sun during the summer, as it never really gets dark that far north,” Baumgarten explains. Within the mid-latitudes, the aurora can appear at any time of the year, but with the shorter nights of summer it can be more challenging to view them.
The aurora are caused by coronal mass ejections that send ionized particles streaming toward the earth. Those particles react with our atmosphere to create amazing, dancing displays of colored light. Faint displays are not uncommon, but to capture an intense light show requires keeping track of the aurora forecast to see, not only the latest conditions, but also an animated globe that will show how far south the lights will go, and the intensity that they will bring.
When you finally get that awe-inspiring view of the aurora dancing overhead, Baumgarten says it’s important to know that the usual settings you might use for astrophotography do not apply when shooting the northern lights.
“If you haven’t seen the aurora before, you might be surprised to learn that the lights move pretty quickly,” he explains. “People often say that it looks like the northern lights are dancing, and that is indeed true. So with these fast moving bands of light, a typical astrophotography shutter speed of 15 to 30 seconds will not capture the sharpness of the light pillars. I have found 5 to 10 seconds is usually the sweet spot, but as with most things in astrophotography, trial and error are necessary to find the right speed to freeze the northern lights.”
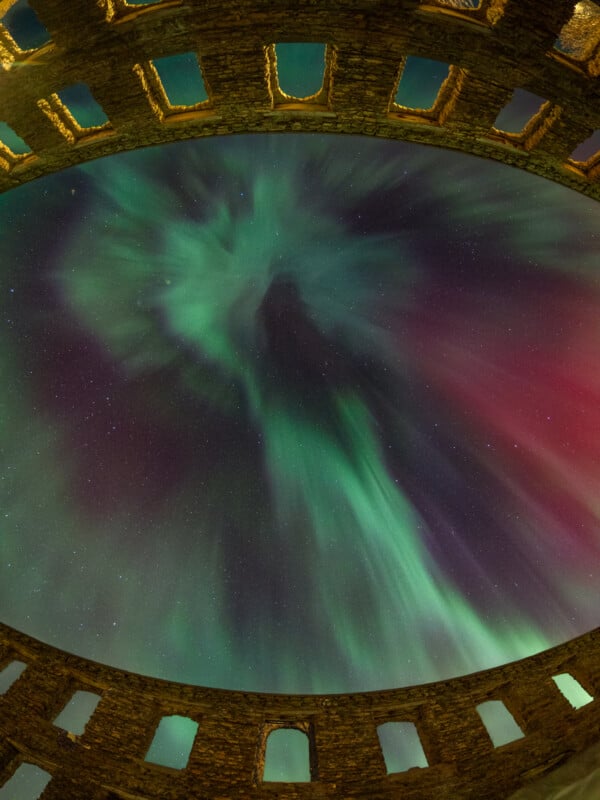
Lastly, Baumgarten says that all photographers who want to shoot the northern lights need to be prepared, know their camera inside and out, and be ready for frustration. “Even with a massive display erupting at great intensity, within five minutes they could just fade away. You may have to wait an hour, or five, before they come back. If they come back at all. It can be incredibly frustrating but that frustration is well worth it when the reward of that incredible northern lights photo first appears on your LCD screen.”
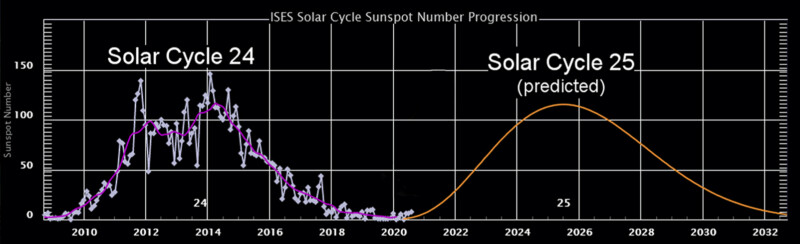
For those planning an aurora photography adventure, the next few years may be ideal. Baumgarten explains that the sun is on an 11 year solar cycle. In this cycle (Solar Cycle 25), the peak year for solar activity is 2025, and we are currently trending upwards towards that peak, making now the perfect time to start planning your northern lights photography trip.
How to Edit Astrophotography
Basic Lightroom Edits
In the modern day of photography, almost every image is post processed in some way. The level of how much editing goes into an image varies greatly, however Baumgarten says that a well captured astrophotography image should only need a few basic adjustments in Adobe Lightroom.
“It really is amazing how much RAW data my OM-1 and OM-5 capture. We are spoiled these days, as the digital cameras of yesterday did not capture near the level of data that cameras today can. Therefore, don’t be frustrated when you first view your Milky Way images in Adobe Lightroom. They might look dark, flat, and very boring. But with a simple move of the sliders in the Develop menu, you can turn that image into a detailed and vibrant nightscape.
Baumgarten will tend to slightly underexpose his astro photographs. Based on that, these are the basic edit values that he will enter before lightly tweaking to make the photo to his liking.
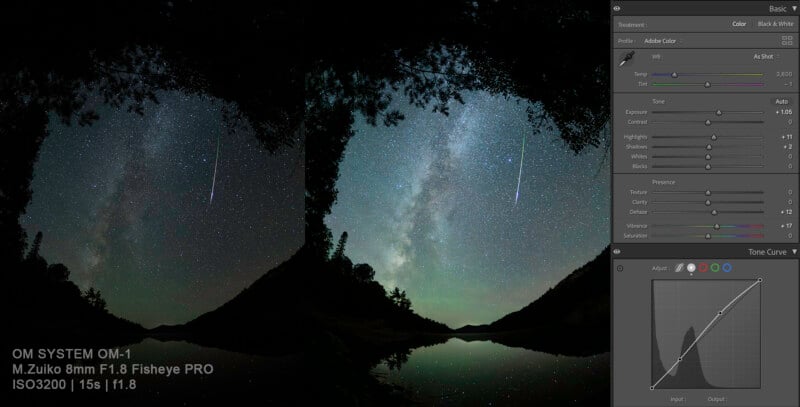
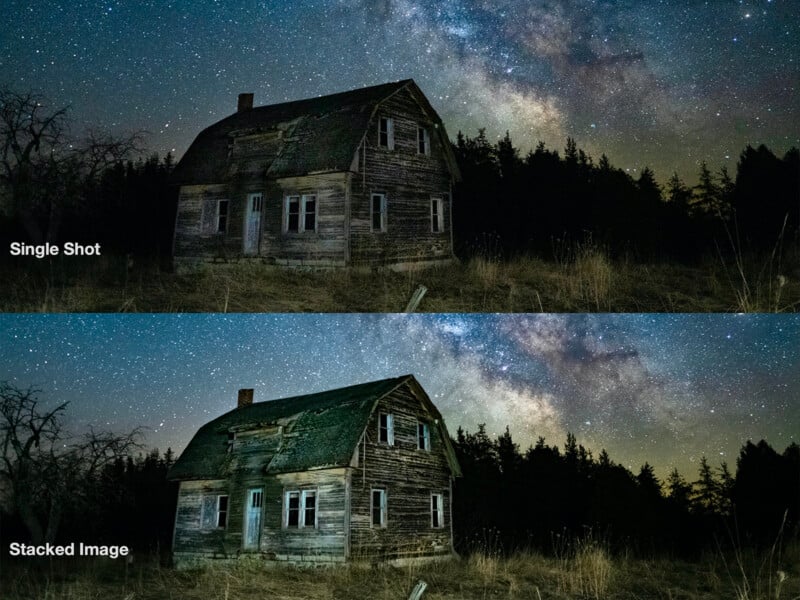
When editing astrophotography, Baumgarten says less is more. “You can really bring out the detail and colors pretty easily when editing images of the night sky. Don’t overdo it, however. Remember that noise hides in the dark so lightening shadowed areas can bring out unwanted digital noise. One way to significantly reduce noise in your photos is through image stacking.”
Image Stacking
While Baumgarten still uses the built in Noise Reduction in his OM-1 and OM-5, when he wants more detailed control over the noise of the final product, he will use noise reduction image-stacking software. In order to accomplish this, he will take a series of images, usually 10-20, of the exact same scene. When he returns home to edit, before he opens the files in Adobe Lightroom, he will open the series of images on Starry Landscape Stacker, a software tool built for Mac users. For Window users, he suggests using Sequator, which can accomplish the same noise reduction via stacking.
“When you first import the images into Starry Landscape Stacker, you will notice the motion blur of the night sky and a large set of red dots that identify most of the stars,” Baumgarten explains. “The foreground should be completely sharp, with no movement.”
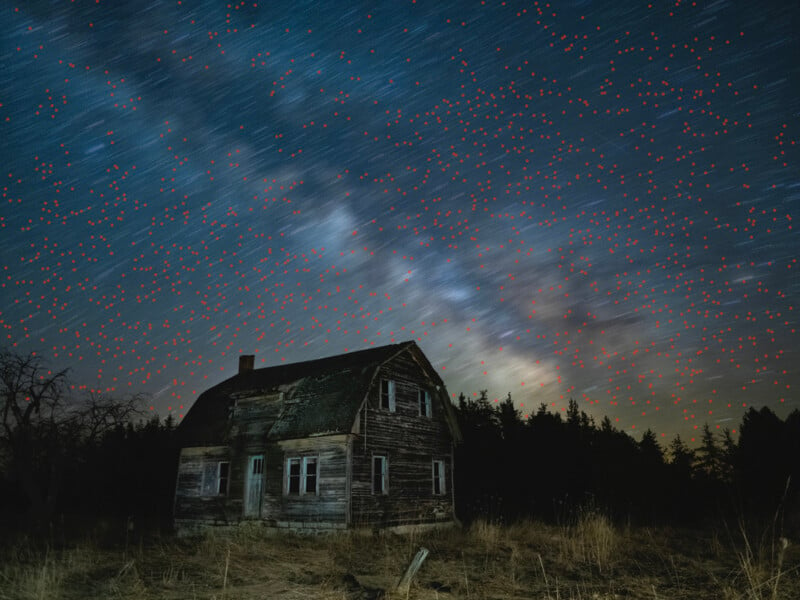
“When you run the program, it will mask the sky and realign those stars, and in the process, clean up the digital noise tremendously. The other added benefit is that it will use the light information from all of the files to create a deeper dynamic range, giving me even more editing power when I bring this stacked raw file into Lightroom.”

Creating Panoramic Photos
In years of teaching, Baumgarten has found that one thing that intimidates beginner astrophotographers is creating panoramic images. However, he says, shooting and editing panos is much easier than many people think.
“Panoramic images are important for a number of reasons,” he explains. “The first being, if you don’t have a wide angle lens, a pano image will still let you capture the full Milky Way, even if you can’t fit it all into one frame due to the focal constraints of the lens. For most of my panos, I will shoot the M.Zuiko Digital ED 20mm F1.4 PRO, which is the equivalent of 40mm. I love this lens for panos because it will really capture some incredible detail in the Milky Way, which will be visible in the full resolution image if my viewers decide to pixel peep. I don’t use any special tripod head or tools to create my panoramic photos of the Milky Way. I simply orient my lens to vertical and shoot a series of shots, with about a 40% overlap between each image.”
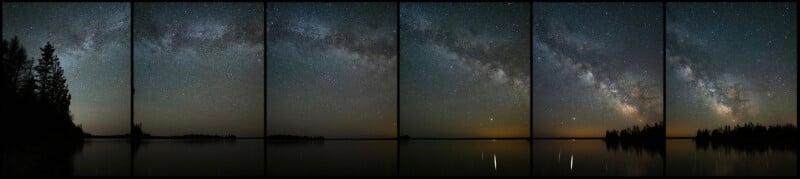
Being that you want to capture this series as quickly as possible to avoid too much movement in the Milky Way, Baumgarten suggests only stacking four images of each vertical scene if you choose to run the photos through Starry Landscape Stacker or Sequator. He adds; “The noise reduction in my OM-1 and OM-5 is so good, however, oftentimes I will just shoot one exposure of each vertical scene and let the camera take care of the noise.”
Once at home, creating panos is as easy as ever since the feature has been added to Adobe Lightroom. Either in Photoshop or Lightroom, simply select all of the images to include, right click, select ‘Photo Merge’ and then ‘Panorama.’
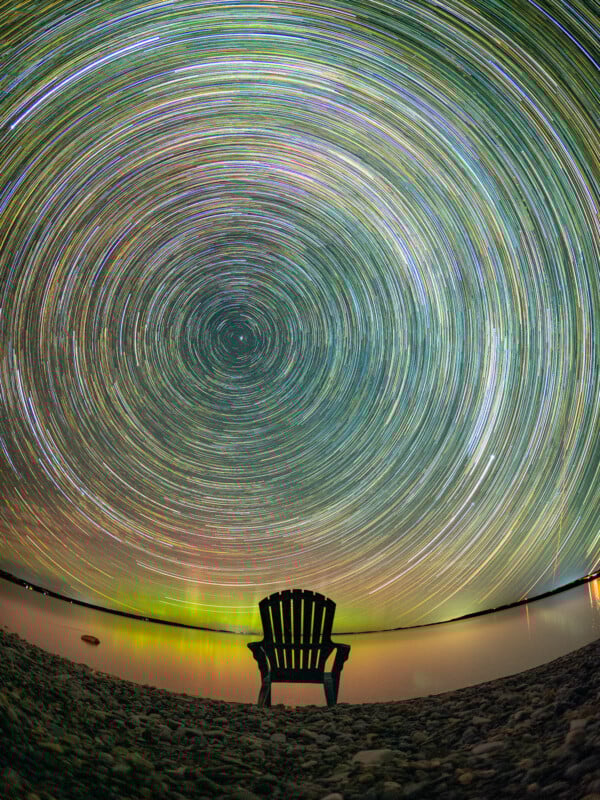
Be Creative with Your Astrophotography
In closing, Baumgarten says that the stars are the limit when it comes to astrophotography.
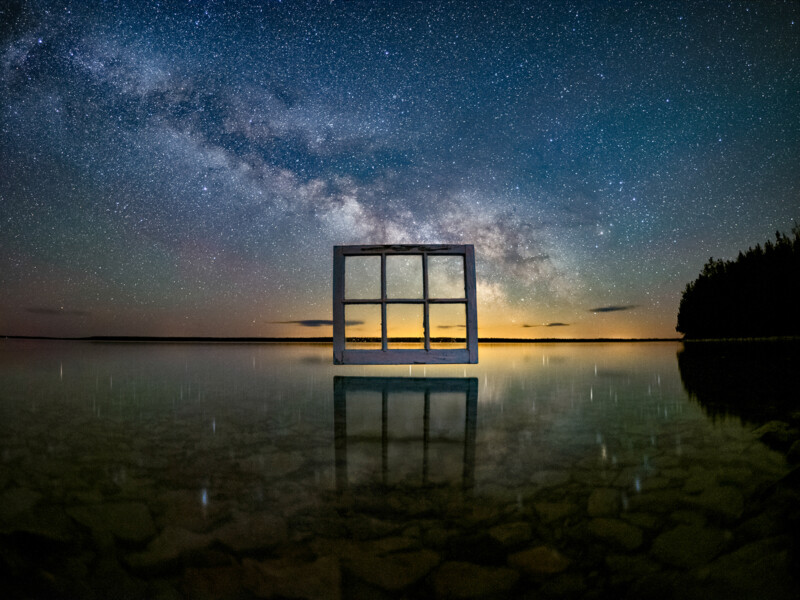
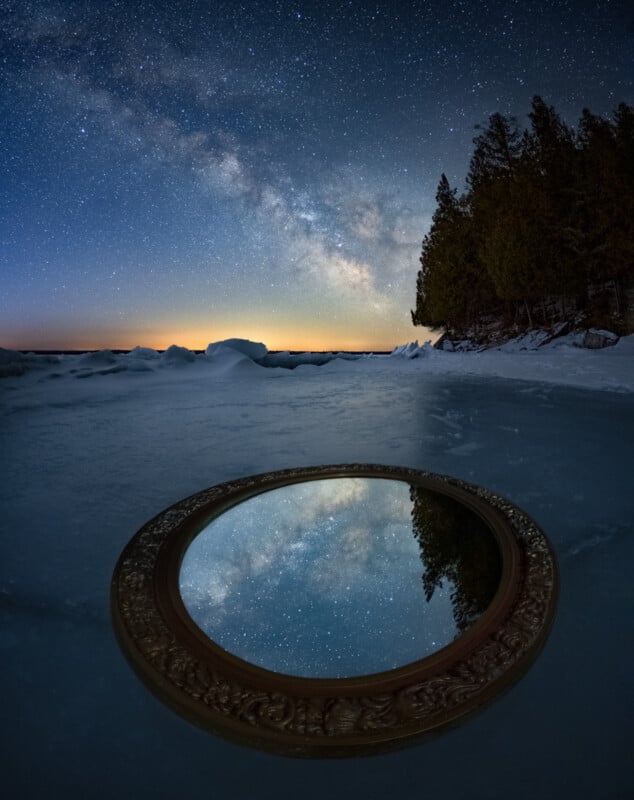
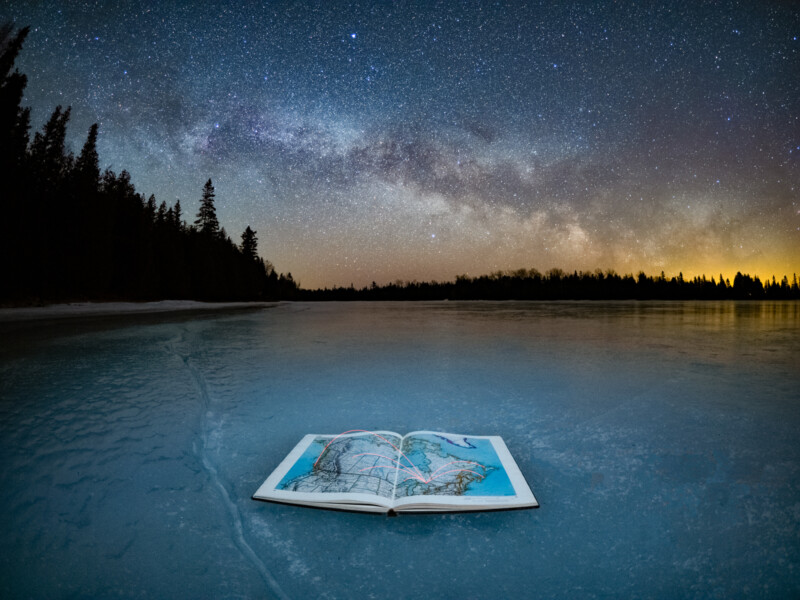
“To be honest, living in such a dark place has almost spoiled me when it comes to my night sky photography. I will never say I get bored with photographing the Milky Way in front of a reflective lake, because I don’t, however, sometimes my creative brain just wants to do more. Some years ago, I started thinking about ways I could use props in my photos to tell a story of sorts. Once I started this, my creativity sparked and I couldn’t stop thinking about different types of mini stories I could tell with my astrophotography. Unlike the rapidly changing light at sunset, once it is dark out the light conditions may stay the same for hours. This allows me to be a bit more creative with my compositions than I might be during the day.”
As always, Baumgarten recommends thinking outside of the box. “Don’t be so hyper focused on capturing the night sky like everyone else does. Find your own creative spark and let your imagination run wild.”
“There is nothing like standing alone, surrounded by pure silence, and gazing up at millions of stars above you. For me, my astrophotography adventures create a sense of calm and peacefulness, where I can stare up to the sky and be amazed at the world I live in. Even if I don’t get any good photos, I always consider a night photographing under the stars a success.”
More from Peter Baumgarten can be found on his website, Facebook, and Instagram.
Full disclosure: This article was brought to you by OM SYSTEM
Image credits: All photos by Peter Baumgarten