Build Yourself a Rudimentary, Hand-Cranked Star Tracker for $30
Star trackers are important for capturing long exposures of star formations by slowly moving to compensate for the rotation of the Earth. Most modern star trackers use motors to do this, but in this 22.5-minute video, photographer Nico Carver shows how he built a hang-crank version for just $30.
Carver’s YouTube channel is dedicated to exploring astrophotography and teaching others the ins and outs of the process. He is particularly interested in looking at how to approach the hobby affordably, since it can be very easy to spend a lot of money.
“It’s easy to go down a gear buying rabbit hole, I’ve been guilty of it myself,” he says. “But I also enjoy getting the most out of budget gear and budget techniques.”
One such example of this is Carver’s DIY, $30 star tracker. The build that he shows in this video is based on a description by George Haig who described how to make it in the April 1975 edition of Sky and Telescope Magazine. It’s called a “barn door tracker” and modified versions of it have been published a couple of more times over the years: once in 1988 and again in 2007.
It’s also sometimes referred to as a “Scotch mount,” referencing Haig’s Scottish nationality.
“It’s been a popular DIY project for amateur astrophotographers ever since he published this in 1975,” Carver says. While he notes there are more recent iterations over the years, Carver shows how to make that original design in the video above to “keep the cost low” and because he is “fascinated by the simplicity of it.”
The full, detailed instructions including a complete parts list can be found in a PDF that Carver has uploaded here.
Once you’ve got it constructed, you need to polar align it. To do that, Carver chooses to sight Polaris, the last star in the handle of the Little Dipper constellation and centers it in the straw mounted to the side of the device.
“This is going to be just a ‘good enough’ polar alignment,” Carver says. “Not a great polar alignment since Polaris is about half a degree off from the pole but hopefully for a wide-angle lens this will work well enough.”
After you have polar aligned the device, the next step is to find the target by moving the camera around on the ball head until the camera is pointed at it. After that, focus on the stars to make sure they are sharp, and then set the camera to bulb mode. You can use a camera’s internal intervalometer if it has one, but Carver uses an external trigger to manage it in his example above. For his example shot, Carver uses a 2-minute exposure.
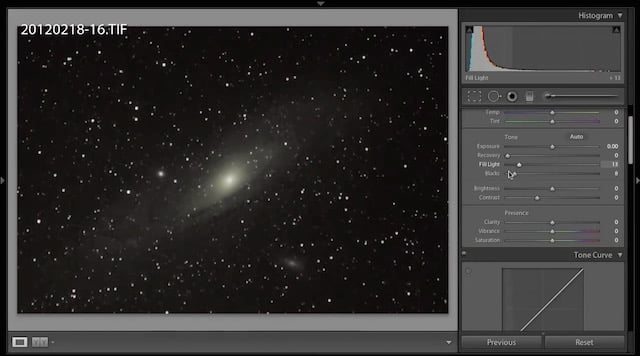
For his particular lens and camera setup, Carver can avoid star trails by moving the wheel on the barn door tracker counter-clockwise 15 degrees every 2.5 seconds. Doing that, he was able to capture the following:
The process is a bit tedious, and Carver details a few pros and cons from the setup in his video above, but for a device that costs just $30, it’s both a useful tool that’s also a neat DIY Project. For more from Nico Carver, make sure you subscribe to his YouTube channel and follow him on Instagram.