How to Shoot in Manual Mode

In a world of increasing automation, at least photography still offers the opportunity to stay alert, active, and in command. While intimidating at first, shooting in full manual mode provides creative control, proper metering in tricky light, and deeper integration into the entire process of making photos. If you give it time, manual photography can help you craft your best images.
Table of Contents
What is Manual Photography?
Manual photography is nothing more than the origins of photography. It’s that simple and basic. For generations, amateur and professional photographers alike knew how to meter a scene and adjust their settings accordingly. So, in many senses, manual photography with a digital camera takes us back to the film (or plate) days.
Eventually, light meters were introduced into the camera, and by the 1970s, autoexposure options appeared. From there, autoexposure camera modes were refined and applied to almost every camera on the market.
You might say that Auto mode reached its zenith with the cheap, popular point-and-shoot cameras of the 1980s and 1990s, which anyone could pick up and use. Cell phones stole that show, however, and their total ease of use only makes manual photography more attractive.
Why Shoot in Manual Mode?
From purists to professionals, all serious photographers benefit from the manual choice of exposure settings. It’s essentially the most sure-fire way to capture photos that look the way you want.
Once a photographer has an understanding of how aperture affects an image and of how light meters can easily become confused, he or she will recognize situations in which manually setting exposure proves irreplaceable. Also, understanding manual photography will help you better utilize semi Auto or full Auto mode when you choose to do so.
Your camera is a tool designed to serve your needs. Since photography boils down to the exposure of light onto a light-sensitive surface, a study of exposure proves essential in understanding how to use and command a camera. Manual photography forces photographers to grasp the theories behind exposure.
The other reason to override Auto mode has more to do with the essence of photography. Besides offering a film-like approach to shooting, manual photography requires more of the photographer: more time spent analyzing a scene and its lighting, more thought on what should be in focus or what should remain blurred, more involvement in the process.
We all know what happens when we slow down and take longer to compose and make photos: We get better results. And with time, manual shooting becomes intuitive, so even though we are making slower, deliberative choices, we’re doing so faster. Find a subject, meter the light, set a “correct” exposure, focus, shoot, move on.
Where to Start?
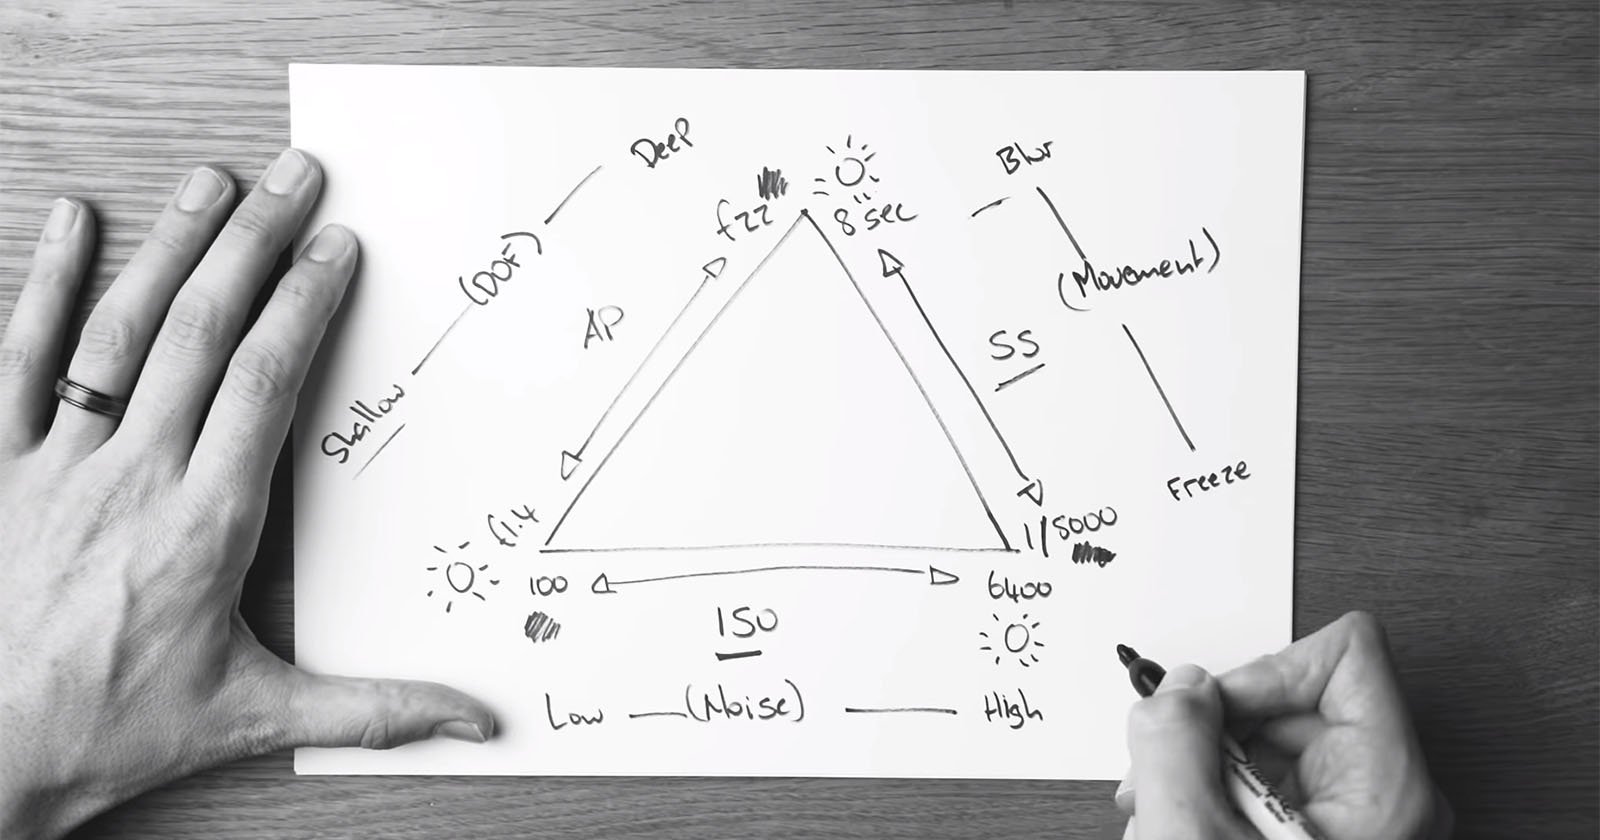
Manual photography begins with exposure. Basically, Exposure = Intensity x Time. It’s a combination of the amount of light that hits the sensor (or film) and the amount of time that light is allowed to hit.
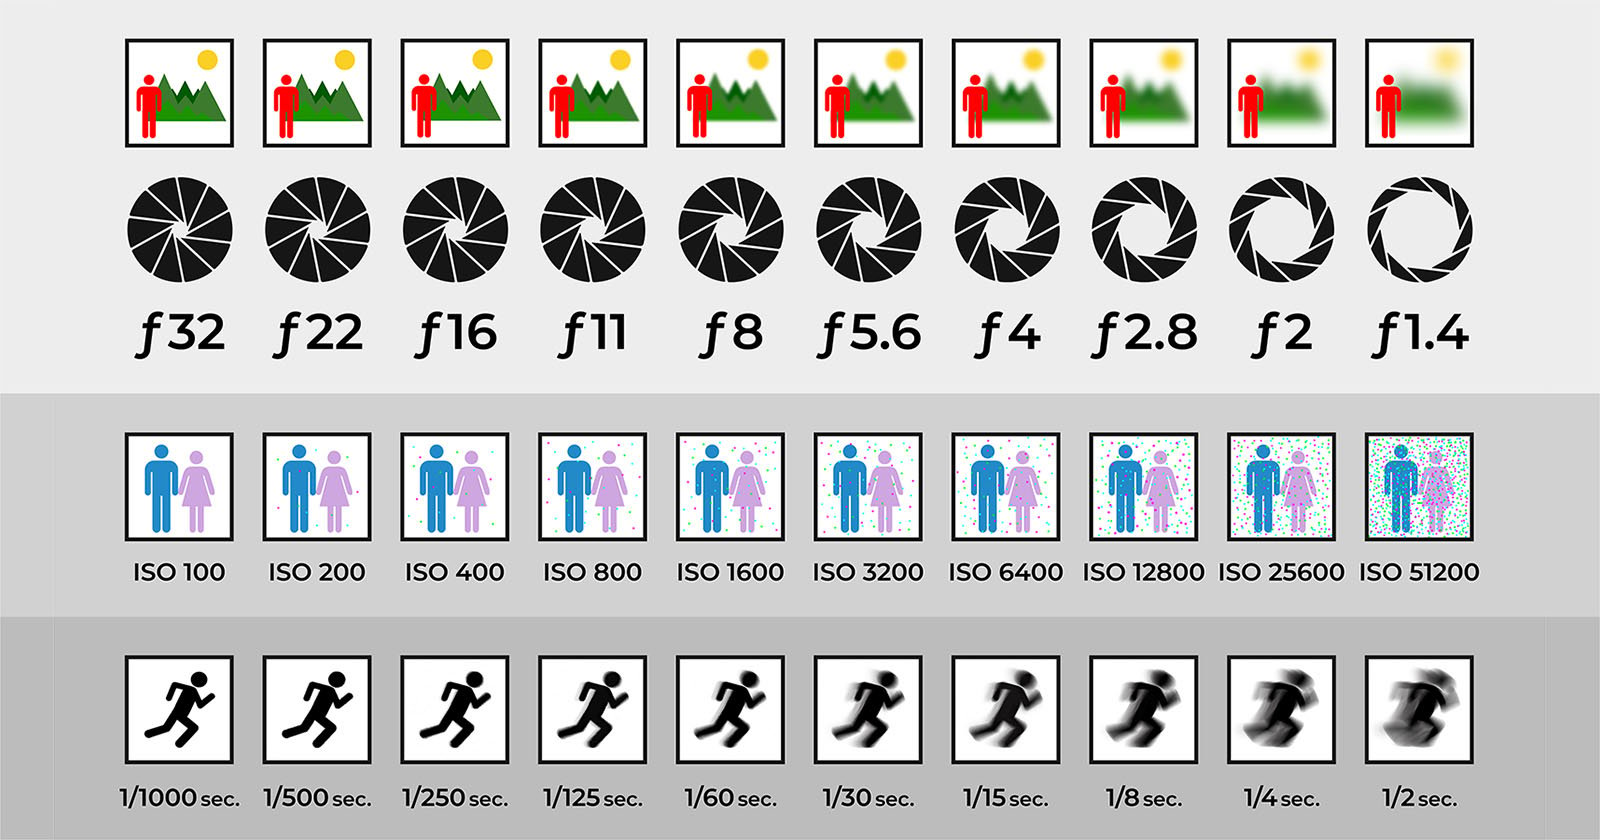
Aperture, or how much the lens opens, measured in f-stops, determines Intensity. Shutter speed determines Time. The remaining factor, ISO, relates to the light sensitivity of your sensor (and in analog photography, it refers to film speed): Higher ISO means more sensitivity to light but with a loss of image quality. ISO helps regulate the quantity of light that hits the sensor, and how well the sensor records it.
Manual photography is really just a balancing act with light.
The beauty of shooting manually is that we can prioritize elements within a photo. Are we going for selective depth of field, for correct exposure in artistic (e.g. silhouetting) or challenging (e.g. snow) situations, for sharpness or blur? Unfortunately, even the best cameras fall far short of our eyes’ performance, so sacrifices must be made. That’s why manual photography begins with deciding which of these elements is most important and setting that value first.
Manual for Beginners
Unless there is action involved in the scene, like dogs or kids playing, aperture often becomes the protagonist in manual photography. Assuming your subject can hold still, working around a desired f-stop permits management of light via shutter speed and ISO. Beginners might choose to let the camera auto-adjust ISO at first, at least until they get the hang of coordinating aperture and speed.
Here’s how to start shooting in Manual mode:
Evaluate the Shot
Look at your subject, be it a person or a landscape. What should be in focus, and what should be blurred? A small aperture (high f-stop number, e.g. f/16) will extend the depth of field, meaning much of the foreground and background will be in focus. But unless it’s an absolutely sunny day, “stopping down” the lens like this requires more light for a proper exposure, hence a slower shutter speed which can cause undesirable camera shake, or a noisy, grainy high ISO.
In comparison, a larger aperture (e.g. f/2) allows much more light to hit the sensor, thus requiring a fast shutter speed or low ISO. The purpose of shooting wide open (low f-stop) is to keep the focused subject sharp while casting the foreground and background into blur. This can offer useful effects, such as bokeh, but it can also ruin a photo. Proper depth of field, i.e. focus, is critical to a photo’s success.

Meter the Light
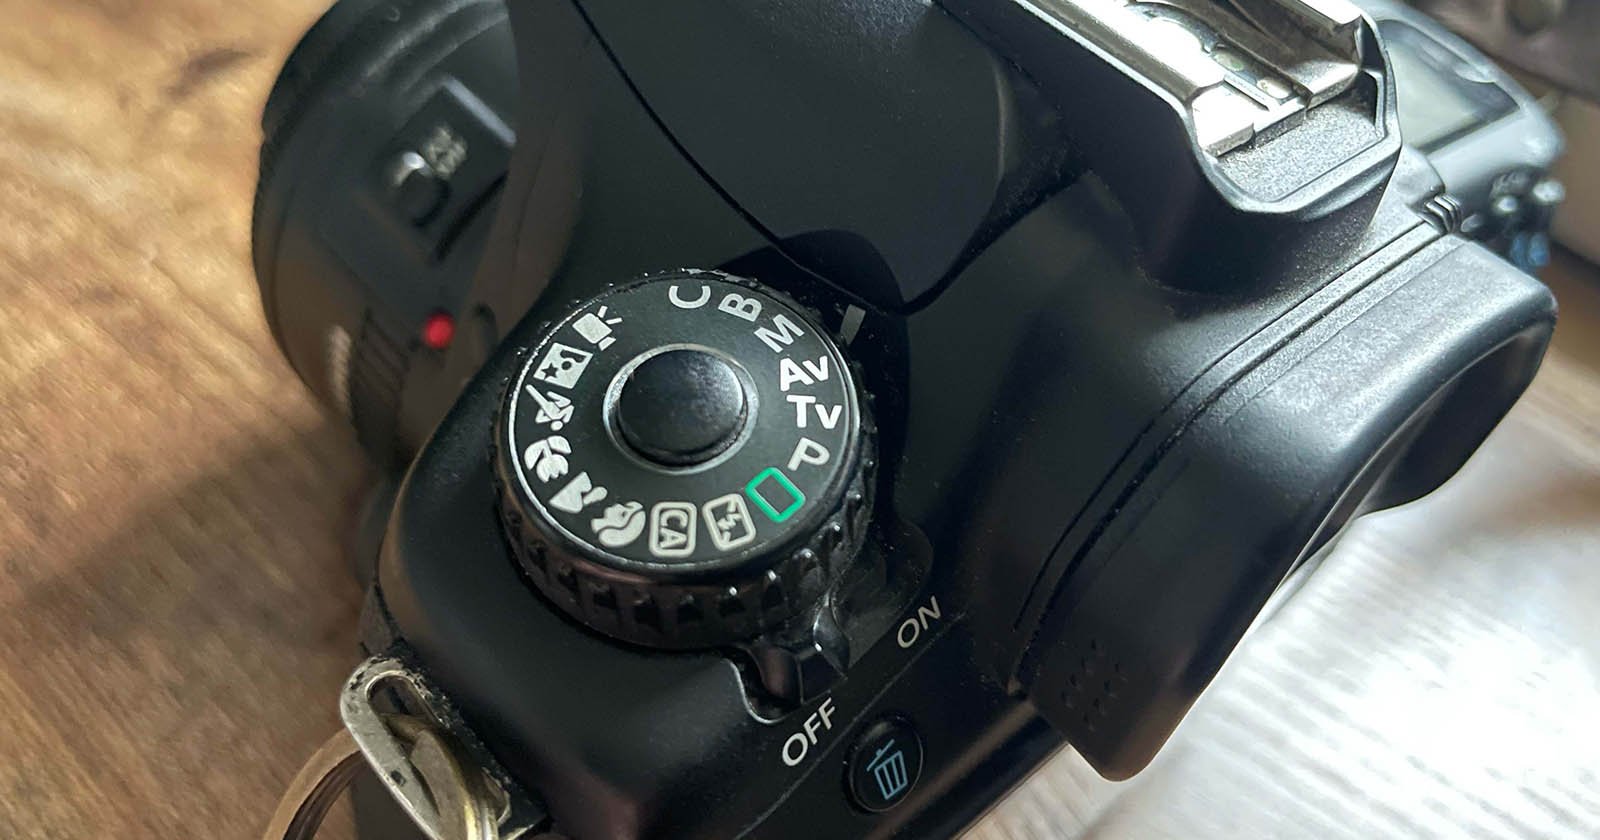
Choose Manual mode on your camera and select an aperture. The camera’s light meter will show you where to put the shutter speed for what it considers a correct exposure. Start here, with the exposure meter line at zero, release the shutter, and look at the camera’s rear screen. Does the image look overexposed or underexposed? If so, add or subtract light by modifying either aperture or shutter speed until your photo looks best.
Get Manual
Once you find the correct exposure, which may vary from what your camera’s light meter deems appropriate, explore the range of apertures. Say your correct exposure is f/8 at 1/250. Having studied exposure, you know that one stop of aperture equals one opposite of shutter speed: When one goes up, the other goes down, to maintain balance.
Move the settings to f/5.6 (letting more light in) at f/500 (letting less light in). Check the results on the rear screen. Try f/11 at 1/125. Find the limits from your lens’ smallest to highest aperture. Experiment. Do the same exercise with shutter speed instead. This is manual photography.
One thing to keep in mind here is the lower limit of shutter speed before an image becomes blurred and ruined. A simple rule of thumb, called the reciprocal rule, is to make sure the shutter speed is at least as fast as one over the focal length you’re using.
For example, when shooting with a 50mm lens, you should use a minimum shutter speed of at least 1/50s to prevent camera shake. If shooting with a 200mm lens, you’ll need to stay at least faster than 1/200s. This is just a general rule, of course, and using an even faster shutter speed can ensure a sharper result.
Observing this rule might sometimes prevent you from stopping down to f/16 or f/22, but at least your photos won’t look as if taken during a bumpy car ride. A balance between acceptable shutter speed, aperture, and ISO will typically offer a range of options for a correct exposure, and you get to decide where in that range the best photo exists.
Try Bracketing
Bracketing is one way to get there quicker. In bracketing mode, your camera will take three successive shots, each with a different shutter speed. This usually results in one being underexposed, one correctly exposed, and one overexposed, but it depends on the exposure you’re starting from. By adjusting aperture and shutter speed as described above, though, you’re already bracketing, manually. See, it’s not that hard to shoot in Manual mode.
Advanced Manual Photography
Once you’ve got the light balancing act figured out, it’s time to go even deeper into manual photography. One way to advance is by forgetting your light meter altogether and applying the Sunny 16 Rule.
When you get the exposure right for the lighting you’re shooting in, leave it there (until the lighting changes). By working in Manual mode and setting the dials yourself, the camera can’t change your settings like it would if you were in a semi-autoexposure mode. Now, with the turn of a dial, you can easily try different combinations of aperture and shutter speed.
This is also a good place to introduce manual ISO settings, which completes the “exposure triangle” equation. Increasing ISO brings more light into your exposure, which means you can stop down the lens and use faster shutter speeds. Another way to approach ISO is to shoot like it’s film and keep the ISO at the same setting for an entire shoot. This forces you to find shots and available exposures using only aperture and shutter speed, a challenging yet rewarding way to improve your skills.
Manual shooting also benefits artful photography. For example, high-key and low-key images are easy to craft while in Manual mode, simply by overriding the camera’s meter and intentionally overexposing or underexposing part of a scene.
Finally, while in manual exposure mode, why not turn your lens to manual focus? This improves your eye and your concentration, and it will help you master aperture and depth of field. Professional photography makes artistic and practical use of aperture in this way, especially by working with hyperfocal distance.
Conclusion
In the end, manual photography implies understanding exposure. Along with other essentials, like composition, exposure requires years of practice for full comprehension. By studying exposure, starting with aperture and shutter speed, and getting to know your camera’s light meter, any photographer can begin shooting in Manual mode.
The camera is a tool, and although we can often make our best photos by overriding its automatic settings, today’s digital cameras also help us learn to shoot manually. The rear LCD screen offers instant feedback on exposure: too dark, too bright, out of focus, shaky, or just right? Our SD cards await with the equivalent of hundreds of rolls of film, so shoot away.
The serious photographer may still shoot in a semi-autoexposure mode like Aperture Priority, but he or she will certainly know how to work manually. Sometimes it’s the only way to get the shot you desire. Other times it’s just nice to slow down, get immersed in a scene, and think about (or intuit) what the composition and lighting demand in terms of aperture, shutter speed, and ISO.
Ultimately, shooting manually lets you take back control from the camera to capture the vision only your creative eye can see.
Image credits: Header photo from Depositphotos