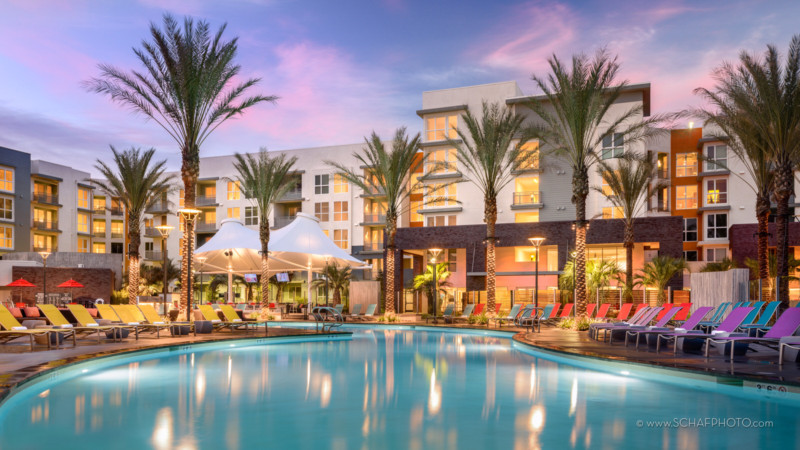
How to Light a ‘Big Budget’ Photo with $5 Lights
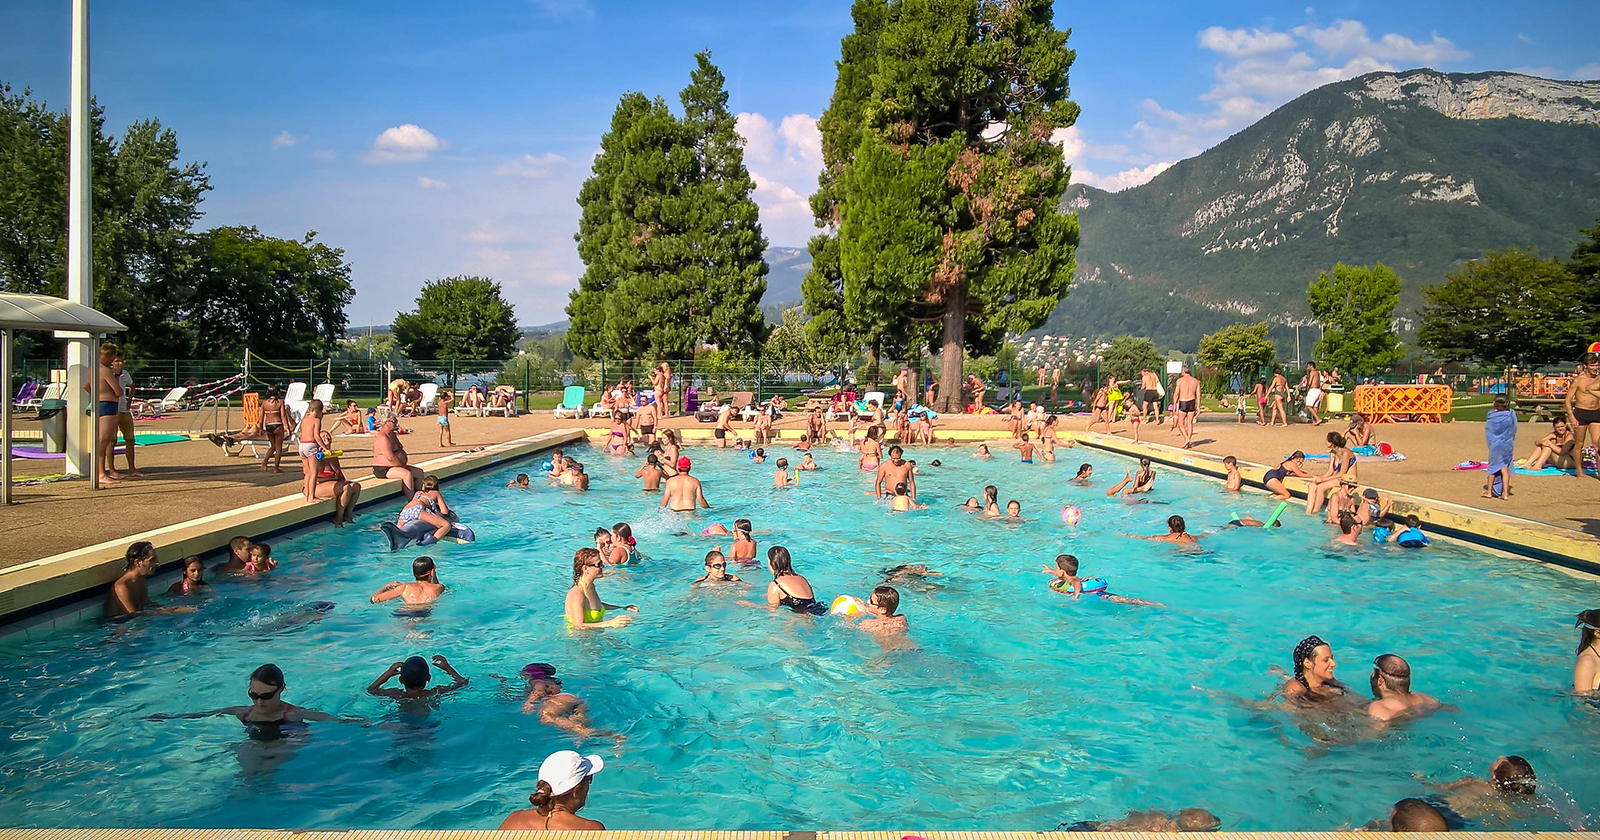
I have a client who builds amazing luxury apartment complexes all over California, and I’m their pool guy. I know it sounds funny, but they call me whenever they need exterior images and pool images (they call another photog to do the interiors of the model apartments).
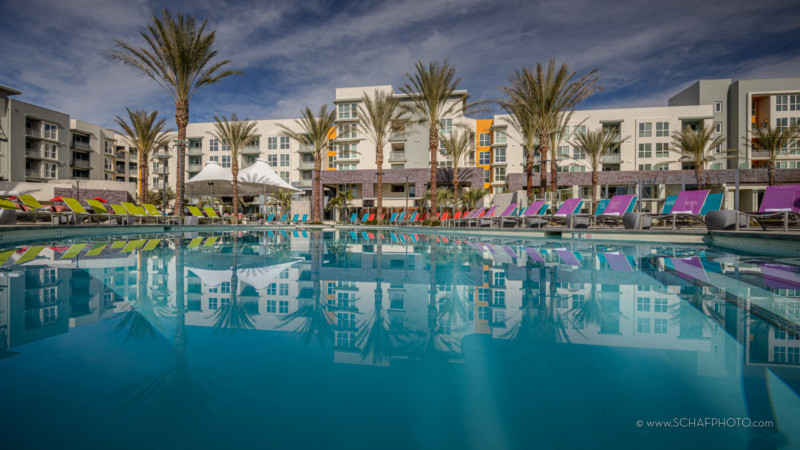
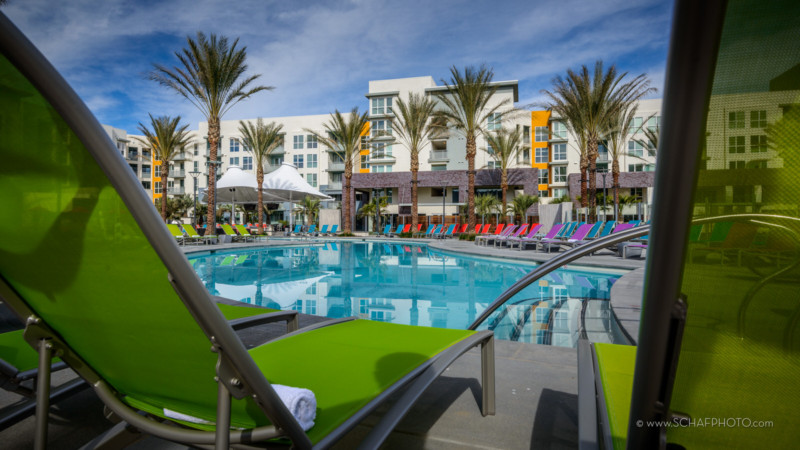
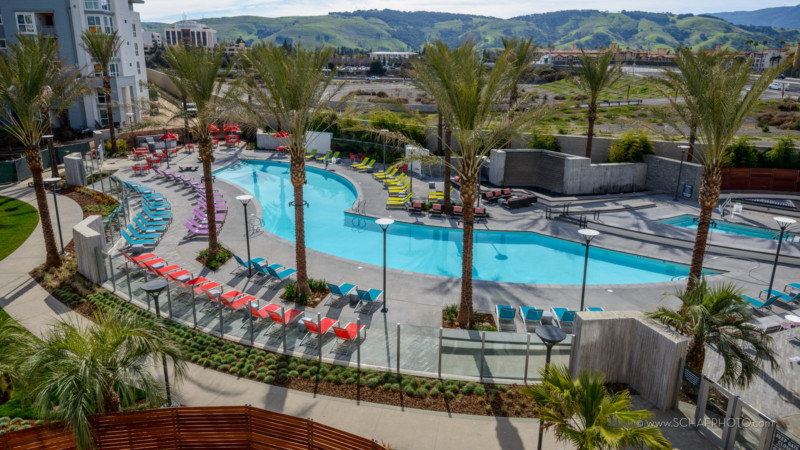
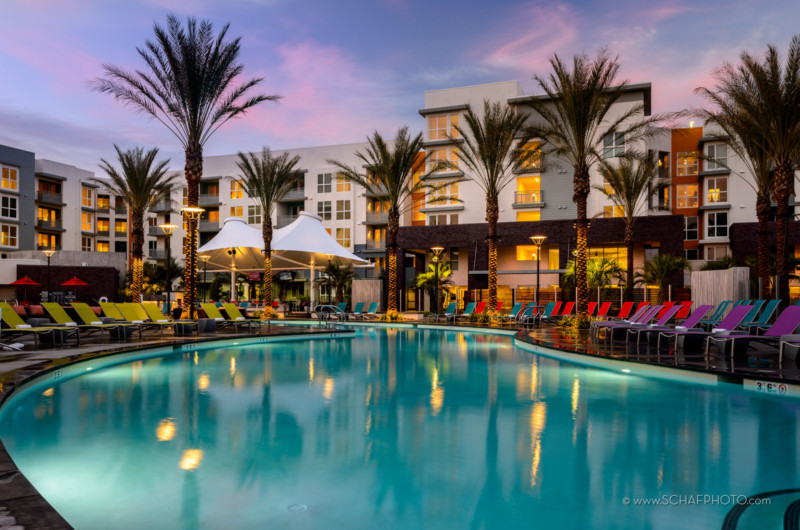
Their projects and their brief are always similar: I have unlimited access to the buildings the day before the tenants move in, the pool chairs all get rolled white towels, I need to make the pool look “big,” and they always want the pool deck wet and shiny (even when it’s 100˚ outside). Oh, and they want the main view of the pool to be a ‘HERO’ photo, I have taught them my slang for the master twilight photo, the ‘magazine cover’ if you will.
On this project my client was hiring me to create marketing images, these were used as website splash pages, glossy brochures, ads in local rental magazines, submissions to award shows, and a web-gallery they can email to prospective tenants. The photos all needed to be horizontal (I usually deliver 16:9) and they generally are used smaller than 11 inches wide at 300 dpi (8MP).
Occasionally they get a spread in a magazine or blow up their favorite HERO photos as 30×40 inch aluminum wall prints and sometimes they produce 80-inch-wide trade show graphics from the photos, so the final delivered files obviously need to be more than 8MP. This image was captured on a 32-megapixel Nikon D800e. (I put the delivered 26MP cropped image on my Flickr Photostream in case you want to pixel peep.)
On this February day in 2016, I set up a time-lapse on a lark. Video is not my thing, I stick to stills mostly. The timelapse video came about because I had bought a Nikon D5300 and 10-24mm lens as a backup camera. I set up the D5300 on my backup tripod behind the main camera and set the intervalometer to take a photo on Program mode every 10 seconds. The following video compresses about three hours of photography into 1.5 minutes (It’s still boring at 1.5 minutes, you can imagine how boring it is in real-time).
The video metadata allowed me to remember the following behind the scenes parts of the day, here’s an overview:
9:00AM. We roll up on the property, a just-completed 650 unit, 5 story luxury apartment building in Northern California. We unload the truck and spend the day photographing exterior images, moving tables and chaise lounges, working around contractors putting the finishing touches on things and rolling the towels for courtyard views.
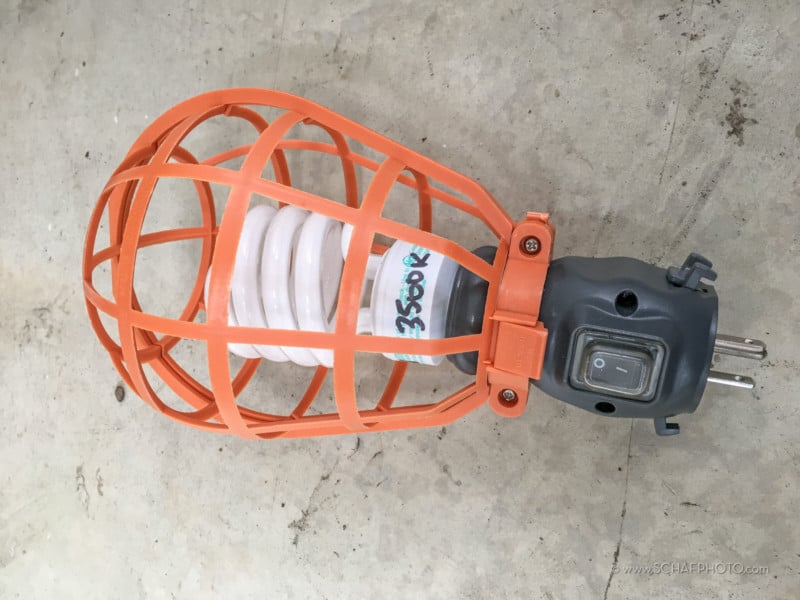
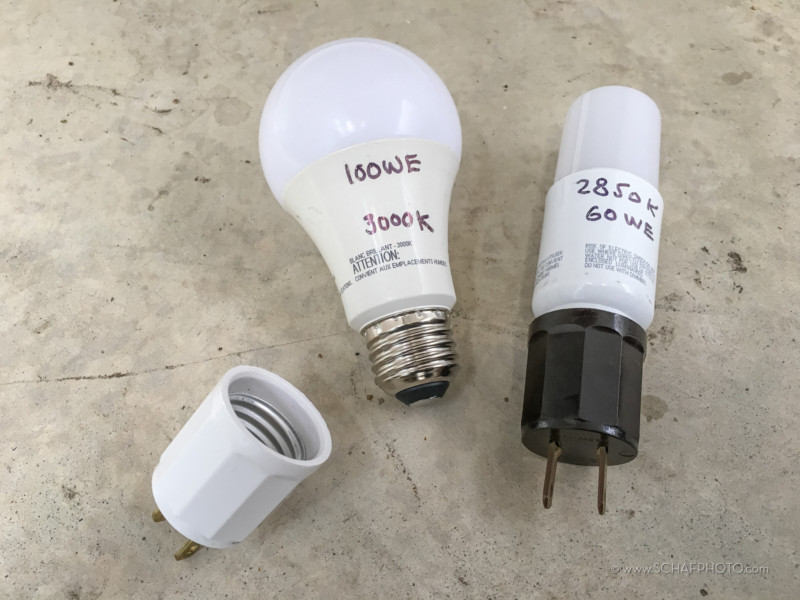
3:00. Since the building is new and vacant, we get the keys to every apartment in the building except for two or three in our view that already have early tenants. My intern and I begin to go door to door on each floor dragging our giant “duffle bag o’ lights.” We turn on every light in every room. The bedrooms of this apartment building don’t have lights and so we plug in 75 Watt equivalent ‘cage-lights’ on the back wall of every bedroom (good thing I had 50 of them). Even better that the elevators in this five-story building work.
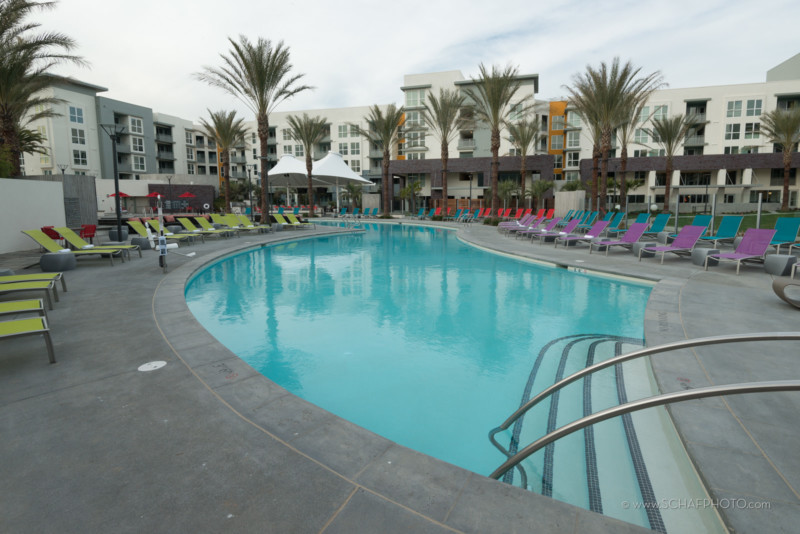
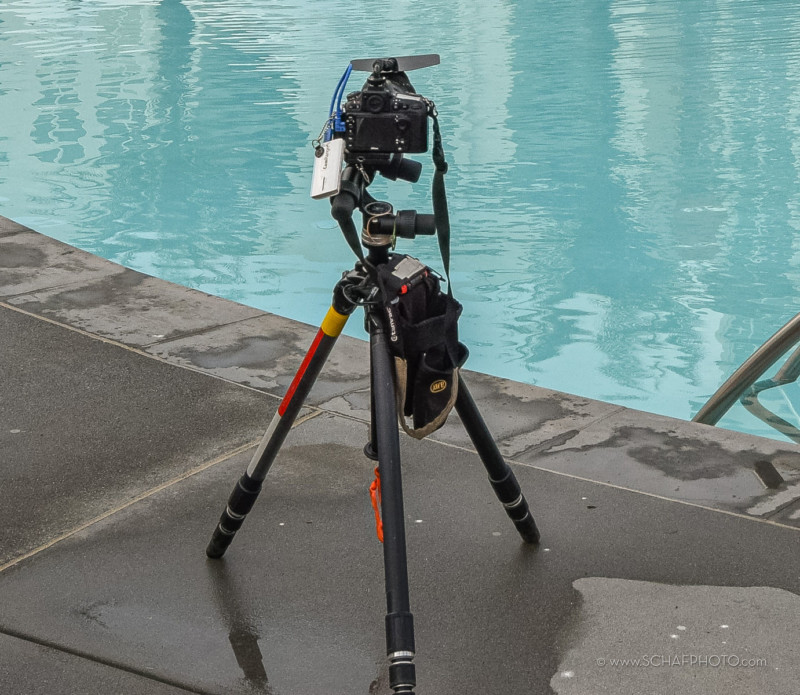
3:45. Partial clouds are blocking the sun and the whole scene looks lifeless and flat. I position my Nikon D800e with 16-35mm f/4 VR lens and settle on a final angle of view, focus, zoom, and aperture. (ISO 100, Aperture f/8, auto shutter speed, zoom to 28mm, Quality set to 14-bit Raw + Jpeg medium) I set up my Slik Professional-4 Tripod Legs with a Manfrotto 405 geared head, I like the Slik because it is VERY heavy and stable and can extend to 8+ feet high. In this case, I use the tripod unextended at about 3 feet high in order to make the pool look like a vast sea with a lower than usual camera position. The lens is tilted slightly upward to get a little headroom above the palms. The horizontal axis is leveled using the electronic level on the live view screen of the D800. I add a Heliopan high-transmission slim circular polarizer and shade the lens from above with a FlareDinkum Compact lens shade in the hot shoe of the camera in addition to the standard lens shade.
4:11. After making small adjustments of all the lounge chairs, we begin to carefully wet down the pool deck with two water hoses. (The rolled white towels were set earlier in the day for the daytime courtyard views).

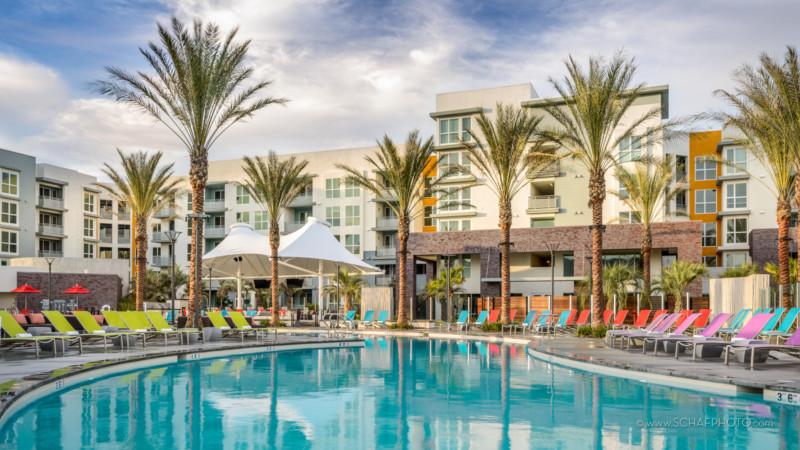
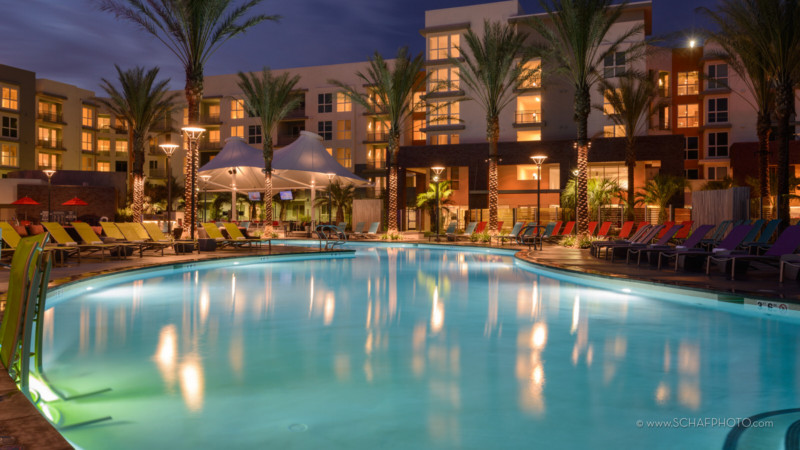
4:51. Just as we get the deck-wetting finished, the sun peeks through the clouds and shines directly on the building for about five minutes. Exposure 1/8 second @ f/8, with the high clouds against the clearing sky. I take a lucky shot that I was not planning on. I later replace the sky with an even better sky from 5:24PM.
4:30. I hang my CamRanger Wi-Fi dongle from a loop of wire fishing leader I have permanently attached to the left attachment point of the D800e. I plug a 12-inch right-angle USB 3 cable into the camera and boot up my iPad Mini Retina. I set the CamRanger intervalometer to take a single frame every 40 seconds and set the bracketing to three frames at +1, Normal, -1. I adjust the CamRanger camera settings to f/10 at aperture priority automatic. Focus set to manual, and vibration reduction is switched off. New batteries are put into the CamRanger and Nikon along with a freshly formatted CF card before all HERO captures.
4:45. We keep wetting the deck because it keeps drying. It gets chilly and I put on a jacket (it always gets chilly).
5:21. The exterior pole lights turn on. The pool lights are already on. We keep wetting the deck because it keeps drying.
5:23. We get the TV monitors in the tent canopy turned on at the last minute. We keep wetting the deck because it keeps drying.
5:50ish. The sun sets somewhere behind the buildings at camera left. We keep wetting the deck because it keeps drying.
5:54. The high pink clouds, lit from below, blow through the blue sky and give me a perfect “sky layer” for later replacement in Photoshop. Exposure 4 seconds @ f/10. I push the contrast and shadows in Lightroom to get the saturation I want in the sky-replacement layer.
5:58. I take a quickie snap on my iPhone and text it to the client. While my intern starts to coil the hoses and put unused equipment in the truck.
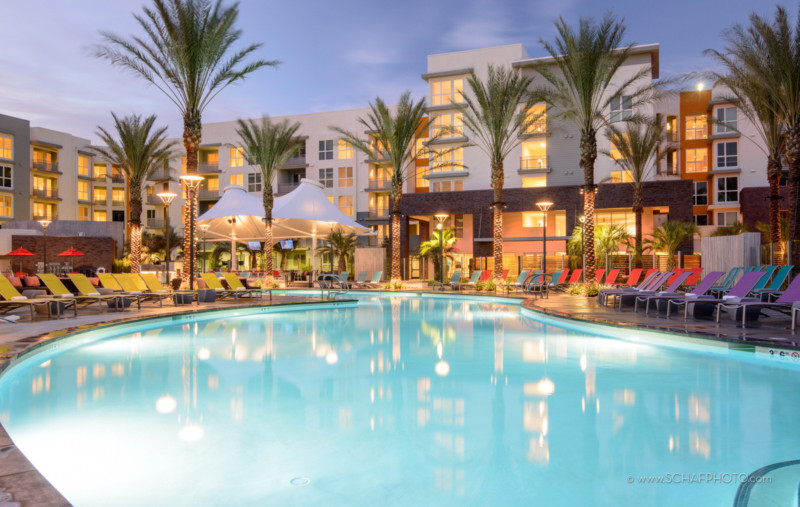
6:02. My intervalometer unceremoniously captures the HERO frame that becomes the master Photoshop layer for the building and courtyard with lights and glowing windows. Exposure 20 seconds @ f/10.
6:09. I dunk two chaise lounges in the pool to eliminate the blown-out highlight from the pool light on the left side. This creates a nasty green cast but mitigates the blown-out pool. This gives me an imperfect but usable pool layer for Photoshop. Exposure 30 seconds @ f/10. Most of the green cast is removed in Lightroom by adjusting saturation and color balance using radial filters.
6:16 to 6:55. I pull the chaise lounges out of the pool and my intern goes to turn off all the apartment lights and pull our cage-lights and lock the doors of each apartment. I put away the iPad and CamRanger and strike the main shot. While the lights go off one by one, I take some additional night photos of fountains and the tent canopy.
7:00. We strike tripods and cameras and the duffle bag o’ cage lights into the truck.
7:15. We go have pizza and beer, after another long day.
I won’t go into details about the Photoshop retouching on this photo, but the final HERO image is a rather straightforward blend of only three layers. A 5:54 Sky layer, a 6:02 Master building and lights layer, and a 6:09 Pool with chaise-blocked light layer.
I got a freebee daytime view at 4:51 which is why I always get the props set early and set the camera on intervalometer while we do other things, sometimes you get lucky.
You may notice some things in the video… I almost always wear a neon safety vest when I do my photography. It’s something I learned doing Historic American Buildings Survey photography. Besides making you look ‘official’ – the surveyor’s-type vest I wear has lots of useful pockets. I also wear Carhart double-knee work pants with a layer of neoprene wetsuit material shoved into the knee pad holders; since I always end up on my knees in a typical day of shooting (pool shots always seem to be low) it makes the constant kneeling bearable.
I have a contractor’s nail pouch permanently strapped on my tripod. It allows me to keep things on hand and is just big enough for the iPad Mini. I use a polarizer on EVERYTHING. I have never had an architectural photo that it did not improve in some way with a polarizer. The 16-35mm Nikon is a great lens. It’s very sharp (if you get a good copy) and it has quite a bit of distortion. Since 100% of the distortion is corrected automatically in Lightroom, it’s never been a problem for me.
The correction for verticals in this image was minus 6, and I doubt a shift lens would be better in this case. Besides no manufacturer making a modern 28mm shift lens. The 24mm Nikon PCE tilt-shift is an old design and not as sharp in the corners as my 16-35mm.
I no longer use the $8.00 Home Depot ‘cage lights’, because I stopped using CFL bulbs last year. The cages were necessary because the glass CFL bulbs would shatter in transit (and in use). I now just use simple $2.50 plug-sockets and $2.50 unbreakable LED plastic bulbs from Costco, (60 to 100-Watt equivalent, 3500 Kelvin preferred). Yes, I have about 50 single bulb LEDs in a big-wheeled duffle bag ‘o lights, five bucks each.
Now you know how I deploy the smallest, cheapest lights to illuminate huge buildings. I make a living, make my clients happy and make my subject (and myself) look like a HERO. In this case, we went back the next day with our $5 lights, to go up and down the elevators again, to do another HERO of the front driveway façade of the apartment complex from the median of a busy street … the client wanted two HEROs on this project, and they got their spread in a magazine.