How I Shot a Photo Series Based on The Twilight Zone
I had been itching to do a composite photo series for quite some time. It’s something I had never actually done up to this point, but I was and currently am a huge admirer of the art form. I’ve been following the great composite photographers like Dave Hill and Drew Lundquist for the past several years.
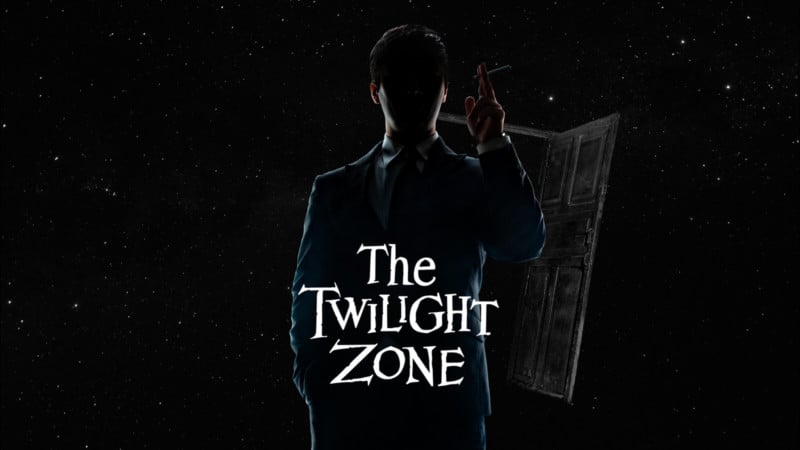
One night, I happened to be watching the “Eye of the Beholder” episode of The Twilight Zone and it hit me: I should craft a passion project around this beloved series. I could bring these iconic characters back to life in full color. The first thing I did was call my producing partner, Austin Sepulveda, and go-to make-up artist, Courtney Christina.
Preparation
It may sound backwards, but the budget and schedule wasn’t the first step of our preparation. After all, I had to know what I was going to shoot. The idea was to concept three thumbnails of my favorite episodes, but that soon inflated to twelve. What can I say?
Each of the thumbnails was a rough sketch done in Photoshop with stock photography and illustration. Anything to get the point across. You’ll see there was no plan to shoot “The Odyssey of Flight 33”. That happened after the fact with some extra photography.

From there, we decided that a manageable budget would be $275. The models would need to bring their own wardrobe, but a few would need specialty costumes. We also needed to buy or rent a few key props: the broken eyeglasses, the make-up mirror, etc. For the speciality props, we reached out to everyone that might give us a lead, hoping that their passion for Twilight Zone and sympathy for our low-budget would yield results. The talented prop fabricator Ryan Nagata lent us his Invaders Spaceman sculpture to use, and Bad Robot Productions allowed us to shoot their replica prop of the Mystic Seer.
We tried to collaborate with several SFX make-up artist for “Eye of the Beholder”, but nothing panned out. Instead, we resorted to gathering as many reference photos of pig masks as we could, then grafting them onto the face in Photoshop.
It was a huge benefit to have a producer on this project helping source items while I shot background plates. We were planning the entire project in our free time – the evening hours of the week. The great thing about photo shoots versus short films is that you can grab a background plate almost anywhere with relative ease. I shot at diners, airplane hangers, motels…
Most store owners were generous in allowing me to snap a quick plate. I asked friends for favors in getting me access to other locations, like the log cabin. The street plate in “Where Is Everybody?” is a shot from Universal Studios backlot metro set. I snapped it off the back of the tour tram.
Some backgrounds were impossible for me to shoot at the time, so I resorted to stock images. Because this is a passion project, I was able to purchase everything with personal-use licensing. I recommend sites like Unsplash and Photobash for high quality compositing assets like skies or atmosphere. I also used several other image packs from Photobash to build backgrounds, like their Eilat Desert and Abandoned Interior collections.
The next step was casting. Again, this was a shoe-string budget so I tried to cast as many friends and prior collaborators as possible. But everyone had to be right for the role. So for the few characters I couldn’t cast with people I knew, I turned to LACasting, where I found models who were willing to work for free since they were fans of the show.
Shoot
We cleared my entire apartment living room and set up a 9’ grey seamless for the shoot. Space was definitely limited, but we made it work. I shot with the following equipment.
- 2x Einstein E640
- D800
- PLM Umbrella
- PCB Large Octabox
- Elinchrom 39” Deep Octa
- Photek Softlighter
- PCB Beauty Dish

I used a Canon 5D Mark III and a 24-105mm L as my primary lens. I shot tethered into Capture One via my iMac 5K, which was a great to be able to check out lighting and composition before we moved on from each setup.

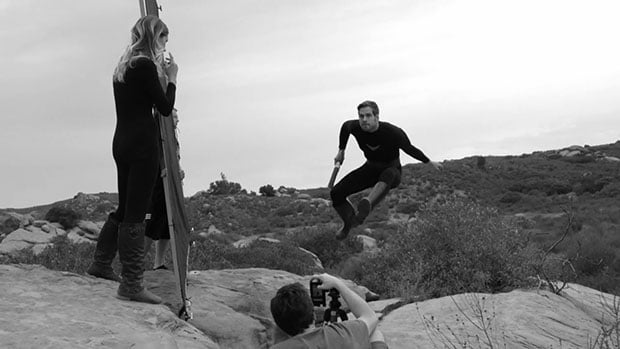
We had to move fast, with 40 unique lighting setups over the 2 days of shooting. When each model arrived, I’d pull up the thumbnail PSD and reference the scene’s light and color, adjusting my setup and camera position accordingly. I’d like to say I had all the setups and modifier choices planned ahead of time, but to be honest, any kind of forethought gave way to impulse on the day. You find a rhythm when you’re moving that fast, and certain techniques start to work well, so you repeat them. Here are the all the RAW shots. You can tell, I quickly found that the PLM Umbrella was a favorite for backlight.

Post Production
The first step of post production was wondering what the hell I got myself into. I couldn’t back out now, there were over 20 people who gave me their time for me and had high expectations of the final product. I started by throwing in my favorite shots to all the comp, forming rough blockings. All I could think of was how badly I had screwed this up. How I should have lit this person more like that. How I should have been slightly lower angle on this. How I should have only shot for one image and not twelve…
But all this is normal.
I don’t think I have ever done a composite where I thought it was pure gold from the very beginning to the very end. Most of the time, 99% of my energy is spent trying to “salvage” the piece. I find it easiest to separate the photographer from the compositor. I can’t shame myself for not getting everything right during the shoot. That’s what learning is for. I need to be proactive and find creative solutions. You’ll see some of my early WIP (work in progress) thumbs are very different from the final image.

But after a few rounds of moving people around, swapping out backgrounds, re-scaling, I finally found most of the composites in a good place. Now it was time to actually build these things…
I always shoot RAW. I try to be as non-destructive as possible. So I bring in my photography as smart objects layers from camera RAW. You can do this by holding SHIFT when in camera RAW. That will turn “open image” into “open object”, which gives you the ability to go back into camera RAW and re-adjust the original photo as you develop the composite.

I usually paint highlights and shadows with curves, but if they need to be somewhat extreme in value range, I can easily kick out another exposure of the model in camera RAW to paint in. I did this on “The Invaders” composite of the woman. She is a painted blend of about three exposures, since I made her rim-lights a bit too hot during the shoot.
You generally won’t want to refine a mask until the composite is locked in. I’ve been burned before, wasting too much time hand-masking a model then realizing down the line I wanted to use another shot. But once you are ready, once you have settled on a composition and selected shots, go for it. I prefer to hand mask with a Wacom tablet, usually a smaller, softer brush that I paint around the perimeter of the subject. I find this gives the most control – I can feather more for out-of-focus areas, for instance. For most hair, I’ll mask with a very soft brush and then paint back in a realistic hair pattern.

Now comes the actual compositing. Grading, blending, more grading, more blending… I use smoke and atmosphere A LOT to help shape the scene. It’s a personal preference, I really enjoy a smokey, moody piece.

I’m constantly re-coloring and matching all my assets to bring the scene closer together and become more of a realistic image. I frequently toggle a black and white adjustment layer over top the entire composite to check value levels. It’s also a good way to keep your eyes fresh.
After letting the project sit for a few weeks, I came back for the final touches. This is where I added some last-minute glows that help unite the foreground and background elements. I also happened to redo an entire composite at this stage, “The Odyssey of Flight 33”. The original composite was never working for me, and this new version was crafted around another shot of the model. I also realized the hair for Rod Serling wasn’t working at all. I failed to position that model correctly, and the top of his head was completely milked by the back light. So I shot my own hair as a replacement the morning before I published the series.

The Finished Photo Series
Here are the finished images along with some behind-the-scenes animated GIFs showing how they were constructed:
Odyssey of Flight 33

The Invaders

Nick of Time

The Lonely
Will the Real Martian Please Stand Up

The Trade Ins

A World of His Own

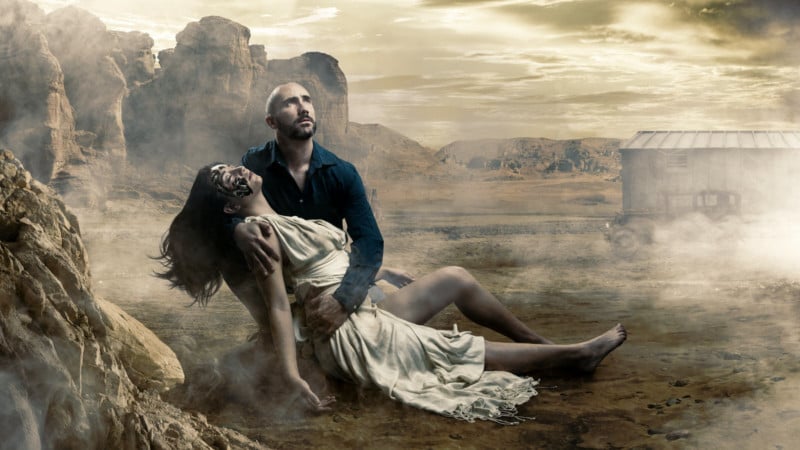
Eye of the Beholder

Nightmare at 20000 Feet

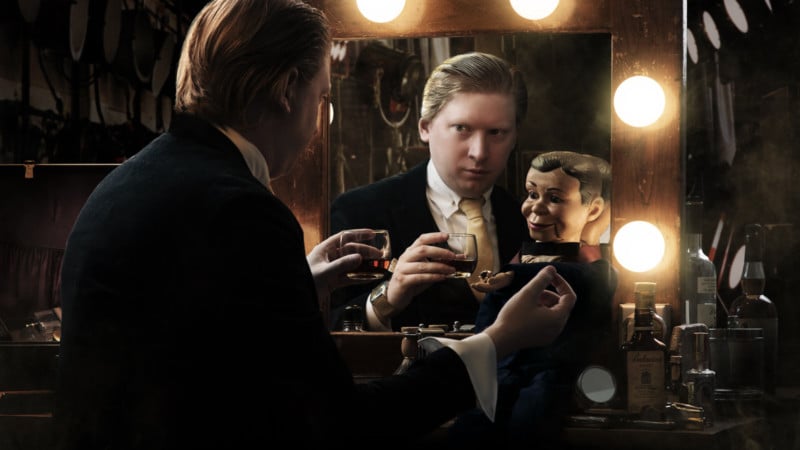
The Dummy
Time Enough at Last

Where is Everybody

Summary
Every project could theoretically go on forever. There are always more tweaks to be made, more details to address, more feedback to consider, etcetera, etcetera… But at some point, you just have to let go. I decided that after six months, I had invested enough time into this project and was satisfied with the results – they were ready to be shared with the outside world. Of course, even after a few days, I’m already seeing small things that I would change or fix. But it’s counterproductive to dwell on it. Instead, I’m considering everything I learned on this project and thinking about the next one.
What would I do different? A few things come to mind. First, I would avoid the dreaded phrase: “I’ll fix that in Photoshop.” Never have I been so frustrated with the naïveté of my past self. There were many occurrences of this – we couldn’t get the hair just right, someone didn’t shave, I didn’t have a microphone to the dictaphone, so on and so forth. But of these necessary fixes added hours to my post production time and, I would argue, never came close to the quality I would have achieved if I had just taken a little extra time to make the fix practically on set.
I would also focus on fewer composites. I may have spread myself too thin on this series, only because of my passion for the source material. But I can’t help but think – if there were only three composites to focus on, maybe I would have been able to dive deeper on each image.
I must admit, finally, that I was not sure I could pull this off. Like I said, to do a series like this was an abstracted idea in my head for so long, I was scared of what it would mean to actually execute it. What if I failed? What if it was more detrimental to my creative endeavors than helpful? What if it’s a waste of time… what if I prove to myself that I’m not capable of this thing I’m dreaming to do… But I did it anyways. I would encourage anyone with a passion project in mind to do the same. Yes, my confidence sometimes wavered to the lowest of lows, but in the end, it gave me the highest of highs.
About the author: Michael Smiy is a photographer and film director based in Los Angeles. You can find more of his work on his website and Instagram.