An Introduction to Digital Infrared Photography

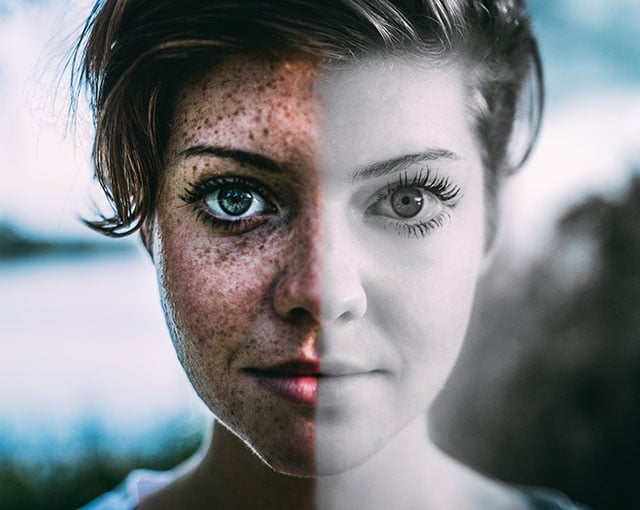
The human eye is incapable of seeing infrared light, so infrared photography is truly a way to show your audience something they can never see with their own eyes. Here’s a guide to getting started with digital infrared photography.
Prerequisites
Before you get too excited, there is a bit of a barrier to entry to digital infrared photography. First, you have to decide which method you’d like to pursue:
Camera Conversion
This is the most expensive route. It involves shipping your camera off to a specialty lab where they’ll take apart your sensor and modify it to only capture infrared light. I certainly wouldn’t recommend this method if you only have one camera. Most people interested in this method either have an older second body, or buy a cheap used one on eBay. The biggest name in infrared conversion is LifePixel. I didn’t go this route, so I can’t comment on their services.
![]()
IR Filter
This is the cheapest route, but won’t work for everyone. I went with the Hoya R-72 filter. It works just like any other screw-on filter and acts just like a thick ND filter. It, however, comes with 2 (potentially) huge drawbacks. First, some cameras have a built-in IR filter that blocks all IR light from reaching the sensor. For those people, you’re stuck. Conversion is your only choice. Google your camera model and see if anyone has tried to do IR with it. I got lucky. The Nikon D800 has no such filter, so I’m able to use the Hoya.
The second potential drawback of this method is that every picture will be a long exposure. On a typical day, you can expect exposure times of 30-120 seconds. Not everyone likes to take ultra long exposures. So if that’s not for you, conversion is your only choice.
Find a Lens
Not all lenses are good for infrared photography. There’s a lot of optics involved in why some lenses produce hotspots when shooting in IR and other don’t, but I won’t go into that here. All you need to know is whether you have a lens that will work or not. Kolari Vision maintains the best IR lens compatibility charts. When I first got interested in IR photography, I didn’t have any lenses that were on the “Good Performers” list, so I picked up a cheap 20mm on eBay. The lens was actually older than I am, but it still works fabulously!
Shooting Methodology
Still with me? Great. Since I went with the filtering method, for the purposes of this section, I’m going to assume you did too.
0) Set your camera to shoot RAW.
The amount of editing required for IR photographs mandates RAW. If you still shoot JPG, please, stop whatever you’re doing and go set your camera to RAW mode right now.
1) Find an interesting subject.
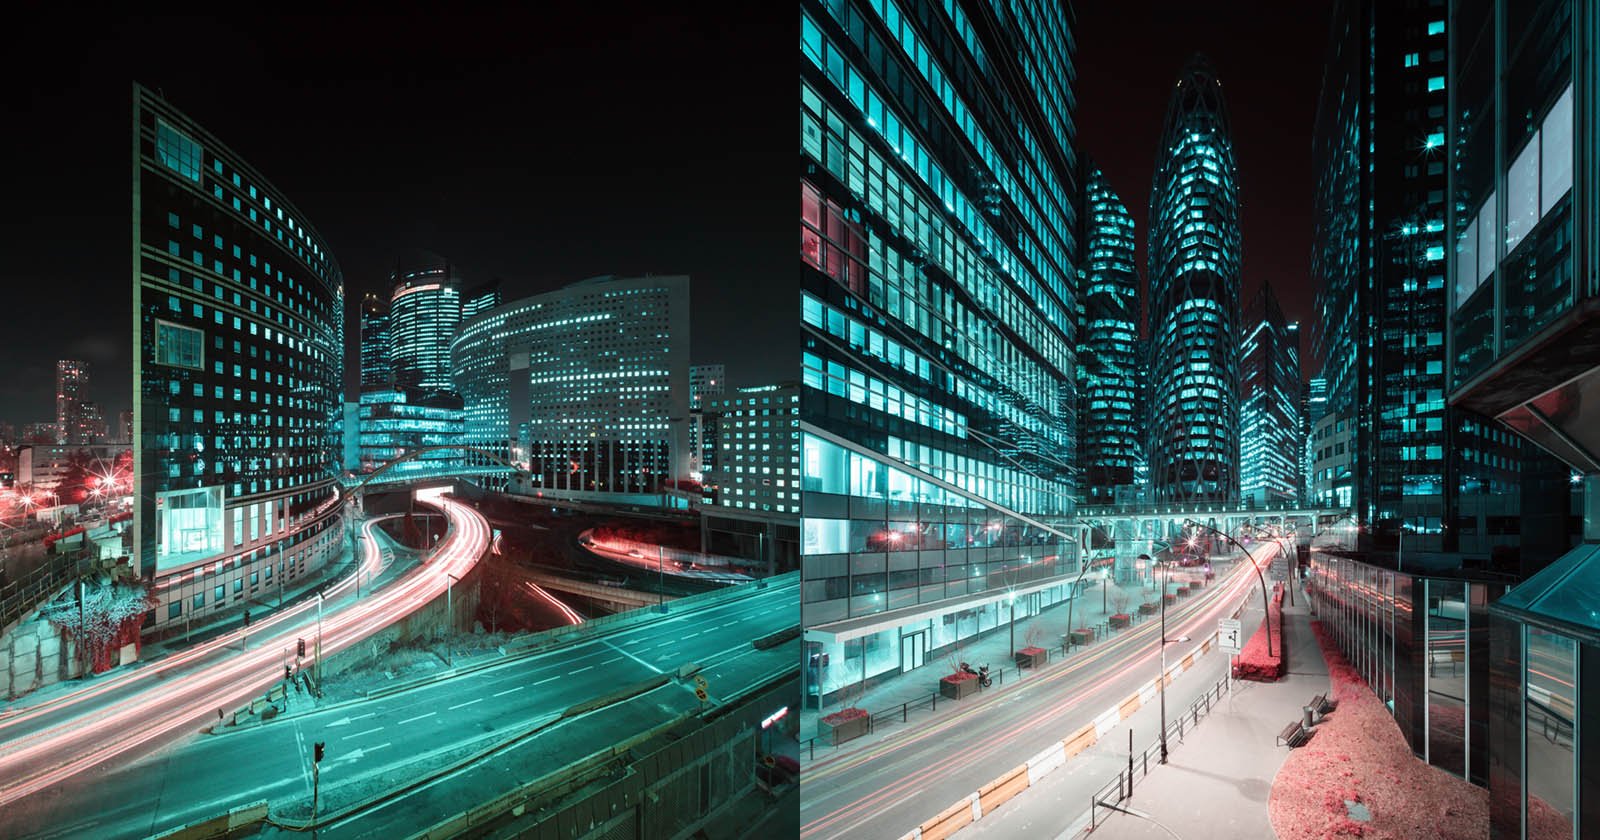
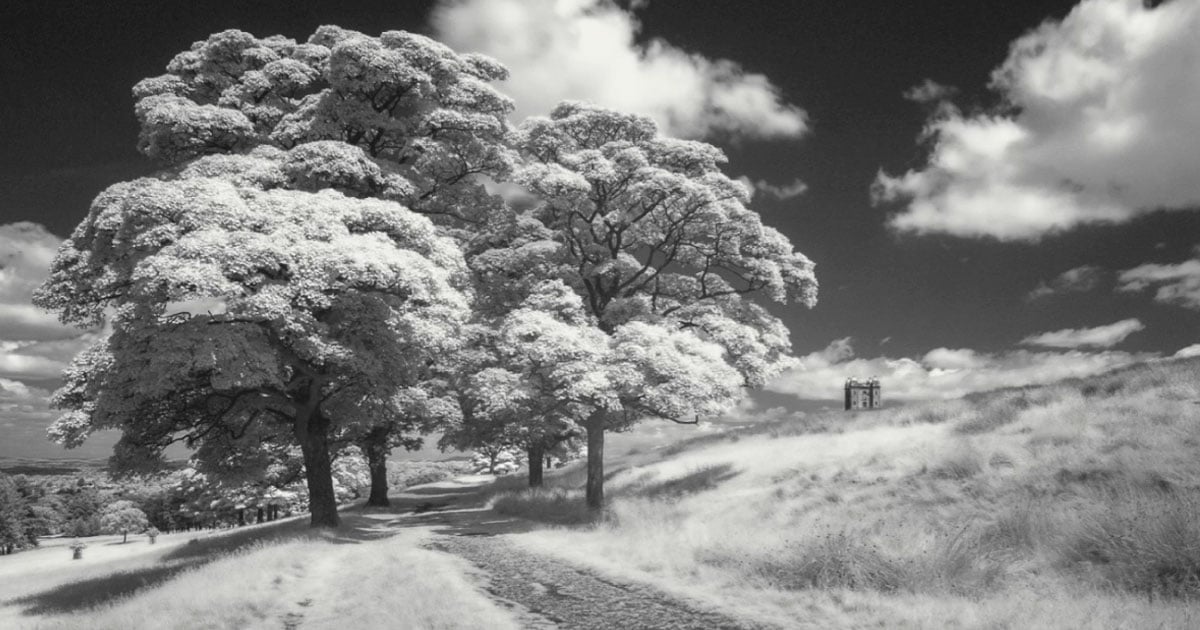
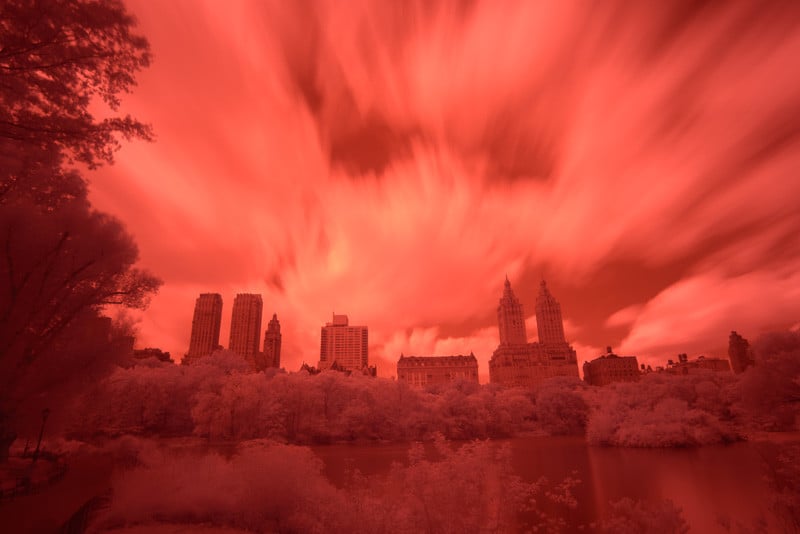
What makes IR photography really compelling is that vegetation reflects IR light. This means it’ll be a more prominent feature of your image than in a normal color photograph. You’ll also find the sky has been darkened. Seascape photography can also be quite compelling since water doesn’t reflect IR light well, leaving any churn bright, but the body of the water dark. Beyond that, all of the rules of composition and subject selection still apply.
2) Focus.
This is where things can get tricky (or not if you avoid the problem like I do). IR light has a longer wavelength than visible light, so it focuses at a different point. Older lenses have an IR focusing scale on them because infrared film was quite popular back in the day. Modern lenses generally exclude them since digital IR photography is such a small niche. To get around this problem, I choose my subjects such that I’m always focused at infinity and use a small aperture. When focused at infinity and around f/8 – f/11, everything comes out sharp.
3) Take a color exposure.
This step is entirely optional, but I like to so I can compare the results to the IR version later.
4) Install the filter.
Be careful not to bump the focus ring while installing the filter. You don’t want to know how many times I’ve knocked the lens out of focus trying to screw in a filter.
5) Cover your viewfinder.
IR leakage can still occur through the viewfinder and looks just as bad in an IR long exposure as it does in a color long exposure.
6) Dial in your exposure.
Utilize the High ISO test shot method to attain a proper exposure. Be sure to check for blown highlights (when part of your preview is blinking at you) and check your histogram. Make sure it’s as far to the right as possible without blowing your highlights. If you’re not sure you’ve gone as high as you can, bump your ISO up again to see if the highlights blow out. If they don’t, you’re good. If they do, just take it back down a notch.
7) Check your focus.
Zoom in to 100% on your test image and make sure your subject is in focus. The last thing you want to do is wait for a 2 minute long exposure to cook, just to find out you were slightly out of focus. If adjustments are needed, switch to live view, zoom to 100%, and work your focus from there.
8) Take the picture.
Set your ISO back down to its lowest native value, doubling your shutter speed for each stop. Take a deep breath, and actuate your shutter. Then find something to occupy yourself with for the next 30-120 seconds.
Note 1: Since you’re shooting RAW, you don’t need to worry about white balance. I leave my white balance in auto and adjust in post.
Note 2: You may or may not want to use Long Exposure Noise Reduction. The internet is full of lively debate over whether or not it should be used. I personally use it, but whether or not you should is a long discussion that I won’t get into here.
Note 3: Most cameras top out at 30 seconds when selecting a shutter speed. To go beyond that, you need a remote shutter release. Set your camera to bulb mode and set your remote shutter release for the desired shutter speed.
Post Processing in Photoshop (2-Channel Swap)
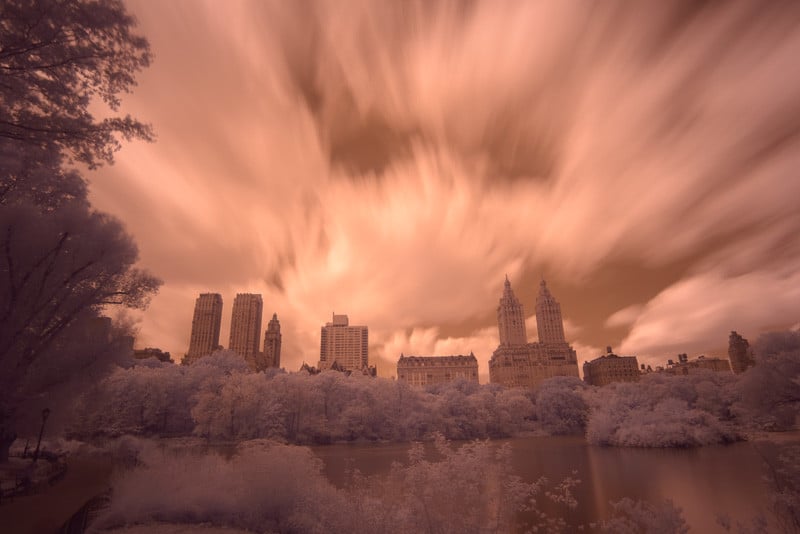
Infrared images straight out of the camera aren’t terribly exciting.
The first thing you need to do is adjust the white balance. Do this using the White Balance Selector (eye dropper next to the White Balance sliders). Select a spot of foliage. The result should look something like this:
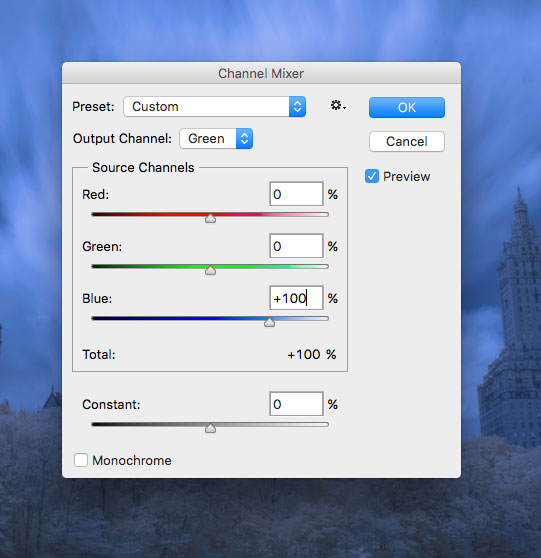
Next, import the image into Photoshop and swap the Red and Blue channels:
1) Open the Channel Mixer.
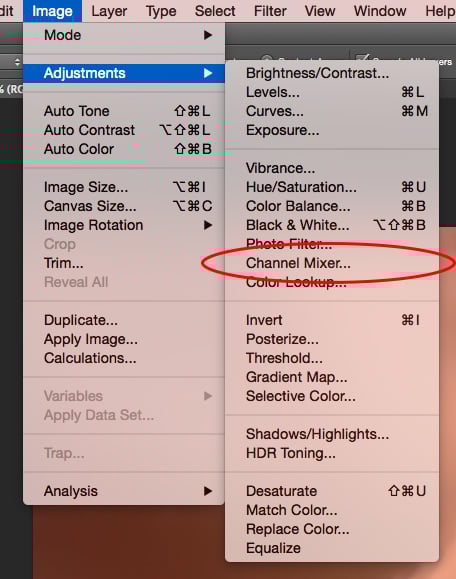
2) Swap the Red channel.

3) Swap the Blue Channel.

Note 1: Under no circumstances should you close the Channel Mixer prior to making both swaps.
Note 2: Doing a full 100% swap is just a starting point. Feel free to play around with the percentages to achieve different looks.
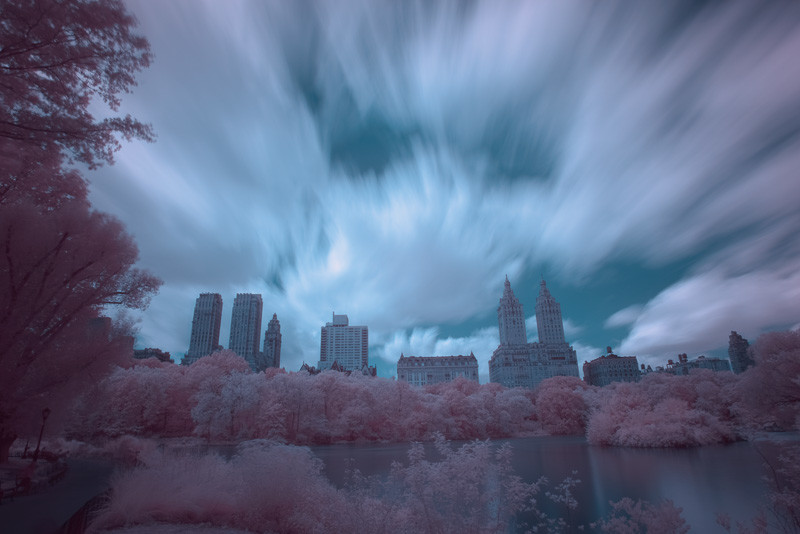
The final step is make any final adjustments you’d like to in Lightroom. Infrared images tend to be pretty low contrast, so the first thing you’ll probably want to do is set the black and white points to get a full range of contrast.
Here are the settings I went with for this image:
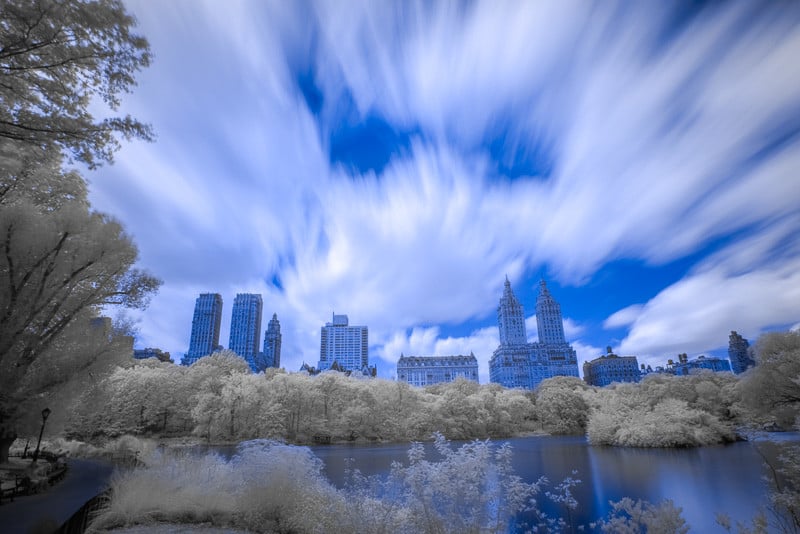
And, here’s the final image:
Post Processing in Photoshop (3-Channel Swap)
Lets assume for a second that you don’t like pink foliage. This is a perfectly fine opinion to have, so lets revisit the channel swap to get white foliage, but keep the blues.
Do the same red/blue swap describe above, but this time, swap the green channel as well.
Now the image looks like this:

Then, just like before, apply a little Lightroom magic … and, your final result looks a little more like this:
Post Processing in Lightroom
Channel swapping in Photoshop is relatively trivial. In Lightroom, it takes some doing, so hold on to your hats!
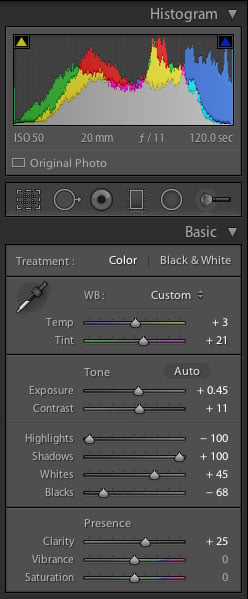
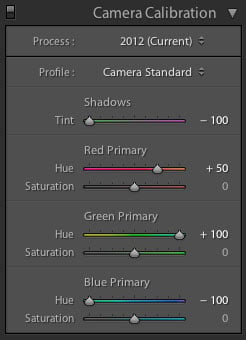
1) Adjust your Camera Calibration to match what you see below.
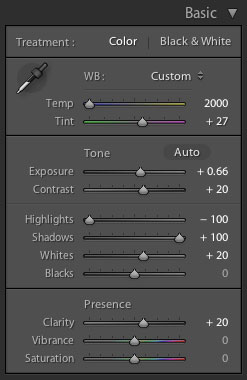
2) Adjust your Basic settings, paying special attention to the White Balance.
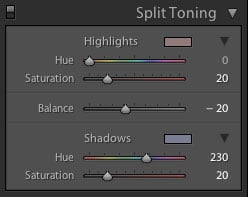
3) Adjust your Tone Curve. IR images are notoriously finicky when it comes to tonality, so don’t be surprised when your basic adjustments aren’t enough.
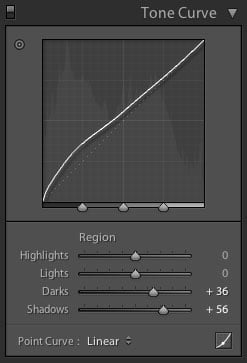
4) Find the color tones you’re really looking for in the Split Toning panel.
And, after all that, here’s the result:
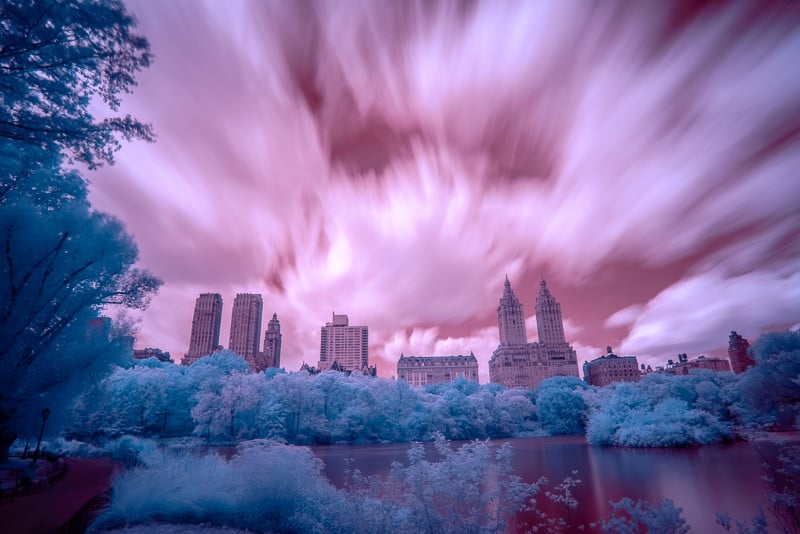
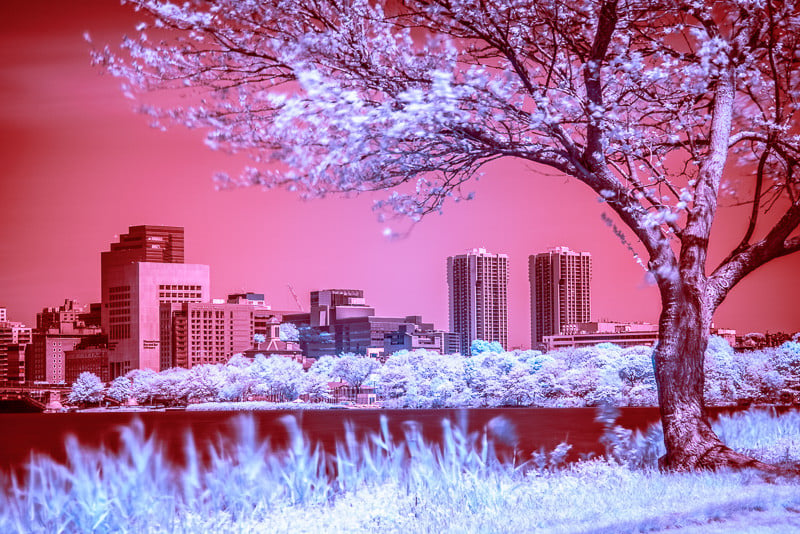
Ok, this one didn’t really come out the way I wanted it to. Here’s an image from Boston that worked better (processed with similar settings):
Note 1: When channel swapping in Photoshop, the sky is blue while the foliage is pink. When channel swapping in Lightroom, the sky in pink while the foliage is blue.
Note 2: The numbers above will absolutely not work in all situations. Expect to have to play around considerably to find settings that work for your image.
Post Processing (B&W)
Don’t forget, with infrared, black and white is always an option!
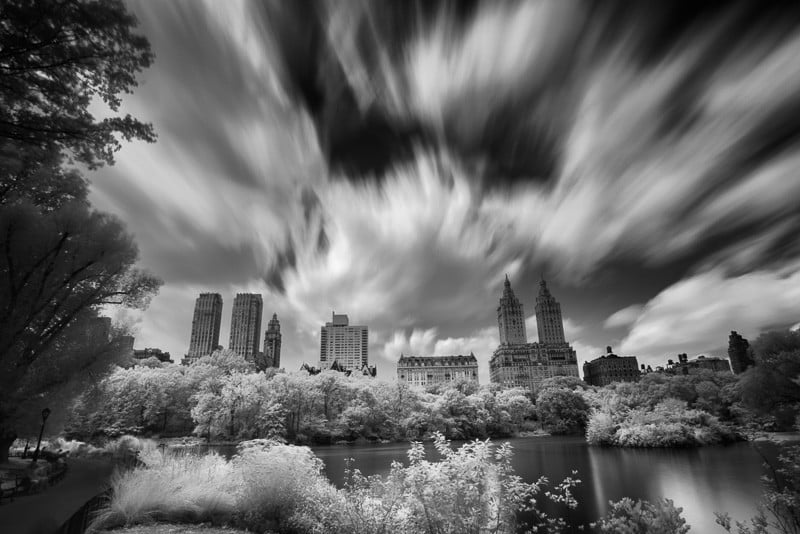
I did this edit in Color Efex Pro, but you can use whatever you like to do the black and white conversion.
About the author: Rick Battle has been photographing the American landscape since 2009. He gained international appeal through social media, amassing tens of thousands of followers. His evocative portraits of Earth’s beauty draw from his deep love of nature, while his vivid portrayals of the urban sprawl demonstrate his appreciation for the achievements of man. You can find more of his work on his website, Facebook, and Instagram. This article was also published here.