How to Photograph the Moon (Part 1)
Ever since I’ve owned a camera I’ve wanted to take photos of the night sky. When I first got a DSLR camera 5 or so years ago I thought getting decent shots wasn’t very likely with the inexpensive gear I had and it was something best left to the pros. It was only after I became comfortable with the manual mode on my camera that I realized that shooting at night was completely doable.
Taking night photos boils down to a single technique called long exposure photography. What that means, in the most basic terms, is you open your camera’s shutter and let the light pour in over a long period of time instead of the standard open and close it would normally do in auto mode.
The only skill prerequisite for long exposure photography is understanding the core concepts of the manual mode on your camera. This means being comfortable with the relationship between Shutter Speed, Aperture and ISO to achieve the best overall image (or exposure). Here is a link to help you get started.
Experimenting with long exposure has been one of the most fulfilling types of photography I’ve done to date and I wanted to write this blog post to share how I go about taking these types of photos. The goal is that it’ll inspire you to get outside and take some photos of your own. This post is going to be the first in a series that will progress through all the various types of night and astrophotography I’ve been obsessed with over the past year. It’s addicting, I’ll just warn you now.
The Moon
I’m going to start out with one of the easiest things to shoot in the night sky because it doesn’t require any extra equipment besides a DSLR camera and a lens with a long focal length (or zoom). If you want to take photos of a lunar eclipse or wider night landscape shots then things get slightly more challenging and I’ll get into that below.
What Equipment You’ll Need
DSLR Camera & Lens
Ideally you own or have access to a DSLR camera. If you don’t, you can buy used DSLR cameras on Craigslist for a very good price. I did a quick search and found Canon Rebel T2i/T3is for around $300-$400. Otherwise head to your local electronics store and buy yourself a new one for $500–1000 (or more).
As far as a lens goes, to get those nice close ups of the Moon I would recommend a lens that’s at least 200mm (referred to as a telephoto lens). You can always buy used lenses as well, but they are harder to find. I’ve read good things about the Tamron AF 70–300mm and it can be had for $380 brand new. Can’t beat that price!
Tripod
Since the Moon is quite bright you won’t require a tripod but it is handy if you want to guarantee a steady shot. If you want to take a photo of the lunar eclipse you will need a tripod because the brightness of the Moon is much much lower. Any tripod will do. I used a $40 one for years. You can get these almost anywhere cameras are sold.
Remote Shutter
This is only required when shooting a lunar eclipse or wide angle shots. When taking a long exposure, pressing down on the shutter can shake the camera leading to a blurry image. Using a remote stops this from happening. These are usually SUPER cheap on eBay or Amazon. I would suggest getting an intervalometer as they’re only a couple bucks more and you can do a whole heck of a lot more with them (hint: time-lapses!). If you don’t want to use a remote you can get away with using the camera’s timer.
My Setup
The equipment I’ve used has evolved over the years as I’ve purchased better and better equipment. My first DSLR was a Canon Rebel T2i with a 50mm lens on a $40 Futureshop tripod. Here is what I use currently to take photos of the Moon:
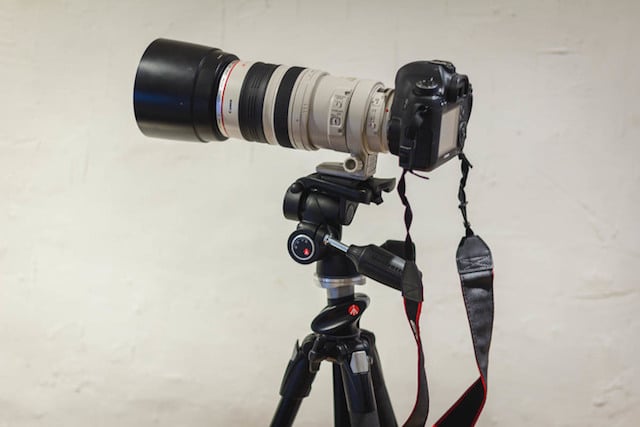
Canon 6D Body
Canon EF 100–400mm f/4.5–5.6L IS USM
Manfrotto 190XPROB with 804RC2 Basic Pan Tilt Head
I use my iPhone as a remote trigger since the 6D has Wifi built into it.
Prep Work
Moon Position & Phase
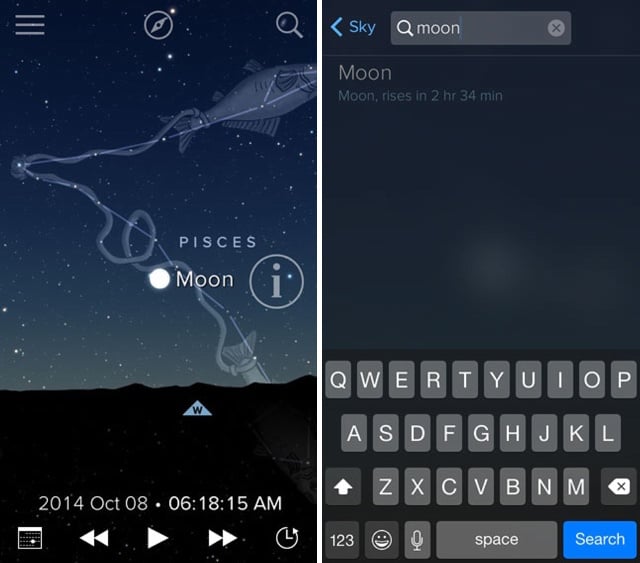
Unless you’re a seasoned astronomer you will need some help knowing when and where the Moon will be in the night sky as well as what phase it will be in. You can go outside and look for the Moon yourself or use an iPhone app like SkyView. It’s a virtual sky in your pocket. What I do is search for the Moon and the app shows me where it is in the sky and what phase it’s in.
If I want I can move forward in time by tapping the bottom of the screen to bring up the time controls. I can then see the Moon’s location and what it will look like on a given date and time. I can also jump to a date and time by clicking the calendar. This app, while incredibly fun to just tinker with, will let you build a plan around getting out and capturing what you hope to capture.
Weather
The next thing we need to check is the weather. The biggest nuisance about shooting anything in the sky is cloud cover. The simple approach is to go outside and have a peek to see what the cloud cover is like and if all is well then start snapping awa

y. However, if you’re hoping to capture a special event like a super moon or a lunar eclipse it’ll be helpful to know what the conditions will be like in the future. If it’s cloudy, then there is no sense getting yourself out of bed or driving a long distance.
An indispensable website when it comes to this is called Clear Dark Sky. They provide simple charts of astronomical forecasts for people hoping to capture images of the night sky. There are a lot of details on these charts, but the one you’re most concerned with when shooting the Moon is the top row; Cloud Cover. If you see a whole lot of white boxes around the time you want to shoot, then you might be out of luck. If you see dark blue boxes you are probably in good shape. In the example below, Wednesday afternoon is looking completely covered but things look to clear up nicely by 10pm (22 in army time).
Composition
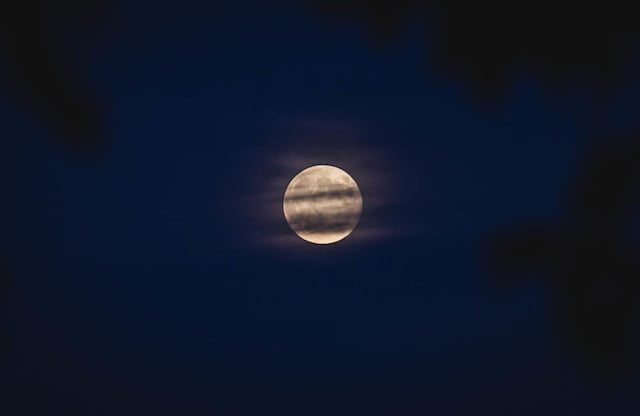
Overall, composition doesn’t really matter if you just want to take a portrait of the Moon. I usually just centre it in my frame and shoot away. You can make it interesting by adding some foreground elements like a tree or a barn. This would give the image a sense of depth, but these types of images are only really possible when you have an very large telephoto lens.
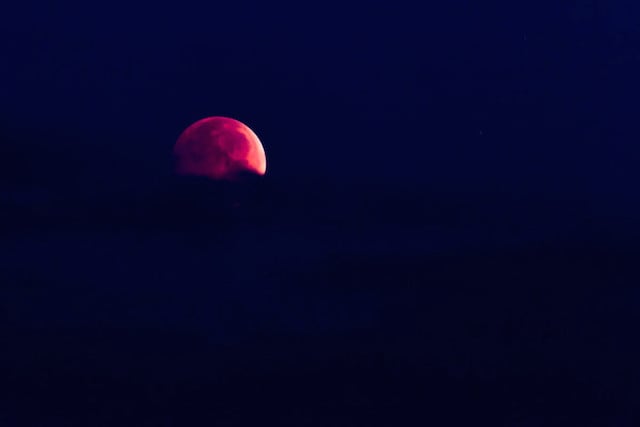
You could use a shorter focal length lens and crop it, but the resulting image can lack sharpness and appear noisy/grainy. What I like to do is try and get the Moon passing behind clouds. It adds a nice layer of depth. The first image here uses clouds for ambiance and a tree in the foreground for framing. The second just uses clouds.
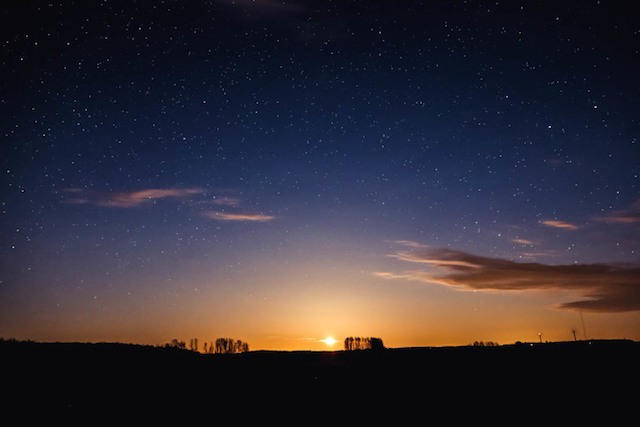
You don’t always have to get close ups either. Going for a wide field shot that includes the land is fun too. This shot below requires a little more skill as you need to have your camera’s shutter open for almost 15 seconds and you need to adjust the aperture and ISO to ensure you get a nice resulting exposure. Here is a shot of the Moon rising over a farmer’s field.
Shooting
Once you’re at the location and you have your camera mounted on the tripod there are a couple things you’re going to want to double check. First, make sure your camera is set to shoot in RAW instead of JPEG. This will allow you to be more selective with the light you want to enhance in post processing (more on this later).
Secondly, focusing can be a little tricky at night because the light coming into the camera lacks contrast. In most cases when shooting the Moon you won’t have a problem and you can auto focus away. In lower light situations you might not be able to auto focus at all. In those circumstance I usually switch to manual focus. To get a sharp focus, I’ll turn on the live view and then use the digital zoom option. It’s usually a magnifying glass on your camera. Consult your DSLRs manual to figure out how to do this on yours. Here are the buttons on the 6D:
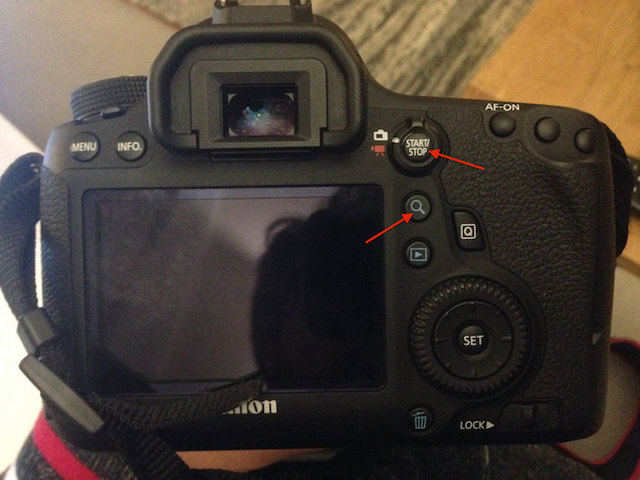
Once zoomed in, manually focus your camera using the focus ring on the lens. Use the live view display to bring The Moon into sharp focus. Once done, try not to touch the lens again. One last thing to keep in mind is that the Moon moves very quickly. You’ll have to frame your shots and take photos relatively quickly and manually track the Moon using your tripod adjustments. In addition to this, when zoomed in on the Moon, keep you shutter speeds less than 2 seconds otherwise it’ll start to blur.
Now you’re ready to shoot! Here are a few initial settings I try for different conditions.
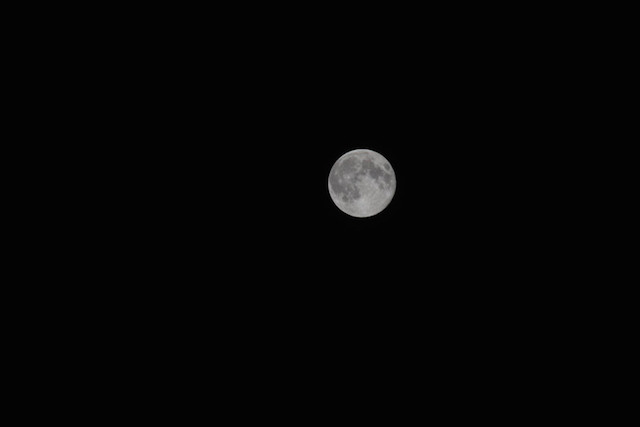
Normal Bright Moon
Aperture f/11
ISO 100
Shutter 1/20th – 1/50th second
Focal Length 400mm
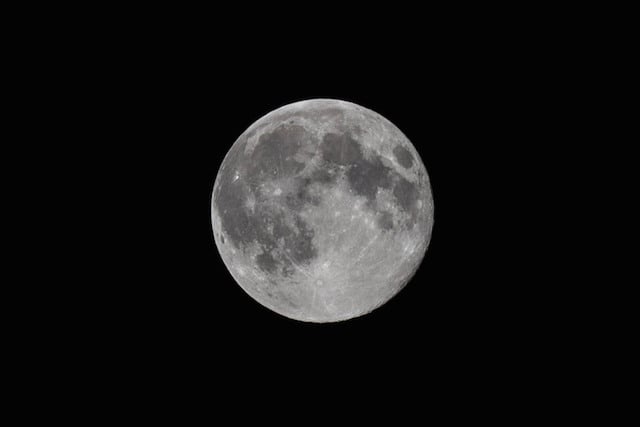
I usually start with the settings above and adjust based on what I see when I take the picture. One thing to keep in mind is that generally the higher your aperture the sharper your image will appear (here is the science). However you can’t go too high or else diffraction will start taking away from your sharpness. Consult the calculator found here (bottom of the page) to see what aperture will cause your image to deteriorate. Knowing all that, if your image is too bright, increase your aperture to f/11 or f/16 and keep the other settings the same. Here is an example of a very bright Moon that had some really nice sharp definition.
The image that appears on your camera won’t look like the above image. That image was heavily cropped and slightly touched up. Don’t get discouraged. Here is what you might see on your camera:
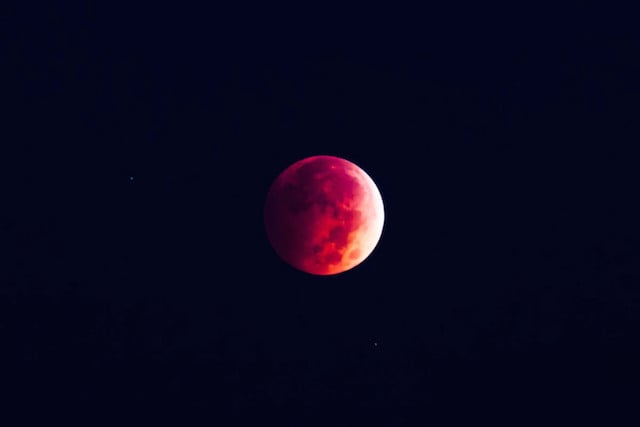
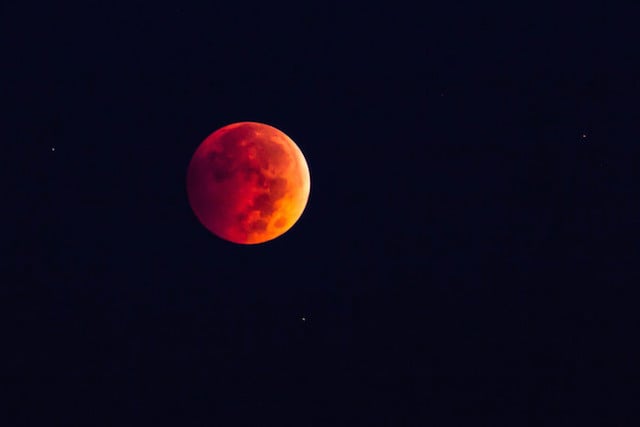
Lunar Eclipse
In the case where you want to shoot a dark moon, things change quite a bit. Since light is no longer in abundance you need to change the settings on your camera to try and get as much of it into your camera’s sensor as you can. In this case you want to drop your camera’s aperture down to its lowest f-stop or widest setting. This will let as much light in as the lens can. You’ll then need to increase your shutter speed to let more light in.
Lastly, you’ll probably need to increase your ISO setting to make your camera more sensitive. The trade off is these changes will result in a less sharp image that has more noise. A rule I like to follow is raise the ISO last. Adjust the aperture and shutter speed first and then if you still can’t get a decent exposure, raise your ISO setting. Here is a nice little blog post about noise.
Here are the settings I used for the most recent Lunar Eclipse:
Aperture f/6.3
Focal Length 400mm
Shutter 1.3 seconds
ISO 400
Wide Field
The big difference between shooting a lunar eclipse vs. a wide field shot is that you change from a telephoto lens to a wide angle lens; like the kit lens that comes with most entry level DSLRs, the 18–55mm. The other big difference is we want to let even more light into your camera sensor so the landscape and stars start to pop out in your image. This will cause the Moon to blow out (overexpose) but the results can be quite nice.
Play with your settings to find that right balance. When shooting landscapes, I like to use the shortest focal length I have available. If you have a kit lens, use the 18mm setting (or most zoomed out setting). You’re going to need to keep your aperture as low as you can meaning the lens aperture is wide open. For the shutter speed you’re going to set it to open for quite a lot longer than you have previously.
In most cases you won’t get a nice star field if you don’t use a shutter speed over 10–20 seconds. Why not go for 30 seconds? The reason for that is the Earth is moving and if you leave your shutter open for too long those stars will start to form trails. This might be a desired effect, but in this circumstance, we want to avoid star trails.
I’ll get into star trails more in Part 2 when I talk about shooting the Milky Way. Finally, in most cases you’re going to need to increase your ISO quite a bit as well; start at 800 and move to 1600 or 3200 if your exposure just isn’t working.
The shot above with the Moon rising in the field was taken with these settings:
Aperture f/4
Shutter 16 seconds
ISO 3200
Focal Length 24mm
Post Processing
Once you’ve taken the photos head back and review the images on your computer. When I first started taking photos I never processed them, ever. When I started into night photography I realized in most cases you will want to improve what you have coming off the camera. The main reason is that these long exposure images soak in every bit of light they can. You might not want all the light that was collected. This is where post processing shines. It allows you to minimize the light you don’t want and enhance the light you do want. Post processing is essential to creating mind blowing images and it’s up to the photographer to pull out those details in post. Some people go to extremes when it comes to post processing and I’m personally of the less is more mentality. I don’t like images that look fake, I just want to enhance what’s naturally there. However, there is no right or wrong in post processing. It’s up to the artist behind the camera to choose how they want the image to appear.
For post processing most photographers will use a combination of Adobe Photoshop and Adobe Lightroom. I personally use Lightroom for all my organization and image correction. I only load Photoshop when big changes need to be done. Photoshop is also very expensive and you can only get it as part of Adobe’s Creative Cloud, so you’ll be paying for it forever. My recommendation would be to pick up Lightroom 5 before Lightroom gets sucked into the Cloud. It’s a one time fee of $80 and an absolute must for any photographer.
Getting accustom to Lightroom and Photoshop is a whole other ball game and I would suggest just googling tutorials. Perhaps start with Adobe’s tutorials found here. Youtube also has countless videos on various ways to touch up your photos.
My quick and dirty processing looks like this:
- Enable lens correction to fix distortion and vignetting.
- Adjust exposure slightly to desired brightness/intensity.
- Increase the sharpness.
- Increase noise reduction (varies depending on how noisy the image is).
- Slightly desaturate the image.
- Adjust split tones and or saturation to enhance the colours that you want to shine.
Wrap Up
That wraps up the first part of the night / astrophotography series. I hope you found this helpful. Let me know in the comments if you have any questions or feedback. If you did find this helpful, please share it! You can also follow my work by liking my Facebook page here.
Happy Shooting.