Mirrorless Sports Photography: Capturing the Tour de France with the Sony a6000
I was under the spell of mirrorless ILCs from their birth in 2009 when Panasonic and Olympus literally tore up the rule book and started from scratch. Their debut models, the G1 and EP1, may have been a little rough around the edges, but I was immediately smitten: these were the future of cameras, at least as far as I was concerned.
At last an interchangeable lens camera with a sensor big enough to deliver high quality images, but a body small enough that I’d never leave it at home; the lens selection grew quickly and as for the full-time electronic composition, I embraced the positives, sold my full-frame DSLR and never looked back.
I admit I was an early adopter, but in the five years since then, Panasonic, Olympus, Sony, Fujifilm, Nikon and Samsung have refined the mirrorless concept to a point where almost all doubts have been eliminated. Almost all. The one thing they’ve struggled with is continuous AF. Sure, the Nikon 1 system performs well in this regard, but employs a small sensor and lenses with an inherently large depth of field. What I want is convincing continuous AF from a mirrorless camera with an APS-C sensor or larger. After months of testing, I think I found it with the Sony A6000.
Prior to the A6000 I’d been using a technique I first learnt with manual focus film cameras back in the day: simply pre-focus on an area where you knew the action would pass through, then fire-off as many shots as possible as the subject passed through it. If your motor drive was fast enough, you’d get a few shots in sharp focus, but they may miss the crucial moment: when the athlete looks up, comes into contact with the ball (or another player), falls or does something else newsworthy. Sods law would dictate the interesting thing would happen just behind or in front of the plane of focus, so even if you captured the moment, it would be blurred.
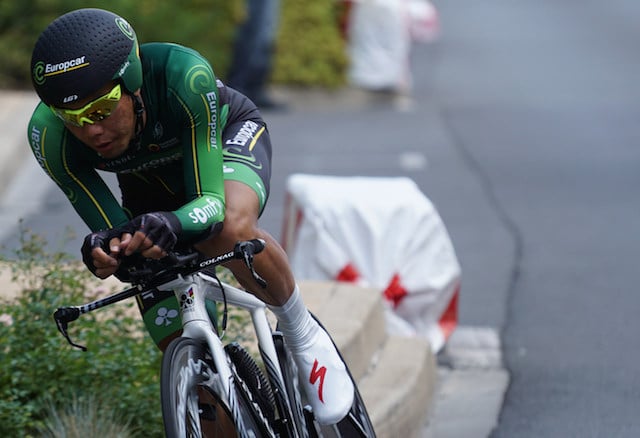
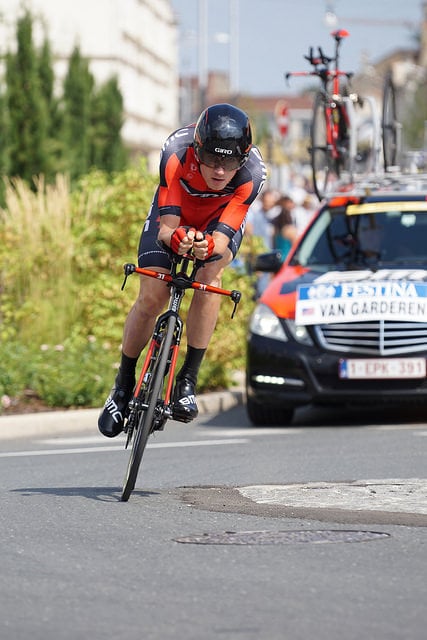
I’m a big fan of the Tour de France, so here’s a photo that illustrates the technique in practice from Stage 3 in London this year. I took it with my Olympus OMD EM1, a camera I love in most respects, except for its continuous AF capabilities. I fitted it here with a rented Canon EF 200mm f2.8L USM via a basic adapter which kept the aperture wide open (which I wanted anyway) and forced me to use manual focus (which I was going to anyway).
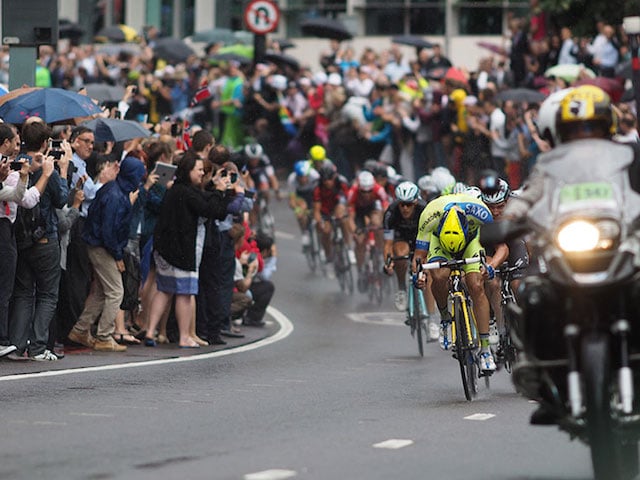
The built-in stabilization of the EM1 worked a treat with what became a 400mm equivalent lens, and its fast burst shooting meant I managed to capture a number of frames within the shallow range of the depth of field. So far so good, and as the peloton hurtled round the corner and I held the shutter release down, the composition was looking good. But just as the lead rider approached my preset plane of focus, he began to lower his head and one of the ever-present motorbikes began to drift into the field of view. And wouldn’t you know it? The sharpest image in the group has the leader looking straight down and the motorbike almost obscuring him. If only I had a system which could have refocused on the group as they first emerged I’d have had a great shot.
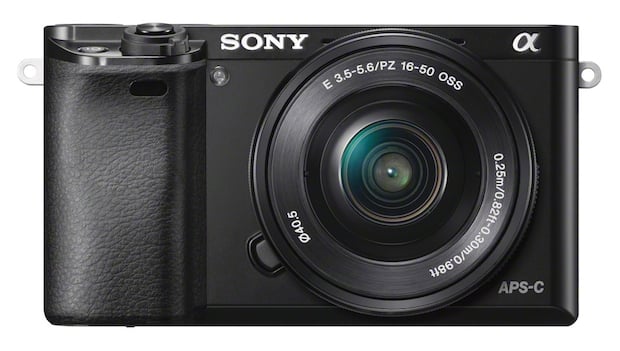
Of course as a camera reviewer I know exactly what type of camera would have done the trick: a semi-pro or pro DSLR would have nailed it with its viewfinder-based AF system, but I didn’t want to carry a 1Dx or D4, or even a 7D. They’re too big and heavy, and besides the technology geek in me always likes to push the envelope with new gear or try unusual solutions just to see what happens. After all dear reader, I’m trying this stuff out to let you know when it finally works as desired. That said, there’s nothing clever about manually focusing and praying while spraying, so with a trip to France for the remainder of the Tour approaching I had to find an alternative solution. As the camera needed to accompany me on a longer trip after the cycling, I decided to pack light and take a mirrorless camera I’d recently tested and found delivered promising continuous AF results: the Sony A6000.
But which lens? I’d initially tested the A6000 with the 16-50mm kit zoom, but of course needed something longer to reach the subjects. Sony recently released the FE 70-200mm f4G OSS, and I’d tried it briefly on the A6000 when Guy from UK rental firm Hireacamera paid a visit to Brighton with one in hand. We were both impressed with the performance when shooting cyclists peddling by on the sea front. But most of our subjects that day were simply folk out for a casual spin. I wondered if the A6000 was really up to the job of shooting pro cyclists racing through widely varying conditions at speeds which can reach over 70kph. In a leap of faith I ordered an FE 70-200mm to go with my A6000 and packed for France.
Dans le field
A few days later I’d driven to the Pyrenees in the South of France, ready for the last three mountain stages of the 2014 Tour. The great thing about the Tour de France is you can simply turn up at the roadside of one of the stages at the last minute and literally stand a meter from the best athletes racing past. No booking, no ticket, no barrier. As such it’s fair to say more than a few fans turn up, especially for the popular mountain stages, and if you want to bag a good spot before they close the road (to cars), you’ll need to arrive a while in advance.
How much in advance though is an unknown quantity until the day of the race. The local Gendarmes judge when to close the road based on how busy it’s already become. Three or four hours is normally safe on normal stages, but it can be much longer in the mountains. I’d ear-marked a good spot on an uphill corner (where the riders slow down a bit, making photography easier) and arrived at the intersection at 10:45am with the race not due to sail past until about 4pm. But to my dismay I was met with police barriers and the news the road had closed just 15 minutes earlier. I could still access the route beyond this point, but it was now all downhill to the finish line in the nearby village. Downhill finishes are very exciting, but with the riders reaching speeds over 70kph it would be a trial by fire for the A6000.
While I waited for the race, I set up the camera. Wanting some blur to separate the riders from the background, I opened the aperture to f4 in Aperture Priority and chose a sensitivity to deliver shutter speeds between 1/1000 and 1/4000 (depending on the weather) to freeze the action – it ended up being 200 ISO for most of the day. I then set the continuous speed to High and the quality to JPEG to ensure I’d never run out of buffer (or memory) when shooting potentially long and regular bursts. I have no need to shot sports in RAW.
After this it was a matter of experimenting with different AF area options on the many enthusiasts who ride the route before the race comes through. I’d had fun in Brighton with face detection, but when the subject is wearing a helmet and sunglasses, it’s out of the question. Wide Area mode also proved frustrating as it generally concentrated on something in the foreground before switching to an approaching rider – same for the zoned modes. Object tracking was an intriguing option in theory, but again the split second you have to respond to an approaching rider ruled it out for this particular sport. The problem with all of them is they just didn’t lock onto the rider when they emerged into the composition, and by the time they registered the desired subject, it was already on its way out of the frame. It all happened too fast.
In the absence of a multi-area AF system which could reliably track what I wanted for the duration it was in the frame, I reverted to a single AF area which I’d just have to manually place over the subject by eye. Again I experimented with different frame sizes and found the medium option proved the most effective at focusing on what I wanted and responding quickly. I was pleased to note it made no difference to the performance where I positioned this AF area on the frame, unlike DSLRs which of course can only track within the relatively small diamond area in the middle of the frame.
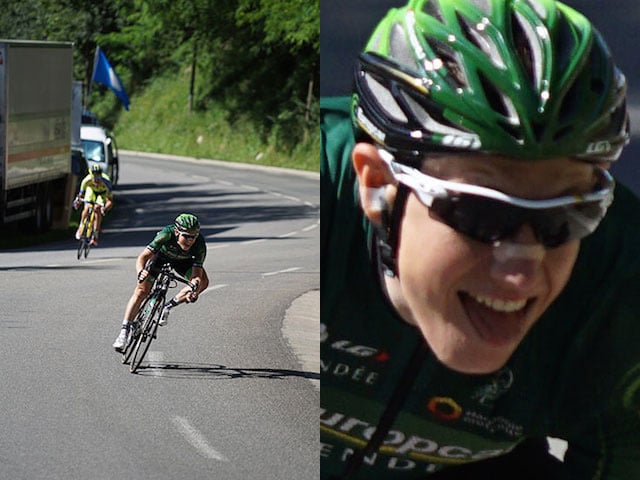
At last the leader of the day’s race came into view: Thomas Voeckler, being chased down by Michael Rogers, and I was taken aback at their speed. Until this day I’d concentrated on viewing Tour stages on uphill sections or, at worst, flats, but this was the first serious downhill and it was coming off a mountain. Later the commentators reckoned Voeckler and Rogers were going about 90kph. With the lens zoomed-into 200mm for an effective 300mm coverage, I was frustrated how hard it was to position the tiny fixed AF area over the leader, firing off bursts, some aimed correctly, others not. It was all over in a couple of seconds. Maybe if I’d locked an AF area to the subject the camera would have tracked it, but again it all happens so fast there’s no time to press anything other than the shutter release.
Then the rest followed in groups, some small, some large, but all terrifically fast. My AF area bounced all over the place due to my excitement and poor aim, but I managed to keep it positioned over the subjects for some of it and later was delighted to discover more than I thought were in sharp focus. Here’s one of the first pair, Voeckler and Rogers, and you can download it for a closer look; alongside I’ve presented a crop at 100%. Tommy’s face isn’t perfectly sharp at 100%, but his shirt is, which makes me wonder if the AF area was positioned lower on the subject, perhaps nearer the handlebars. But remember we’re talking about a 24 Megapixel image here, and if you zoom out a level it looks much better while still leaving plenty of pixels to play with – and again remember the speed they were travelling. But I wanted to get much closer to the riders with them filling more of the frame. That would come on day two.
Atop the mountain, Day Two
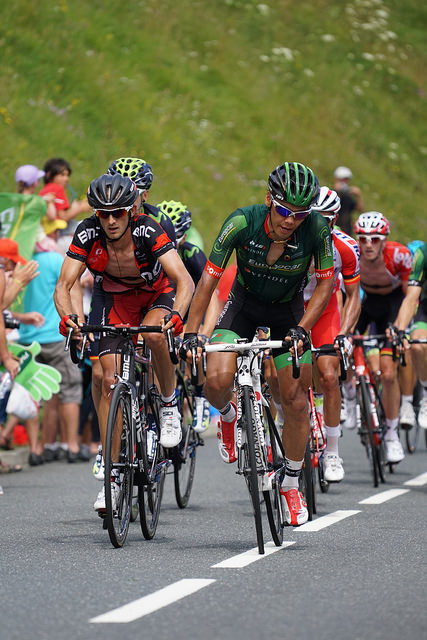
Stage 17 of the 2014 Tour de France was day two for me, and another in the mountains. I was staying in a ski resort near the peak of the Col du Peyresourde, where the Tour would pass over later that afternoon. As a popular mountain stage the main road was closed very early, but luckily I could drive along a connecting road and park only 50m walk from the top. I found myself a good spot by the side of the road about 10m from the very top of the uphill side and waited.
Day three: at the foot of the Tourmalet
Stage 18 of the Tour was my third in France and the last day in the Pyrenees. The race would climb the legendary Col du Tourmalet where the campervans had begun to gather over a week earlier. There was no chance to get to the top, nor indeed any way to get onto the route itself on the day, but again I found a good access road that connected to the mountain, parked-up and walked about 100m to the roadside.
This time I was looking at a shallower incline at the foot of the mountain, but a longer stretch where I could test the continuous AF over a decent distance. As with the day before though, the crowd would prove my biggest challenge with enthusiastic fans jumping out and waving enormous flags, completely blocking my view.
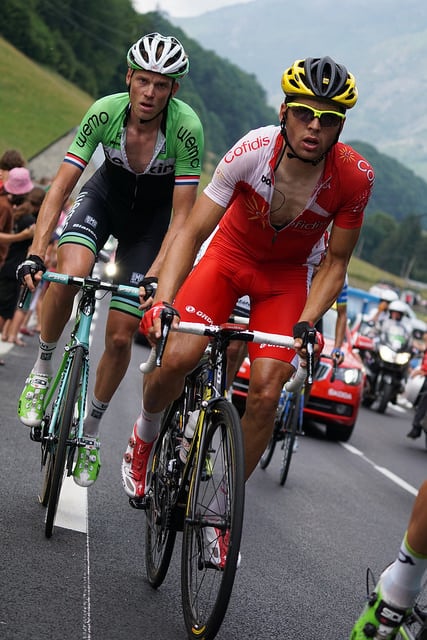
This did however allow me to test one of the key advantages that a native live view camera has over a DSLR. In the shot above it looks like I’m (foolishly) on the road, but I’m in fact safely on the side and just briefly holding my camera out. But rather than shooting blind, I had the screen angled out to face me. Of course you could always do this in Live View with a DSLR equipped with an articulated screen, but the Live View AF on all models (apart from perhaps the EOS 70D) would not be capable of tracking the action. So while I embarked on this as a technology experiment, this was a shot which truly exploited the benefits of the A6000 over a DSLR. I’m very happy with the results too as the riders were approaching quickly. Oh, and don’t worry, I’m not one of those nutters who gets in the way – the compressed perspective of the telephoto lens makes them look much closer than they actually were, and I whipped the camera out of the way in plenty of time.
Day four: doing it old school
Stage 19 of the 2014 Tour took a fairly uneventful route North out of the mountains towards the penultimate day in the Dordogne. With no hills to slow the riders, the best you can do on a stage like this is position yourself on a hairpin bend. Better still if it’s a hairpin bend in a small French town with some great cafes.
I found a good position on the inside of a corner, but it meant I wouldn’t get a clear view of the riders approaching head-on due to the crowds. Instead I’d get my first look at them when they were already at very close range, braking as they took the 90 degree bend. This would not be the stage for the A6000 with a big lens, so instead I reverted to my Olympus OMD EM1 with my Lumix 7-14mm at 14mm for a 28mm equivalent field of view and manually fixed the focus on a point halfway across the road. I then closed the aperture to a point where the depth of field would cover pretty much the entire width of the road, ensuring focusing would not be an issue wherever the riders went. All I had to do is choose a sufficiently fast shutter speed to freeze the action and fire-off bursts as they went past.
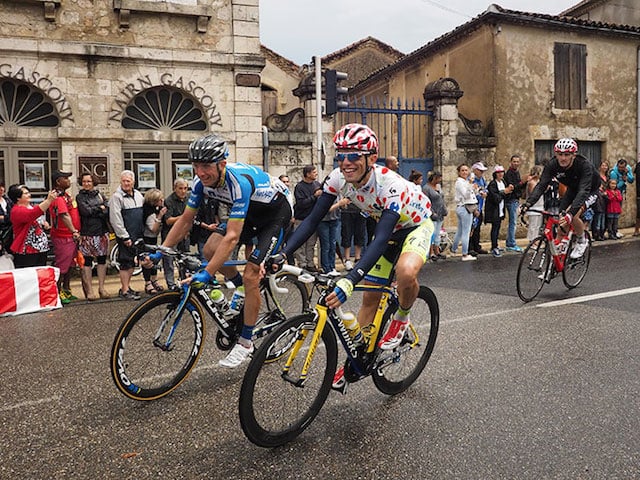
There’s very little to go wrong in this scenario. Everything’s in focus, there’ll be no motion blur and as you’re on the inside of a corner, the riders will slowly be turning to face you a little as they navigate the bend so you’ll get to see their expressions. I bagged plenty of good shots that day, and the wide lens gives a nice dramatic, almost 3D look compared to the flattened perspective of the long telephoto of the previous days. It’s nice to vary your approach like this to avoid coming back with a bunch of identical looking images.
Day five: The Time Trial
My final day at the 2014 Tour was the penultimate day of the race, and the only time trial of the entire event that year. In an individual time trial, the riders set off one at a time a few minutes apart, slowest first, fastest last. With typically 150 riders in the race, that adds up to several hours worth of action to photograph.
This is what makes a time trail so much fun to photograph. The problem with a normal stage is the riders generally race in a large group called the Peleton, with perhaps one or two smaller breakaway groups. In this instance, you have one chance per group to get your shot, and as they pass by so quickly, the pressure is on. But on a time trial, a rider sails past literally every couple of minutes over a course of several hours giving you plenty of chances to refine your technique, adjust settings, change equipment, even alter your location. Conveniently in the couple of minutes before the next rider you’ll have a good chance to ‘chimp’ your results to see how you’re getting on. I arrived about halfway through the event, but still with about 80 riders remaining. That’s 80 chances to get a good shot. I’ll happily take those odds.
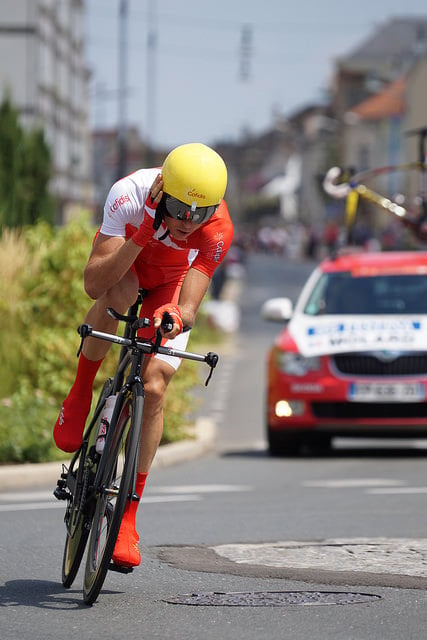
Indeed if you have a camera with good continuous AF, the time trial is a bit like shooting fish in a barrel. So long as you’re on the same side of the road as they are, you’ll get chance after chance of them cycling straight towards you for a lovely head-on composition. To eliminate any chance of them choosing a different side of the road, I normally position myself on the exit path of a sharp bend, or better still on the exit of a roundabout. Just think about geodesics and which route they’ll most likely take, and position yourself so they’ll approach you face-on. There’s also opportunities to crouch down and shoot wide with a fixed focus as they pass within a meter of you at terrifying speeds.
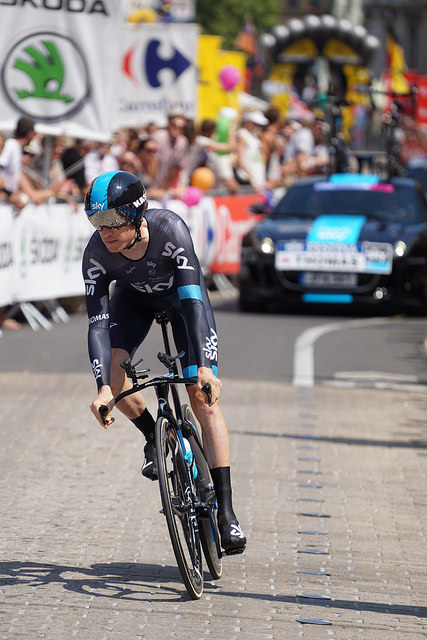
Here’s a shot from the start of the race, followed by a couple from my favourite position of the day, at the exit of a roundabout.
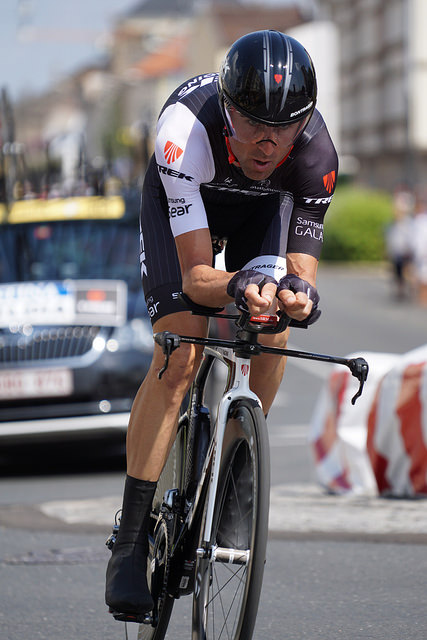
I photographed about 80 riders during the time trial, for bursts of 10-30 frames each. I varied my location, my angle to the action and the position of the AF area many times during the day, but enjoyed pretty consistent results throughout. To take a closer look at the A6000’s AF performance, I’ve picked the number five rider in the race, American Tejay Van Garderen, who let me assure you was not hanging around as he approached me on one of the first roundabouts of the course. Here’s one frame from the sequence.
I set the AF area to medium and positioned it just left of centre, allowing me to position Tejay a little to the side and away from the team car in many of the images. I zoomed the lens to the maximum 200mm, for a 300mm equivalent field of view with the crop sensor, and set the aperture to f4 in Aperture Priority.
At 200 ISO with +0.3 EV compensation, the camera metered 1/1600, but while handling the camera, the aperture was accidentally nudged closed a third of a stop to f4.5, reducing the shutter to 1/1250 for this sequence. It’s just fast enough to freeze the action, although in some other sequences on the day, motion blur was a small issue at times; this however was user-error as I should have used shutter priority or even manual with Auto ISO.
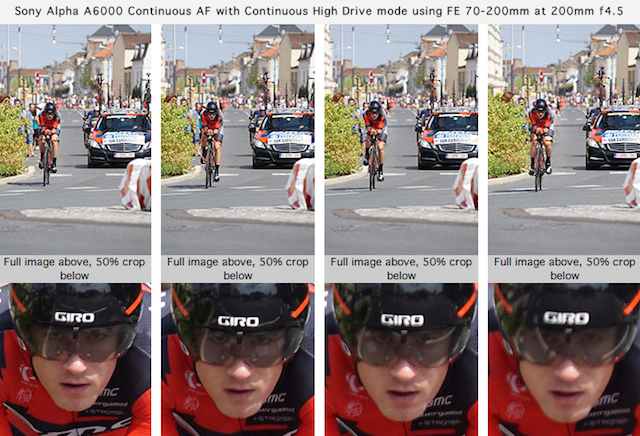
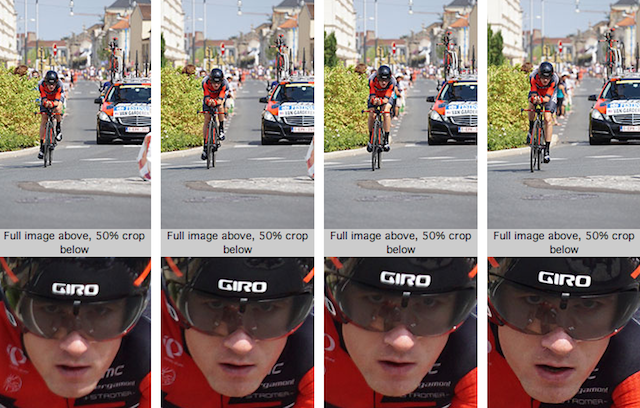
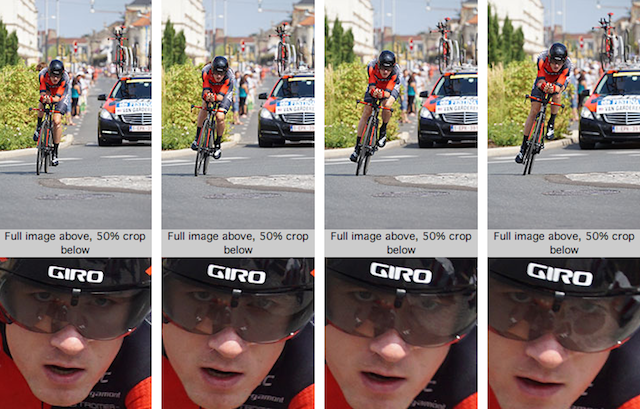
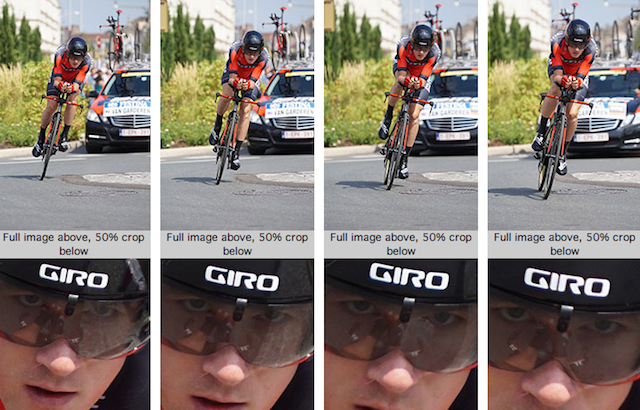
Above are 16 images from a burst of 20 representing about two seconds of action. For presentation here I’ve reduced the original images to show the complete frame, accompanied by a 50% crop of Teejay’s face; I initially prepared 100% crops, but with 24 Megapixels and the small tables here, the area was too small to be interesting. Having seen both 100% and 50% crops, I’m satisfied the latter are a fair representation of performance, and if you want a closer look, just head over to my sample images page where you’ll find several examples to download in their full glory.
Of the 16 images above, I’d rate 10 as essentially perfect and four as only fractionally-off, but still very respectable. This leaves just two which aren’t 100% sharp: frames three and four, interestingly near the start of the sequence, and of these, frame three is actually not that bad if used at a smaller size; even frame four is acceptable for online use. So over 87% were perfect or very good, which is a very decent hit-rate, especially for a camera of its price, regardless of the AF and composition technology.
What makes it even better is we’re talking about 87% at 10fps, which roughly translates into nine out of ten very usable images for every second of action. When shooting at slower speeds, say 3-5fps, it’s easy to miss a decisive moment even with the same hit-rate as you’re simply not getting as many usable frames per second. But with around nine good shots every second on the A6000 in this test, you’re not going to miss a thing. Even when the camera under-performed slightly, or I made an error, I was still getting over five perfect frames a second.
Ultimately that’s the wonderful thing about the A6000’s continuous AF: it’s coupled with burst shooting that’s so fast that even if half the images are out of focus, you’re still getting five good ones every second. And once again in my tests the camera generally delivered many more than that. Better still you can enjoy this AF tracking anywhere in the frame, not just within the central diamond pattern enforced by DSLRs. Plus, since it’s natively live view, you can also exploit an articulated screen to compose at unusual angles – you saw earlier how I composed with the camera held out, but I also used it during the time trial to compose over the heads of crowds, all while still shooting with uncompromised AF and burst performance.
It wasn’t all roses though: while the A6000’s continuous AF was almost faultless, the camera itself suffered from a number of ergonomic frustrations. First the viewfinder is fairly small and not as easy to look through when quickly brought to your eye in a spontaneous scenario. It would be much easier with the larger viewfinder image of higher-end models like the Olympus OMD EM1 or Fujifilm XT1, and you’d also benefit from an eye shield to block stray sunlight. The screen too is dim in outdoor conditions unless you set the brightness to Sunny and accept the subsequent battery consumption.
At this point it’s also worth noting that for all the A6000’s power, once you start shooting continuously, the screen and viewfinder show the last picture taken rather than an actual live image. This is a problem with all live view cameras at the moment and results in a slightly unnerving situation where you’re looking at what’s just happened, rather than what’s happening right now. That’s the great benefit of the optical viewfinder on a DSLR as the speed of light ensures that once the mirror falls back, you see what’s happening right that moment. But when you’re shooting at 10fps on the A6000, the delay is so small as to let you to make compositional adjustments and keep the subject where you want it – it just requires a bit of readjustment if you’re used to DSLRs.
Moving on, I’m not fond of Sony’s controls on the A6000, particularly using the rear wheel to adjust the aperture. It is possible to reassign a lot of controls, but the bottom line is I just don’t find it as tactile or intuitive as other systems.
Mirrorless Tour de France Verdict
I set out with fair expectations for the A6000 at a professional sporting event. Based on my tests so far I knew it should be okay when the action was a bit slower on the uphill sections, but I had little idea how it would fair on the faster flats and downhills.
That it delivered hundreds of technically good images over five days astounded me. Here was an affordable mid-range camera that consistently captured the best road cyclists in the World in a huge variety of conditions, even when they were hurtling towards me at speeds in excess of 80kph. Now I understand that’s not as fast as track cycling, nor anywhere near the same league as motor racing, and for those situations I can’t yet say how performs as I’ve simply not had a chance to try it.
But the fact it performed so confidently in the conditions I tested it opens it up to a wide variety of sports and events. It should handle pretty much any athletics, ball or court games, and of course your kids running around at any age. The FE 70-200mm f4G OSS is a great lens to pair it with for fairly close range action and I’d recommend it to any owner of the A6000 wanting a high quality telephoto zoom that’s also future-proofed for full-frame.
My earlier complaints about the viewfinder and controls are more criticisms of a mid-range system camera rather than the A6000 itself. In other systems they’re solved by higher-end models and I’ve no doubt there’s a camera positioned above the A6000 on the way. Indeed it’s testament to how well the camera performs in AF and burst shooting that I began to treat it as a semi-pro model and that’s where my expectations were unfairly raised. After all the A6000 is very firmly a mid-range model, costing roughly half that of semi-pro options and of course coming in a lot smaller and lighter.
Ultimately I embark on these projects more to test the technology more than anything else, but I came out of this one believing Sony’s finally resolved the one major issue remaining with mirrorless cameras: convincing continuous AF. I’d say the A6000’s continuous AF and continuous shooting are up there with the best semi-pro DSLRs and for the reasons noted earlier, I actually prefer the live view experience. Sure there’s the brief lag when composing, but being able to exploit an articulated screen or deploy face detection to track someone anywhere on the frame just opens up so many more ways of shooting. Don’t get me wrong, I’m not suggesting this is a 1Dx or D4 replacement, far from it, but it does deliver the best sports shooting experience I’ve tested for any mirrorless camera, not to mention any camera at all even at twice the price.
P.S. In mid-August, Sony announced its new upper entry-level mirrorless camera, the A5100, would share the same AF system as the A6000, bringing a degree of continuous autofocusing performance not yet seen at this low price point. The A5100 may not have a viewfinder, but it becomes your best bet if you want to shoot action on a budget. It’s so refreshing to see Sony deploy its best technologies on as many cameras as it can, rather than hold them back for certain models.
About the author: Gordon Laing is a photographer, foodie, traveller and Editor of Cameralabs, where he publishes some of the most in-depth reviews of gear you’ll find anywhere. He’s been into photography since childhood and written about imaging over a 22 year career in journalism. He’s currently based in Brighton, England, but takes any opportunity to travel and share his adventures on social media.
You can follow all of his photography, news and reviews on Cameralabs, Twitter, Facebook, Google+, or Instagram! And you can check out his full, in-depth Sony a6000 review by clicking here.