Blending Modes in Photoshop: A Comprehensive Guide
Photoshop can feel infinite. It’s a lot like a high-tech espresso machine or a sports car: you don’t have to use all of its features for it to be functional, but when you can, it’s a powerful tool.
If this already sounds complicated, don’t worry. It’s important to remember that you can use these as little or as much as you want, and there is almost always more than one way to do something in Photoshop. These are options, not requirements.
Table of Contents
What is a Blending Mode?
When you make a new layer in Photoshop, it has some sort of effect on the layers below it. For example, if you make a new layer with a brush stroke or a graphic, it likely covers up whatever’s below it. Blending modes change how layers’ pixels blend, and ultimately change how layers interact. It helps to think of them as interactions between the top (blend) layer and the bottom (base) layer.
How Do You Access Blending Modes in Photoshop?
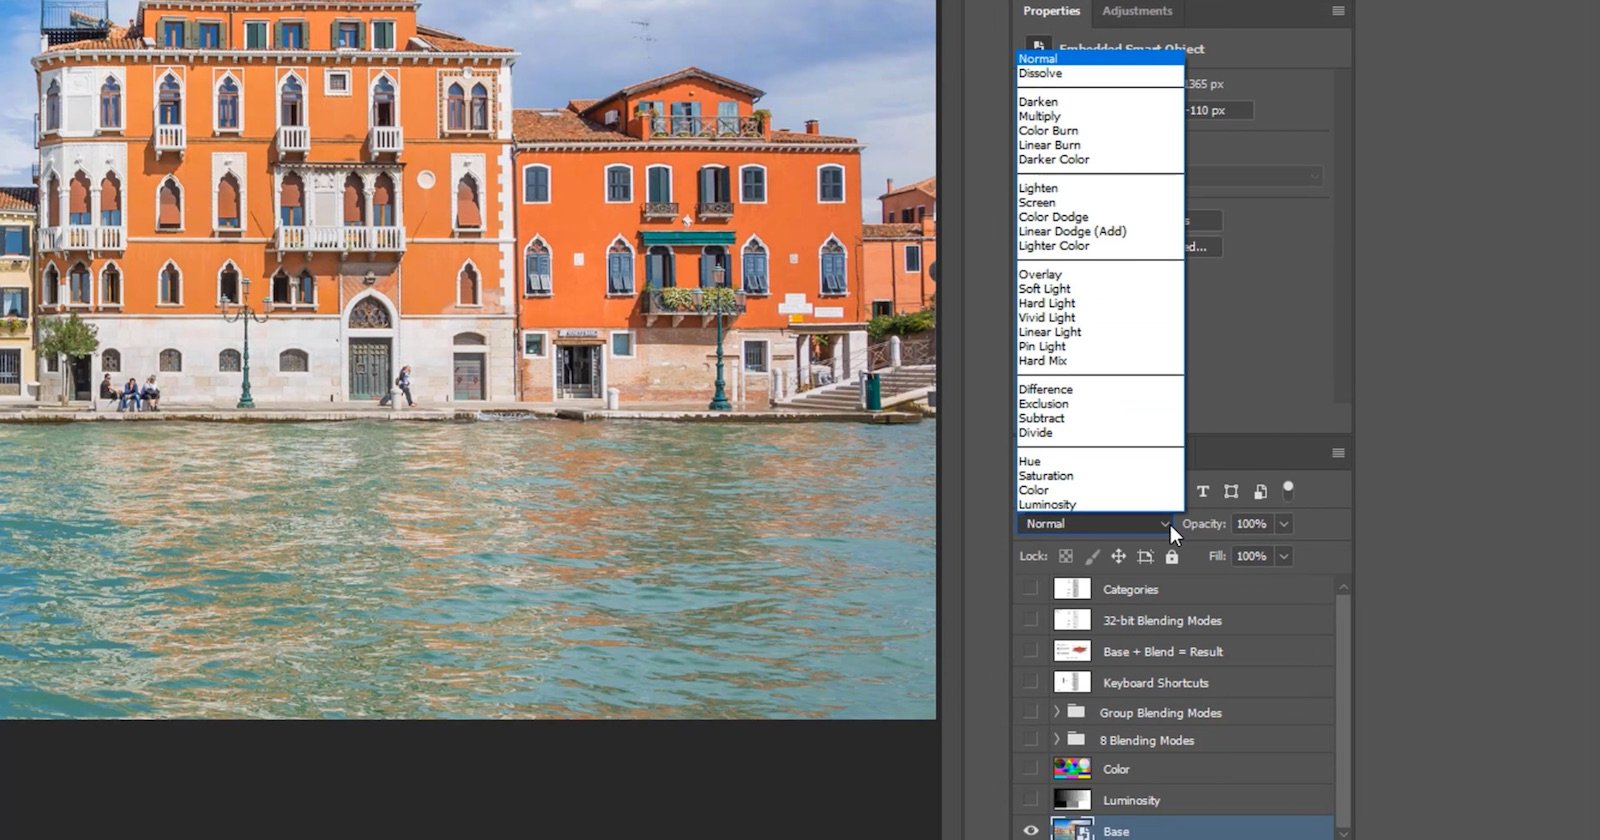
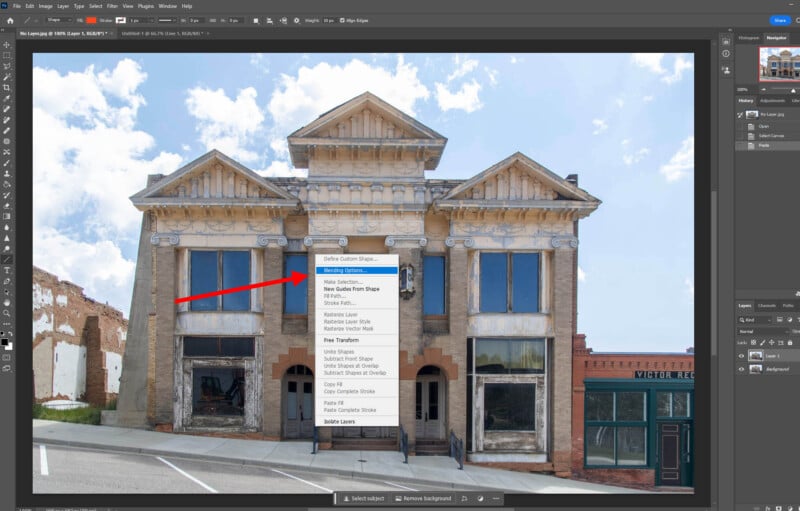
Blending modes are easily accessed by right-clicking on any layer in Photoshop and selecting “Blending Options.”
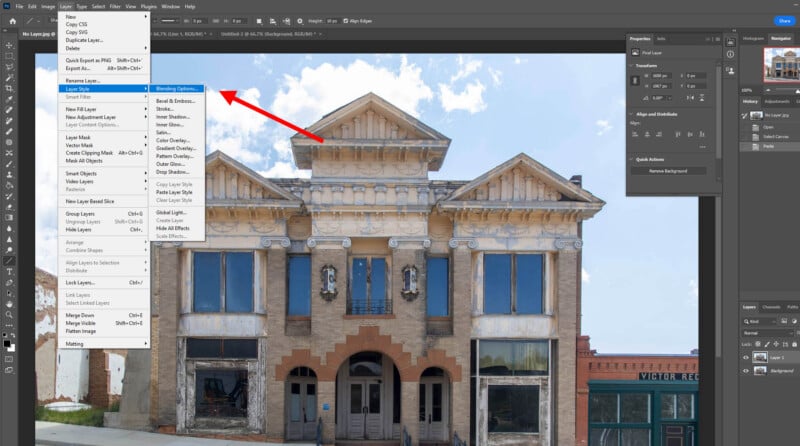
You can also click “Layer” at the top of your screen, select “Layer Style,” and “Blending Options.”
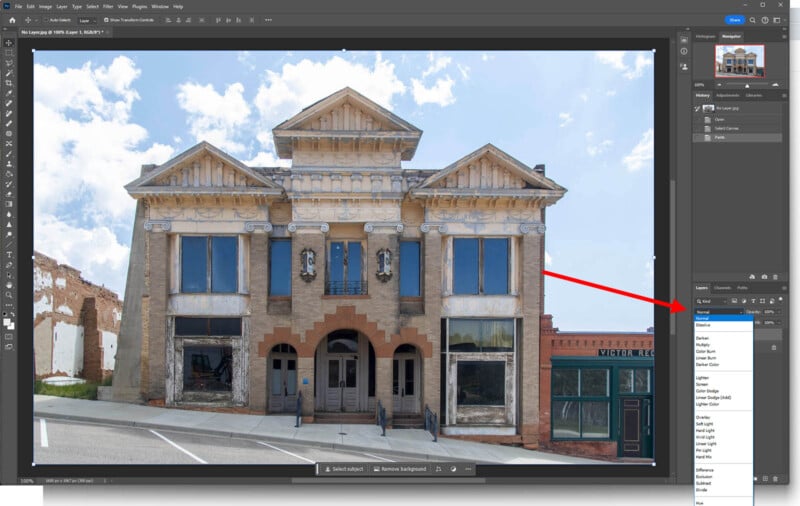
If your current workspace has it open, you can also find blending modes in the Layers panel.
If you are unable to click on some of the blending modes, convert your image to an 8-bit or 16-bit RGB Color image. This is done by clicking on “Image,” “Mode,” and changing your image to “RGB Color” with 8 or 16 bits per channel.
Every Photoshop Blend Mode Explained
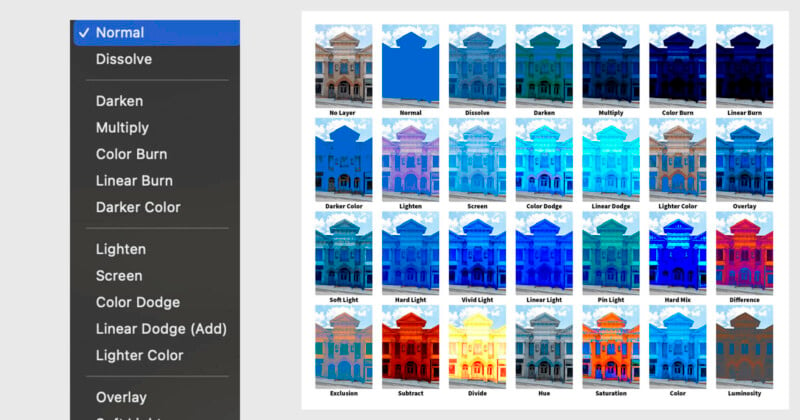
Conveniently, blending modes are organized into categories based on their basic functions. Photoshop doesn’t label the categories, but they’re separated by lines.
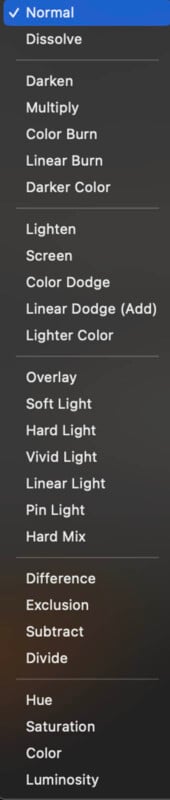
From top to bottom, the categories are Normal, Darken, Lighten, Contrast, Inversion, and Component. The following is what each mode does, with examples.
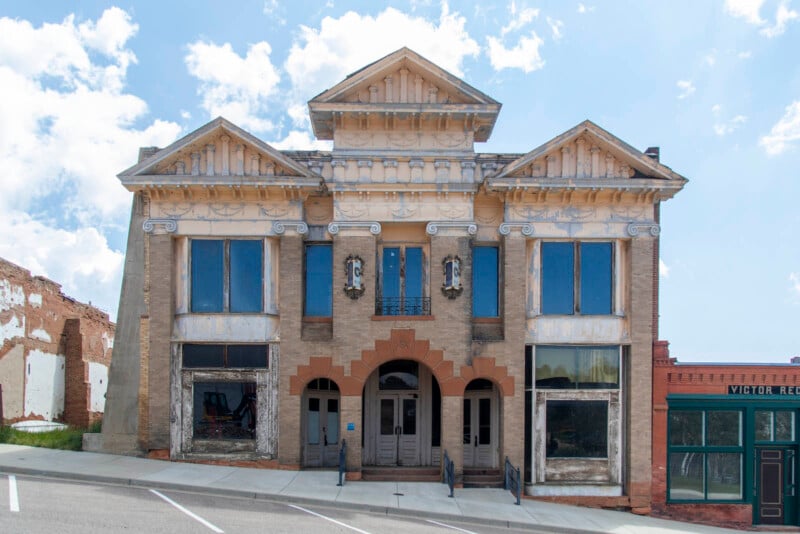
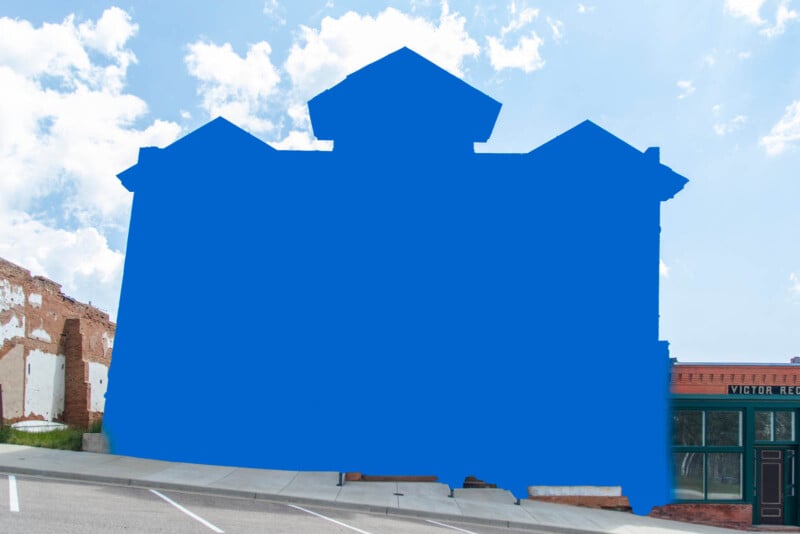
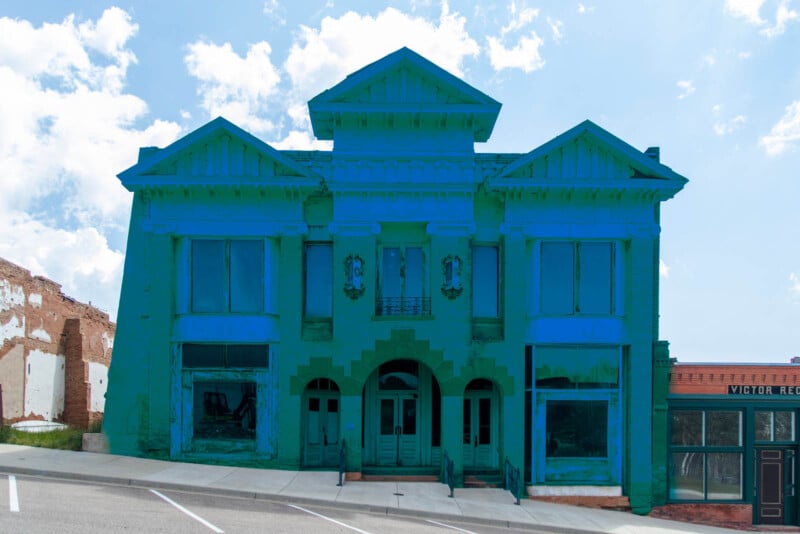
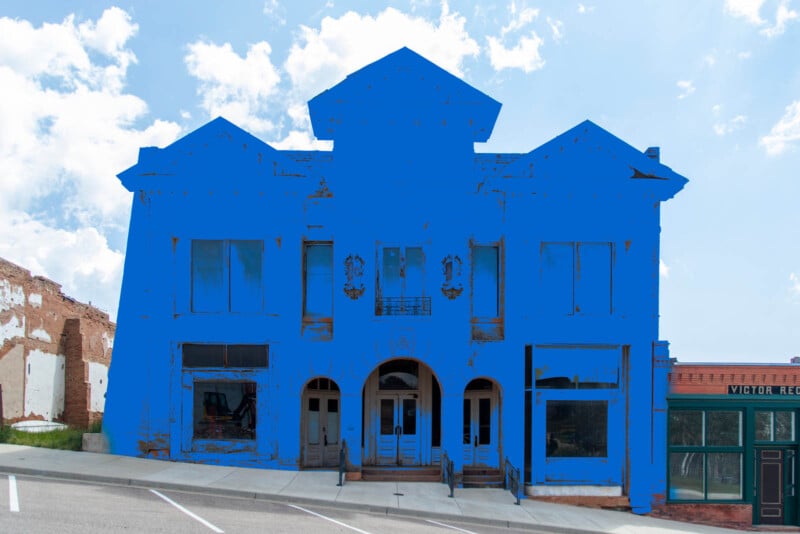
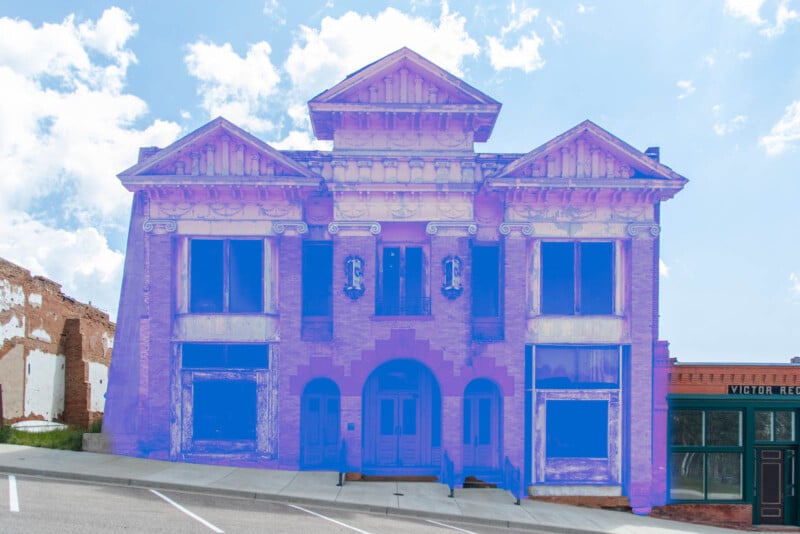
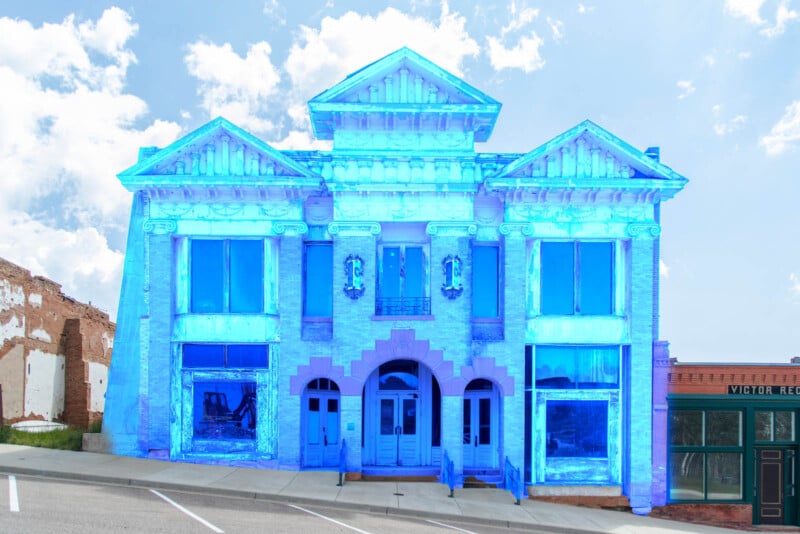
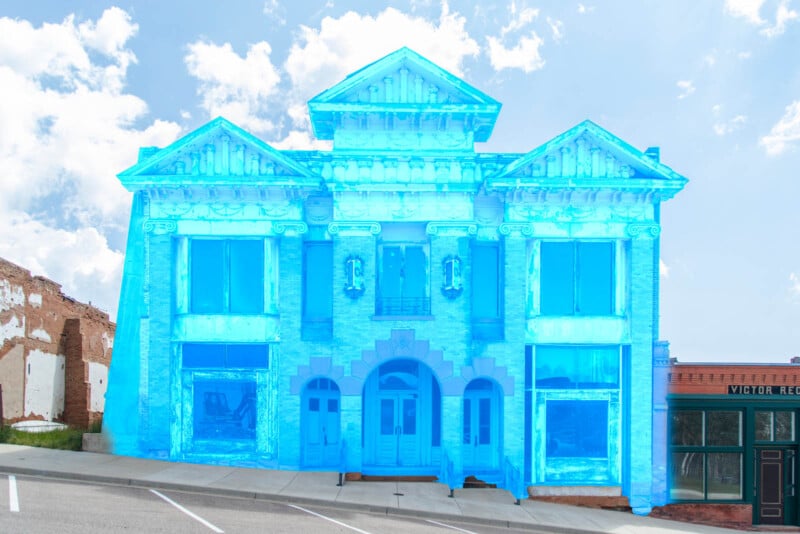
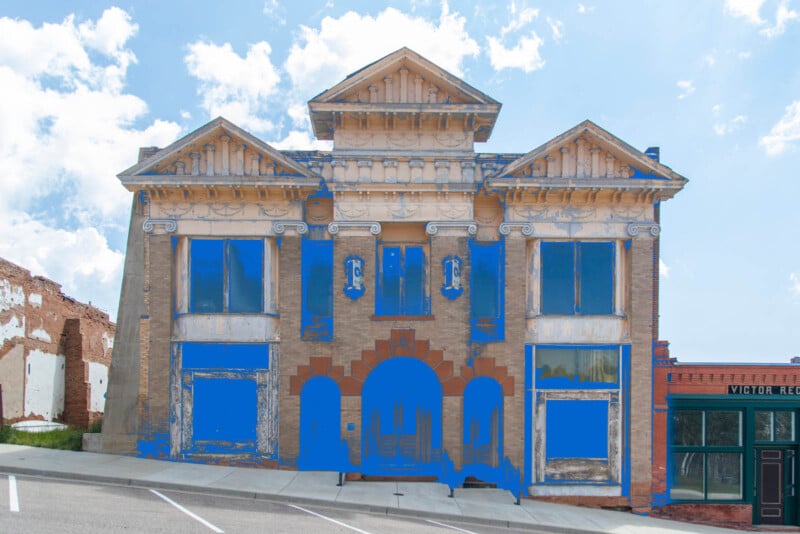
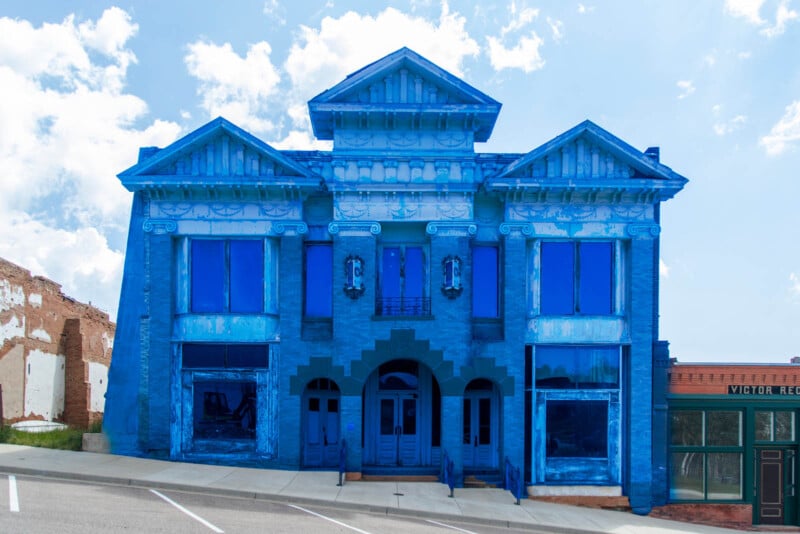
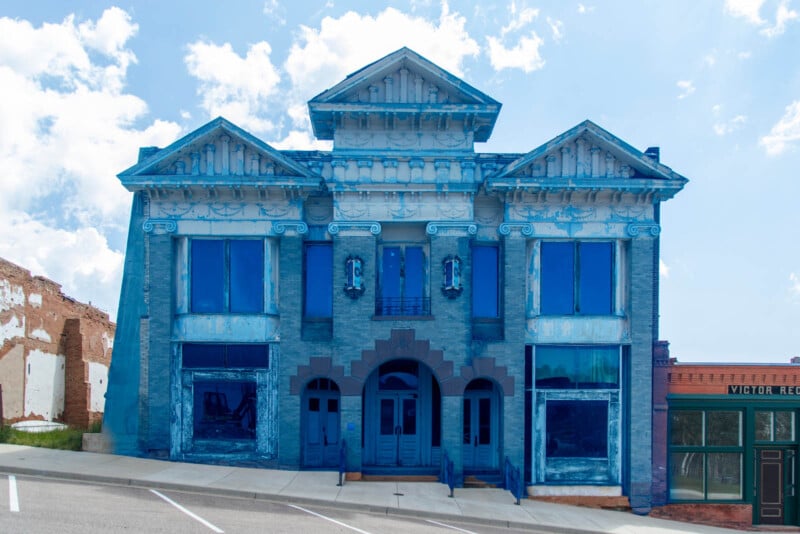
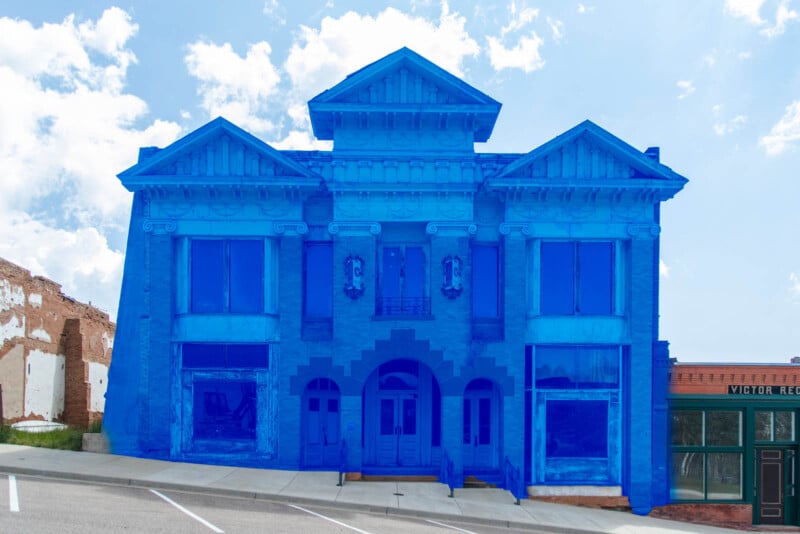
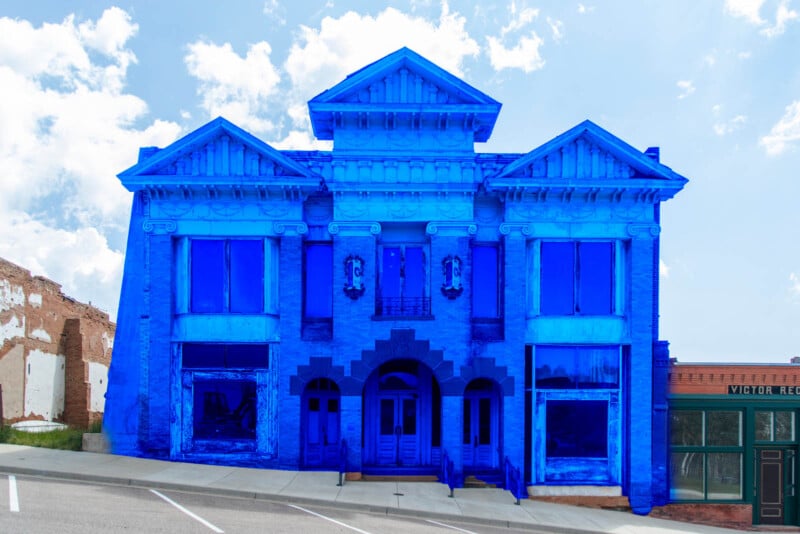
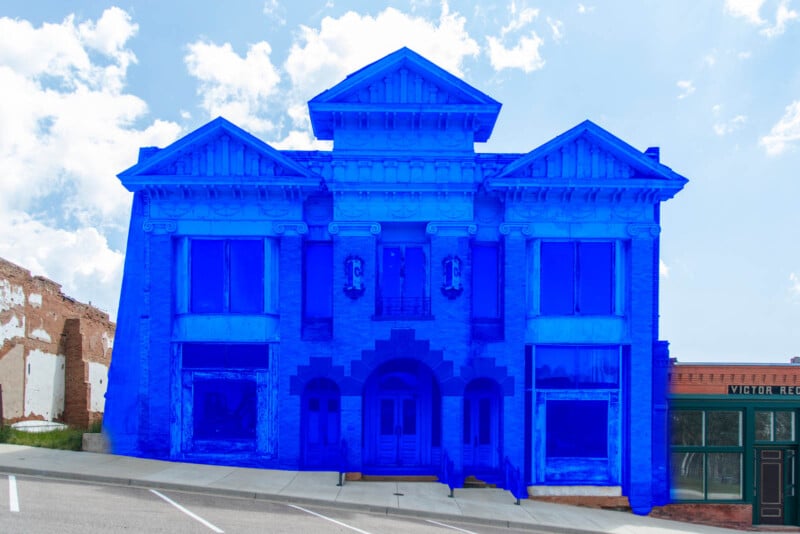
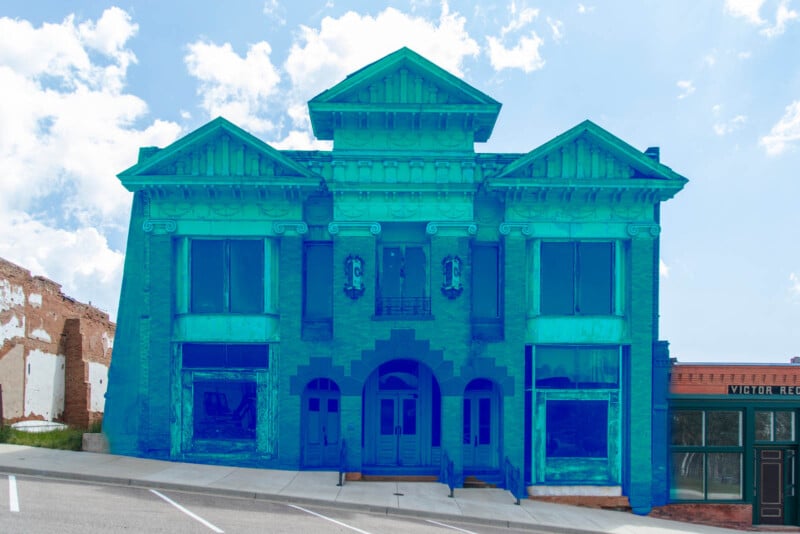
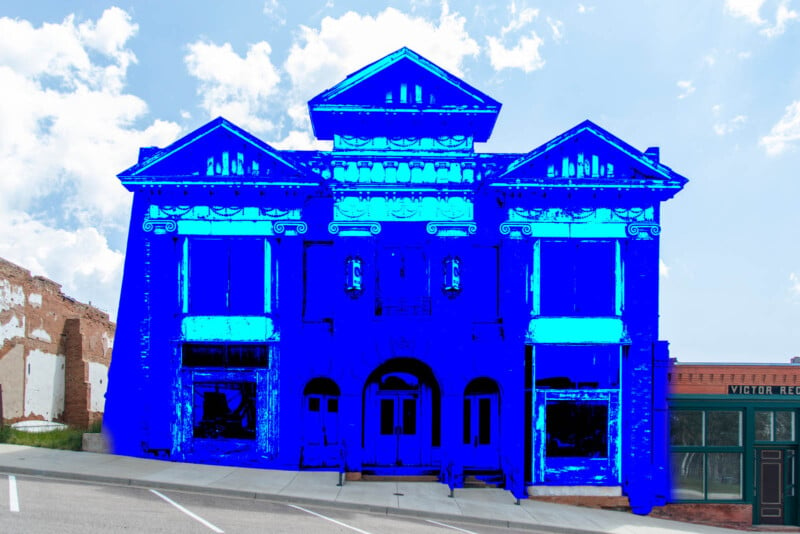
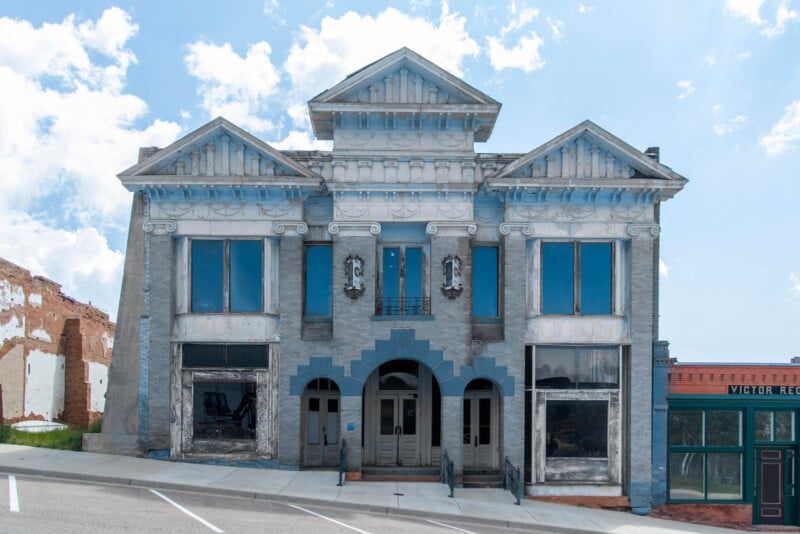
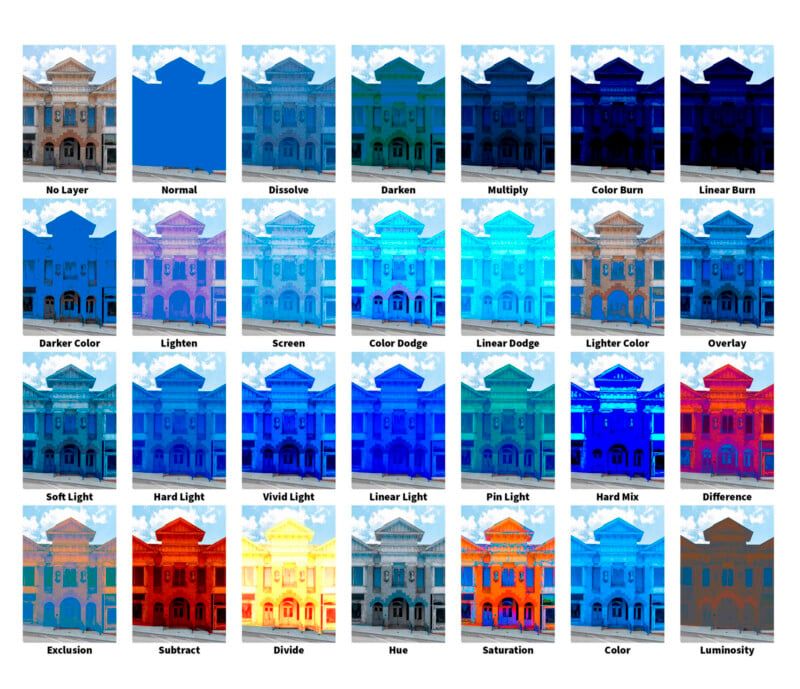
Firstly, here’s the sample photo we’ll be using in the examples with a blue, building-shaped layer on top of it.
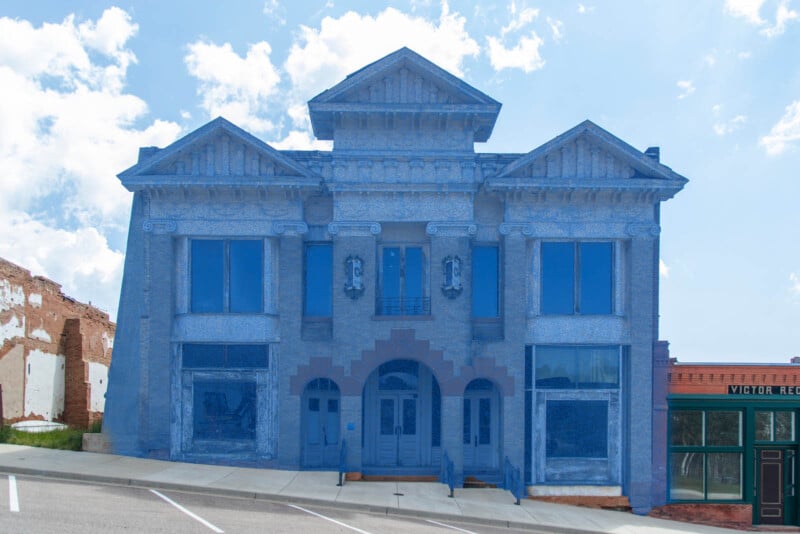
Normal Blending Mode: Normal
As the name implies, this is the default blending mode. This shows your layer as-is, without further adjustments to how the pixels interact. Blending modes are non-destructive, so as long as a layer still exists, you can always revert to its Normal blending mode.
Basically: The default blending mode, where there’s no change other than what the layer did originally.
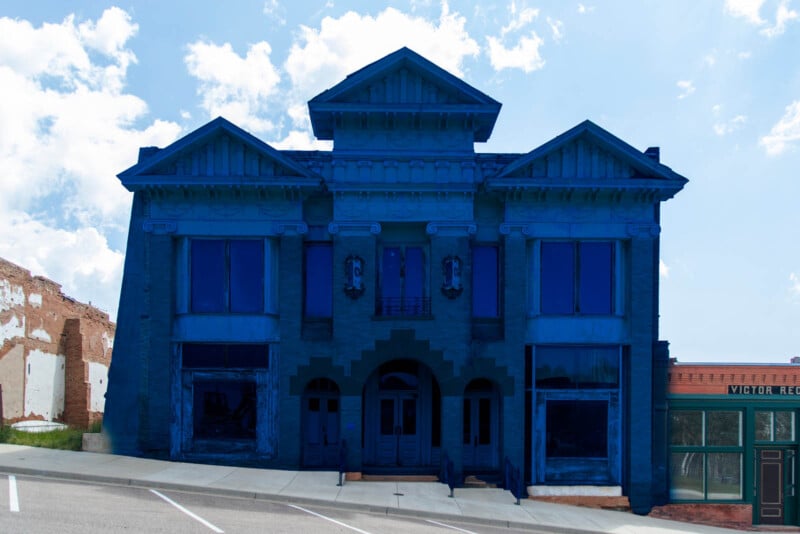
Normal Blending Mode: Dissolve
As another Normal blending mode, Dissolve doesn’t necessarily change the way pixels interact like other blending modes. Instead, Dissolve creates a “dissolved” look by randomly showing pixels from the blend and base layers. The intensity be changed by adjusting the opacity of the layer, giving a more- or less-dissolved look. Dissolve is great for adding texture.
Basically: Creates a “dissolved” look with two layers by randomly showing pixels from one or the other.
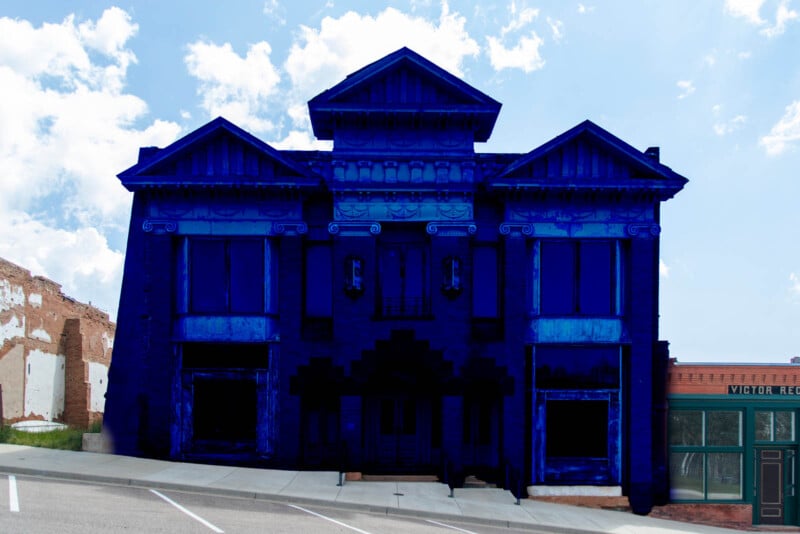
Darken Blending Mode: Darken
This mode looks at RGB color channel values separately to determine the brightness of two layers’ colors. Selecting this mode will keep the darkest of the two layers’ pixels. If the blend layer has pixels that are darker than the base layer, then those replace the base layer’s pixels.
Basically: Compares pixels between two layers and keeps the darkest ones.
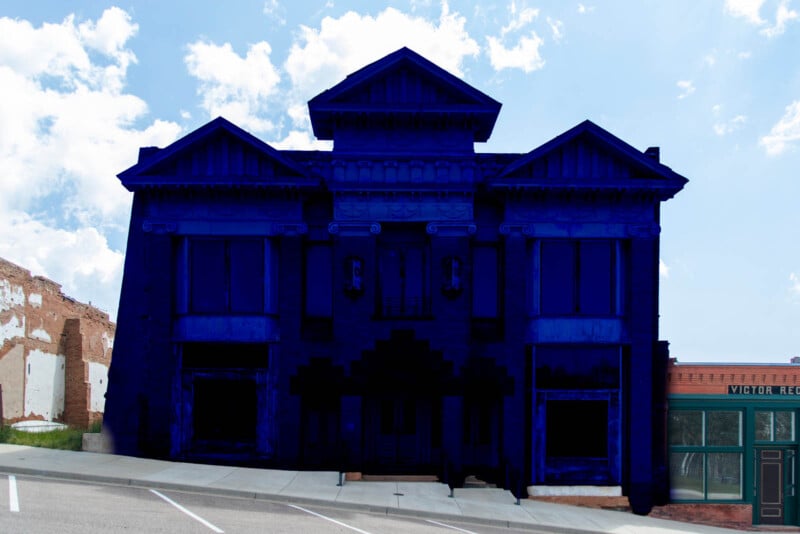
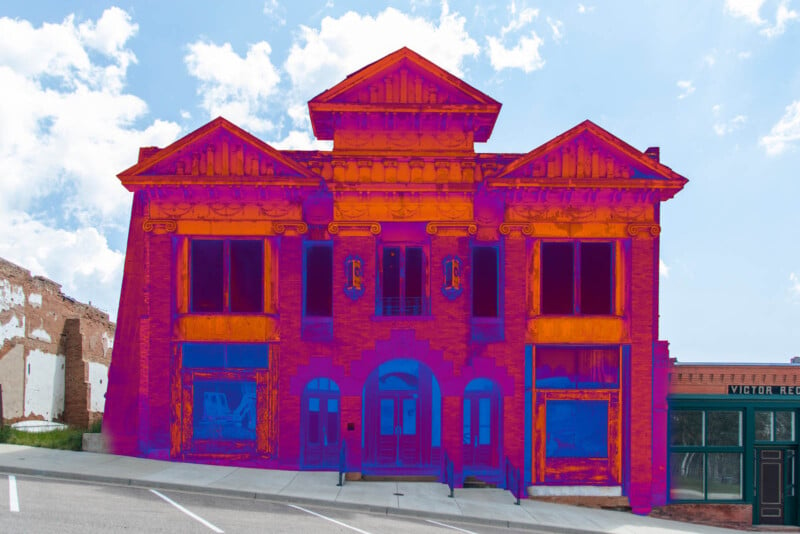
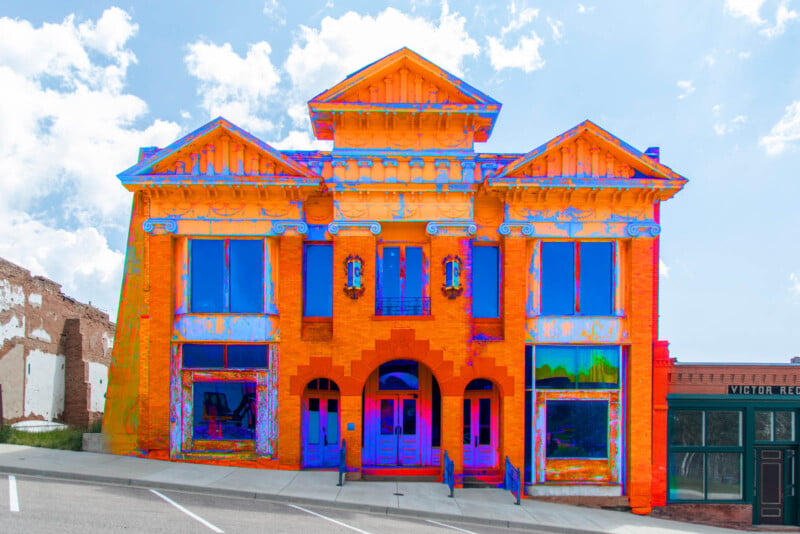
Darken Blending Mode: Multiply
This multiplies the base color luminosity values by the blend color values. The resulting blend always has darker colors than the original. Colors that are multiplied by white are not changed, and colors that are multiplied by black become black. This is often used to accentuate shadows in an image.
Basically: Darkens parts of an image by multiplying color values. One of the most popular blend modes.
Darken Blending Mode: Color Burn
As the term “burn” implies, this mode darkens the base colors by increasing the contrast between the base and blend pixels. It usually gives a darker result than Multiply and tends to be more saturated.
Basically: Darkens parts of an image by increasing contrast.
Darken Blending Mode: Linear Burn
This is another way to darken parts of your image by darkening the base color to more closely match the blend color by changing the brightness. It’s similar to Color Burn but changes the brightness instead of the contrast. Thus, the result is similar to Color Burn but less saturated.
Basically: Darkens parts of an image by decreasing brightness.
Darken Blending Mode: Darker Color
This mode is similar to Darken but has less of a color-changing result. It works by comparing the total channel luminosity values from the base and blend layers and then displaying the lower-value color. Darken, on the other hand, looks at each channel by itself and then comes up with a darker result.
Basically: Compares total brightness values and keeps the lowest between two layers. Almost the same as Darken, but with a slightly different algorithm.
Lighten Blending Mode: Lighten
This mode looks at RGB color channel values separately to determine the brightness of two layers’ colors. Selecting this mode will keep the brightest of the two layers’ pixels. If the blend layer has pixels that are brighter than the base layer, then those replace the base layer’s pixels.
Basically: Compares pixels between two layers and keeps the brightest ones.
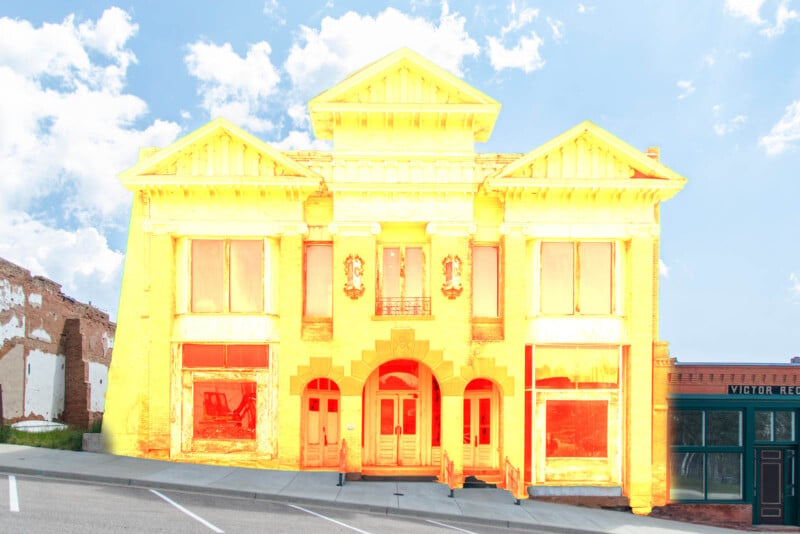
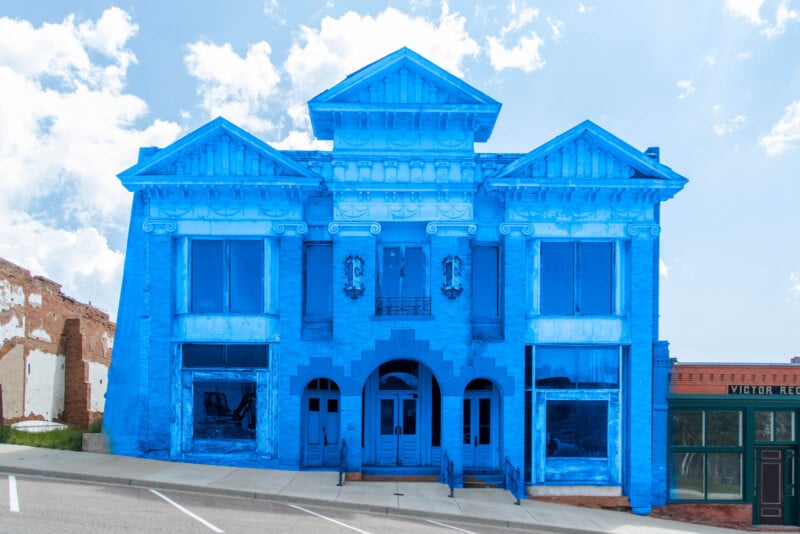
Lighten Blending Mode: Screen
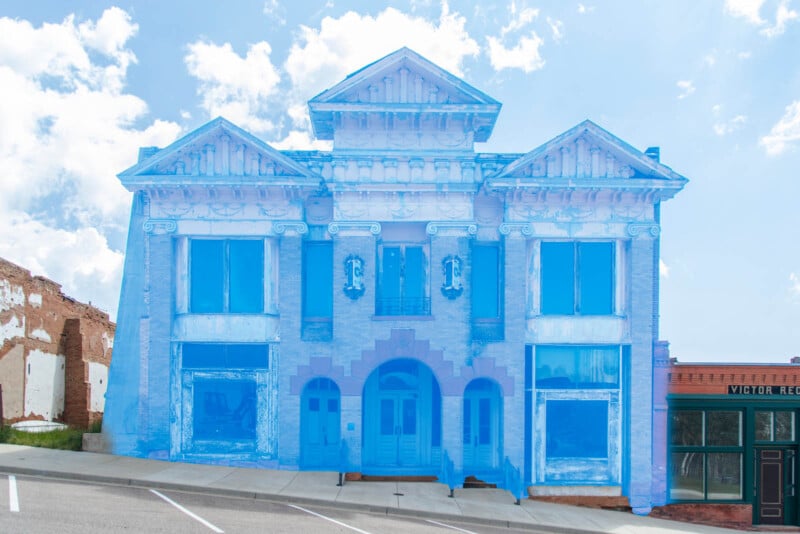
The opposite of Multiply. This multiplies the inverse of the base color luminosity values by the inverse of the blend color values. The resulting blend always has lighter colors than the original. Colors that are multiplied by white become white, and colors that are multiplied by black are unchanged. This is often used to accentuate highlights in an image.
Basically: Brightens parts of an image by multiplying inverse color values. One of the most popular blend modes.
Lighten Blending Mode: Color Dodge
As the term “dodge” implies, this mode brightens the base colors by decreasing the contrast between the base and blend pixels. It usually gives a brighter result than Screen and tends to be more saturated.
Basically: Brightens parts of an image by decreasing contrast.
Lighten Blending Mode: Linear Dodge (Add)
This is another way to brighten parts of your image by brightening the base color to more closely match the blend color by changing the brightness. It’s similar to Color Dodge but changes the brightness instead of the contrast. Thus, the result is similar to Color Dodge but less saturated.
Basically: Brightens parts of an image by increasing brightness.
Lighten Blending Mode: Lighter Color
This mode is similar to Lighten but has less of a color-changing result. It works by comparing the total channel luminosity values from the base and blend layers and then displaying the higher-value color. Lighten, on the other hand, looks at each channel by itself and then comes up with a brighter result.
Basically: Compares total brightness values and keeps the highest between two layers. Almost the same as Lighten, but a slightly different algorithm.
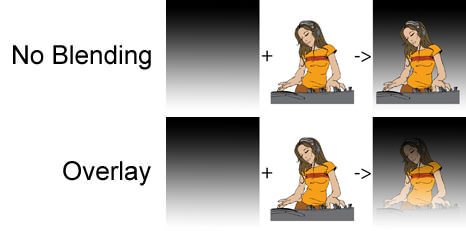
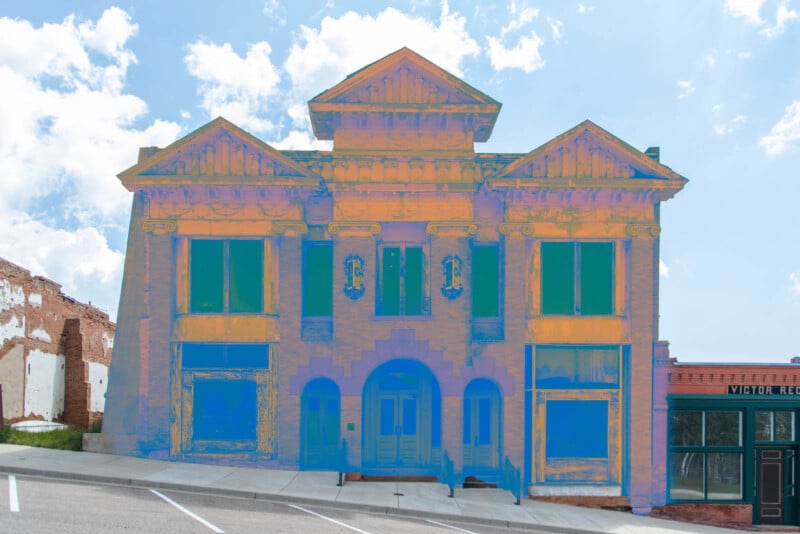
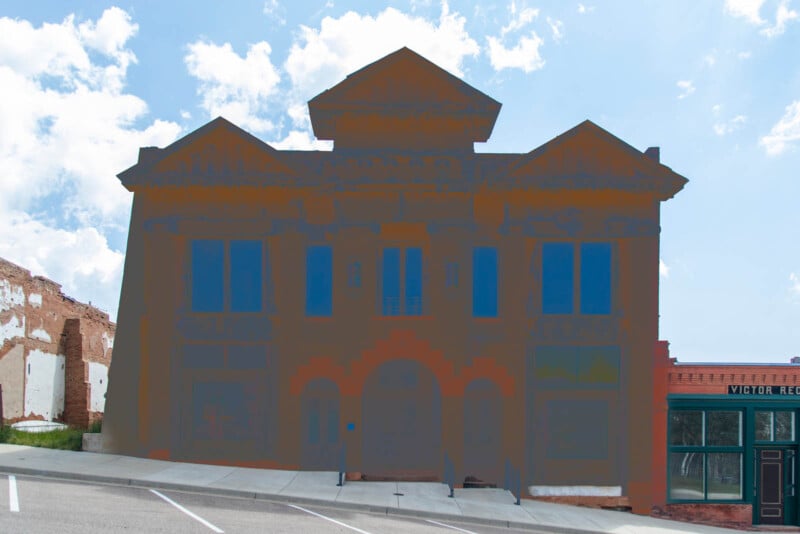
Contrast Blending Mode: Overlay
This mode uses both Screen and Multiply modes depending on the color. Screen is used on brighter colors in the base layer, and Multiply is used on darker colors in the base layer. The result is such that elements of the two layers can be combined while shadows and highlights are preserved, and the midtones are most altered.
Basically: Combines elements such as color and pattern while preserving highlights and shadows. Midtones are changed the most.
Contrast Blending Mode: Soft Light
This mode’s name comes from the idea that the affected area is similar to that of a diffused light source. Wherever the blend layer is lighter than 50% gray, the image is slightly brightened, and wherever the blend layer is darker than 50% gray, the image is slightly darkened.
Basically: Softly brightens lighter parts of an image according to the blend layer’s values. Softly darkens darker parts of an image according to the blend layer’s values.
Contrast Blending Mode: Hard Light
This is similar to Soft Light, but the effects are much more prominent. This mode’s name comes from the idea that the affected area is similar to that of a harsh light source. Wherever the blend layer is lighter than 50% gray, the image is brightened, and wherever the blend layer is darker than 50% gray, the image is darkened.
Basically: Brightens lighter parts of an image according to the blend layer’s values. Darkens darker parts of an image according to the blend layer’s values.
Contrast Blending Mode: Vivid Light
This mode brightens and darkens colors by changing contrast. It uses the blend color as a guide, brightening the brighter parts by decreasing contrast, while darkening the darker parts by increasing the contrast.
Basically: Changes contrast to brighten brighter parts and darken darker parts of an image according to the blend layer’s values. Produces an effect similar to Overlay and Soft Light, but on a greater scale.
Contrast Blending Mode: Linear Light
This mode brightens and darkens colors by changing brightness. It uses the blend color as a guide, brightening the brighter parts by increasing brightness, while darkening the darker parts by decreasing the brightness.
Basically: Changes brightness to brighten brighter parts and darken darker parts of an image according to the blend layer’s values.
Contrast Blending Mode: Pin Light
This combines Darken and Lighten into one mode depending on the blend color. When the blend colors are light (lighter than 50% gray), any pixels that are darker than the blend color’s pixels are replaced. When the blend colors are dark (darker than 50% gray), any pixels lighter than the blend color’s pixels are replaced. This usually creates a fairly extreme effect.
Basically: An extreme effect that combines Darken and Lighten blends based on the blend color’s values.
Contrast Blending Mode: Hard Mix
Creates a sum of each RGB channel in the blend layer and the base layer. If the sum meets or exceeds the maximum value of 255, it remains at 255. If the sum doesn’t reach 255, it is reverted to 0. The result is that all pixels in the blend have RGB channels of either maximum or minimum levels, and all pixels are either red, green, blue, white, or black. Pixels in CMYK become cyan, yellow, magenta, white, or black. This also tends to create an extreme effect.
Basically: Creates an image where all pixels are either red, green, blue, white, or black depending on the added values of the base and blend layers.
Inversion Blending Mode: Difference
Subtracts two layers’ values so that there is never a negative result. Two pixels that are the same in the base and blend layers will result in black, and blending with white will invert a color value.
Basically: Subtracts the smaller color value from the larger one in two layers. If the pixels are the same, the resulting value is 0 and produces black.
Inversion Blending Mode: Exclusion
Creates the same result as Difference, but with lower contrast because there is no midtone inversion.
Basically: Subtracts the smaller color value from the larger one in two layers. If the pixels are the same, the resulting value is 0 and produces black. Exclusion produces lower contrast than Difference but otherwise is the same.
Inversion Blending Mode: Subtract

This subtracts the blend color from the base color based on each channel. As blend values go up (get brighter), the result gets darker.
Basically: Subtracts blend color values from base color values.
Inversion Blending Mode: Divide
This divides two layers’ color values. Blending two of the same colors produces white, and blending with black produces no change. It can be useful for removing color casts, as dividing by a uniformly-colored layer will remove that color from the final product.
Basically: Divides color values and can be used to remove color casts.
Component Blending Mode: Hue
This retains the hue of the blend layer but keeps the luminance and saturation of the base layer. It’s useful for changing a layer’s hues without changing other characteristics.
Basically: Keeps the hue of the blend layer, and keeps saturation and luminance of the base layer.
Component Blending Mode: Saturation
This retains the saturation of the blend layer, but keeps the luminance and hue of the base layer. It’s useful for changing a layer’s saturation without changing other characteristics.
Basically: Keeps the saturation of the blend layer, and keeps luminance and hue of the base layer.
Component Blending Mode: Color
This retains the hue and saturation of the blend layer but keeps the luminance of the base layer. This preserves gray levels, so it can be used to colorize monochrome images.
Basically: Keeps the hue and saturation of the blend layer, and keeps the luminance of the base layer.
Component Blending Mode: Luminosity
This retains the luminosity of the blend layer but keeps the saturation and hue of the base layer. It’s useful for changing a layer’s color luminosity without changing other characteristics.
Basically: Keeps the luminosity of the blend layer, and keeps saturation and hue of the base layer.
Conclusion
There are few hard-and-fast rules when it comes to Photoshop blending modes, but they can be extremely useful tools if you know how to use them and what they do. Sometimes, hours of work can be saved by simply changing the way two layers’ pixels interact via blending modes.
Other times, blending modes contribute to creativity in digital art and other post-processing practices. Blending modes are useful tools that just about anyone with basic Photoshop skills should try to implement in their post-processing.