How to Crop in Photoshop
![]()
One of the most (seemingly) basic tools in Photoshop is the venerable Crop Tool. Used to cut way portions of an image to only leave the desired area, the Crop Tool might appear to be simply a one-trick pony. However, there is a lot more to here than you might think. In this guide, I’m going to break down the various options for making the best use of the Crop Tool.
Table of Contents
Crop Tool Basics
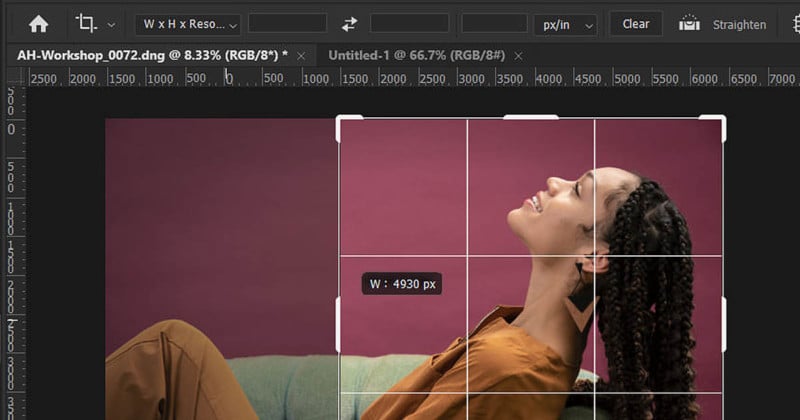
You can access the Crop Tool from the toolbox (Figure 1) by clicking the (by default) third icon down on the first column (or the fifth icon down if you’ve narrowed the toolbox as I have). You can also call it by pressing the C key on your keyboard.
![]()
To make a crop you can either click in the image which will bring up the crop box with eight thick areas or “handles” in the corners and in the middle of each side, or you can click and drag to create a crop area. Using the former option allows you to go to each handle as needed to adjust the crop as desired.
The Crop Tool has a second mode called Perspective Crop that can be accessed by holding down your mouse click on the icon or by holding the SHIFT key while pressing C. The C shortcut is also shared by the Slice Tool which can be used to divide an image up into multiple sections.
Once you’ve called up the Crop Tool, you are presented with various options on how you will proceed with the crop. Some of these options can impact the image quality of the cropped image, so it’s important to understand how these work.
Ratio | W x H x Resolution
In the crop options toolbar, the first icon you’ll see is the Crop icon itself. Clicking on this will present a list of presets of some standard photo print sizes from 3×5 inches to 8×10 inches, all set to 300 PPI. This list can also contain all presets for all tools by checking the option (gear) icon when viewing the presets. You can also save your current crop settings here if desired. You can also save them in the next pull-down list to the right, which we’re about to get to
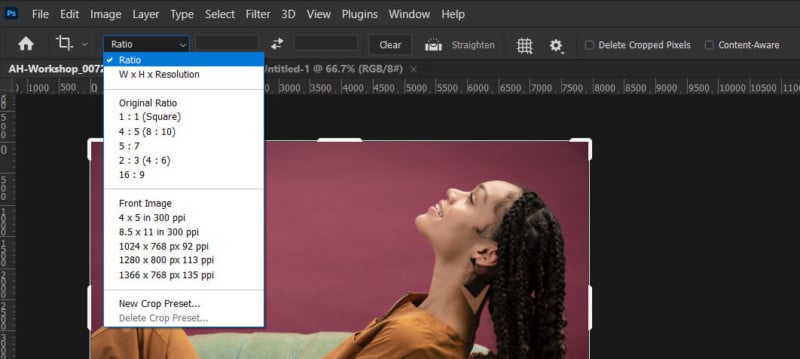
Clicking the next pull-down list in the Crop toolbar allows you to select cropping by ratio or by exact dimensions and resolution. Additionally, Adobe provides a list of common ratios followed by a list of some commonly used specific sizes for prints and computer display sizes. There is also an option to save a preset to this list, as well as an option to delete presets that you create. Any presets you create will be listed above the New Crop Preset text in the list. Before we get into the presets, let’s first look at using the Ratio option.
When talking about ratio, we’re referring to the proportion of an image’s width to its height. For instance, a “full frame” DSLR or mirrorless camera has a sensor that is very close to 36×24 mm frame size, which is the size of the negative or slide a 35 mm film camera produces. Since 36 by 24 can be divided down by 12 the final ratio here is 3:2.
Note: Most full-frame sensors differ slightly from exactly 24x36mm, and this varies across brands and models of full-frame cameras. APS-C sensors are also in the 3:2 ratio.
For example one of the most popular enlargement sizes is 8×10 inch prints, however, the 3:2 proportion of 35 mm full frame images (film or digital) requires the image to be cropped. This is because we’re going to an image at a 5:4 ratio for an 8×10 print from a source image that is at a 3:2 ratio of width to height. Something will need to be cropped out in order to fill the print paper, or you’ll have to leave a border on two edges, which is usually not desired.
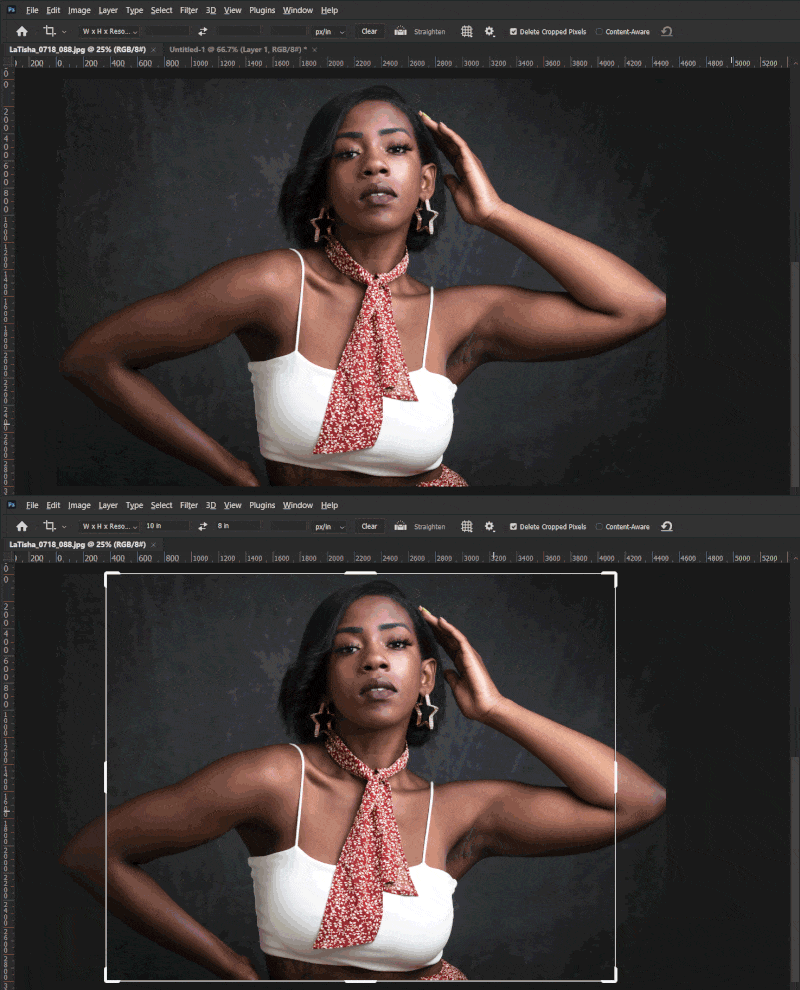
In Figure 3 you can see an example of how an image that is in the 3:2 ratio gets cropped when adjusting it to fit into an 8×10 print (5:4 ratio). In this case, I might instead make an 8×12 print as I don’t want to cut that much of the image away. Of course if you know that you will need to make an 8×10 or similar proportioned prints, you can leave space when shooting your photos.
Using the Ratio option allows you to input your desired proportion of width to height using the two fields to the right of the pull-down list where Ratio is selected. While there are several presets in the list, you might have a specific use. For instance, if you have a printer on which you print 13×19-inch photos, you can input 13 and 19 into those boxes. This will constrain the crop box to those proportions.
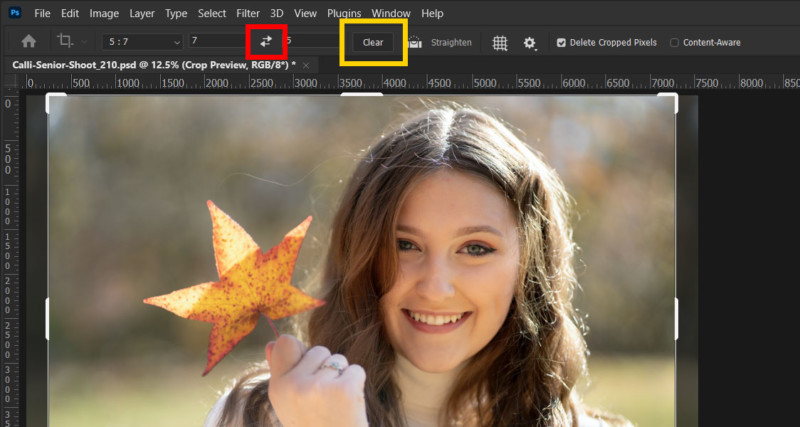
You can swap the ratio numbers anytime by clicking on the two opposing arrows (red box in Figure 4) between the ratio input fields, making it easy to switch from portrait to landscape orientation. While we’re looking at this area, you will also see the Clear button (yellow box in figure 4) to the right of the input boxes. This will empty the input boxes and works with both the Ratio options and the W x H x Resolution option.
It’s important to keep in mind that when using the Ratio option for cropping, the image is not being “resampled” as no pixels are created or deleted within the crop area. Pixels may be removed from outside the crop area itself, but the pixels within the newly cropped image will be unchanged. This isn’t necessarily true for the next option, W x H x Resolution.
W x H x Resolution
Using the W x H x Resolution option, you can input exact dimensions for your crop in the fields that were previously used for the ratio values input. In addition, there is a third field for inputting the pixels per inch (or pixels per cm).
The width and height fields allow for multiple types of measurement values. After a number, you can put in px, in, cm, mm, pica, or pt, which are short for pixels, inches, centimeters, millimeters, picas, and points (respectively). You can also mix and match values between width and height if desired, or if you just like doing math.
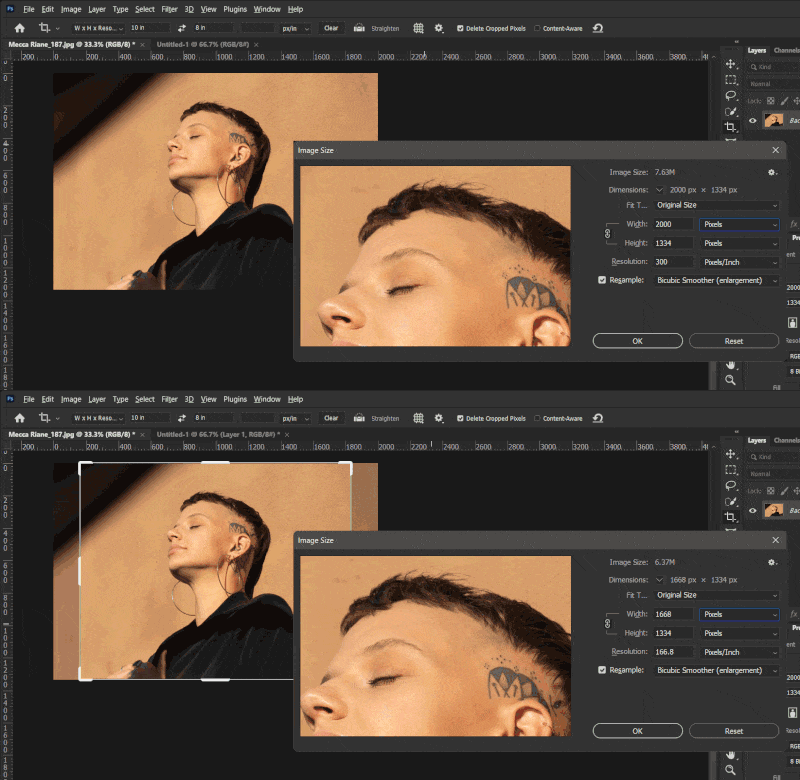
The PPI/PPCM value is optional and if it is not filled the crop will simply adjust to the ratio of the values input. So if one has an image that is 2,000 by 1,334 (3:2 ratio) and you crop it to 8×10 inches, the PPI value will be recalculated to reflect this with a new PPI of 166.8 (Figure 5). The new pixel dimensions will still be 1,334 on the short side. The resulting crop will have shortened the long side to 1,668 pixels, having removed some width based on the crop box position.
If you input a desired PPI value, then Photoshop will resample the image and increase or decrease the pixels to match the new total width, height, and resolution. Using the same 2,000×1,334 sized image as before and setting the crop tool to 8×10 inches with a PPI of 300, the resulting image is now cropped to fit the 8x10inch size but now is 3,000×2,400 pixels. Photoshop has resampled the image and through interpolation has added pixels in order to fit the image to the desired output.
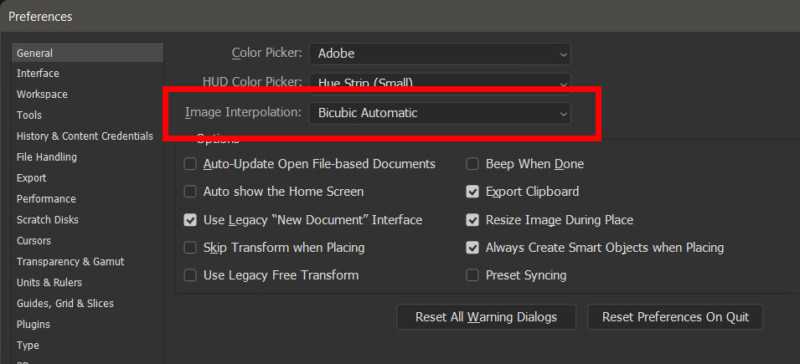
Note: Resampling done through the Crop Tool uses the method indicated in Photoshop’s preferences. Under Preferences>General, (Figure 6) you can set the Image Interpolation that is used by the Crop and other tools. However, the option of Preserve Details and Preserve Details 2.0 are not available in this space. Since these are arguably the best methods to use for enlargement resampling in Photoshop, I would not use the Crop Tool to make significant pixel dimension increases.
The above example is obviously going to suffer from some loss of image quality as interpolation is happening to enlarge the image. I recommend resizing the image using the Image Size function to the desired pixel dimensions of the longer side before cropping. This will allow you to choose the type of resampling method. You can check out our How to Resize an Image in Photoshop guide for information on the best approach.
When cropping to a size that is smaller, you can let the cropping tool do this as the resampling to a lower pixel count final image should be fine quality-wise. You can make certain that you get the best quality in downsizing by making sure the default image interpolation in Photoshop’s preferences is set to Bicubic Automatic or Bicubic Sharper.
Cropping Aids
Before getting into more of the Crop Tool options, there are a couple of things you can do to make it easier to get the exact crop you need. First up is using the Rulers. If the Rulers are not already appearing at the top and left of the Photoshop interface (or at the top and left of an image in a floating window) you can go to View>Rulers from the main menu or press CTRL+R on Windows (CMD+R on Mac) to bring them up.
The rulers support several different measurement types such as pixels, inches, millimeters, etc, and you can quickly change what is displayed by right-clicking in Windows (CTRL-click on Mac) on the ruler and selecting the value from the list that appears.
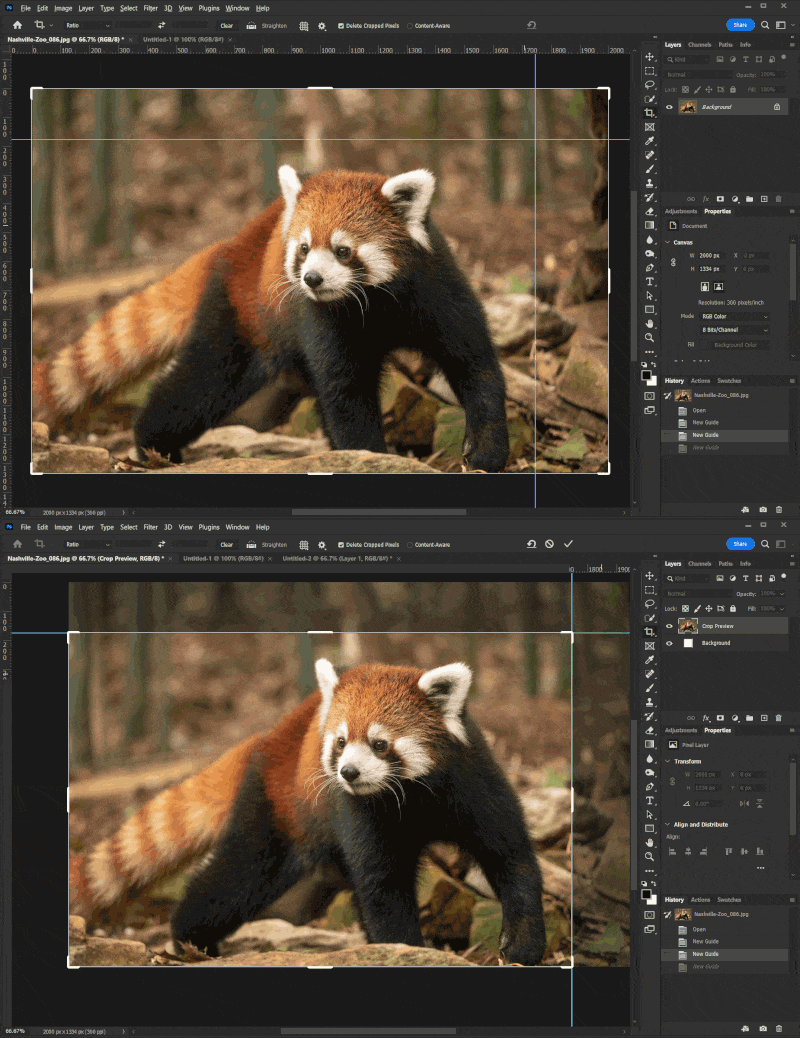
Now that the Rulers are visible, if they weren’t already, you can use guides as shown in Figure 7 to help determine where you want to crop before going pulling out the Crop Tool. By clicking and dragging from the rulers you can drag out guides that can be used to visualize where you will crop. You will also find the crop tool edges will “snap” to the guides once you’re ready to use the crop tool.
Modifier Keys
Like some other tools in Photoshop, the Crop tool can be used in conjunction with some modifier keys. If you click in the image to bring up the crop handles, and you don’t have a ratio or dimensions set, you can click and drag edges and corners to modify the crop. You will be able to adjust the crop any way you like, but if you want to maintain the original proportions of the image, you can hold the SHIFT key which will maintain the proportions.
The ALT key can also be used with the Crop tool and will hold the crop in the center while it is being adjusted. The SHIFT and ALT keys can be used together to maintain the proportions and adjust from the center point of the crop area.
If you are drawing a crop and there is no ratio set or dimensions defined, the crop tool will be “freeform” and will be whatever shape of rectangle you can draw out. You can hold the SHIFT key to constrain the crop box to a square in the same way you can do this with the Marquee Tool.
Likewise, you can hold the ALT key when drawing a crop box to have the box draw out from the initial click point which ends up as the center point of the crop. This can be combined with the SHIFT key to create a square crop centered on the point where the cursor was first clicked.
Creating Presets
There are two ways to create presets for the Crop Tool. Once you have input the values you want in the fields, you can click on the Crop Icon in the toolbar (not the one in the toolbox) and click the gear icon. Selecting New Tool Preset will bring up a dialogue box (Figure 8) where you can name the preset and after that, the preset will be added to the list of Tool Presets visible when clicking on the Crop icon.
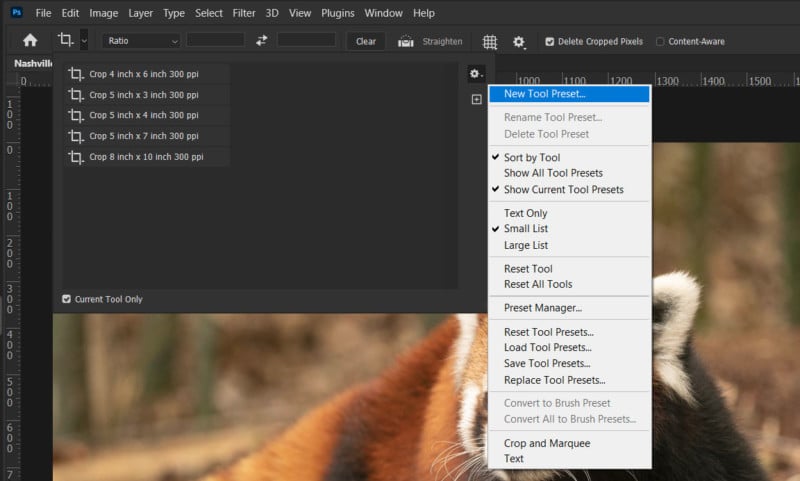
The other option is to add it to the presets that are available in the Ratio / W x H x Resolution pull-down list. Once you have inputted the values you want for the preset, click the Ratio / W x H x Resolution pull-down list and select New Preset near the bottom of the list as shown in Figure 9. A similar dialogue box to the Tool Preset option will appear where you can name the preset. Once you click OK it will be added to the list of preset options below the Adobe-provided ones. You can see in Figure 9 where I have added 11×15 and 6×8 sizes to my presets.
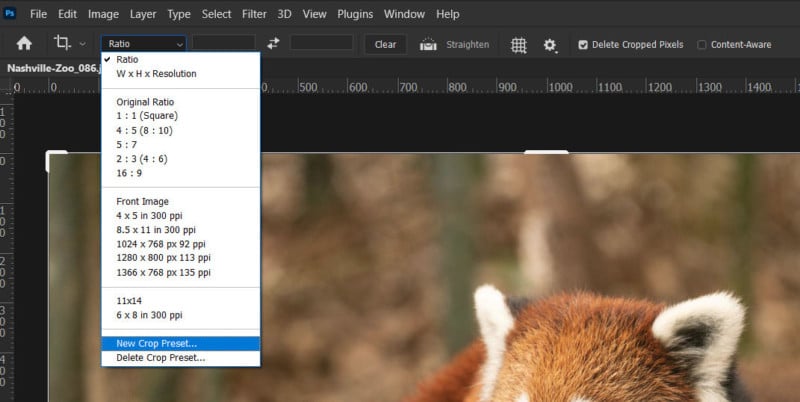
Creating presets is a great way to save time if you have specific crops you need to use often. If you have presets you are no longer using you can delete them using the Delete preset option available for both methods described above. Keep in mind that while you can delete any of the items in the Tool Presets, the Adobe-provided presets listed under the Ratio / W x H x Resolution list are not removable. Only the presets you create here will be removable from this list.
Straighten Tool
To the right of the Clear button we have the Straighten option. Clicking on Straighten allows you to use your cursor to draw a straight line within the image. After drawing the line the crop will be adjusted so that the resulting cropped image will be rotated so that the image aligns with the drawn line. Figure 10 shows where I drew with the Straighten tool along the post (highlighted in red) and then the resulting rotation performed after.
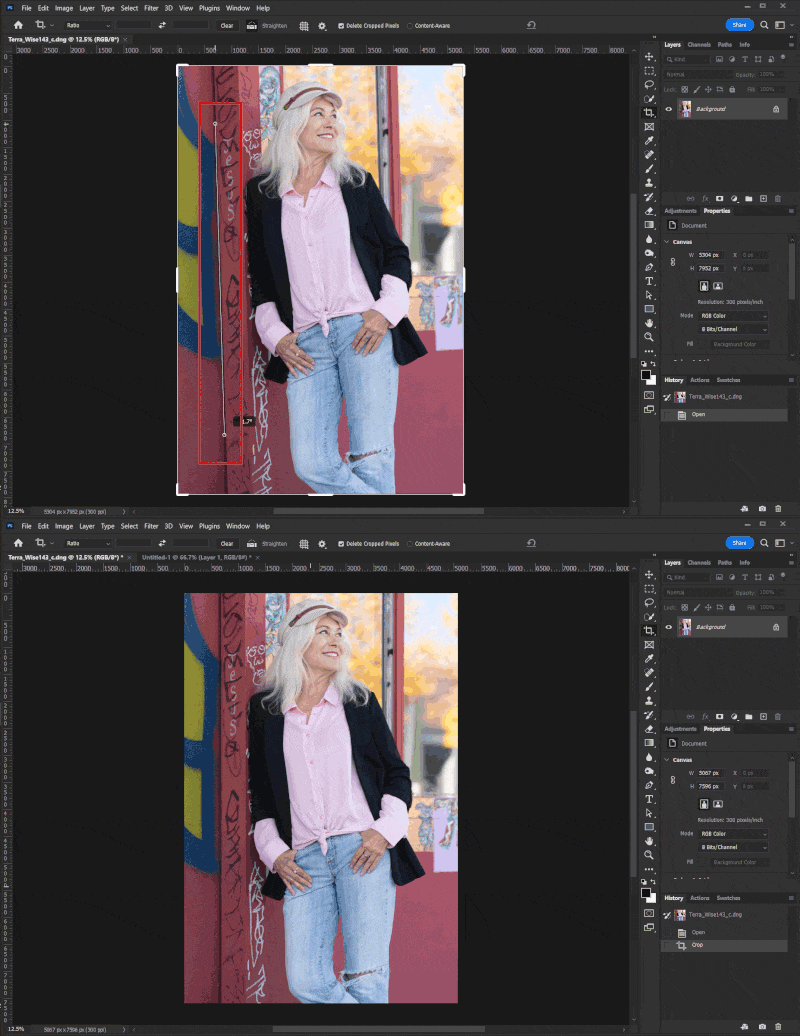
Straighten works in both the vertical and horizontal directions. You’ll find that if you pass the +/- 45 deg values, the angle value will start counting back down automatically. Straighten can be accessed before or after you have made your crop selection. If you have no values entered for ratio or width x height, the image will be rotated and constrained to the image area. You can readjust the crop after the fact if desired.
If you have already selected a ratio or dimensions but have not yet drawn the crop yet, the image will be rotated a crop box with that setting will be created. You can also draw out the crop and then use the Straighten tool and the crop selection will be rotated. Whichever way you use the tool, you can still adjust the crop box before committing the crop. But wait! There’s more :)
If you want to make use of Straighten Tool you can quickly switch to it by holding down the CTRL (CMD on Mac) and the Crop Tool will switch to the Straighten Tool. This way there’s no need for your mouse to make a trip to the Crop Toolbar.
Overlays
The next item in the Crop Toolbar is Overlay which is represented by a small grid icon to the right of the Straighten option. When you draw out a crop selection, the interior of the crop will display a set of grid lines. Clicking the Overlay icon lets you select from a variety of grid types including rule of thirds, golden ratio, and others which you can see in Figure 11.
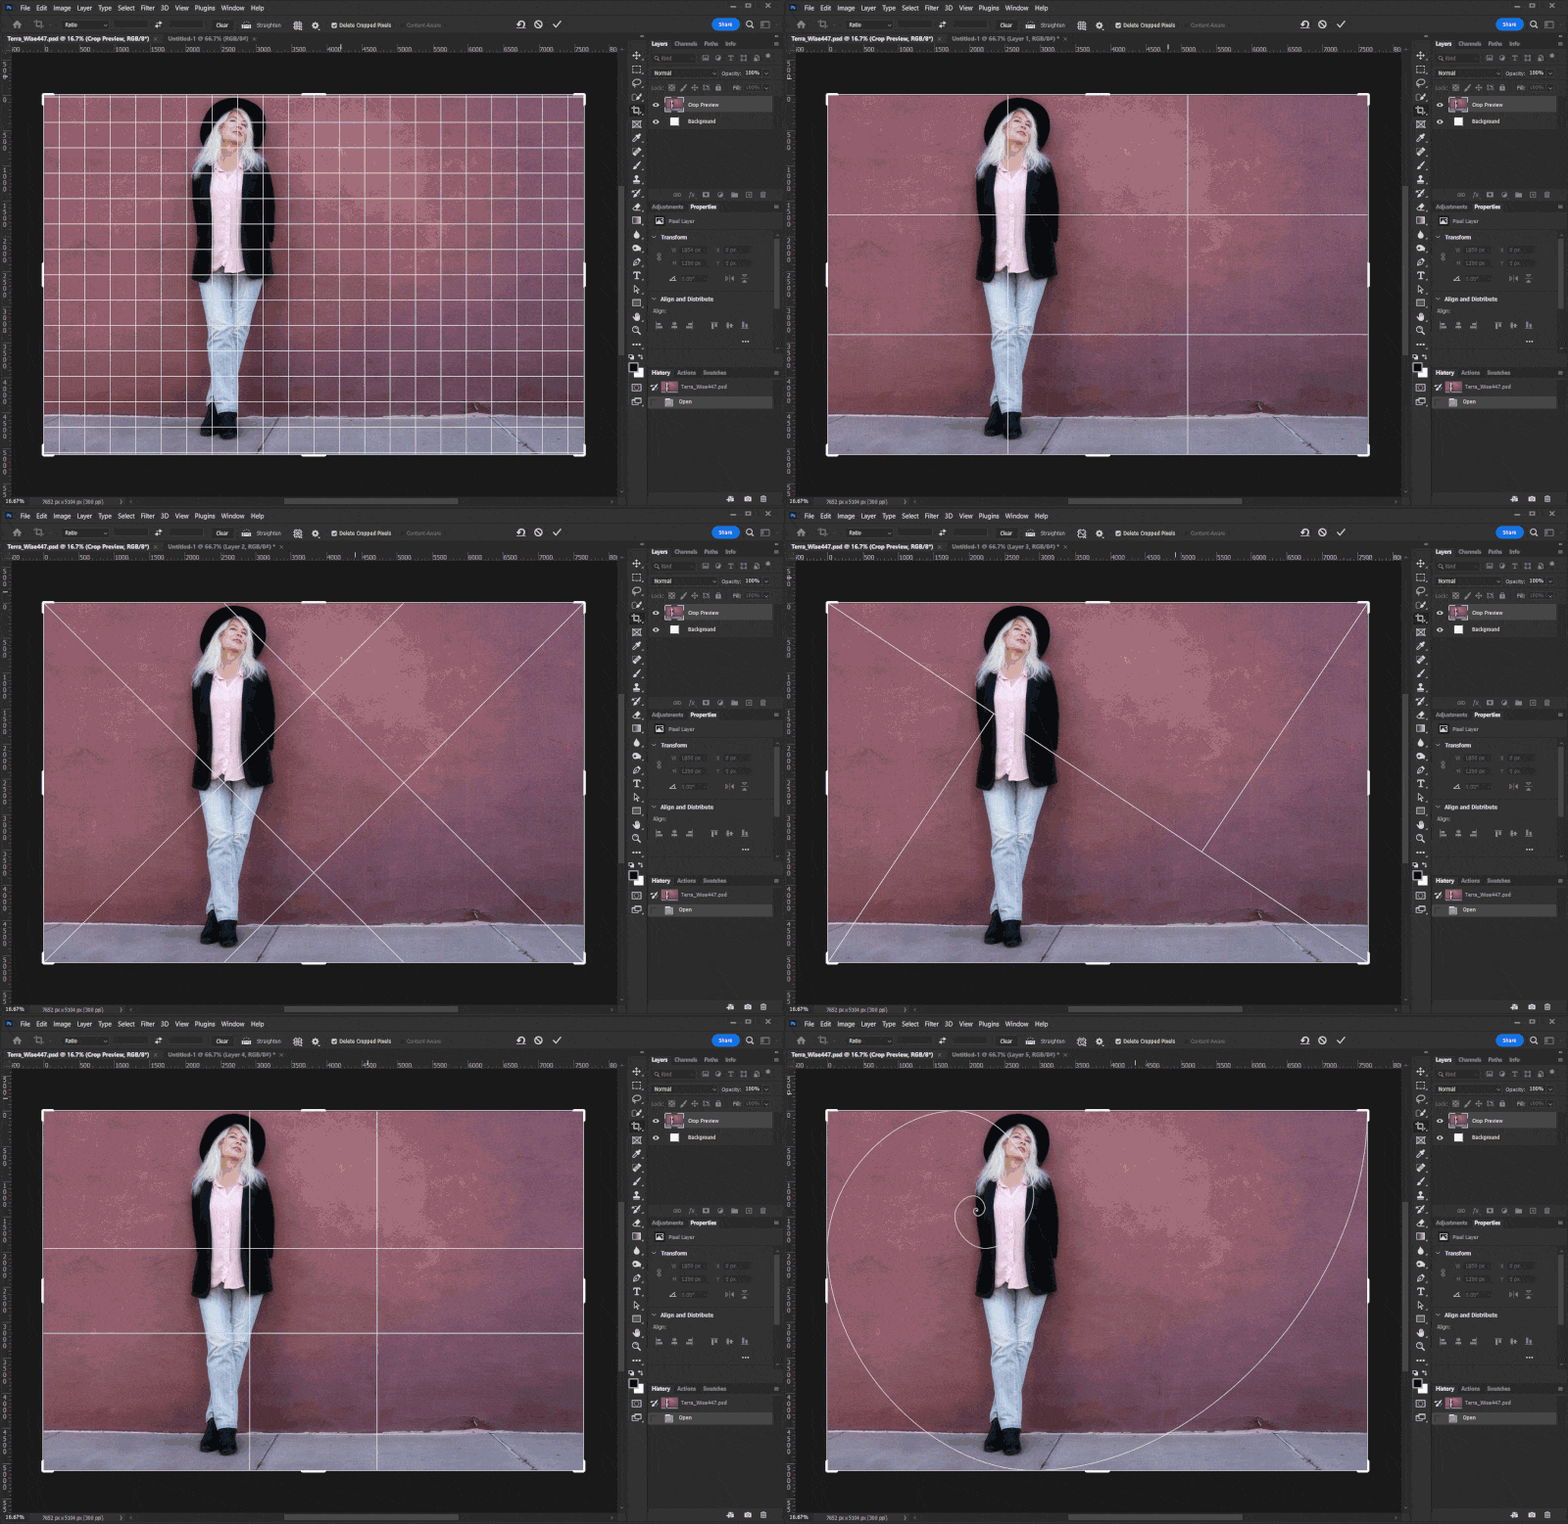
Below the various overlay types in the list are options to have the overlay always visible, never visible, and have it automatically appear. I prefer it always on, but this is a personal preference. If you want to switch to a different overlay after drawing out the crop box, you can press the O key to cycle through the various options available. Some overlays, such as Golden Spiral, can be rotated and can be done by pressing SHIFT+O.
Crop Tool Options
In the Crop toolbar to the right of the Grid icon is a small gear icon for accessing the Crop Tool options as shown in Figure 12. The first item in the listing is Classic Mode. Some time ago, I believe in Photoshop CC 2019, Adobe introduced the current Crop Tool which made a lot of changes to the way this tool works. For instance, when rotating the crop in previous versions of Photoshop, the crop box would rotate. The new Crop Tool rotated the image itself while the crop area remains stationary.
Needless to say that some of us who had been working in Photoshop for a long time at that point took some time to warm up to this and the other changes. Thankfully, Adobe provided the option to switch to Classic Mode. This reverts the behavior of the Crop Tool back to the previous style. Over time, I learned to appreciate the new version’s functionality, but if you prefer the original tool, you can enable classic mode.
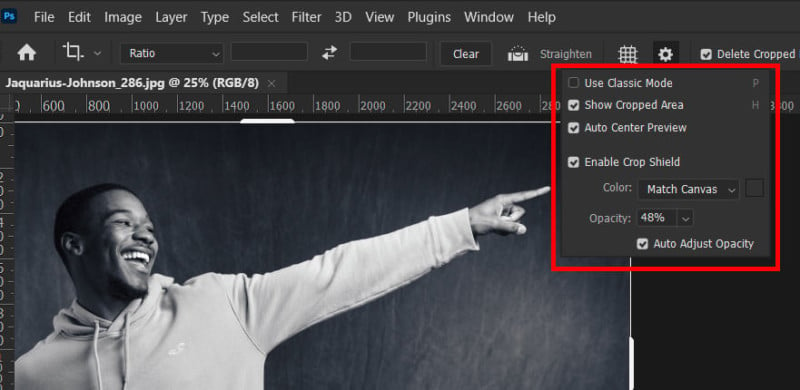
Assuming you haven’t enabled Classic Mode, the next option is Show Cropped Area. When this option is checked, areas of the image outside the cropping space will still be visible. I leave this checked as I prefer to see the overall image as I perform the crop.
Auto Center keeps the cropping box centered when adjusting the crop, and the image itself is shifted to maintain this. Disabling this keeps the overall image steady in position when adjusting the crop area. Whether you enable this is purely your preference. I leave it on but wouldn’t find it an issue to work without it. Like the Show Cropped Area option, the checkbox to turn this on or off is not available in Classic Mode.
The Crop Shield option creates an overlay over the areas outside the crop selection. This helps visually separate the cropped pixels from the ones within the crop space. The Crop Shield color and opacity can be adjusted to based on your own preferences. There is also an auto setting that will adjust the opacity so that it still stands out if the cropped pixels happen to be close in tone to the crop shield to maintain easy visualization.
Delete Pixels
Moving past the options on the Crop toolbar, we have the Delete Pixels checkbox (Figure 13). This option does what it sounds like and allows you to decide if you want the cropped pixels deleted or not when applying the crop. This is handy if you want to be able to return to the saved PSD file and re-crop the image differently.

Having this box unchecked makes the cropped pixels hidden until the crop tool is accessed again. If this box is checked the cropped pixels are removed from the image file entirely never to be seen again, unless of course you “Undo” the crop before saving the file.
To the right of the Delete Pixels option is the Content Aware option. Since you can adjust the Crop Tool to include areas outside the original image, this can leave blank space in those areas. If you have the Delete Pixels option unchecked, this area will be filled as transparent.

With the Delete Pixels option checked, the space is normally filled with the current background color, but you can change this behavior by checking the Content Aware option. When checked, Photoshop will use Adobe’s Content Aware fill technology to fill in the empty space based on the content of the image.
This sounds good in theory, and it can do a great job in situations where the area near the crop edge is simple, however in some situations the results can be what I would call “sub-optimal”. As you can see in Figure X, this option can be hit or really miss, so use it with caution.
The last icon on the Crop toolbar is the Reset option shown in Figure 15. Clicking this returns the crop, image rotation, and other settings to their defaults. Keep in mind this does not replace the Undo command as it will not revert the image back to the previous state after you’ve applied the crop.

Perspective Crop
Just when you thought there couldn’t be more to talk about regarding the Crop Tool, there’s in fact a bit more. Accessed by holding down your mouse click on the icon or by holding the SHIFT key while pressing C, the Perspective Crop tool is a handy variation on the Crop Tool.
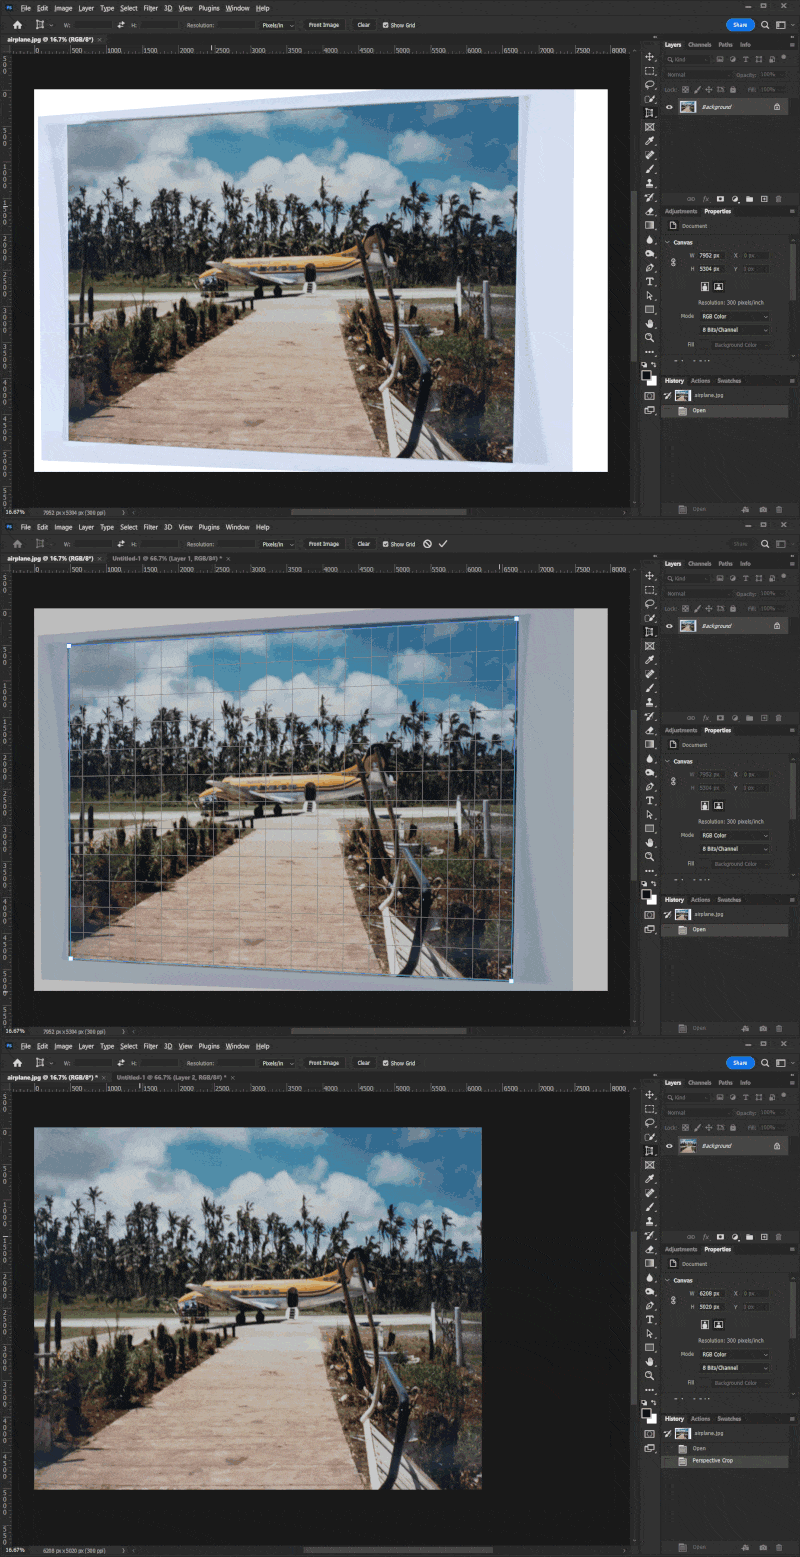
As the name implies, the Perspective Crop tool can be used to crop and correct a skewed image. An example of when this could be used is if you have an image of a document and the camera used wasn’t exactly parallel with the document. When using the Perspective Crop, each of the corners of the crop box can be moved independently after drawing out the crop box.
Additionally, you can draw out a crop one corner at a time in Perspective Crop. You can click and then as you move the cursor a straight line will be drawn from that point. You can continue to click and move until you have all four sides and have reconnected back to the starting point.
By lining the corners up on the corners of a skewed image and applying the crop, Photoshop will adjust the image so that the corners are squared up into 90-degree angles. Besides documents, photographs of flat artwork and other similar objects where a bit of perspective correction is needed is a perfect use case for this tool. In Figure 16 I’ve taken a photo of an old print and specifically made sure I didn’t have the camera level. After pulling the corners to the edge of the print content and committing the Perspective Crop, the image is squared up and the extra area has been cropped out.
The setting for Ratio is not available when using the Perspective Crop, only width, height and resolution are available. The same options for values such as pixels and inches are available as they are for the standard Crop Tool as shown in Figure 17.
If you want to use another image’s dimensions for setting the Perspective Crop, you can open that image in Photoshop and, with it being viewed, click on the Front Image button. This will copy the dimensions of that image into the settings for the Perspective Crop. This can then be applied to another image or images.

Modifier Keys can be used with the Perspective crop tool and using the SHIFT key will keep the point being moved in a straight line towards either of the two points to which it connects. Using the ALT key will maintain the angle of the two intersecting lines at the point being moved. It’s a bit hard to describe, but try it out, and you’ll see what I mean.
Conclusion
I hope you have found this information useful and maybe learned something you didn’t know before about the Crop Tool in Photoshop. There is a lot more to this tool than you might think at first glance, and understanding how and when it resamples can make a difference in post-crop image quality.