How to Shoot Otherworldly Macro Photos of Soap Bubbles
There are certain subjects in the macro world, which are so fascinating and absorbing that almost every macro photographer will point a camera at them at some point. No matter how many photos you take or see of these subjects, their charm does not seem to wear off.
Just think of snowflakes, the compound eyes of insects or the refractive nature of water droplets. Or, of course, the psychedelic colour plays of soap film.
After spending countless hours photographing these mesmerizing patterns, I can assure you that it never gets boring. Quite the opposite is true indeed, the more you watch and observe them, the more fascinating they become. I think you’ll see what I mean in the video below:
In this tutorial, I will show you how to film and photograph this play of shapes and colours. I explain the physics behind, problems you might encounter and of course their solutions.
But if you aren’t much of a reader you can watch my video tutorials instead:
The Science of Soap Bubble Photography
Before we dive into the topic on a photographic level, let’s have a quick look at the science behind these spectacular colour plays:
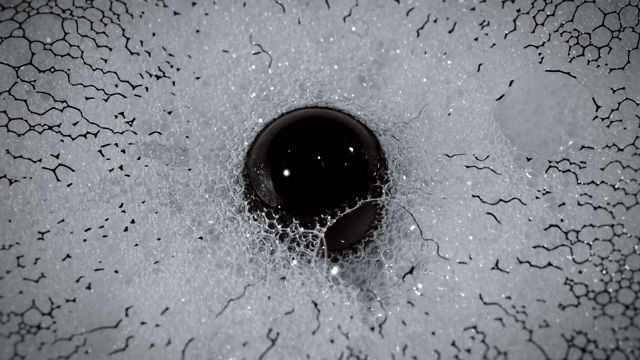
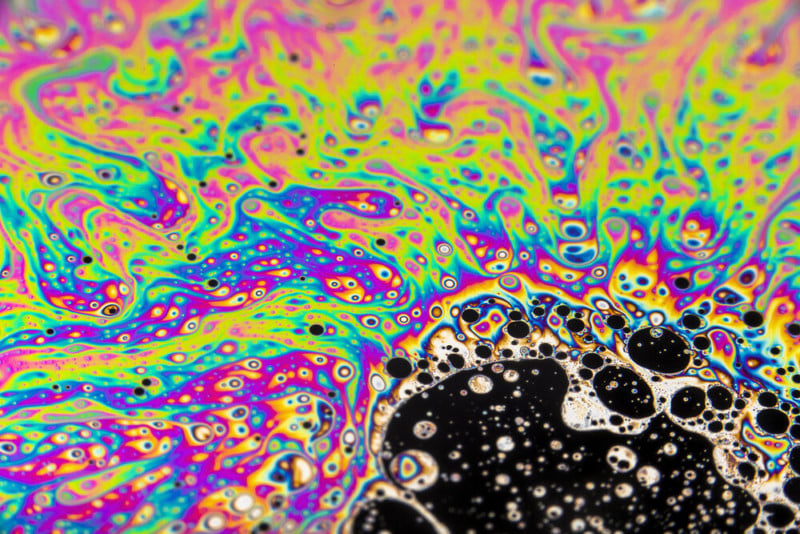
When we are looking at a film of soap, what we are really looking at are two films of soap, enclosing a thin film of water that’s only a few molecules thick. And it’s actually that layer of water that’s mainly responsible for the colour plays we get to see. This film of water has two sides, the outer and the inner side of the bubble.
Similar to a beam splitter (a half transparent mirror) the both sides are semi-transparent, meaning that they will reflect a certain portion of the light and let the rest of the rays pass. And exactly the same happens when these passing light rays hit the inner surface of the watery thin film.
This leaves us with 2 reflective surfaces, less than 1 micrometer apart from each other. As a result the reflected light rays will interfere with each other and change the reflected colour according to the local thickness of the film.
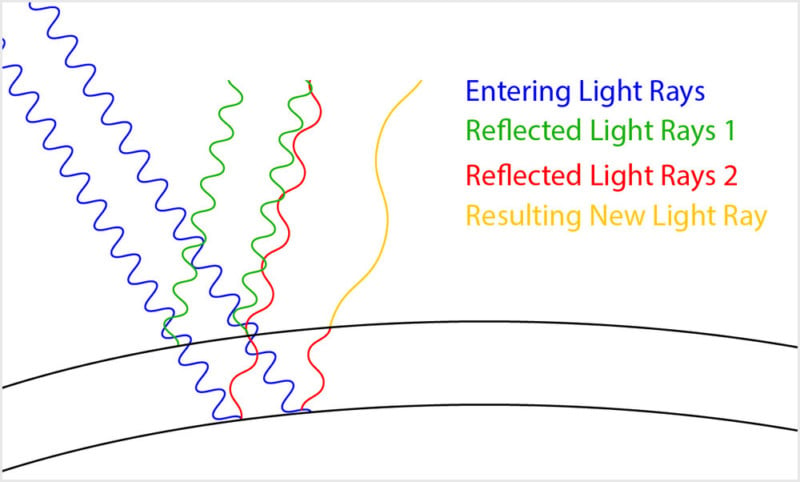
So what we are really looking at when we watch these colours run across the surface of a bubble, is the changing thickness of the film, turning white light (depicted as blue rays in the image above) into spectacles of colour.
First of all they have a very short life span and even though there are ways to prolong the short while they last, time will always be a critical factor. The second challenge is proper lighting; bubbles are highly reflective and translucent. If you look closely at a soap bubble, you will find that psychedelic plays of colour only become visible in areas, that are reflecting concentrated light.
Getting a clean and clear shot of these vibrant patterns is mainly a matter of choosing the right light source. That light source should have a large surface area an also be powerful enough to maintain a reasonable ISO, as we will have to stop the aperture down a bit in order to get more than just a thin slice of the half-sphere in focus:
Getting Started
But let’s start at the beginning: With the bubble solution. Most recipes you’ll find will be based on dish soap as it works very well for this purpose and is widely available. Mix 1 part soap with 2 parts water. To increase the longevity of your bubbles you can add sugar (raw sugar, corn syrup, honey,…) or glycerin to your solution.
Next we’ll need to think about how we shoot the soap. There are two basic possibilities: We can film/photograph a soap bubble as a half-dome, or we can shoot a plain film of soap on some kind frame.
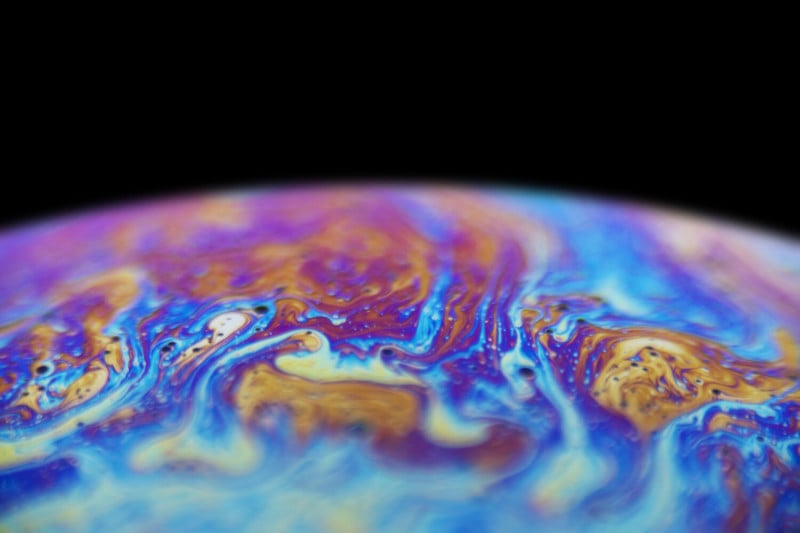
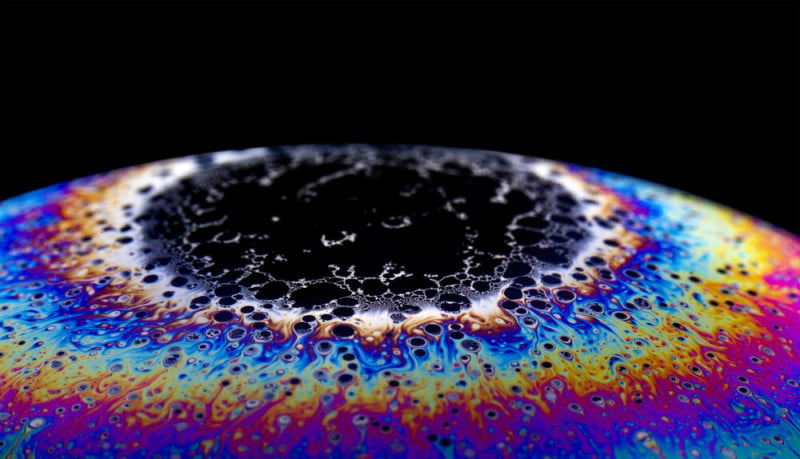
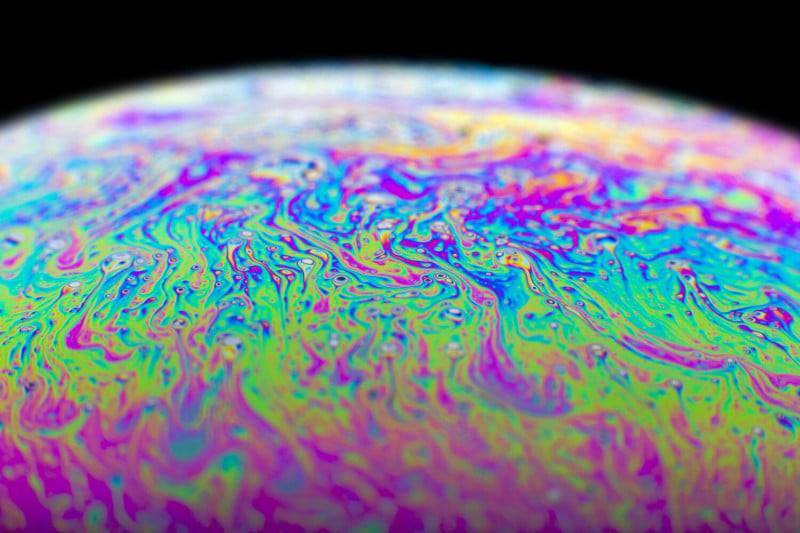
Filming just a single bubble puts all the focus on its perfectly spherical shape and the mesmerizing change of colours that pour down from its north-pole, until it eventually becomes totally transparent and pops:
The patterns that a flat film will show depend on its orientation:
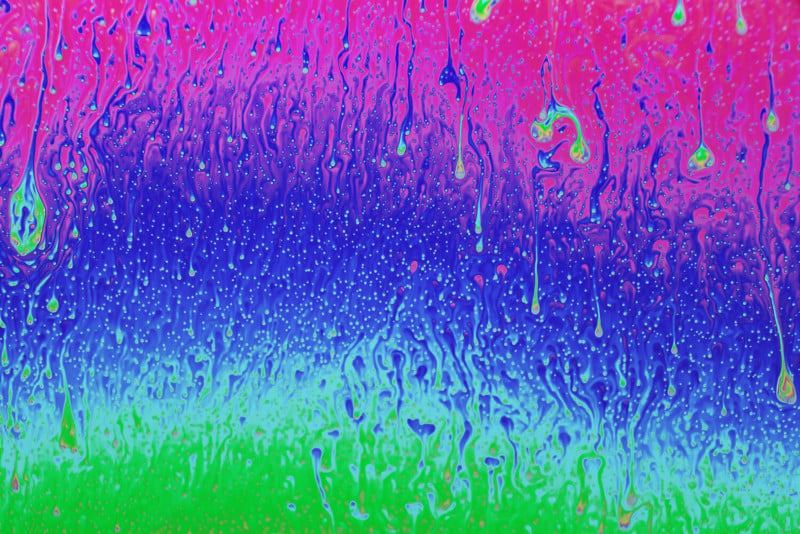
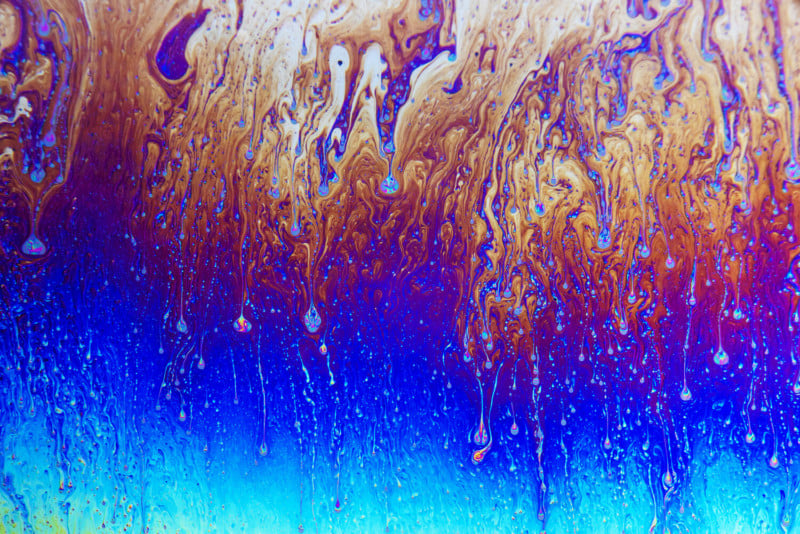
If the film is positioned vertically, gravity will cause the soap to slowly run downwards, creating horizontal gradients with an abundance of detail.
It is also possible to shoot the film in a horizontal orientation, with the help of a round vase; when the film is in a horizontal position, a pole will form somewhere around the center of its surface and similar patterns as with bubbles can be observed. If the film is perfectly flat, it will last quite a while and the streams of colour will happen in slow motion, which is especially cool for filming if you’re camera doesn’t support high frame-rates.
The reason for this phenomenon is that a perfectly horizontal film has no relevant elevation—gravity affects the whole surface area more or less equally.
Both bubbles as well as a plain film have their own fascinating characteristics, and whichever one you like better is more or less a matter of personal taste. However, a flat film has one obvious advantage: it’s flat. Meaning the required DOF to show most of it in focus is much less than for a soap bubble.
Both shots below where taken at f/22, and even though the flat film on the left was shot at a higher magnification ratio, a much larger portion of it subject is in focus than in the bubble photo on the right:
Lighting
To light the subject evenly and really bring out its vibrant colours, a large and soft light source will be essential. But if you don’t have a softbox, don’t worry: simple solutions such as a bedspread over two chairs or a a couple sheets of parchment paper between your light source and the bubble can deliver great results, too.
Behind the diffusion layer you will need a strong light source. For still images an off-camera flash is the best solution as it’s controllable and strong enough for this purpose. If you want to shoot video or in case you don’t have a speedlight handy, you can use a strong lamp (or even multiple lamps behind the same diffusion sheet) to illuminate your shot.
You’ll want to position the light source as close to your bubble as possible or vice versa. The closer light and subject are, the more of the subject will be illuminate. Now is also a good time to make sure that you’ve got a clean background without any distracting structures. If you’re background looks cluttered or busy you can use a black piece of fabric or cardboard for a clean black backdrop.
Of course you don’t have to stick with the “large-and-soft-light” look; I’m sure a creative mind will find other great ways to capture the magic of soap bubbles, too.
Workflow
An important part of this project is a convenient workflow; having to move around a light box on a stand to blow a new bubble, every time one pops, can soon become frustrating and this is supposed to be fun after all!
Another thing to note before we get started is that it’ll take a few seconds for a the soap to settle and reflect the vibrant colours that we’re after. So if you don’t see results immediately, just give it another moment…
I used my camera on a tripod for all images and sequences shown in this article and highly recommend to do so too, not only for filming, but for photography as well; it makes for easier focusing and eliminates hand shake. Your lens should obviously be set to manual focus, as always recommendable with macro photography. Use the self-timer function or an intervelometer to avoid motion blur.

Soap Bubbles
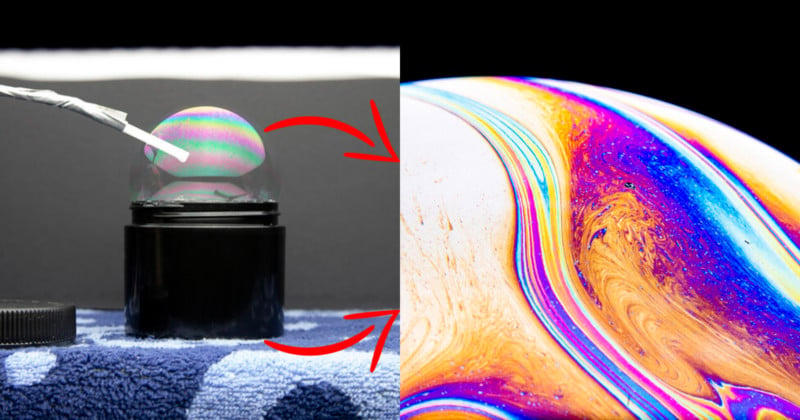
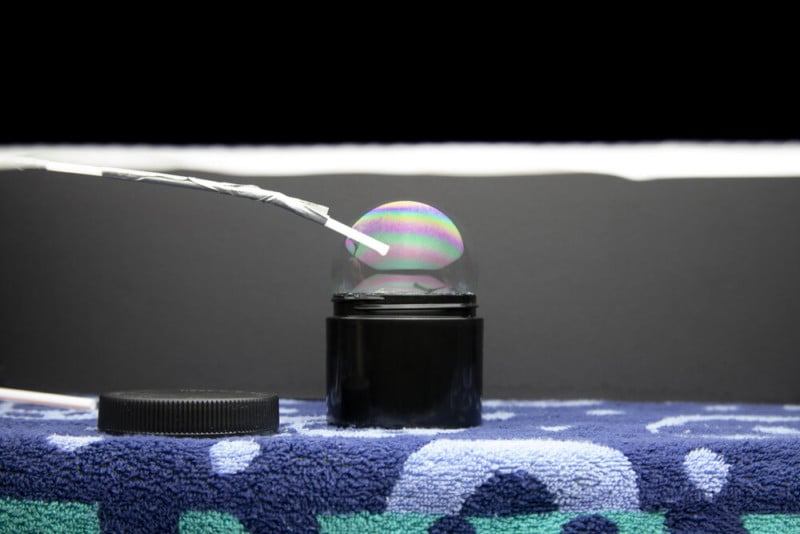
For the soap bubble sequences I positioned a round and black base filled with bubble solution on an end table with a softbox right above, only a couple inches away from it. There was basically just enough space left to fit in the bubble between the container and the light source.
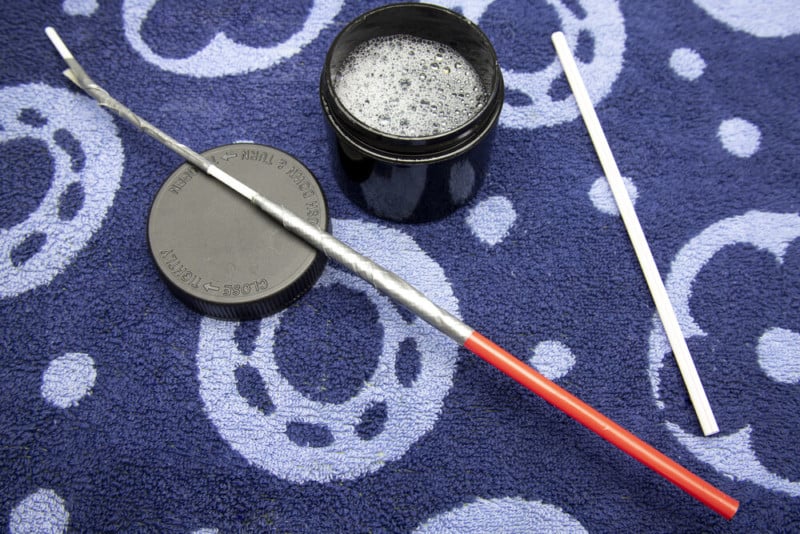
Best results are yielded with the light source centered above the bubble. This made it difficult to access the vase without moving it and shifting focus between bubbles. To work around the problem I manufactured an extra-long straw, using I lighter to veld the plastic and duct tape to stabilize the seam. This allows me to blow new bubbles without touching the set-up and film with a pre-focused lens.
I find it helpful to focus in live-view at maximum zoom. Even though I focus the lens before I start shooting, I always double-check at full zoom in life-view between bubbles.
Soap Film
Fortunately enough the same vase works well for producing a flat film of soap. Blow a bubble with the straw and deflate it again to create a two-dimensional film. This method is very simple and convenient; the lens can be pre-focused this kind of film lasts quite a while.
The slow motion and the almost perfectly flat shape are the result of using a vase instead of a frame. A horizontal film on a frame would form a center of gravity, where water will concentrate and cause the film to pop. The enclosed space of the vase and the air pressure inside solve this problem.

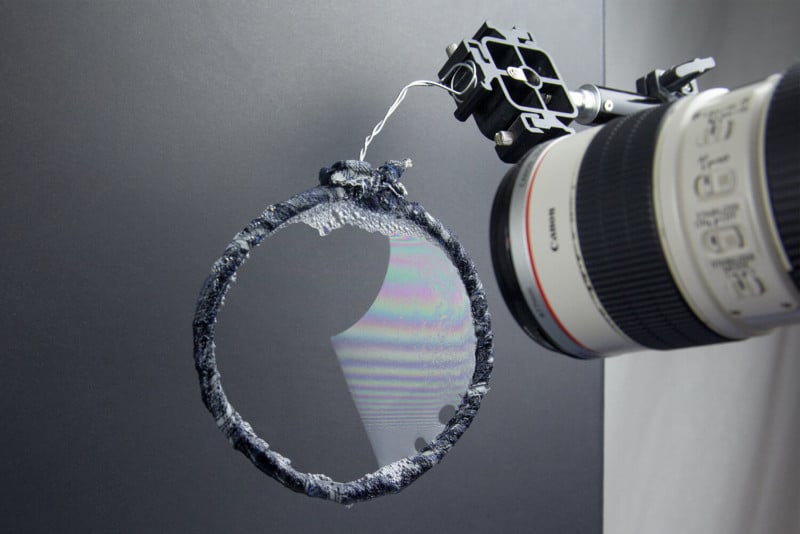
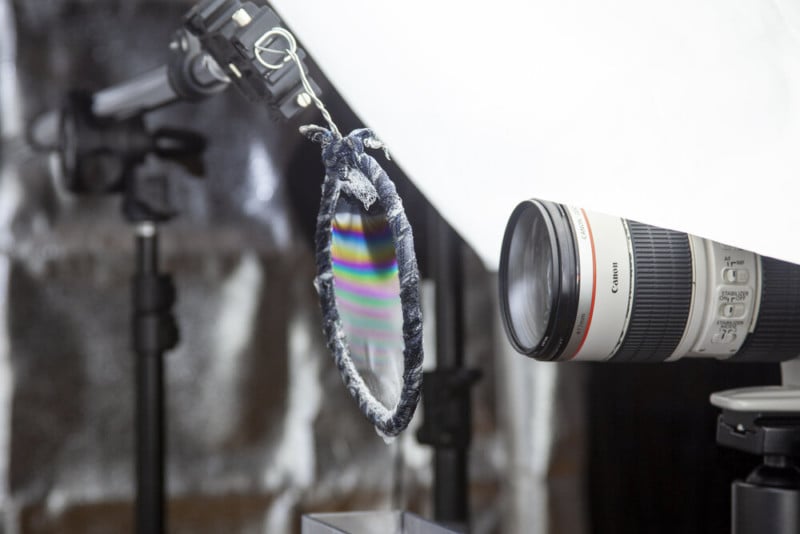
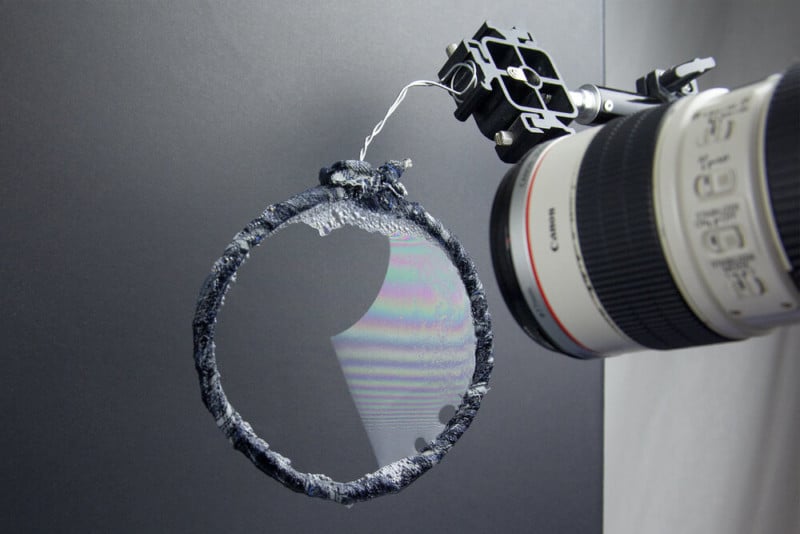
To capture the down-pouring gradients of colour I had to place the film vertically, so that the solution would flow downwards. This required a more original solution.
I crafted a round frame from craft wire, with a small loop on its base that fits into a hot-shoe. I wrapped it in cotton strips and mounted it on a boom-arm. Then I replaced the round vase with a tall rectangular one that was just big enough to submerse the entire frame in it:
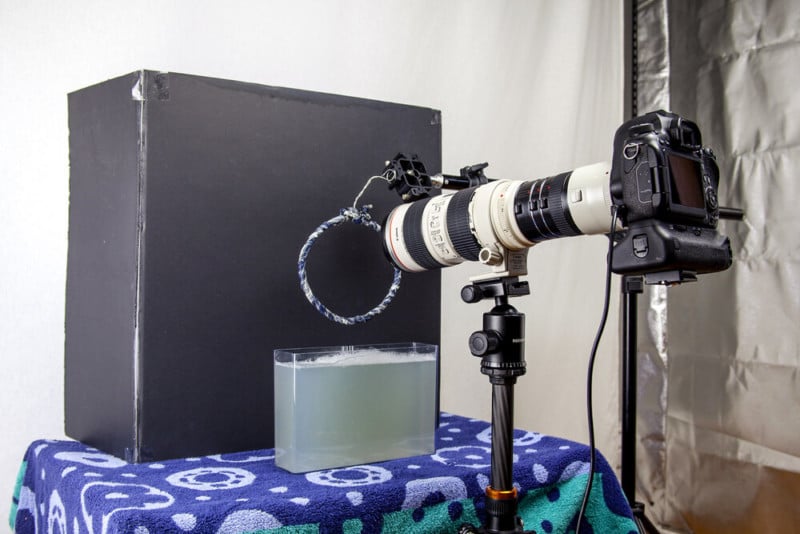
I set up the frame right above the vase filled with bubble solution. To create a film I only have to lift up the vase and dip the frame in it. Once the camera is pre-focused, this process can be repeated as long as your soap lasts without or only very minor changes in focus.
In this case we need the light source next to, or above the camera, shining directly at the soap film.
Even though it would make perfect sense to have film and sensor plane in a parallel orientation, this would result in a reflection of the lens on the subject and so we will have to rotate the camera, just by a couple degrees or so, to cancel out this reflection. By my experience this isn’t too bad and still allows to keep almost the entire frame in focus.

Challenges and Solutions
To sum it up, here are some common problems and ways to work around them:
- Not enough DOF: One simple way to increase the depth of field is, to photograph a larger subject. By filling the fame with a larger bubble instead of a small one e.g., you can shoot at a lower magnification ratio and maintain a larger DOF. In case you have your heart set on a certain composition or magnification ratio, a crop sensor or a tele-converter can help: both pieces of equipment apply a crop factor to the original image circle. This increases the effective magnification while maintaining the depth of field of the original image.
- Reflections of the lens: If you have trouble with reflections of your lens and camera, a longer working distance or a larger angle between sensor plane and subject will help avoiding these.
- Only a portion of the bubble is lit: Bring light source closer to increase the illuminated surface area. Smaller bubbles are easier to illuminate.
- Not enough light: To maximize the yield of light, bring your light source as close to the bubble as possible. Especially when shooting still images don’t worry too much about your ISO; the structures inside the bubble survive noise reduction rather well.
Lens & Camera Choices
Even though a great image is taken by the photographer and not by ones camera, the right equipment will always be beneficial. To take the best footage possible we will choose a set-up that fits the specific requirements of this project: a good amount of working distance while strong magnification. Therefore a macro lens with a long focal length, such as 100mm lens would be a good choice.
I decided on a telephoto-lens on extension tubes. The reason for this decision was mainly that it is my sharpest lens and that the range of working distance and magnification ratio made it a perfect fit.
To get even closer, without loosing working distance or depth of field, I used a 2x tele-converter. However, using such a converter comes at a price: it multiplies the original aperture by its own strength, which causes a significant lack of light and can result in diffraction softening.
Of course other lenses will work too for this purpose, I had good success with my reversed 24mm and 50mm FD lenses, too.
Be Creative
Last, but not least, I want to encourage you to stay creative and be adventurous! A bit of alcohol for example makes for even more psychedelic patterns and I’m sure there are other substances that will have cool effects. By blowing air at the bubble (not directly, just past it) you can create unusual patterns as well.
About the author: Maximilian Simson is a photographer and artist based in London, Ontario. The opinoins expressed in this article are solely those of the author. You can find more of Simson’s work on his website and Facebook. This article was also published here.