I Shot All These Photos from My Yard — Here’s How You Can Do It Too
As recently as the early 1900s, astronomers believed the Milky Way was all that existed in the universe. That view persisted until 1923, when Edwin Hubble used glass plate photographs of the Andromeda galaxy (then still thought to be just a nebula) to discover that the universe was unimaginably larger. His discovery was so significant that NASA’s first space telescope was given his name.
It is worth noting that when I started I had never used a telescope before and had zero background in photography. So I’d like to think that if I can learn all of this, so can anyone else!
The Telescope
First, let’s talk a little about telescopes. For astrophotography, you can consider a telescope to be just a big camera lens. Using mine to image the planets, I am shooting at a focal length of about 5600mm.
Now, there are a lot of telescope options out there, and which one to buy is always the first question people ask. Telescope buying advice is pretty simple: buy the telescope that you will use most often. That advice ends up usually referring to two things, weight and difficulty.
The weight problem is pretty obvious: if the gear is too heavy, moving it in and out of your house, or off to a dark site to avoid city lights could be a hassle for some or impossible for others. Difficulty refers to how forgiving the device is to beginners.
Smaller telescopes are easier to get started on than larger ones. The smaller versions see much more of the sky, and objects look smaller. Because of this, they are easier to point, align, and set up tracking without mistakes showing through, which is then more forgiving for beginners that are prone to making mistakes. Larger telescopes, on the other hand, have a much smaller tolerance for errors, which easily can lead to bad images, frustration, and quitting.
So the basic astrophotography advice usually translates to buy a small, widefield telescope first and work your way up to something larger. Of course, I did the opposite.
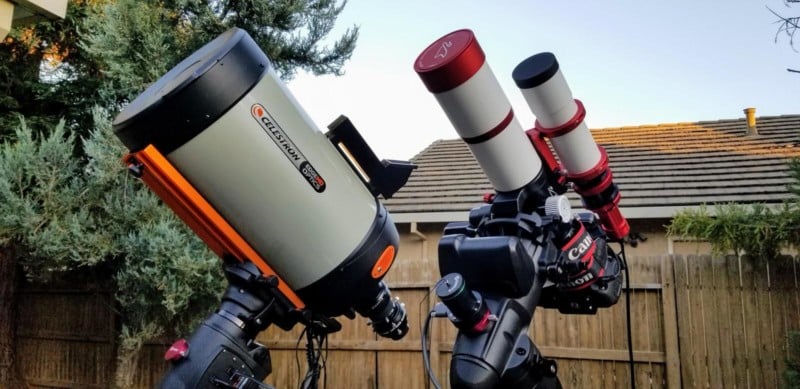
My first telescope was a Celestron 1100 EdgeHD model on a CGEM DX mount. It has an 11” diameter optical tube on top of a computerized, motorized mount that tracks the night sky and keeps the telescope pointed at the desired star or planet. But altogether it weighs about 140 pounds, stands about 7 feet tall, and requires quite a bit of patience to set up.
I have since also purchased a smaller widefield telescope, and it is indeed so very much easier to use. Having both, I see why the traditional advice is the way it is. I do recommend people to get a wide field telescope first unless they want to see the planets. In that case, you need more aperture, and that was my situation. I wanted to see the planets as detailed as possible, and I was not disappointed!
That first telescope is still my primary telescope, and I love every minute that I get to use it. It took dedication to set it up night after night, carrying it in and out of the house piece by piece, but sometimes there are those things in life that you just love, those things that nothing can keep you from enjoying. Astronomy is that thing for me.
When I first looked through the telescope at the Moon, Saturn, and Jupiter, I was absolutely blown away. The rings of Saturn are, hands down, the most gorgeous sight in our solar system. The craters and mountains on the Moon are substantial enough to make anyone gasp. And there’s something surreal about seeing the four Galilean moons of Jupiter and knowing that you are looking at the same objects Galileo saw over 400 years ago.
Of course, I had to take a picture to show my friends these wondrous sights. I held my phone up to the eyepiece, struggled to find Jupiter, and then tried to snap away… AND IT CAME OUT TERRIBLE! So, I tried again using “pro” mode on my phone (I at least knew what changing exposure did), and I was amazed to see that something remotely resembling Jupiter showed up.
And just like that, I was hooked! Less than two years of practice later, I am incredibly proud of the advances I’ve made, and honestly, none of them are that difficult, so let’s dive in.

Planetary Imaging
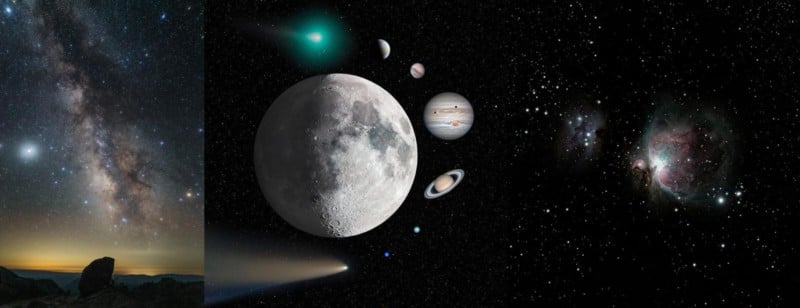
For starters, there are different types of astrophotography: Nightscapes, Deep Sky Objects, Planetary, Solar, and Lunar. Nightscapes are usually very widefield images of the Milky Way and often some earthly foreground. Deep Sky Objects are images of objects outside of our solar system like nebulae or other galaxies. Planetary, Solar, and Lunar are just what the names describe: planets, the Sun, and the Moon.
We can go very in-depth on all of these topics, but in this article I will just be covering planetary imaging.
Imaging the planets is the most “weird” of all of the imaging types. You don’t take long exposure shots like you do with Nightscapes and DSOs, nor do you just take a nice, quick single frame like you can with the Moon. Planetary imaging is problematic because Earth’s atmosphere really gets in the way. The turbulent airflow in the atmosphere bends light and creates image distortions that ruin the details that the planets display.
To counter this, a technique was invented called “lucky imaging” in which we use a video camera to capture thousands of frames, each frame lasting only a few milliseconds. Software is then used to sort those frames and assemble the best into one good image. More software is used to sharpen and process the image into the final product.
None of these steps are very complicated, but they do take patience and practice to learn. I won’t be diving into all of my individual settings or details, but instead just covering the flow of how I get my images from the sky to the screen.
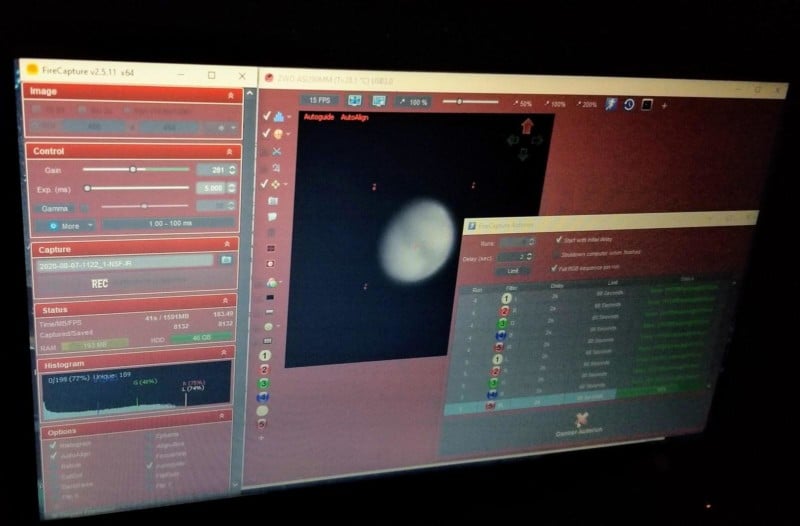
Setting up to image with a telescope is a little bit of a process. First, my mount must point towards the north star. Doing so allows the motorized mount to track along with the night sky and keep the planet in the field of view while imaging. To do this I use a device called a PoleMaster, and then I also use the built-in alignment program inside of my computerized mount.
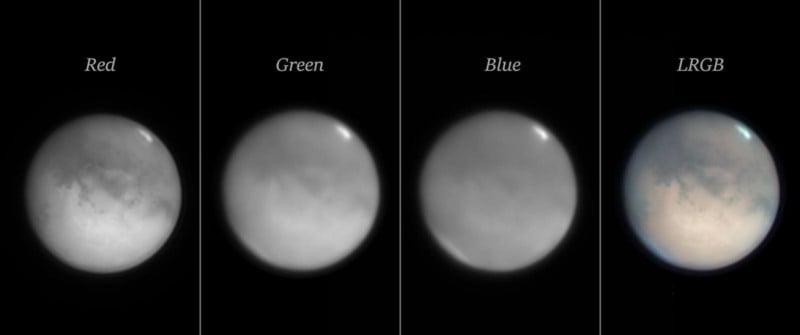
Next, the imaging equipment must be attached to the telescope. For me, this includes a 2x Televue Barlow (which doubles the size of the images I am seeing), a color filter wheel, and a black and white imaging camera. I use a mono camera (a ZWO ASI290MM) to capture the most possible light from the specific filters as possible. This allows for greater detail and faster exposures, which in turn leads to more frames for the computer to pick from, and thus a better “lucky” image.
The filters that I use are generally a luminance filter that cuts out UV and IR light, and red, green, and blue filters. For Mars, I also take images in IR to help resolve surface details, and for Venus, I take images in UV which allows us to resolve cloud details. While I’m using a mono camera, a color camera is a good place to start for beginners since it eliminates the extra acquisition and post-processing time that comes with filters and combining the channels into a color image. I started on the ASI290MC color camera.
All of that gear is attached right to the back of my telescope where the eyepiece would be so the light is landing right on the camera sensor. Once attached, the whole system must be properly balanced so that the motor is able to track the mount successfully with the sky. The telescope has a counterweight to offset the weight of the optics and the camera gear. Also, the optics and camera are attached to the mount via a saddle and must be centered there for proper balance there as well. Balancing is often overlooked, but it makes a difference since a stable mount takes better pictures.
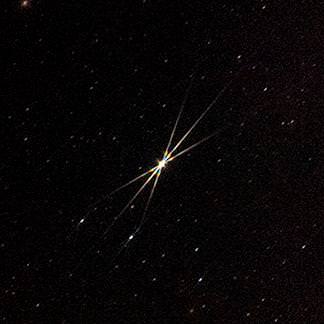
The next step is getting the telescope in focus and collimated. Focusing is easy as pie with a device called a Bahtinov Mask. It’s a simple piece of plastic that you put in front of the optics which creates diffraction spikes. Move the focus and the spikes move. When you are perfectly in focus, the spikes all converge to a point, simple as that.
After focusing, collimating the telescope is the process of aligning the mirrors as perfectly as possible so as to avoid image distortion. For collimating I point the scope at a star and turn on a program called MetaGuide. This software displays the image from the camera and helps me to know which way to adjust the mirror so as to achieve alignment. This step can be done visually, but MetaGuide makes it far more precise.
Collimating is probably the most difficult part of setup, in my opinion, and at times it still gives me trouble. But getting it right is absolutely critical to getting good images of fine planetary details.
After that, it’s time to image! I use a program called FireCapture to bring in my data. This program has proven easy to use and does a great job collecting video files. It allows you to crop the scene down to avoid wasting time (and hard drive) recording empty space, and it can control various attachments like my filter wheel as well as automatically guide the telescope to keep the planet centered.
I really only need to adjust the gain and exposure setting, tell FireCapture how many seconds to record, and push start. The video file is saved and then it’s time to begin processing it.
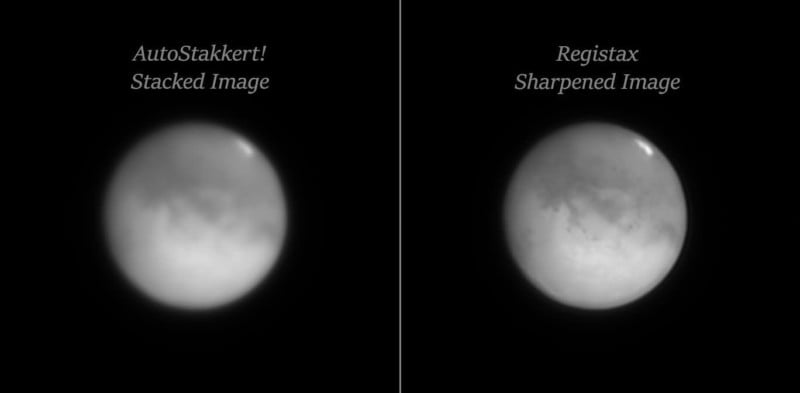
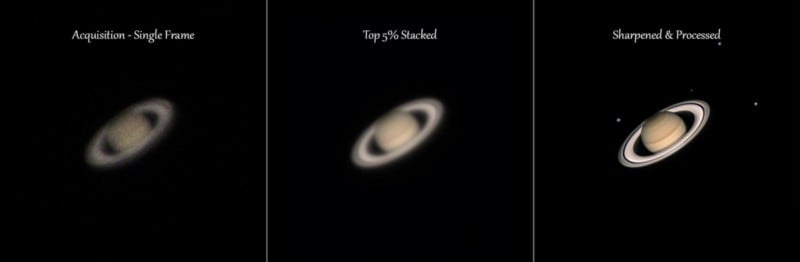
The first step after gathering the data is to run it through a program called AutoStakkert! (yes, the ! is part of the name). This program was made by another astronomer as a passion project and is absolutely amazing. It automatically sorts the frames by their quality, and then allows the operator to use as many or as few frames as desired to produce the “stacked” image.
Stacking is a term for taking multiple frames and averaging them together to reduce atmospheric distortion and noise from the image. Interestingly, stacking actually works for normal daytime photography too, but typically the noise in a daytime image is so low that it isn’t worth the time.
Once finished, Autostakkert! produces a single stacked image as a .TIF file. It is an amazing leap forward compared to a single video frame, but it still isn’t terribly impressive and often looks pretty fuzzy.
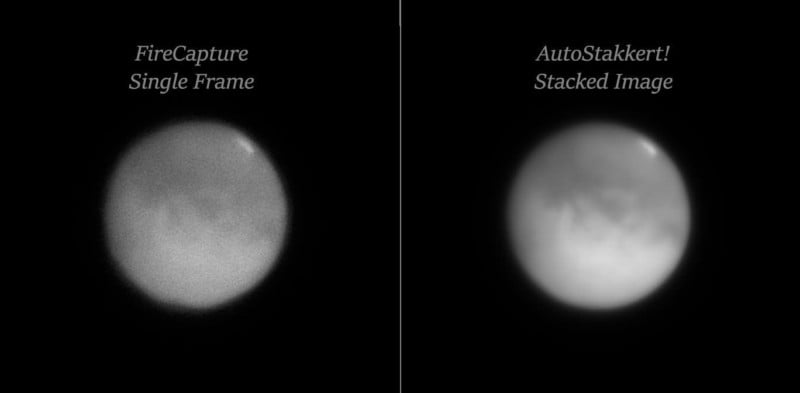
The next step after stacking is to sharpen the image using the wavelets feature of a program called Registax. This program used to be the go-to option for stacking, but popular opinion seems to be that Autostakkert! is the best these days. However, Registax has a sharpening tool referred to as “wavelets” which allows you to take the fuzzy, stacked images and produce a nice crisp shot. This really is where some magic happens.
The actual process of how wavelets work is probably something for a research paper, but suffice it to say, you move the sliders and watch the image come alive before your eyes. The same settings don’t often work from image to image, so it is a bit of trial and error each time, but the results are stunning.
If you’re doing mono imaging, the Red, Green, and Blue channels must be combined along with the Luminance channel after sharpening. I use a program called winJUPOS to do that, but you can also do it in photoshop easily too. Color cameras can skip that step, of course.
After that, the typical photography post-processing edits in Lightroom and/or Photoshop happen. Planets typically do not need as much post-processing as things like Nightscapes and Deep Sky Objects do, but they still benefit from moving the Lightroom sliders around a little. Sometimes I throw the image back into Registax for more sharpening too.
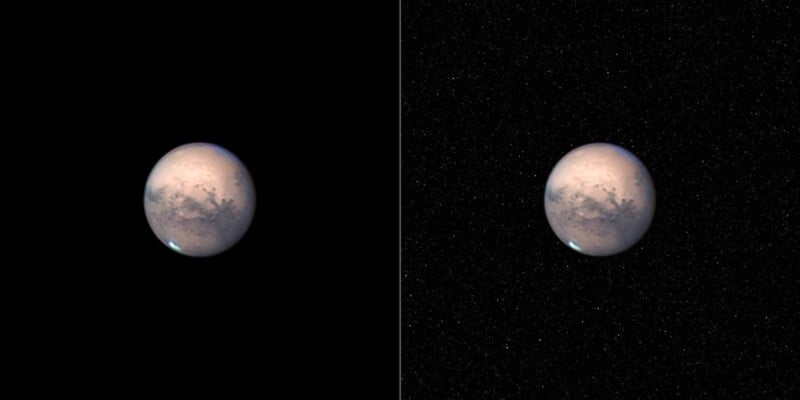
Really, I don’t have anything specific that I do in this phase of post-processing. I like to follow the advice that I give anyone who asks: process the image in a way that is pleasing to you. I do try to stay as faithful to the reality of nature as much as I can, but it is often impossible to capture space in one shot because the dynamic range of these targets is so huge.
For instance, one thing I very much like to do is composite a starfield behind my planet image using Photoshop. The stars are real, and the planet is real, but the camera has zero chance of capturing that dynamic range in one shot, so it has to be done as a composite in post-processing. And really, I just like the way it looks.
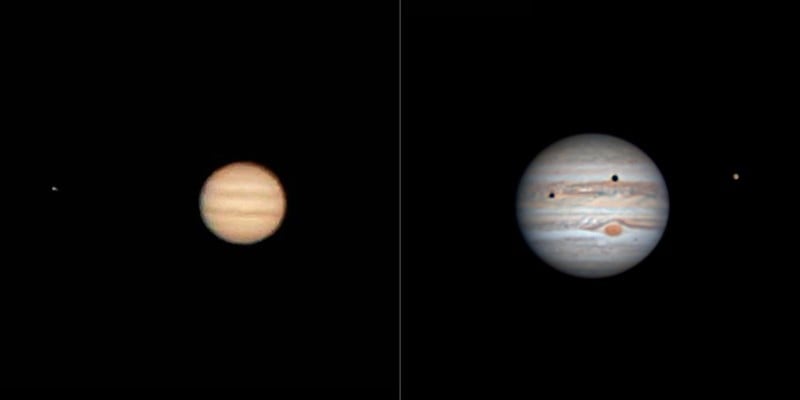
One last, additional piece for planetary photography is capturing the moons of distant worlds. These moons are out there, and they are amazing to see through the eyepiece. Those orbiting Saturn and Jupiter are especially prominent. But, just like how the camera cannot capture stars and planets at the same time, it is tough to capture some of the moons and planets at the same time as well.
For these, I take an overexposed video in FireCapture, which I then process in the same way as before, but this time looking for the faint moons. Afterward, I use photoshop to align the planet and moon images as separate layers and then blend them together into a combined final image.
Using all of the above techniques, I have been able to image many objects in our solar system. I’m still working on my methods, and I feel like I improve almost every time I go outside, even though I only usually get to image on the weekend and then only when the weather is good. But, by continuing to push myself, I have been able to make some amazing strides in less than two years of practicing.
So there you have it, a little bit about me and my adventure in learning astrophotography. I hope this has been helpful and least given a few of you the motivation to go out and capture the night sky for yourself! If you’re interested in learning more, follow @NightSkyFlying on Instagram where I post all of my work and the stories that go with it. You can also find prints of my work at NightSkyFlying.com if you’re looking for gifts for yourself or others.
I wish you all the best and clear skies if you decide to pursue this hobby. I do believe astronomy can change your life, and that anyone can pick up this hobby. And who knows, maybe one night you will take a picture of the sky that will change the way we see the universe!
About the author: Jonathan T. Grayson is an astrophotographer based in Northern California. The opinions expressed in this article are solely those of the author. You can find more of Grayson’s work through his handle @NightSkyFlying on his website, Facebook, Twitter, and Instagram.