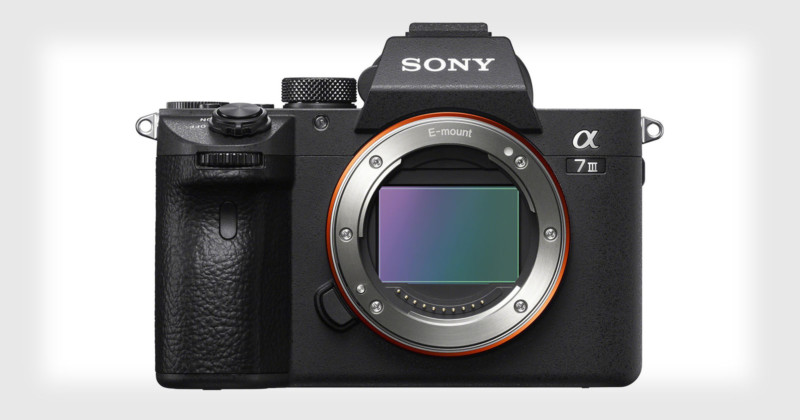
Sony a7 III Review: An Elite Camera with a Friendly Price Tag
I recently had the opportunity to test the Sony a7 III thanks to the generosity of Glenn Wenfield from Sony North America. Since this is a camera that has already generated quite a buzz, I want to start by discussing how I am approaching this review.
I prefer one body that can do both because, in addition to making me faster, it is easier to match colors between stills and motion content if they come from the same sensor. I am a working professional freelance photographer, educator, artist and filmmaker who focuses on visual storytelling. What matters most to me is whether or not a tool will help me tell these stories more effectively.
The short answer for the a7 III is that yes, it does. I will be purchasing one as soon as they are available because I believe that this camera is likely to be a tool that changes the way we can tell stories, which is huge. This is because Sony has put both real pro video features and top-quality stills features into the same small, lightweight body that has good ergonomics, nice color, spectacular ISO and AF performance, great battery life, and a solid build.
As a point of reference for my opinions on the a7 III, I want to mention that I have used or tested most of the Sony a7 series of cameras so far. This includes the a7 II, a7S II (2 different bodies on multiple shoots), a7R II (3 different bodies on several hundred shoots), and now the a7 III. I have also had a brief hands-on moment with the a7R III and the a9, but have not had the chance to fully test them yet.
I own the a7R II and have rented or borrowed the rest. Collectively I have shot over 25,000 photos and dozens of hours of video with these cameras.
While the feature list is extensive for the a7 III, there is a much shorter list of things that I look at when I evaluate whether I want to make a camera as part of the kit I use on a regular basis to create the photos and videos I deliver for my business.
Durability and Dependability
I start with durability and dependability because if a camera doesn’t work when I need it to, nothing else really matters. Every time I look at a new piece of gear, I ask if it can keep working under the conditions I need to use it under to do the jobs I do.
This will ultimately remain unanswered in part for the a7 III until these cameras are out there being used heavily day-in and day-out. But in my two weeks of use, things look promising on this count. I was able to take the a7 III into some challenging conditions, including inside an ice rink, and there were no durability or performance issues at all.
Usability and Feel
If the camera is likely to be reliable and durable, then I look at how it feels to touch and operate. The first thing I noticed about the a7 III was that the ergonomics had been upgraded significantly.
For something I will be holding in my hand for up to 12 hours a day when I am shooting, this is very important. The shape of the body has been changed in subtle ways that make it far more comfortable to hold. I didn’t have any shoots over 8 hours during the time I was testing it, so I can’t speak to how it will feel at the end of an all-day shoot, but so far it is a very noticeable upgrade over the previous bodies in terms of ergonomics.
Part of the improved ergonomics is that the dials are more solid. They click positively into place and have been made easier to activate on purpose while at the same time harder to activate accidentally. It is also now easier to sense by touch alone exactly what is happening with the dials, which means I don’t have to take my eyes off the finder or monitor when I an shooting.
Another thing that I noticed right away is that the color of the camera’s monitor is much better than previous A-series cameras. It seems to have a higher dynamic range and better contrast than the version 2 cameras. Not quite as nice as a purpose-built field monitor, but much closer to that than the earlier cameras. It is also more easily viewable in bright light, so I can take low-angle shots on sunny days without crouching.
The waist-level abilities of the particular way the Sony screens flip out are something I love because it lets me take pictures without anyone being able to see for sure I am taking them. The more common screens that flip out to the side are visible to the subject which gives the whole thing away. Having the screen between me and the camera body is great for situations where I am photographing intimate gatherings that need to be undisturbed.
Menu System
Another key part of usability is how the experience of operating the menus system is. Sony has made some significant advances in the menu layout for the version III cameras, and this is no exception. I like the addition of the My Menu function because it makes me faster to be able to assign commonly-used items there for easy access. The layout tabs based around groups of related operations are also a good strategy.
I do still have a few suggestions for future improvements. The menus have multiple names for the same thing or multiple locations for accessing different parts of the same operation in some cases. In the a7 III menus, the finder and monitor are sometimes named using these two words most photographers use. But sometimes one is called Monitor and the other is the Viewfinder. Then in the next menu item, it is called the Finder again. And sometimes one of them is called a pad or a panel. I suggest using Finder and Monitor everywhere they are found in the menu.
There are also Focus Area and Focus Settings that are in fact 2 different ways of accessing the exact same choices of how many focus points are used and how they behave. My suggestion is to get rid of the term Focus Settings and keep one menu called Focus Area because it more accurately describes what the menu does. The majority of students that I have helped learn to use a camera find the menus on all cameras to be somewhat challenging at first, so the more intuitive a menu system is, the more new users will like it and feel comfortable using it.
Autofocus
Since I am talking about the controls for the AF, I need to mention that the autofocus on the a7 III is absolutely spectacular. It is fast and accurate for both stills and video. Based on what I have seen so far, the claims Sony is making about low-light AF on this camera are not exaggerated. It can acquire and track a bird flying rapidly across the sky an hour after sunset and almost never miss.


One of the things I do to test AF on new cameras is to point them at my black cat as she sleeps in the shade. No camera has ever been able to lock focus on her without a lot of hunting. This one can on the first try. I also love the touch control of the AF points by moving my thumb around on the monitor.
Camera Quirks
There are two things related to menus that I feel deserve special mention. The first is that currently, all three dials on the camera do essentially the same thing when operating the menus. Since the menus are so extensive as a result of all that this camera can do, it would be a small but very useful addition if the dial by the shutter button could be used at all times to scroll through the top-level tabs of the menus. The rest of the navigation could stay as it is. This small change would dramatically speed up the process of using the menus and improve the user experience.
The second thing is one that I am still quite baffled by. This camera can be connected to computers and mobile devices through Bluetooth, Wi-Fi, NFC, and USB. But none of these connections can set the camera’s clock. This has to be done manually. I checked with Sony Pro Support to see if this is the case on all of the A-series cameras and was told that it is.
Setting the clock is important to people like me who either work with other photographers on a regular basis or use more than one body ourselves. Once the shoot is over and the files are ingested onto a hard drive, I need to be able to sort all of the stills taken by all of the cameras by their capture date and have them show up in the correct order during culling and post-production. Other brand’s cameras have been able to have their clocks set from computers (and now smartphones) for over a decade. It is time Sony added this in a firmware update.
Color and Dynamic Range
If a camera works and is easy to hold and easy to operate, then I look at color and dynamic range. Depending on the job, this may come before one of the other two. I am a dedicated colorist who does independent consulting work for other photographers who are seeking to improve their understanding of digital color as well as a teacher who has led classes on digital color at all levels from intro to Graduate-level.
I have processed over 250,000 RAW files that came out of cameras from Canon, Nikon, Hasselblad, Fuji, Olympus, Leica, Phase One, and Leaf as well as scanned and corrected thousands of images shot on film. I have helped several thousand students over the past 15 years do the same. It is safe to say that I am obsessed with color.
The color from the a7 III is an improvement over its predecessors, especially where skin tones are concerned. With video, it has the best color for skin tones, I have yet seen in any camera I have owned under tricky light sources like fluorescents. With the JPEGs I shot and the RAW files as I viewed them in Sony’s Imaging Edge software (the only thing that can read them at time-of-writing), they were at least on a par with other mirrorless and DSLR cameras I have used recently.


Medium format backs that have 16-bit capture still have a slight edge, but that is to be expected because of the increased capabilities of those types of capture. The a7 III seems to do particularly well under sodium vapor lights and mixed tungsten and daylight during the afterglow well beyond sunset. Both of these were pleasant surprises as these are very tricky situations to get any kind of decent color in.
Low-Light Performance
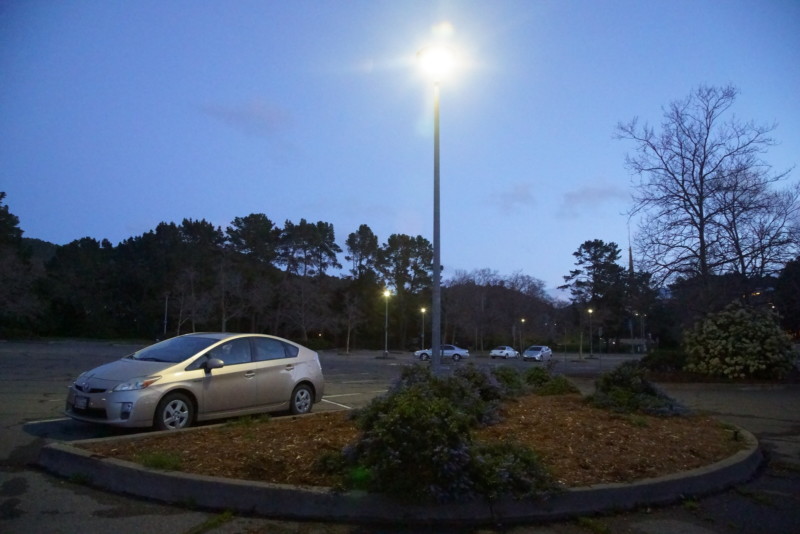
On a related note, the a7 III has impressive low-light performance. It can create usable images at ISO 51,200 under a variety of circumstances, including mixed lighting and extremely low light.


The color isn’t quite as good at this ISO as it is at the lower settings, but it is still unusually good for color at such a high ISO. Compared to my experience with the A7 S II, they are essentially the same for stills at high ISO in terms of noise level. But I prefer the color on the shots from the a7 III over the A7S II.


Sony appears to have been actively soliciting feedback from actual working photographers and implementing what they have learned from this process in terms of color science extremely rapidly. The improvement in color between the II-series cameras and the a7 III is a spectacular achievement for Sony in such a short time. Color science is tricky because it is subjective and perceptual as well as technical. It seems they have paid particular attention to the Auto White Balance and performance under mixed-light situations.
Focus Peaking
About half of what I do with Sony cameras is create stills and about half is digital cinematography. For the motion content, I favor vintage manual focus and cinema lenses for their unique expressive quality and precise control of focus and iris. For me, using MF lenses means using focus peaking most of the time.
The focus peaking on the a7 III is easier to use and more accurate than the previous a-series cameras I have used. This being said, it is annoying that there are three menus to adjust it. One is for peak settings, one is for the color of the outline and one turns it on and off. These could be combined into one that has low/med/high/off, plus Red/Yellow/White color choices. That way everything I need to know about peaking would be immediately accessible from one menu item and one slot in the highly useful Fn button menu that I use constantly whenever I am shooting Sony.
The same goes for the two menus needed to control the zebras. That could be simplified to OFF plus the different IRE-level settings. The A7 R II has 2 menus for peaking and 1 for zebras, which is better because it is faster to use.


Finding a Glitch
The finder/monitor auto-switching also has a weird glitch in the camera I tested. There were a few times when I was using the monitor and the subject changed suddenly so I needed to use the finder. I pushed the monitor in while lifting the camera to my eye. I got it far enough in to easily put my eye to the finder, but the finder was black and the monitor was still on. I was able to repeat this every time that I hadn’t pushed the monitor completely into the body. Having it out even a millimeter deactivates the auto-switching. This could be because I was using a pre-production version.


The Battery
Moving on to batteries, the new BC-QZ1 charger is a step in the right direction. The battery locks in securely and the way the LED lights illuminate to tell me if the battery is charged makes more sense than the single LED on the BC-VW1 charger for the NP-FW50 batteries. I would like to see an LED indication of a full charge that stayed lit until the battery was removed so that I don’t have to wonder if the battery is fully charged or if the charger lost its connection to power. Currently, the LED indicators all go off once the battery is fully charged.
Making the NP-FZ100 battery is another huge score for Sony. It lasts long enough that I no longer have to worry about battery life any more than any of the other cameras I use. I wasn’t able to test the long-term performance of the battery because I only had the camera for 2 weeks, but I was consistently pleased with how long it lasted. The camera also no longer drains the battery rapidly when it is turned off like the version II cameras do.

Gamma Display Assist
Another feature with a huge benefit is Gamma Display Assist. It means I can now shoot video in S-log and select a LUT from the camera’s menu to apply to the monitor so that I can see a better idea of what the finished file will look like. This also means that I can use focus peaking more effectively.
4K Video
The new proxy file recording for 4K video, separate custom key settings for video and stills and the menu item called Movie W/Shutter are also small but important additions that make the a7 III a better video camera. Now I can record 720p proxy files when I shoot 4K to streamline my workflow later, have the custom keys all set to relevant functions for both stills and video and use the shutter button as a start/stop button to take advantage of the still-camera ergonomics when shooting video handheld. I would suggest having two Fn-menu setting. One for video and one for stills, just like the 2 separate custom key assignments for the same.
Suggestions for Video
Since so many things about this camera are built for serious video use, I have a few small suggestions for future updates. These are not criticisms so much as the last 10% of what would make this a really special video camera. The first 90% is already there.
I shot multiple 4K clips in a row that each went as long as the camera would allow before it stopped the recording on its own. I wanted to see if it would overheat. In my tests, it kept right on shooting and did not get warm to the touch or show any signs of preparing to overheat. I can’t say how this would go for a full day of shooting in a hot environment because it was cold and rainy the days I ran the test, but it bodes well for using this camera as a 4K capture tool in demanding situations.
The S&Q menu is wonderful for video because it allows me to set both the playback and capture frame rates so that I can have slo-mo or high-speed video right out of the camera without the need to conform files in post. Adding in-camera time lapse ability with user-controllable intervalometer functionality would complete this particular set of skills for the camera.
Internal 422 video recording would be amazing. So would a waveform monitor option that is assignable to a custom button so that it can be easily turned on and off. I would also like to see a mini or full-sized HDMI connection because the micro HDMI cables tend to be fragile due to the small size of their connections. A solid, wired remote from Sony that would allow me to strap it to my rig when I do video to use as a start/stop button would also be very welcome.
For post workflow, I would also like to see the ability to control the names video clips have. One of the test shoots I did with the a7 III was a 3-camera production where I ended up with several clips from different cameras that were all called C0001.mp4. This presents challenges in media management during post that could be avoided easily if the files from different cameras had custom names that were different from each other. DaVinci Resolve, in particular, does not like dealing with multiple clips that have the same name, but different content. Premiere Pro seems to be slightly more accommodating of this.
To Sum It All Up
In conclusion, the a7 III is a top-quality hybrid stills and video camera body that I highly recommend. It comes in at a price point that makes it very appealing to students, indie filmmakers and anyone on a small budget.
The best thing, in my opinion, is that you can get real, practically useful capabilities for both stills and motion capture in a very small package that produces high-quality results that I feel I can confidently deliver to my clients.
About the author: Bryan Hewitt is an artist, educator, filmmaker and photographer. You can find his photography work on his website and his film and video work on Vimeo.