Fuji Raw Processors Compared: There’s a Lot More To It Than Image Quality
There has been a wave of updates to raw processors recently, including new releases this week from Topaz and ON1. Consequently, it has been difficult for me to finish this review, but developers updating their software is a good problem. Finally, here it is!
Note: Although this is a Fuji-centric (RAF/X-Trans) review, I also tested this software with several other file types and included Sony results so much of the information will be useful to shooters of every brand.
This review is geared towards factors that add or take away from the potential enjoyment you receive from processing your images. The main factors are efficiency (AKA your time), interface, and accuracy, all leading to perhaps the most important factor: enjoyment.
Let’s face it, if you don’t enjoy working on your images then you may have to question your dedication to photography. An intuitive interface with images that open up with proper color and a workflow from start to finish that is fast and efficient will all lead to a more enjoyable experience. And the opposite will lead to frustration and spending too much time trying to reach your imaging goals.
Bottom Line First
I would love to be able to tell you there is one winner that will solve all your needs. The reality is we all have different needs, goals and personal workflows. I encourage you to read the rest of the review, check out the Pros and Cons below and look at the chart I made to help you match one or more of these processors to your own personal needs and workflow. I may be the exception but I actually use all four of these. I realize that may not work for everyone so here’s my bottom line on these:
Best All-Around Solution
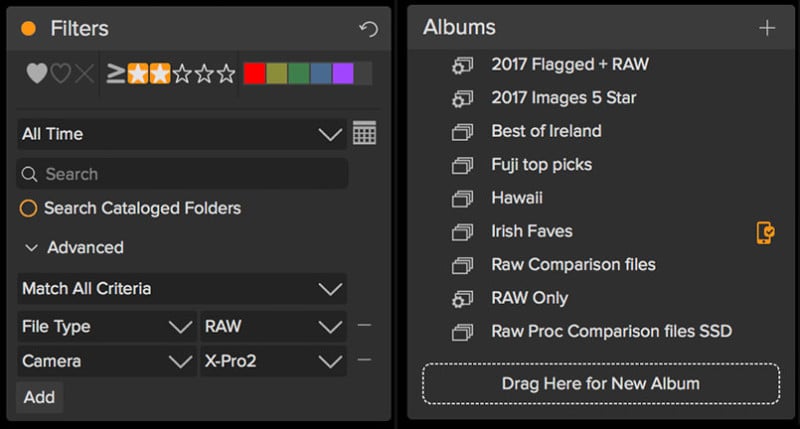
ON1 Photo Raw 2018 is the closest to being a comprehensive solution. If you deal with lots of images and want to manage them (culling, rating, keywords, searches, etc.) and have a broad array of useful tools for processing along with fabulous masking capabilities, then ON1 Photo Raw is it. It does a great job with Fuji X-Trans files. It is also fast with most tasks. I would really like to see ON1 provide the ability to combine RAW+JPEG. You can work around it by filtering to see just raw or just jpeg but it can be a problem if you already have final versions in other formats that you want to see alongside raw without seeing hundreds of jpegs. All this said it is my main hub. ON1 will be releasing a significant update in a few days. I’ve been working with a pre-release and will report on the update when it’s released.
Best Interface/Most Intuitive
Luminar 2018 is a fabulous single image processor (image management coming down the road.) It has the most intuitive and easy to use interface out there. It’s simply a joy to use it. Fun and enjoyment rank highly in my book. I typically hop into Luminar after I’ve exported a high-resolution file from ON1. It does handle raw files well, including Fuji X-Trans but there are two reasons I don’t use it for initial raw processing with my Fuji raw files: 1. No lens profiles built in (supposed to be coming in the future according to Skylum) 2. It takes 21 seconds to open an X-Trans file. Lack of lens profiles is definitely the bigger factor and really more applicable for mirrorless users like me, where we’re used to seeing corrected images in our viewfinders and want that to be reflected when processing. I consider these a minor inconvenience and would not want to be without my favorite filters in this gem of a processor (Golden Hour, Sunrays, Orton Effect, Bi-Color Toning, and AI-Accent)
Best Artistic Effects
Topaz Studio is unique with a dedicated following and Topaz products are an old favorite of mine. Until their release of Studio, they had been creating plug-ins. This company has their roots in creativity and consequently they have come up with Adjustments and plug-ins that no one else has. The base Studio program is free along with some basic adjustments and extensive masking capabilities. You can have multiple images open and create versions, all of which appear on a filmstrip at the bottom. There aren’t any image management capabilities so other than the aforementioned capabilities, it’s a single image processor. There are two main reasons the Topaz following is so dedicated: No one else has free lifetime upgrades and no else has the likes of Impression, Glow, Abstraction, AI ReMix, Precision Contrast, and ReStyle. Some of these migrated from plug-ins and some are new.
Good Database and Variety of Modules
Lightroom Classic CC on paper (see my chart) should be the best choice for an all-rounder but the numbers aren’t the whole story. If I didn’t have ON1 Photo Raw as an option I might still be using Lightroom for my main hub as I was before, relying on other programs and plug-ins to make up where Lightroom is lacking. There are two main reasons I don’t use Lightroom as my mainstay processor anymore: 1. I shoot a lot of work on my Fuji system and Lightroom still has problems with “worm” effects and diminished acutance (aka “sharpness”) on some subjects with Fuji raw files. I make large prints and it shows up. 2. I add selective contrast for a sense of depth to almost every image and this is not feasible to do in Lightroom- typically I do this with Dynamic Contrast in ON1 Photo Raw or Precision Contrast in Topaz Studio. There really is no good equivalent in Lightroom.
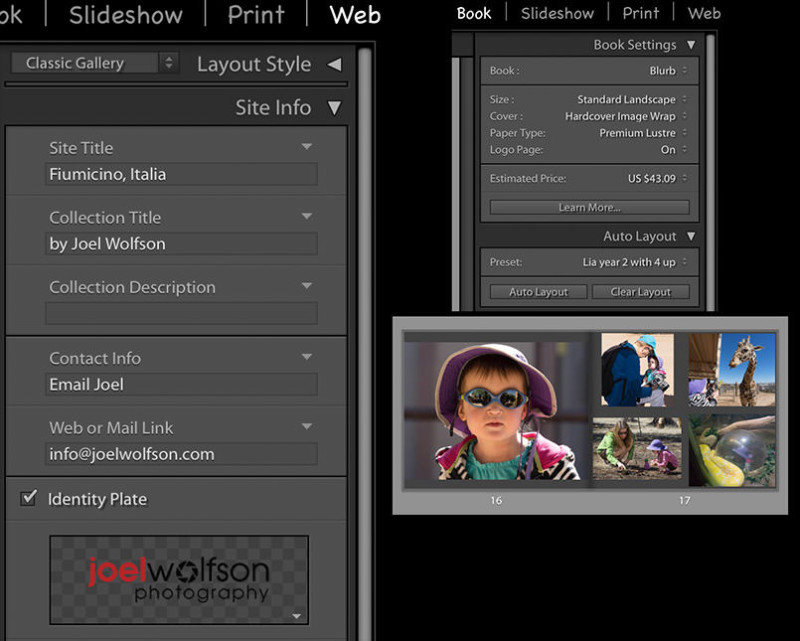
I feel Adobe is playing catch-up to their competition and still behind. This latest version does make great strides in speed as long as you have a fast machine with at least 12GB of RAM and multi-processor CPU. It’s still quite poor on my laptop which I use when I travel and shoot on location. I still like the reliable and fast image database capabilities, the stellar print engine and I make use the slideshow, web, and book modules.
Bottom Line on Workflow
The best workflow is one that fits your needs and the way you shoot and think. You may not even need to “manage” your images with a browser or cataloging. If that’s the case and you don’t need built-in lens corrections you could easily use just Luminar and be very happy. It’s easy, fun and intuitive. Or if you like to go way beyond a photographic look, your application of choice may be Topaz Studio for its unique artistic effects. At the other end of the spectrum are shooters like me that have many tens of thousands of images to manage and keyword along with a vast array of processing needs. As mentioned, every one of these programs has unique features that I use. For everyone else in between the ends of the spectrum I have an easier time recommending ON1 Photo Raw as a hub (over Lightroom) and then hopping into either Luminar or Studio (or both) as needed for their particular assets. Use the chart and Pros and Cons as well as the trials offered by all the developers in this review to choose what makes sense for your particular workflow.
Quality is a Given (Mostly)
When I looked into the raw processing of Fuji X-Trans files a couple of years ago, image quality, particularly acutance (aka “sharpness”), was the main challenge. With almost every other file type (Canon, Nikon, Sony, etc.) acutance and detail were a given whether you used Lightroom or something else. That’s how it should be and finally is for Fuji X-Trans raw files (except Lightroom in some cases.) I will say that when I make big enlargements I can see differences among the processors but most of my patrons will never see the nuances I do, especially when viewing large prints at a normal distance.
I can always spot the photographers when I have an opening or show because their viewing distance is dictated by the length of their nose. Humor aside, I could pick nits with any of these on very large prints as they all have their strengths and weaknesses but when real life and all the other factors of a workflow are taken into account the issues are mostly negligible. The one that bothers me in some cases is Lightroom. In spite of using deconvolution* sharpening I still see “worm” effects, particularly in landscapes with green foliage and rock formations/mountains.
* Typical deconvolution settings for X-Trans files in Lightroom: Detail slider all the way up with moderate use of Amount slider, generally no masking, and optimal Radius, which is usually about 0.7 with X-Trans 24MP files. Basically Lightroom starts using deconvolution sharpening once you move the Detail slider past the 50% point.


So What Else is Important?
Ultimately you will decide this for your personal workflow but I want to point out a few things I believe are important for processing virtually any image:
Retouch and cloning
A constant annoyance for me over the years has been Lightroom’s lack of ability to clone. I don’t use cloning very often but avoiding an extra trip to Photoshop is something I’ve always wanted with Lightroom. These days it is a bread and butter task.
Luminar and ON1 have the best set of tools among the bunch for retouching and cloning. I like that Luminar shows you a mask of the area you’re about to “erase” and can change it before committing to it but it does take several seconds for each step. With either of these programs, the cloning tool saves you going into Photoshop. Topaz Studio has a good retouch tool but it’s only for removing small items or dust without being able to set a clone source or change it. Lightroom has a very rudimentary tool that works fine for dust and retouching small things but anything beyond that will require a trip to another program that has real cloning abilities.
Fujifilm Profiles
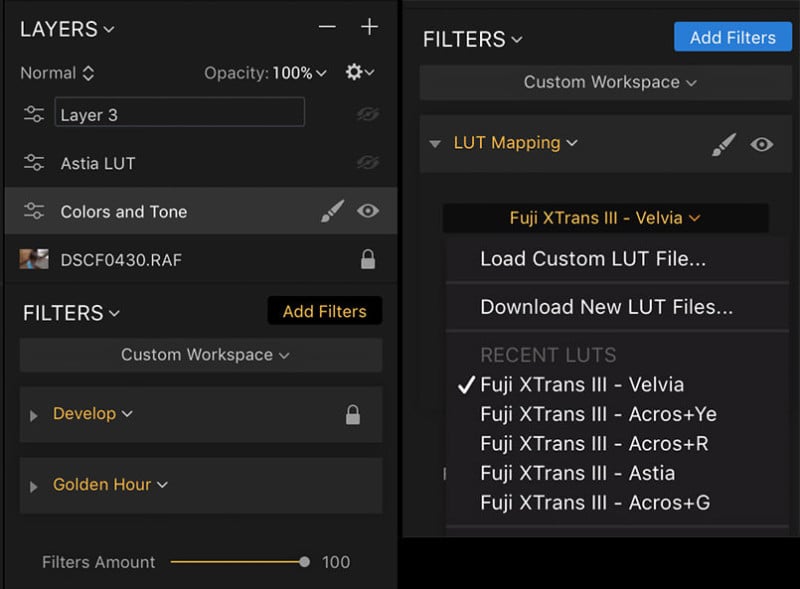
Currently, only Lightroom has Fuji film profiles which are applied to raw files at the Camera Calibration level and you can have them applied during import using a preset. Although Adobe developed these with Fuji they’re not an exact match to the in-camera profiles. That said I think they’re pretty close. The conundrum, of course, is that you may be sacrificing quality with Lightroom due to it’s less than stellar results with some Fuji X-Trans images. Luminar 2018 has the ability to apply a LUT (custom LookUp Table.) This means you can use third-party LUTs for various effects including Fuji film profiles. The ones I’ve used have been excellent and the closest match I’ve seen to the in-camera profiles.
Highlight and Shadow Detail
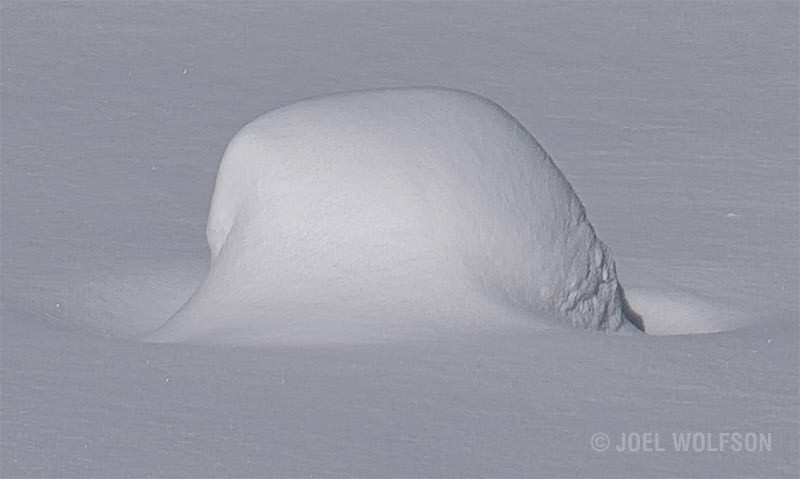
Modern digital cameras capture a huge dynamic range and to get the most out of your image you often have to use highlight and shadow sliders to bring back detail that is in the raw file but you may not see until you make these adjustments. This is especially applicable to landscapes and outdoor scenes or anything with direct sun and/or heavy shadows.
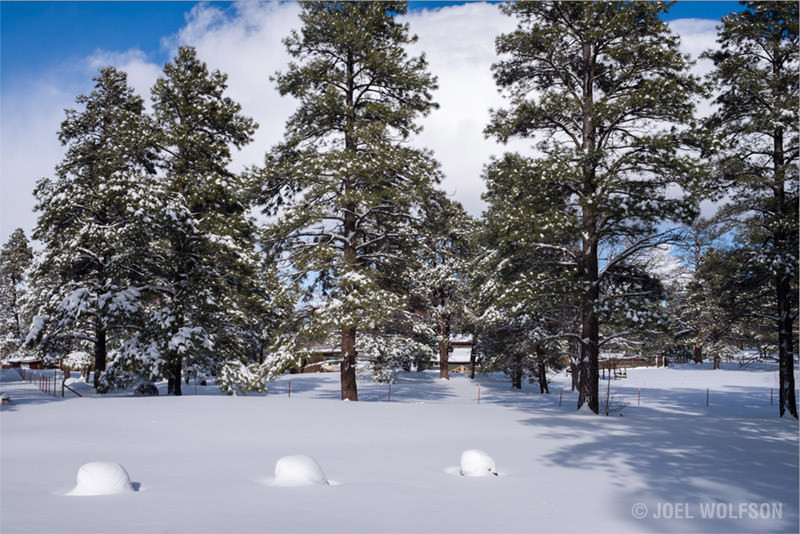
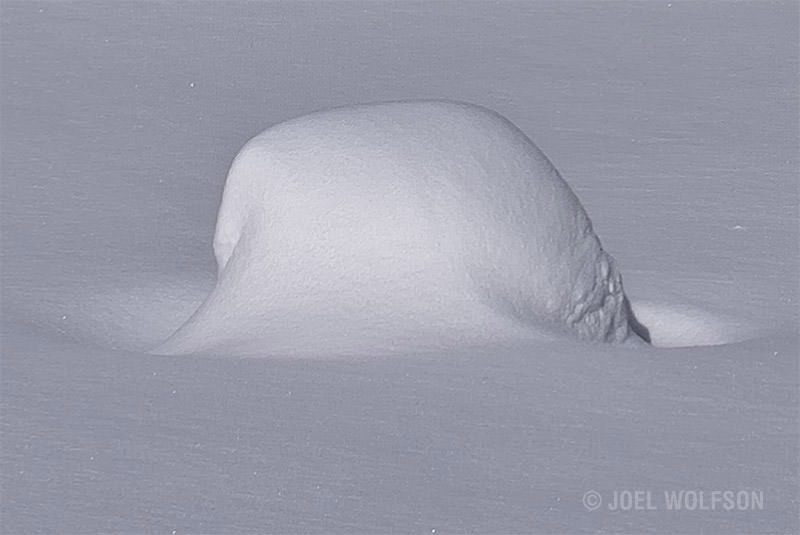
To test highlight sliders, I used a snow mound in direct sun and brought the sliders down as far as possible to retain the most detail. The fact that the X-Pro2 even has tone and detail on a snow mound in bright sun is a testament to the X-Trans sensor and the XF 23mm f1.4 so if you want to retain that, your processor has to cooperate.
All do a good job with retaining highlight tone and texture in the snow but with LR you will run into cases where you get the worm effect when you sharpen enough to get the kind of detail you retain with the other processors. This is using “deconvolution” with Lightroom which, in my opinion, is the only way to get reasonable sharpening in Lightroom even though you can still get the worm/plastic effect in many cases.
The shadow sliders in Photo Raw, Luminar, and Studio are all pretty good- once you go above a certain point you start to affect mid-tones and eventually even highlights. Not a big issue with a tight face portrait but in a broad scene like a landscape, you will likely be using a mask to isolate the shadow adjustments.
In the case of Luminar and Photo Raw 2018, you will be using a different filter from the basic/raw ones (Tone and Tone Enhancer respectively) if you want to use masking. Interestingly ON1’s Tone Enhancer (mask-capable) is much less heavy-handed as you move towards the maximum effect than its non-masking-capable counterpart in Develop. Topaz Studio doesn’t limit masking anywhere. Lightroom’s shadow slider is so subtle that even if you max it out, you may still need more boost. Not really an issue if you’re doing it selectively. LR’s masking is more tedious to use and you may not remember whether you masked something as a gradient, radial, brush or some combination of those without consulting your history or digging through the effects.


If you are trying to get by with just one program then you will want one that has lens correction profiles, especially for Fuji or other mirrorless users. Soon that shouldn’t be a concern as all but Luminar have them built in and Skylum has said Luminar is supposed to have them coming in the future. All of these processors have manual lens corrections but I find manual corrections to be tedious and some aberrations (like dark vignetting in the far corners) just can’t be properly corrected without the lens profiles. You also want a processor that extracts useable color, tone, and contrast from the raw file.
Pros and Cons
ON1 2018
Pros
- Image management capabilities with cataloging, browsing, searching, filtering, and key-wording
- Fast rendering makes for fast culling and rating especially compared to Lightroom in many cases
- Versatile presets with stacking capability
- Fantastic masking capabilities
- Handles X-Trans files well
- Favorite/most useful features: Dynamic Contrast, Color Enhancer, Local Adjustments, Resize
- Built-in lens profiles/corrections
- Raw panel (Develop) has a Mid-tone slider in addition to the usual sliders.
- The Haze slider is in the Raw/Develop panel which is a more logical placement as that is generally a broad and primary adjustment
- Best scaling algorithms (Resize) for increasing resolution if you make large prints
- You can resize on the fly in the Output dialog
- Very fast searching and filtering
Cons
- No ability to combine RAW+JPEG captures
- No TIFF compression for output
- Lack of keyboard shortcuts to move among modules
- Tone & Color Whites and Highlights slider functions seem to be flip-flopped (those in Tone Enhancer are correct)
Topaz Studio
Pros
- Very fast processing (especially with capable graphics processor that has ample RAM)
- Built-in lens corrections/profiles plus optional manual adjustment
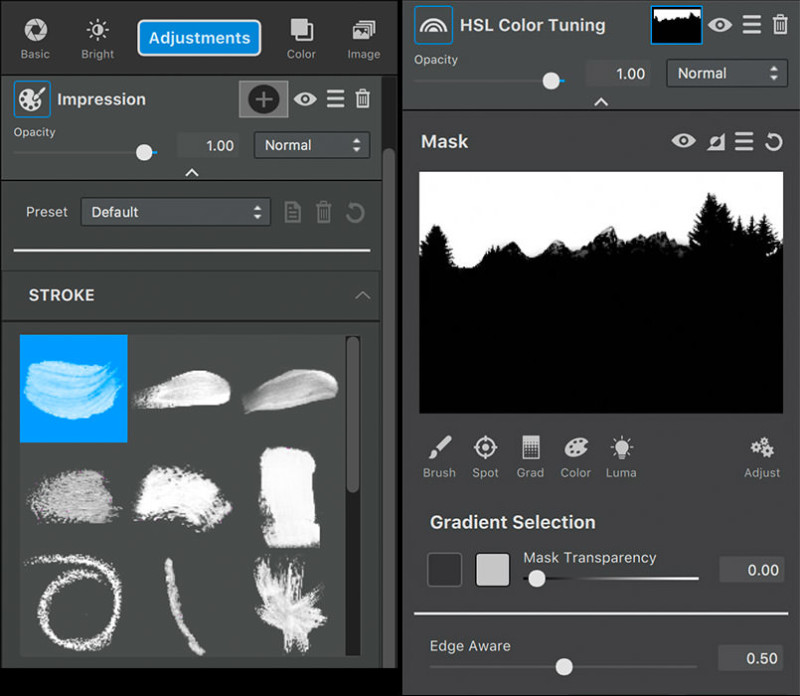
- Edge Aware gradient mask is brilliant and saves a ton of time with landscapes and other scenes
- Opacity sliders for each adjustment/layer and overall
- Masking for every adjustment with extensive capabilities and versatility
- Nice X-Trans processing once you make a preset for it (I have one available)
- More effects than any other processor
- Favorite effects/features: Precision contrast, Glow, Impression, Edge-Aware gradient for masking
- Virtual copies though they must be saved as project (.tsp) files if you want to go back to them with all adjustments showing
- Can save files in project format (.tsp) that preserves all your Adjustments/layers, masks, etc.
Cons
- Fairly slow to open X-Trans files
- X-Trans files need significant exposure and contrast adjustments to reach a starting point
- The mask gets misaligned if you crop or change crop after masking (this seems to be a bug so I assume it should get fixed in a future update)
- The size of the panels are not adjustable- this is an inconvenience on a laptop where you may have limited screen real estate.
- The image does not automatically adjust to available space when you close bottom or side panels- you have to click on “Fit” each time
Luminar 2018
Pros
- Intuitive interface and just plain fun to use
- Ability to save your own custom workspaces and useful ones that come with it
- Nice selection of presets, ability to make your own and import others (right now easier on Mac than Windows)
- Layer and sublayer structure via layers and filters
- Opacity sliders for each layer and one for overall
- Handles X-Trans files well (I have a preset for this)
- Favorite features/filters: Golden Hour, Dodge & Burn, Advanced Contrast, Polarizing, AI Accent, Sunrays, Bi-Color Toning, Orton Effect
- Fast export process, with resolution settings right in the export dialog
- Can save files in project format (.lmnr) that preserves all your filters, layers, adjustments, and history
- LUTs, although a bit esoteric are useful, especially to Fuji shooters with some great film profiles available via LUTs.
Cons
- Slider lag with some sliders as well as rendering and redraw lag when moving around image at 1:1
- Too little metadata shown (Only ISO/focal length/aperture but no shutter speed, lens, file size, etc.)
- Masking capabilities not as extensive and capable as others
- No built-in lens corrections (supposed to be added in a future update)
Lightroom
Pros
- Excellent and rock solid database with very fast searches
- Extensive metadata which can be used for searches and filtering
- Great print engine
- Additional modules that are useful (Slideshow, Web, Book, Map, etc.)
Cons
- Worm effect when sharpening, even with deconvolution method (subject dependent- worst cases are green foliage, rock formations, mountains)
- No feasible way to add a sense of depth with selective contrast like Precision Contrast in Studio and Dynamic Contrast in Photo Raw
- Indefinite monthly fee
- Adobe’s “addiction” sales model moving towards online only (even the naming “Classic” vs “Lightroom CC” seems to foreshadow this)
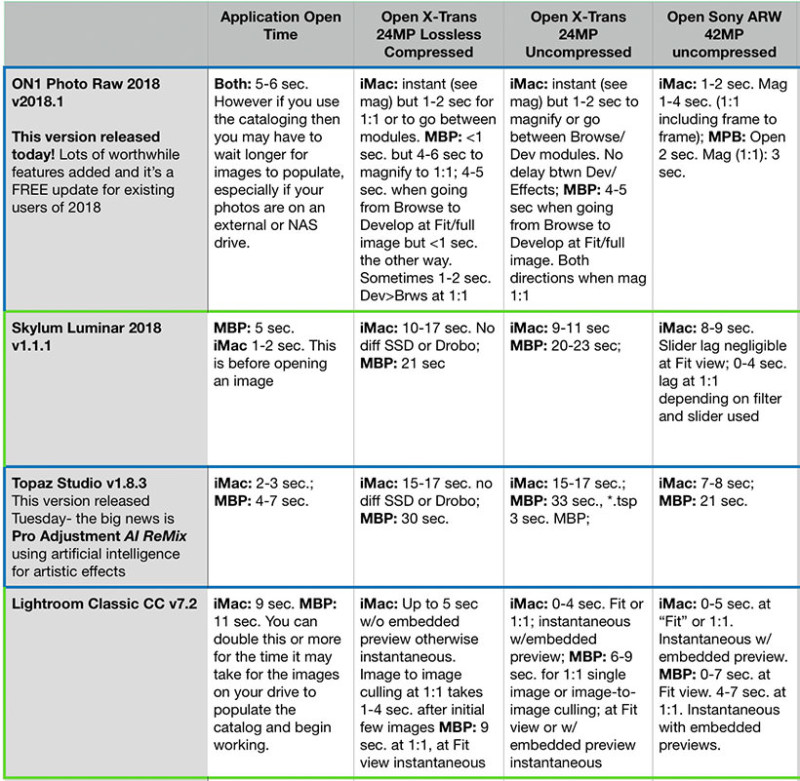
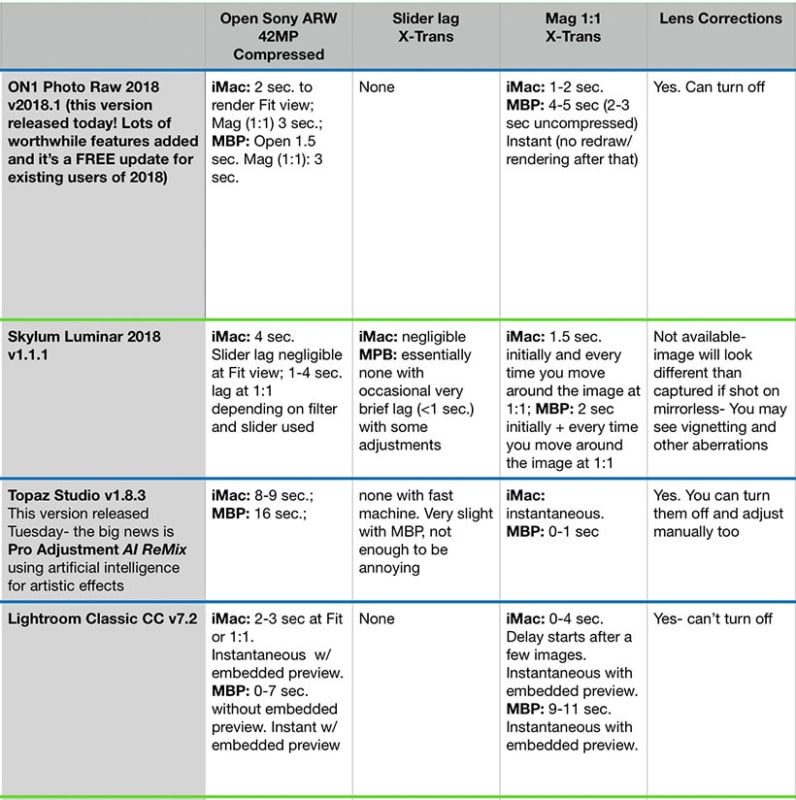
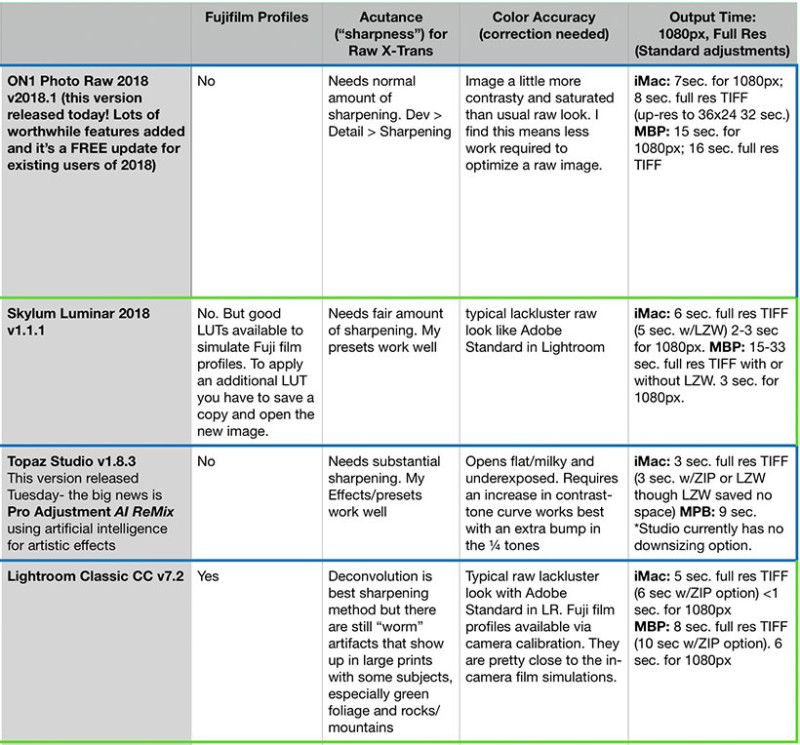
Comparison Chart
The chart below is a condensed version of my comparisons where I’ve evaluated the factors that are important to everyday editing, particularly Fuji X-Trans files. And yes I work on images virtually every day. Where timing is concerned I used a digital stopwatch and did numerous runs of each test.
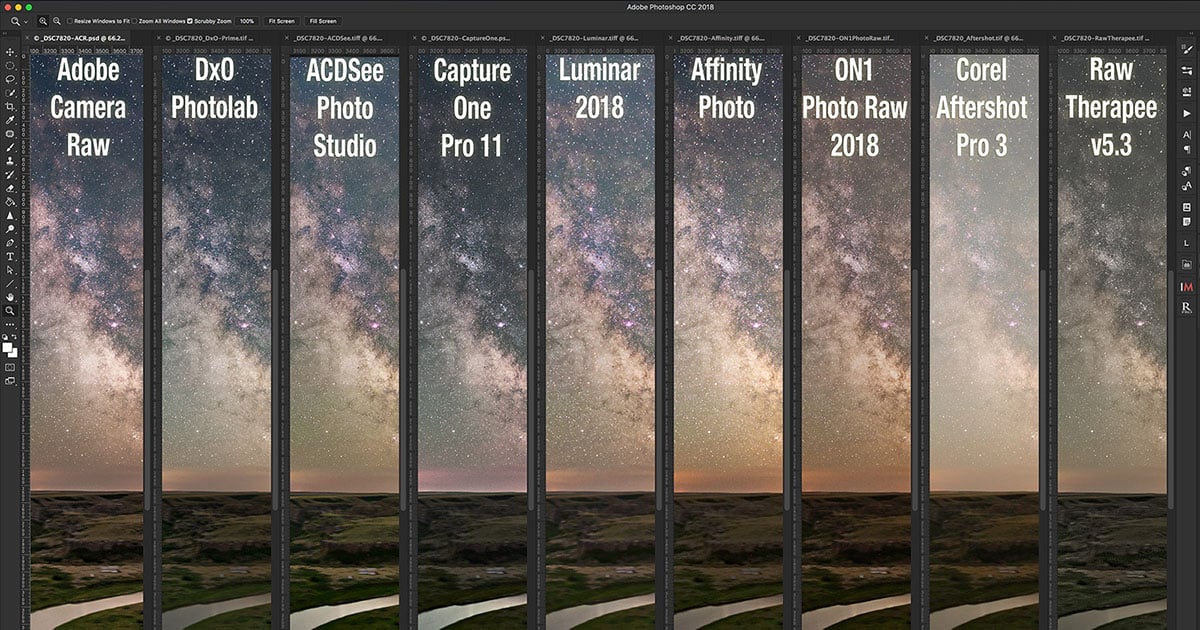
Fuji raw X-Trans files (.RAF) are a tough test because they use a different sensor pattern than every other camera and thus require different algorithms. I also gave these raw processors another difficult test with Sony raw (.ARW) files from my A7R II which are 42MP and a challenge due to their size. As you can see I compared a robust recent model desktop computer and my 3-year-old laptop which has decent specs but nothing special by today’s standards. I believe this provides enough criteria to help make an informed decision on various aspects of the raw processors and how they will handle a challenge.
The images above pertain to the color accuracy column in the chart.
Important factors to keep in mind:
1. The desktop/iMac times may be influenced by the fact that it has a 5K display and I take advantage of the real estate so even in “Fit” view the image is around 1200 pixels in the long dimension. Due to the limited real estate on my MacBook Pro laptop, the Fit view is much smaller at 600-700 pixels depending on the application.
2. A faster GPU with a lot of RAM will generally help performance. Adobe and Topaz state this specifically and in Lightroom you can turn it on or off.
3. The desktop machine I used is a 2017 iMac Retina 5K with 4.2 GHz Intel Core i7 with 32 GB RAM and GPU is Radeon Pro 580 8GB.
The laptop I used is a 2014 MacBook Pro 13” Retina with 3GHz Core i7 with 8GB RAM and Intel Iris GPU with 1.5GB RAM
4. My image server is a Drobo 5D3 (135,000 images) using hard drives connected via Thunderbolt 3 to the iMac. For the MacBook Pro, I used my usual travel rig with images on a 1TB external SSD connected via Thunderbolt 2.
Conclusion
In most cases, one size won’t fit all. I use all four of these as each one has something I need and I’ve figured out an efficient workflow with them. I may be the exception. Hence I’ve done this extensive comparison so that others can figure which of these can best fit their needs, goals, and workflow.
Image Management and Beyond
Of these ON1 and Lightroom are, right now, the only ones with image management capabilities. Both also have lens correction profiles built in. This is critical for me being a mirrorless user. If I were still shooting Canon or Nikon DSLRs then it wouldn’t be as important. This is because I see the corrected image at the time of capture with my Fuji mirrorless cameras and an uncorrected image through the viewfinder in a DSLR.
The processing capabilities of ON1 Photo Raw 2018, especially with today’s update, are beyond Lightroom and with a more sensible interface with effects contained in a layer, each of which has masking and opacity (Effects module.) It is a multipurpose hub solution. Because of its roots as a plug-in maker, ON1 essentially is a new generation of image management and processing with all kinds of capabilities that would require plug-ins were you to use Lightroom as a host/hub. I use Photo Raw for my initial processing and hop into Luminar or Topaz Studio for the unique filters and effects those programs offer.
You might have ascertained that in terms of image processing capability, Topaz Studio also has layers with opacity sliders, many effects that no-one else has, masking capabilities second to none, and very fast processing speeds. The main reason I can’t use it as a hub is that it has no image management capabilities. But that said it has many effects, especially artistic ones that no one else has. And once I go into it I have many of the best interface qualities with fabulous masking. So I can’t live without it.
I loved Luminar the first time I used it and that hasn’t changed. It has the most intuitive user interface of them all. The net result is that it’s just plain fun and a joy to use. Luminar 2018 has many useful and unique filters/effects. It is an excellent raw processor, especially if you don’t need or want built-in lens corrections. Regardless of where I start I often end up in Luminar for some of my favorite filters and effects like Golden Hour, Orton Effect, and the numerous others I lauded above. If you had to choose just one raw processor for everyday single image processing this would be it. And it makes a wonderful companion to other processors too!
Price and Support
All of these products are relatively cheap ranging from free to about $80 with discounts and promotions mentioned above. And upgrades come in cheaper. This makes it feasible to own multiple products without breaking the bank.
Just to keep this in perspective I spent $6800 on Adobe products when they had perpetual licenses and several hundred dollars so far just on my Photoshop/Lightroom subscription. And Adobe’s support is seriously lacking. ON1, Skylum, and Topaz are much smaller companies and my feedback from customers runs the gamut in terms of satisfaction but all of them offer free email support and in general the feedback I get is good for all of them, not to mention my own personal experience has been good, even as an everyday customer before I started working with these companies.
Workflow Efficiency, Fun, and Options
Processing software is much easier and more fun to use than ever. However, in spite of the marketing hype, there really is no one-size-fits-all product to meet all your processing needs. Granted, if your needs are simple you might be able to do that. And if you are an intermittent user with modest needs then look at the pros and cons sections and you may indeed be able to get by with one of these.
I will be the first to admit it one has to make a fairly big time commitment to learning these products to get the most out of them. But if you do, you will be rewarded exponentially by greater efficiency, allowing you a more enjoyable experience and in the long run, more time behind your camera.
Happy Shooting!
Joel
Epilogue: So where are Aurora HDR 2018, Iridient and Capture One?
Aurora HDR 2018 is far and away the best HDR product out there but you can also use it for more than HDR. It handles X-Trans files very well. In the end it is a fairly specialized product so you’d probably still want one the other ones I reviewed here to go with it. But for many images it’s a great starting point, especially for images with a large contrast range.
Iridient Developer is renowned for it’s exceptional acutance (“sharpness”) with X-Trans files where it still reigns king. However it is a pass through type application in that you still need one or more of the processors in this review to complete optimization of an image. It is also somewhat difficult to get accurate color. If you want the utmost in acutance you’re better off using Iridient Transformer which can batch process your raw files with the option of “Adobe Standard” which does yield accurate color. If storage space is an issue for you, bear in mind that Transformer outputs only DNG files which are 3X the size of Fuji’s lossless compressed and at about 50% larger than uncompressed.
Capture One is an excellent raw processor and has a dedicated following. There are several reasons I didn’t include it, not the least of which is their lack of a clear commitment to Fuji X-Trans raw files. They have gone back and forth on supporting X-Trans lossless compressed in the last few versions. I think you are fine using it with Canon, Nikon, and Sony but it may be a gamble for long term support for Fuji. It uses an import system of cataloging like Lightroom but other pros I have talked with that use it run into problems once the catalog goes above 10,000 images.
Editor’s note on 3/2/18: The original version PetaPixel published made it less clear that this review is geared primarily toward Fujifilm photographers with more general information included throughout. We’ve added “Fuji” into the title to make this more clear, and we’ve added in the Epilogue by Wolfson. Sorry for the confusion.