How to Create Foreground Bokeh with Water Drops on Glass
![]()
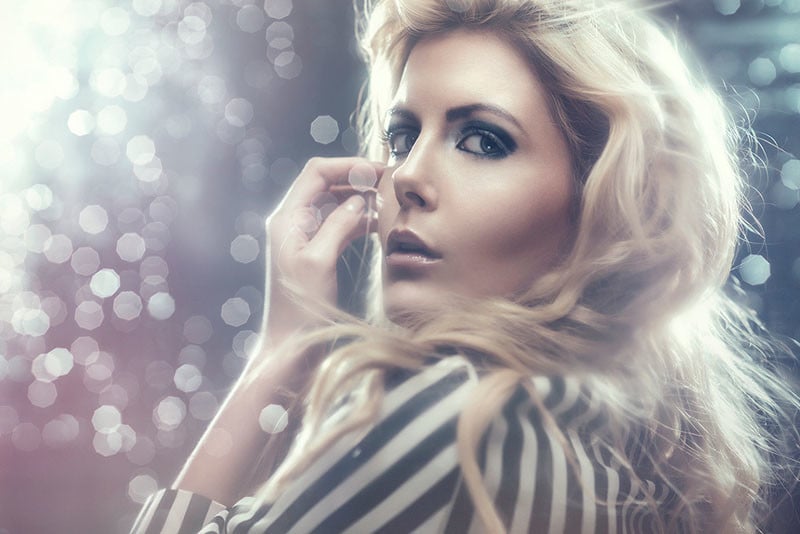
This foreground bokeh look is actually a setup I played around with a few times many years ago. I thought it would be a good, fun setup to share, as you can get some interesting results whilst playing around the much-loved bokeh.
![]()
So how can we harness these “mystical orbs” into our studio shots to create something a bit more engaging than yet another sunlight-through-leaves bokeh effect?
Things You’ll Need
- 1 Sheet of glass/good quality perspex.
- 2 – 4 Lights (the principles of this setup can be achieved with two lights).
- 1 beauty dish/small soft box key light.
- 2 directional lighting modifiers – snoot, grid or barn doors etc.
- 1 small softbox as a fill light modifier but a reflector can be a substitute here.
- Gels (optional).
- Glycerine and water mixture.
- Hand sprayer thingy.
- 1 dark background – This can be anything from a black sheet/velvet to a black colorama.
- 1 shallow aperture lens – Ideally around f/2.8 or less.
- 1 patient model/subject.

How It’s Done
The basic principles of this setup are that you create water droplets on the glass that will catch the light in the foreground of your image. You simply place a sheet of glass with water droplets on it in between yourself and the model, shine lights onto the droplets and the model, set your camera to a very shallow depth of field and then take some shots.
That’s the super simple explanation, but let’s look at each stage in a little more detail.
First off you’ll need a piece of glass. I actually just had a picture frame that I simply removed the glass from and used that. I will just say that this process is likely to render the glass seemingly un-cleanable forever, at least that’s what’s happened to mine. The sheet I had was about 23″/60cmm square so it doesn’t need to be massive and you could probably get away with smaller if you just wanted to test it first.
For my piece of glass I simply removed the glass that was in a large picture frame. Be careful though as this type of glass is often extremely sharp and fragile. If you can find some good quality perspex then that is definitely safer and a lot easier to work with.
![]()
I haven’t tried this with perspex but if you have access to some then I think this would be a good substitute as handling large sheets of fragile glass around models terrified me. You have been warned, and for safety reasons I recommend the clearest perspex you can find.
Next you’ll need the “mystical orb” creating spray. I simply bought a garden/hair sprayer for $1 at the DIY store and then mixed my formula to put inside it. The formula is pretty straight forward: it’s glycerine and water, nothing too crazy. Glycerine is one of those products that you’ve never heard of until you have and then you see it literally everywhere. Glycerine is used to preserve foods, in cosmetics, inks, glues, antifreeze and even medicine. I think it’s also a product that helps with severe eczema so I picked up a big bottle of it at a local pharmacy for about £1.
The reason you need this is to thicken your water which glycerin does really well as it’s very thick and completely colorless. You want to thicken the water so that it doesn’t immediately run off the glass you’re about to spray it onto. With the addition of the glycerin in your sprayer you can spray some on the glass and it should bead up to create those little droplets you’re after. Food photographers use this trick all the time to get those fresh tomatoes covered-in-water-droplets type shots.

For my beading mixture I used three parts water one part glycerine but I would advise doing a couple of tests before the model arrives. Start off with half water and half glycerine first then add more water if needed.
![]()
Now you have your piece of glass/perspex and your droplet spray you’re ready to start setting up the shot. This next step was by far the trickiest as you now have to support your sheet of glass vertically between you and the model.
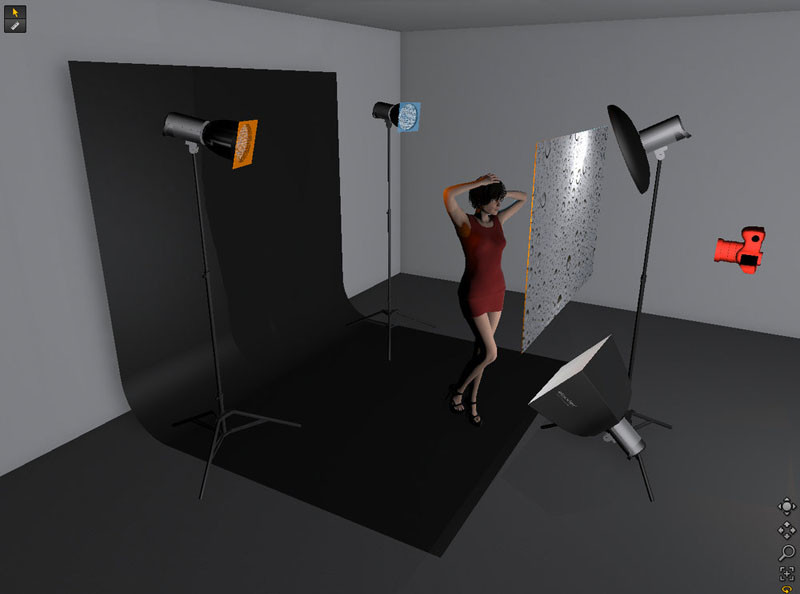
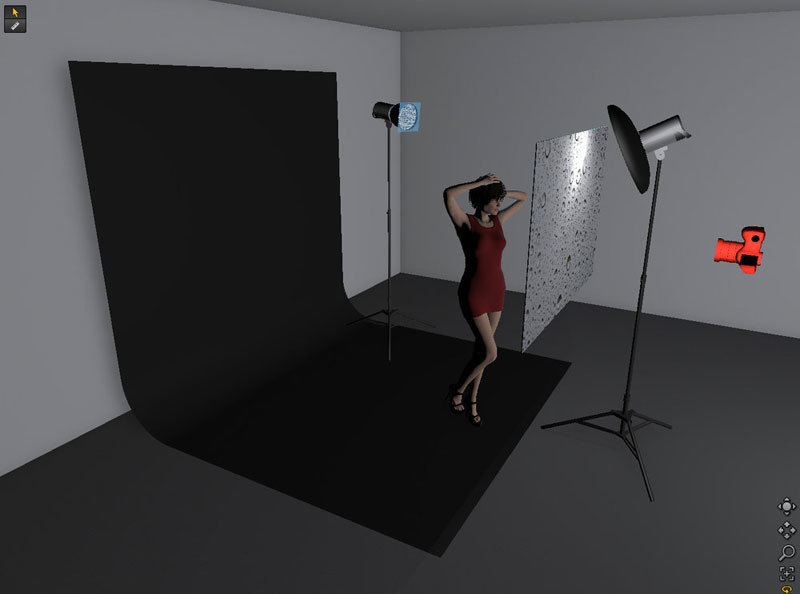
Once your glass is in place you’ll want to setup your lights — wait until the last possible moment to spray the glass as it will run off even with the glycerine. I took my shots with four lights but the principles of this setup can be achieved with two lights if that’s all you have. I’ll explain my four light setup but also show you what to do if you only have two or three.
First off set up your two back lights behind the model and above head height and angled past the model towards where your camera will be. You could choose to add gels to those lights if you want to (of course you want to). These lights should have directional modifiers on them like grids, shoots or barn doors as we want to control the light in one area rather than bounce around the set.
Second we want to set up our key light. I used a 22″ silver beauty dish but you can also use a small softbox instead but just be aware that the light will spread around a lot more so if you’re close to the background then the light might spill onto it. Place the beauty dish on the camera side of the glass and have it above the camera and angled down towards the model.
Thirdly I set up a fill light via a small softbox on the floor. This is positioned under the model and obviously out of shot. You could substitute this for a reflector if that’s all you have.


Next it’s time to get the model in position on the other side of the glass to you and now you’re ready to spray the glass. It’s advisable to have a sheet or newspaper etc below the glass as you will get some run-off. I didn’t find it made much difference which side I sprayed the glass, it’s just the highlights you’re after and the light hits the droplets whichever side they’re on but it was just easier to spray it from camera-side.
Finally you’re ready to start taking some shots. You’ll want to set your camera to a shallow aperture, something around f/2.8 or wider will be preferable. Take a shot and adjust your key light around your aperture then once you’re happy with that you can adjust the power of your two back lights. More power on those will create more pronounced bokeh and less power will obviously create a more subtle effect.

![]()
![]()
![]()
So there you have it, that’s the in-camera foreground bokeh lighting setup. It may seem like you need a lot of kit and preparation to achieve it, but it’s really not that bad — even if you only have a couple of lights, you can still get the look.
P.S. If you liked some of the gelled lighting shots in this article and you’d be interested in learning how to take those shots yourself or you’re simply interested in finding out everything there is to know about Gelled Lighting then why not check one of my workshops.
I have also just released a brand new 22 hour complete Gelled Lighting Tutorial video. I go over everything from studio lighting setups with gels to being on location with gels plus I also go through my complete retouching and post pro workflow.
About the author: Jake Hicks is an editorial and fashion photographer based in Reading, UK. He specializes in keeping the skill in the camera and not just on the screen. You can find more of his work and writing on his website, Facebook, 500px, Instagram, Twitter, and Flickr. This article was also published here.