How to Create a Window Reflection Effect in Photoshop
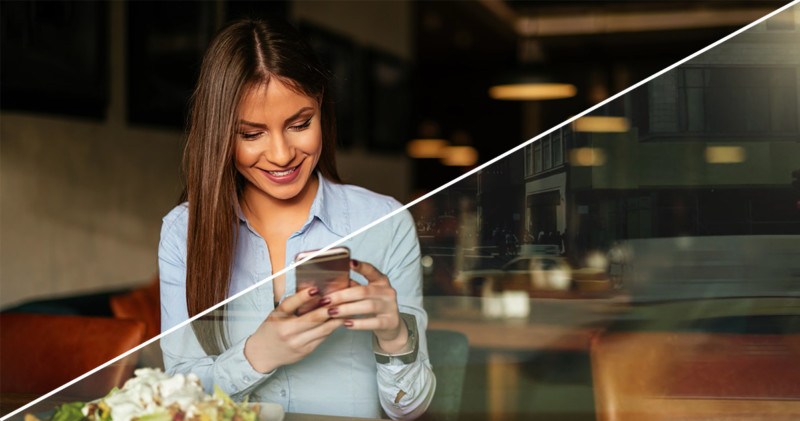
Window reflection portraits are a popular style, but you don’t need to live near an empty cafe on a busy New York City street (do those even exist?) to create a photo like this. The effect is pretty easy to replicate in Photoshop in just a few steps.
The detailed walkthrough was created by Jesus Ramirez of the Photoshop Training Channel on YouTube, and we suggest you give it a watch even if you never intend to fake reflections in Photoshop. If nothing else, it’s a great crash course in how certain blending modes work.
And, if you do want to learn how to fake a reflection like this, the before and after results speak for themselves. This isn’t a basic job, Ramirez went all out to make sure the final image looked as authentic as possible:
So, how’s it done? Check out the video up top for a detailed step-by-step, but the basic steps are as follows:
- Load up three images: a portrait, a city scene, and a texture image of dirty glass.
- Place the city scene on top of your portrait, set the blending mode to Lighten, and bring the opacity down until it looks right to you.
- Duplicate the city layer, set its blending mode to Screen, and turn that layer black and white.
- Use this layer to enhance the bright pixels by going into the layer’s properties, and isolating only the brightest pixels under Blend If > This Layer
- Use a Hue and Saturation Adjustment Layer to add a green tint for a more authentic “glass” look.
- Enable the texture layer and use the “Blend If” sliders in the layer properties to hide the bright pixels and leave only the dark smudges. Adjust opacity as needed.
- Add a Gradient Adjustment Layer that goes from foreground color (black) to transparent, and use it to darken the bottom of the image.
At this point you could stop, because your image looks pretty good. But Ramirez goes further by adding some highlights in the glass, and then applying a lens blur to the whole image in order to make it look a tiny bit more authentic. These are subtle touches that make a big difference.
In all, the final product takes Ramirez about 15 minutes to create—and that’s with a lot of stopping and explaining—so the process isn’t too advanced. Check it out for yourself up top, and then head over to the Photoshop Training Channel for more like it.
(via Photoshop Training Channel via Digital Trends)