Creative Use of Light in Street Photography
If you have been shooting streets for some time or have been following the genre, you might have already thought about some of the things that I am going to talk about below. Street photography is a very volatile genre by virtue of the volatility of the decisive moments.
Hence as a street photographer, your arsenal should be much broader and be equipped with a set of skills to capture interesting images under different challenging situations.
What Is the Role of Lighting in Street Photography?
One of the most important foundations of photography is the manipulation of light, be it ambient or an external resource. Light is a tricky business in the streets and there are many myths regarding the ‘best light’ to shoot.
I believe there is nothing called the ‘best light’ for street photography. As a street photographer, you should adjust to the ambient light and produce interesting images. Let me take you through some examples as to how to use the lighting in the streets for your advantage.
Now, one could write a whole book on different lighting in street photography, but what I am specifically going to focus on is “harsh light,” since there are many myths around it. In this article, I have shared the EXIF data in order for you to get an idea as to how I created these images in-camera.
The actual lighting when you shoot could necessitate slightly different settings, but this should give you an acceptable starting point. In fact, this would help you to create some remarkable artworks even in the absence of so-called “decisive moments.”
#1. Make Friends With the Shadows
The first step you should learn in street photography is coming to terms with shadows. Especially with harsh light, there could be a broader dynamic range in the image with deep shadows and bright highlights. There is no such thing as a “properly balanced exposure.” I would, at most times, protect the highlights and let the darker areas fall in a range of shadows from mild to pitch black.
Another inherent advantage of accepting shadows is the ability to use smaller apertures — hence giving a deeper depth of field (DoF) — and faster shutter — giving the ability to freeze motion — than you otherwise would have, both of which can give you much freedom in streets.
#2. Use Shadows as Composition Elements: Identify the ‘lightscapes’ in Your Scene
Shadows can actually give you composition elements that are otherwise not physically present in the scene. How interesting is that? They would make shapes, lines, and geometries that can be constructively used in composing a street shot that can stand out. Actually, the highlights and shadows in a scene contribute to something I would call the “Lightscape.”
Think of it as a virtual landscape that allows you to create images. In the same location, your “Lightscape” is different in the morning than it is at noon and therefore may give you different opportunities. In the streets, some “Lightscapes” are very obvious with stronger shadows and highlights and some may be very subtle to the naked eye, but with the correct camera settings will become more obvious. Therefore training the eye to identify the “Lightscapes” is something I would strongly recommend.
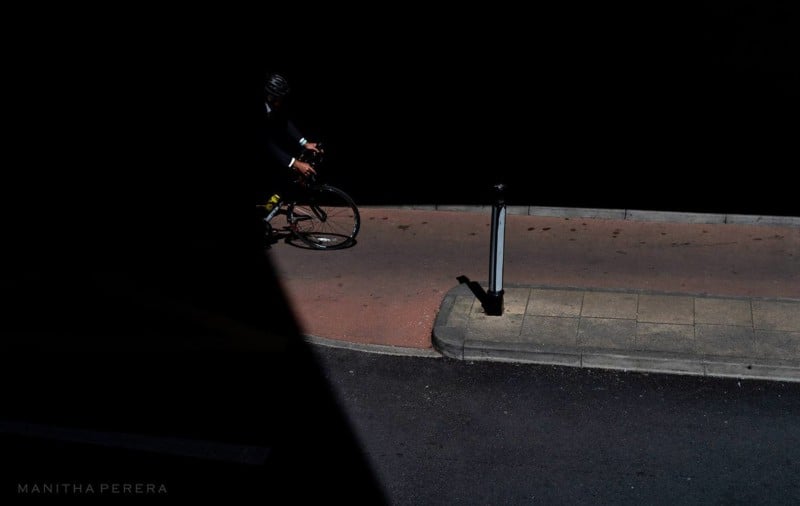
In the image below I have positioned the apex of the shadow in the upper third of the frame and captured a cycle emerging from the dark. Incorporating a subject to be partially in the shadows and emerging into light or vice versa, at times would create a connection between the shadows and the highlights and allow the viewer to have a feeling of transition between the two zones.
For instance, if this bike was completely out of the shadows I believe this shot would not be strong as it is now. Without this ‘lightscape’ this would have been a rather plain shot of a cycle on the road, which is pretty bland I would say.
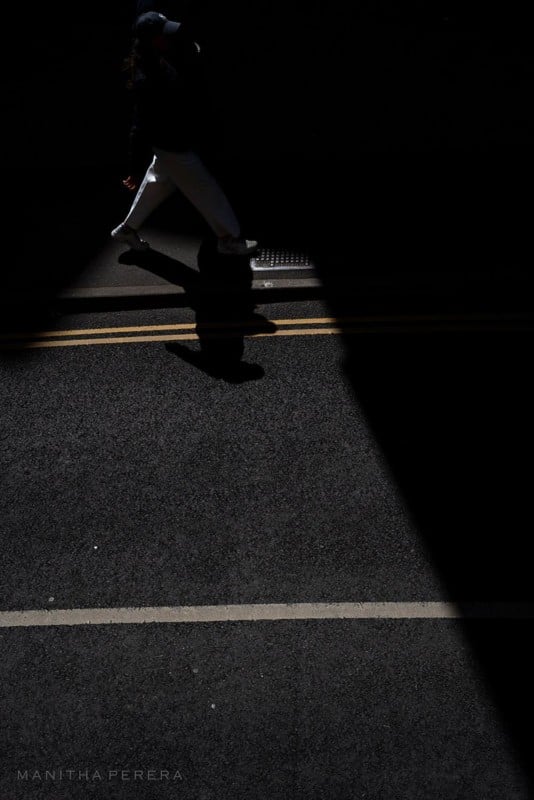
Below is another example where I have used the shape of the shadow and the leg position of a pedestrian to complement each other. I must say, creating this type of image involves a lot of waiting as well as the selection of a contrasting subject too.
In summary, the ‘Lightscape’ is not merely a patch of shadows and highlights, but rather a compositional tool which should be used just as you would compose a landscape.
#3. Create a ‘Low Key’ Effect
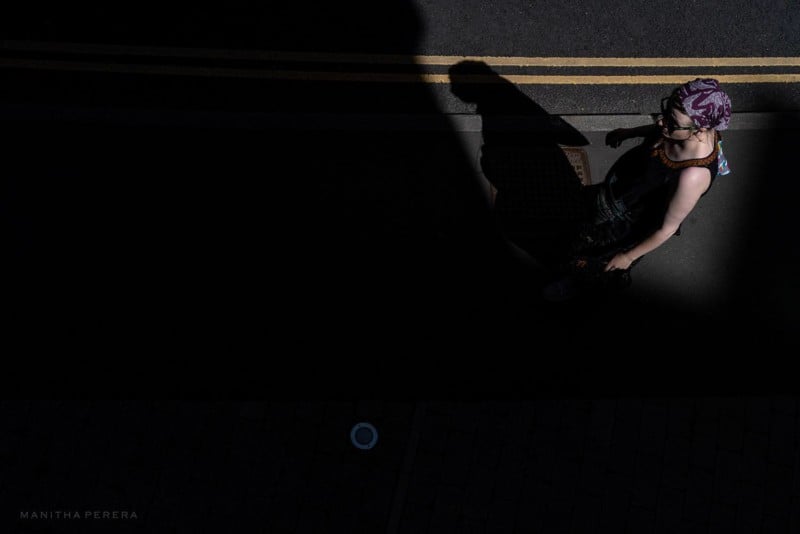
At times you could use the ambient light to give a ‘low key’ effect creating a darker backdrop and selective lighting on the subjects in your image. This could be especially important in the streets if you do not like the clutter in the background or if your background is uninteresting. This could be consistently achieved when the light falls from a side and illuminates your subject selectively while the backdrop falls to shadows with the aid of fast shutter speed.
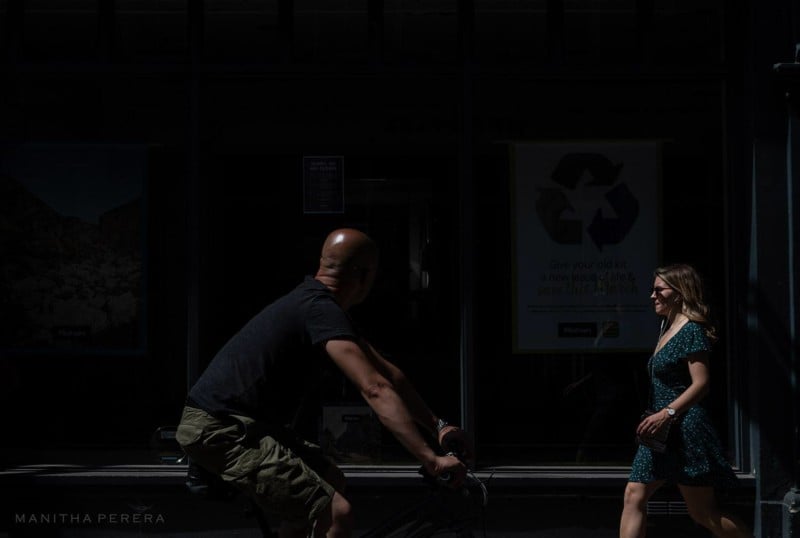
This is an interesting moment where the cyclist has a glance at the lady. The light falls mostly from the leftwards and not directly on the backdrop in this scene. Hence with the use of a fast shutter, I have managed to achieve the lighting in this shot ‘in camera’, where the subjects pop out from the otherwise uninteresting background creating a nice contrast.
Whether you need shadows in the backdrop (or in any other part of the image) to retain some details vs. making them pitch black depends on the scene and personal preference. This could be achieved with the aid of adjusting the shutter to underexpose the backdrop appropriately.
I personally would retain some details in the shadows when I shoot streets since it would give a nice transition between the different shades of grey and also respect the genre of ‘street photography’ better by leaving some information about the space.
#4. Try Different Angles
Remember the effect of the light could be totally different depending on the angle you frame. Therefore be watchful to choose a frame which gives you the opportunity to make use of the light available. Rather than blaming the ambient light, we should learn to use it effectively. I always say you should be able to shoot streets from morning to night, unless of course you are tiered, meaning you should be able to adjust to the prevailing lighting.
The image below of a man reading on his phone was taken in the noon with the sun right up in the sky. Shooting directly into the subject would have been quite uninteresting given the lighting. Instead, I have come around and shot this from a shaded area so that the hands with the phone now nicely fall into the highlights and there is a gradient in the lights from the left to right of the image adding depth.
An additional point worth mentioning would be, at times I tend to keep the face of the subject hidden and draw emphasis to an activity the subject does. This gives a different point of view, adds a tinge of ‘abstract’, and creates curiosity in the viewer’s mind.

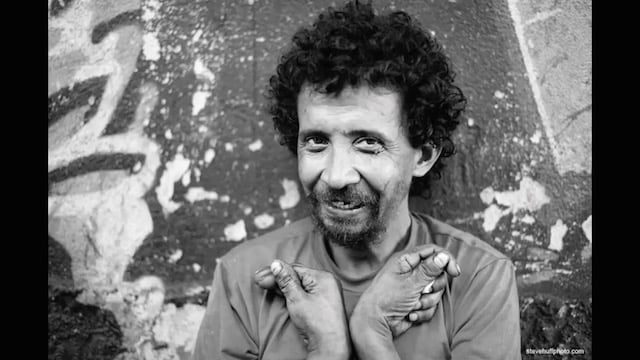
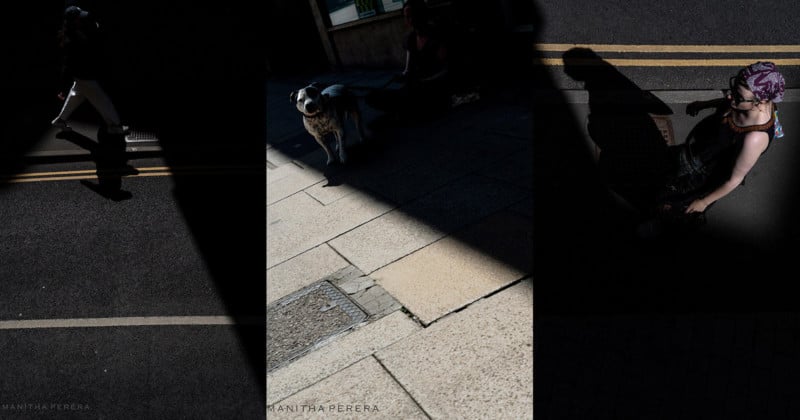
#5. Subjects Within Shadows
In the previous examples, we have seen the subjects that fall within the highlights, thus making them prominent as the characters in the spotlight in a stage drama. Sometimes your subjects will invariably fall inside the shadows. Don’t be discouraged when this happens. After all, you are in the streets where many things are not controllable, so instead you should adjust.
In these circumstances, the contrast in the subject can become handy in producing something exciting. Remember the lighter colors can reflect light better than the darker colors even in shade, hence could manifest them better at a given exposure.
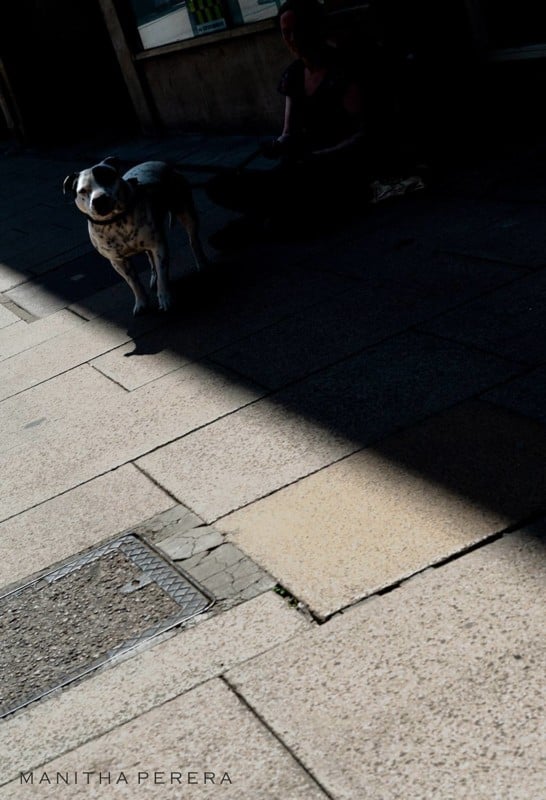
In the image below I had to choose between going for an exposure that will expose the shadows sufficiently vs. going for an exposure that creates something that retains the contrast. I chose the latter with the confidence that the whites will still manifest in dark and this complements with the division of the rest of the frame into a highlight and shadow across the diagonal.
While this exposure was sufficient to give prominence to the dog’s face (the dog too having one eye white and one eye black was a bonus!), it has put the owner wearing dark fall into shadows barely sufficient to mark her presence. Again not going for ‘pitch black’ shadows in my opinion have left the details of the actual scene available to the viewer.
#6. Create Negative Space
Negative space photography could be applied in many genres and street is no exception. However, creating negative space images in the streets can be challenging. What negative space could give you is space to breathe and imagination. This will make your street shots stand out from tons of busy and chaotic street images around.
Lighting could be used in your favor when creating minimalistic negative space images in the streets, where you could make shadows to create negative space around your subject.
So next time you go out for street photography, think beyond “decisive moment.” Don’t be afraid to shoot in harsh light. Try to manipulate the ambient light to produce something different.
The more I shoot streets, I have learned that there are no limitations for artwork in the streets. Actually, the conditions others would avoid are my favorite to experiment with, as that would give me something uncommon, hence unique.
About the author: Manitha Perera is a street and fine art photographer based in Cambridge and an acute physician at Cambridge University Hospital. The opinions expressed in this article are solely those of the author. You can find more of Perera’s work on his website and Instagram.