How I Shot a Time-Lapse of a Large Thunderstorm Rolling Through Sydney
Shooting time-lapse is fun. Watching a big storm devour a city is fun. Doing both at the same time is ‘super’ fun.
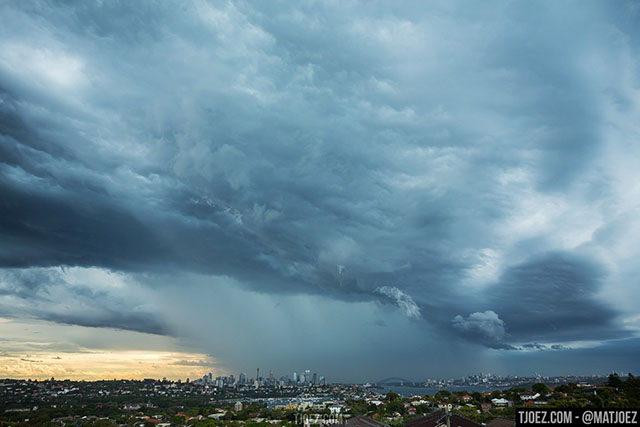
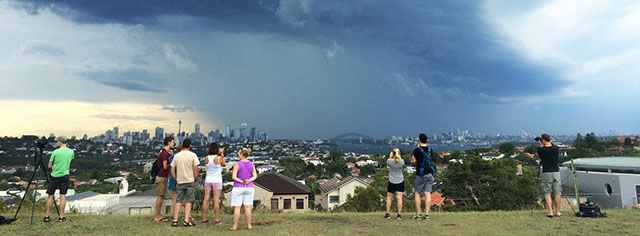
Sydney has been getting hit with unusually big storms for this time of year over the past week. This past Sunday my girlfriend and I went out to shoot one of them. As it happened it was one of the bigger ones! In this post I will explain a few things about the capturing and editing, as well as thought processes behind certain editing decisions.
Time-lapsing a Big Storm
Camera? I used a Canon 5D MkIII with external battery grip and two fully charged batteries because I knew I might be shooting a really long sequence. This setup will allow you to shoot for the better part of a day!
Lens choice? Easy, go wide! You never know how big these freak storms get, you want to make sure you capture it all. I shoot ‘B-roll’ footage with a different focal length so I have cutaways to work with in the edit. Ideally you’d be shooting with two cameras and two different focal lengths at the same time. My lenses here were the Canon 17-40L and 70-200L IS MkII
Interval? Fast. These clouds and weather systems move at an incredible speed. You want smooth playback so your sequences will be 24 frames per second at the minimum, this makes everything move even faster! The main sequence in this short film was shot with an interval of 2 seconds per frame.
Tripod? Sturdy. Very sturdy. Storms equal wind, and hectic storms equal hectic wind. You don’t want your gear to get blown over, you don’t even want it to shake a little bit. Deshaking/stabilizing 1000 frames is a time intensive process, and can easily be avoided.
Memory cards? Fast! Dark clouds and sunny skies, that’s a lot of dynamic range. You’re gonna need to shoot RAW if you wanna keep exposure in check later on. Shooting RAW equals a lot of data and your memory cards need to be able to handle the fast intervals without lagging/buffering!
Motion Control gear? The kind folks at Kessler Crane have sent me their latest and greatest Second Shooter motion control time-lapse device. It’s an amazing bit of kit that I used for the beginning panning shot in the video, however with this fast moving storm things got too hectic for me to set it up and use it for more shots. (this is why I usually shoot with two cameras)

Postproduction
Back up your footage!. Too many people fail to do this. Too many people cry about losing footage when their drive crashes (they all crash in the end). I always say: if your footage is only on one drive then you’ve already lost it.
Select and grade your sequences in Lightroom/Bridge/Aperture/Capture One, then export to a file format that’s easy to work with on your system. I like exporting to full resolution JPEG because they are light to work with and I usually have a finalized idea about how I want them to look so I don’t need the big TIFF files to do major color corrections later on.
Compile those JPEG sequences into video files using software like Adobe After Effects/Quicktime/GoPro Studio etc. I like creating 4K files because they are awesome.
Edit those video files into something that makes sense and that you think will go crazy viral online. I like to experiment with sound design to add an extra layer of drama to my edits (always use headphones).
Upload to YouTube (or Vimeo if you like a smaller audience and less views on average without a proper option to monetise your hours of labour), think of an interesting title (super important) and create a cool looking thumbnail that will act as an initial visual impression for your audience (lure them in!).
Finish off with writing a blog post about the whole process in the hopes of getting more views and attention.
The Story
Let me share with you a few thoughts about how I came to the edit itself. I like to believe the main sequence is visually powerful enough to not need motion. I consciously did not add a pan or zoom in post because the storm is what’s important here, and I like to believe it’s visually interesting enough to keep your attention for more than 10 seconds without needing fancy moves.
I add the dramatic soundscape because “subconsciously” I want to increase the dramatic vibe, basically to enhance the already dramatic looking footage. As storms go we got absolutely drenched in the end. This is refreshing, but also stops you from shooting and just makes you want to go home and dry up.
What usually happens then is that you don’t have an ending (makes sense if you stop shooting before it’s over, right?). So, challenge! How do I end the edit? In this case I try to distract the viewer from the lack of ending by adding even more interesting sounds and playing everything you just saw backwards and sped up.
Again, the storm looks cool enough to keep you looking at it and we finish off with the first shot and the chirping birds. Kind of conceptual, we go back in a loop, just like these storms have been doing for the past week.
I sincerely hope you’ve enjoyed this post, leave me some feedback, give the video a share, like, comment or whatever you feel like doing and have an amazing day!