How to Use the Zone System in Photography
Even though the Zone System is over 80 years old, it is still relevant today whether shooting modern films or digital capture. This article is for photographers wanting to learn more about the Zone System for their particular workflow.
What this article is not intended to be is an exhaustive deep dive into any element of a particular workflow. Photography is art and craft, and mastering both takes as much time as it would take to master the art of painting or playing a musical instrument. It is my hope you find something in this article that stirs your interest in discovering what the Zone System can offer your workflow. With all the countless educational resources available today, you will be able to find what I have touched on here in greater detail elsewhere. With that being said, let’s move on.
Table of Contents
The Origins of the Zone System
The Zone System was developed during a time when black and white sheet film was the standard in commercial and amateur photography. Ansel Adams and Fred Archer developed the Zone System while teaching at the Art Center School in Los Angeles in 1939 and 1940. The Zone System is based on the 19th-century sensitometry studies of Hurter and Driffield, photographic scientists who brought measurable scientific practice to photography.
Why Use the Zone System
If you want to improve the art and craft of your photography, the Zone System can help you. It was developed to help photographers capture the largest tonal scale they choose to have for their black and white photographs. Initially, it was created to work with film that was not as technically advanced as modern film, but at the core of its technique is a method that can help all photographers regardless of their chosen platform.
Note: When citing film during this article, I will be referring to black and white film.
Using the Zone System for Film and Hybrid
We will look at typical workflows for film and hybrid platforms, and I will touch on each individual step.
A Typical Classic Film and Darkroom Workflow
- Pre-visualization
- Metering
- Shooting
- Film development
- Darkroom skills and printmaking
A Typical Hybrid Film and Digital Workflow
- Pre-visualization
- Metering
- Shooting
- Film development
- Digitizing film and post-processing
#1: Pre-visualization
Pre-visualization is a big word for imagining what you would like your photograph to look like before you make it. How can we design a photograph in our mind that is visually appealing? Just like an athlete practices their sport, so do visual artists. Learn how to play the game!
The best way I found to practice for the game is to look at visual art. Study art that appeals to you. When I say study, I mean look at it and try to figure out why it grabs your attention. Look at the light, the elements, the color, the theme, etc.
Ask yourself, “why did the artist choose to include these particular elements?” Maybe they chose them because they help tell a deeper story. Look at the direction of the light if it stirs your emotions. What about the color? Does it appear graphic in nature? Or maybe it is part of a larger pattern. After you study enough art, you will start to understand what makes an image, art.
With enough appealing art feeding into your brain, you can develop a database of visual ideas to pull from. Take the time to expand your visual intelligence so you don’t wander around aimlessly with a camera. Make a photograph instead of taking a photograph. How do you know if you are using your visual memory? Your images will improve over time as your visual cortex subliminally guides you. This is the only way I know how to explain what drives visual creativity. Feed your visual database with art and photographs you enjoy looking at.
#2: Metering
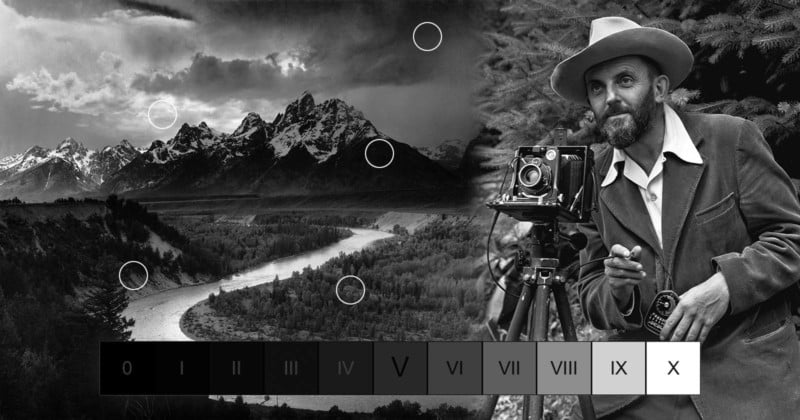
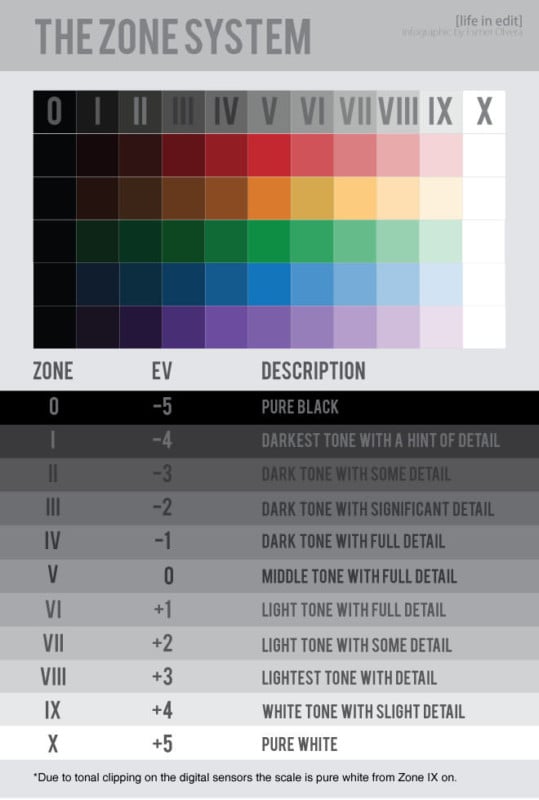
A simple explanation for the Zone System is metering for the shadows and developing for the highlights. The zone step chart below shows the zone values with Roman numerals. Each step equals ‘one stop’ of light change. We will reference these values when metering during the pre-visualization step. I have a zone sticker on my meter that I use for quick reference, and recommend something similar when metering for zone values.
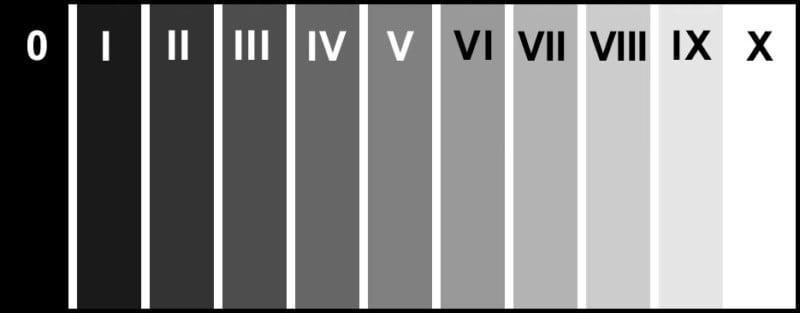
The zone values III, V, and VII are the deciding zones I concern myself with the most. Zone III is where the darkest tone with detail is. Zone V is middle grey (think Kodak’s 18% grey card). Zone VII is where the lightest tone with texture is. Zone II is almost black and Zone VIII is almost paper white. I treat zones outside of III through VII as accent tones and do not expect detail from them. For example, specular highlights should fall into Zones IX and X.
Below is an example where I metered for the shadows and developed for the highlights.

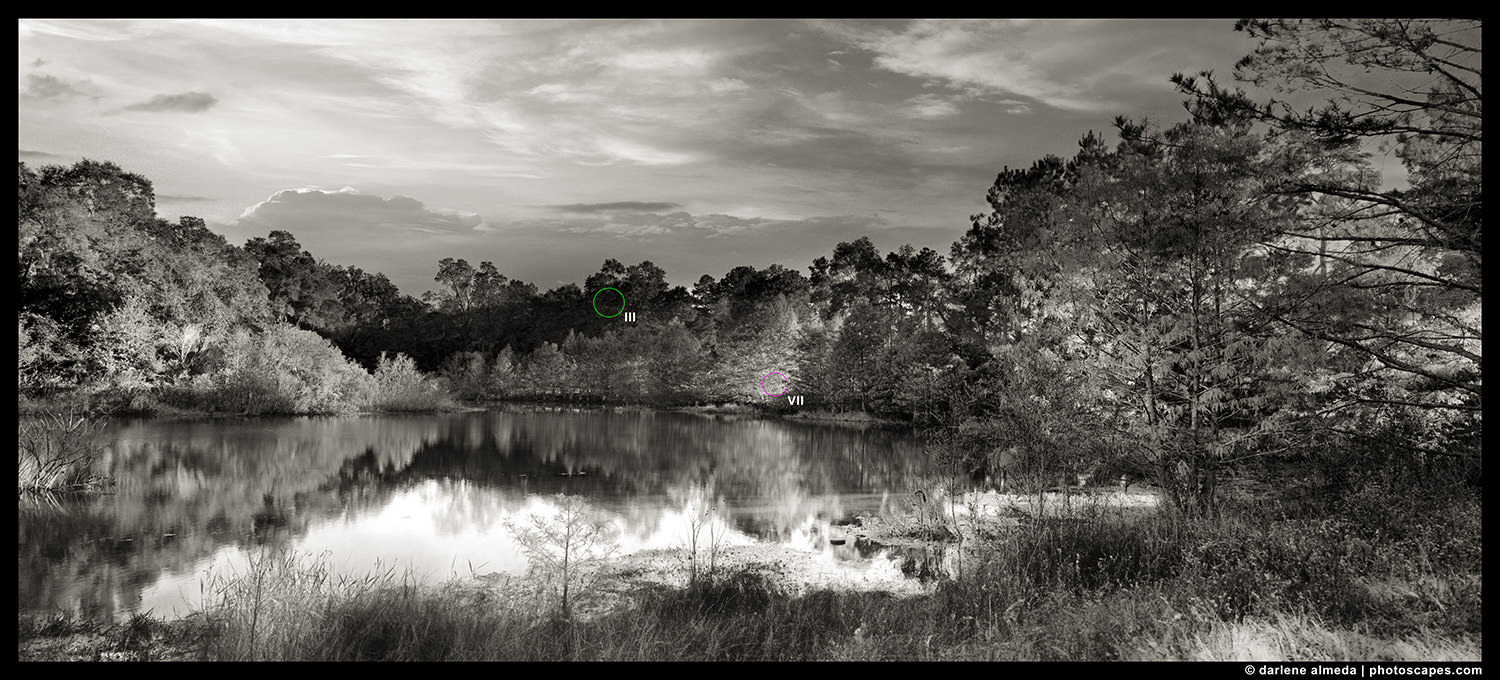
When I metered for this photograph, I took various readings around the composition and decided the most important detail for Zones III and VII was in the circled areas. The next step is to put the meter readings into shooting success!
#3: Shooting
Now we need to combine the meter readings into a single exposure. The metering math is not hard, and you may have to work on it until you understand it, but once you see what is really going on here, you will always understand it. Part of the pre-visualization process is to decide how you will set the camera lens. Will it be aperture priority or shutter priority? I generally choose my aperture first for depth of field control and let the shutter speed fall where it needs to be for correct exposure.
Step 1
This is what the metering results were for the image above. I metered the indicated areas for an average exposure at f/22:
Green Circle = f/22 @ 1/8
Pink Circle = f/22 @ 1/125
Zone values III, V, and VII are the deciding zones. Zone V is middle grey and is used as an average reading for all light meters. If the subject you metered is brightest white or darkest black, it will appear middle grey on the film. We need to correct for this.
We will make adjustments so our shadows are in Zone III and our highlights are in Zone VII. If you have a light meter dial to try the settings in this example, it will be easier to understand.
Step 2
Green Circle: Adjust shutter speed for Zone III (shadows)
Zone V to Zone III is 2 stops less light: 1/8 – 2 stops
1/8 → 1/15 → = 1/30 | (faster shutter speed = less light)
Corrected Exposure = f/22 @ 1/30
Pink Circle: Adjust shutter speed for Zone VII (highlights)
Zone V to Zone VII is 2 stops more light: 1/125 + 2 stops
1/125 → 1/60 → = 1/30 | (slower shutter speed = more light)
Corrected Exposure = f/22 @ 1/30
Step 3
Both adjusted meter readings now read f/22 @ 1/30 for Zone V. This was my exposure setting for the image. When I realized the difference between the shutter speeds was five stops (1/8 to 1/125), I knew the exposure was spot-on. What happens when Zones III and V do not line up after we make adjustments for shadows and highlights? This is where film development can bring in more tones.
#4: Film Development
We just read through a meter reading that placed the shadows on Zone III and the highlights on Zone VII. This is called Normal (N) development. If we had a reading that placed the shadows on Zone III and the highlights on Zone VIII, we will end up with a six-stop exposure (Zone III to Zone VIII = six stops). This is called Normal minus 1 (N-1). We need to minus a stop in development to keep the film exposure within the five-stop range for best negatives.
If we had a reading that placed the shadows on Zone IV and the highlights on Zone VII, we will end up with a four-stop exposure (Zone IV to Zone VII = four stops) and would need to add a stop in development for best negatives, thus Normal plus 1 (N+1). It is not uncommon for film developments to go as far as N+2 and N-2, but after a two-stop pull (-) or push (+), the film’s latitude can suffer.
During the development process, shadows develop first and highlights last. Adjustments to development can be made through time, developing formulas, agitations, and temperature. Increasing development time has a significant effect on the highlights, with little effect on the shadows. To increase shadow detail, exposure needs to increase and development must be reduced.
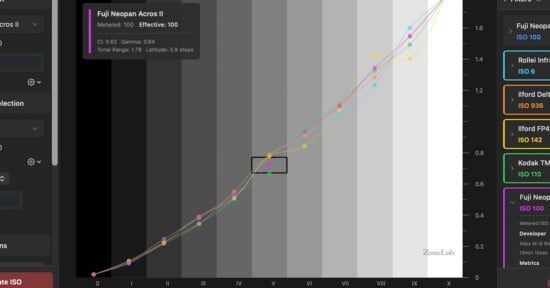
My standard kitchen sink developer is Rodinal. My normal mix for ASA 100 film is 1+50 (1 part Rodinal + 50 parts water), with water temperature at 68°F. The film develops nicely at 12 minutes. The examples below illustrate changes in temperature, time, and dilution for push/pull development with Rodinal.
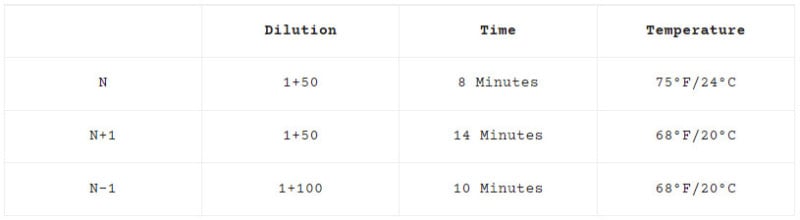
The amount of control the Zone System enables is amazing. It supports an extensive amount of tonal placement manipulation. There is a large arena for experimenting with film development. If you are interested in learning more about development, there are books, videos, and online photography forums that can help you gain knowledge.
When I know the lighting situation or exposure was far from Normal, I use semi-stand development. With modern films, semi-stand development is more than acceptable to me.
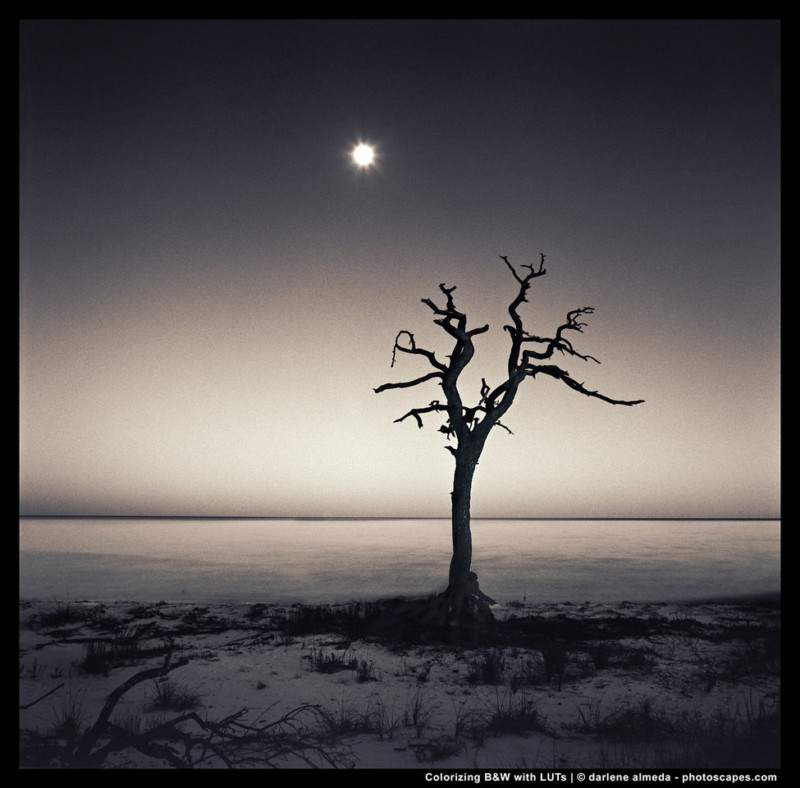
The image below was about capturing the mood. As I was driving home after a day of shooting, the sky and sand dunes caught my attention. I turned my vehicle around, grabbed my camera and tripod, and took off running through the sand dunes. It was a very pleasant experience to be at that location during the moments of twilight turning to night surrounded by a shoreline, body of water, and dunes. The light fell fast and I had one roll of 120 to capture it. It was growing too dark not to cross my fingers.
Development was: Pre-soaked film for 5 minutes, 1+100 Rodinal dilution, agitate 15 seconds the first minute, let sit for 30 minutes, then agitate 15 seconds again, then sit for 30 minutes. Total semi-stand time was 1 hour. Nothing hard about that!
I am sharing the above image for two reasons: (1) to briefly talk about semi-stand development, and (2), as a lead into the darkroom and digitizing section, because the negative was digitized and post-processed using LUTs.
#5a: Darkroom Skills & Print-Making
When I started my journey in photography, I spent enough time in the darkroom to learn it was not for me. I know photographers that enjoy the darkroom and make incredible prints, but that is not my area of expertise. There are a lot of skills involved in darkroom craft. When a darkroom photographer pre-visualizes, I am sure they have some darkroom magic to add to their Zone System exposure method.
Some darkroom skills include: dodging and burning by hand or by making cutouts to manipulate specific areas where the enlarger light hits; color correction filters, contrast correction filters, and creative filters; different grades of paper, various toning options, bleaching, blocking, paper chemistry, inter-negs, enlarger bulb preferences, and more. Check for instructional videos and online communities that promote darkroom photography if you are interested in pursuing darkroom magic.
#5b: Digitizing Film & Post-Processing
I was an early bird to digitizing film. I never wanted to give up film, just the darkroom. Most of us that digitize film started with a film scanner, and photographers continue to use them today. When digital sensors became good enough for me, I began the practice of digitizing my film with a camera. Because I already had the necessary camera and digital software, all I needed was a copy stand and lightbox. Once you learn how to digitize your film, it can be a lot quicker than scanning.
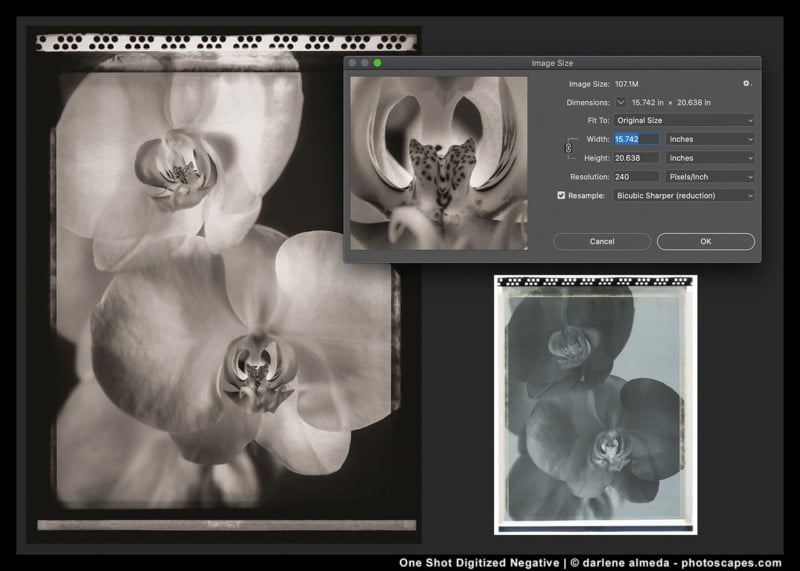
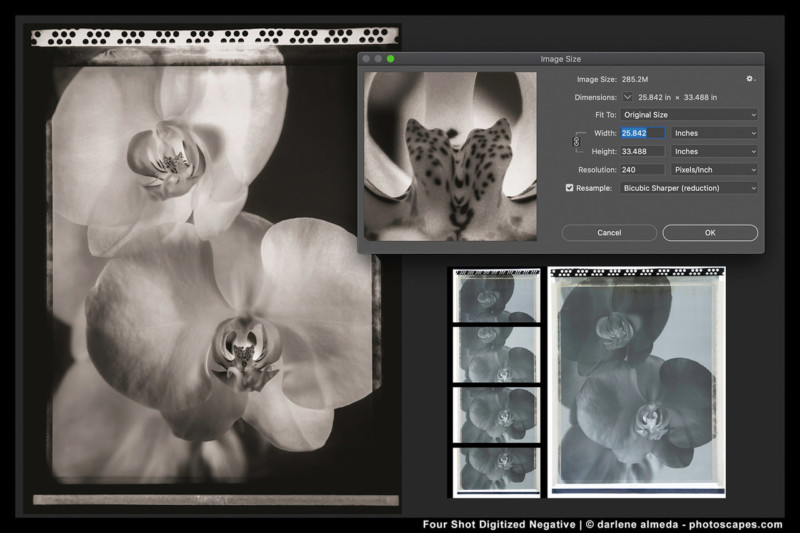
Since I understand exposure through my usage of the Zone System, I know that a flat negative is my goal when digitizing film. When digitizing film, we can make individual brackets for contrast control; dodge and burn the negative in post-processing, and if a very large print is needed, we can digitize slices of a negative and join them together in Lightroom or similar software as shown below:
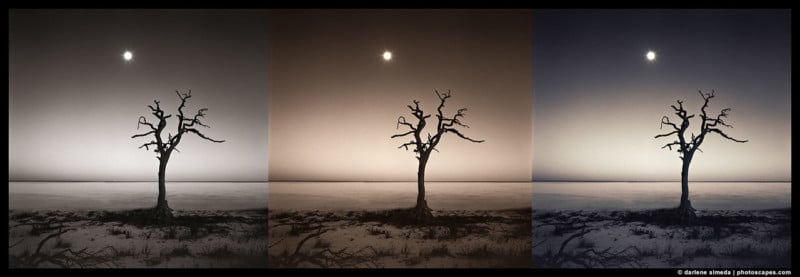
Post-processing my digital negatives provides me with the precision and creativity I long for in my work. Remember the image below? I felt it needed the color of the night sky to emulate the mood. This black and white negative was colorized using a LUT. A LUT is a look-up table that produces color grades and tones. There is an infinite amount of possibilities in post-processing. Learning a few tools well, goes a long way.
The Zone System for Today’s Digital Photographer
Understanding proper exposure as Ansel Adams and Fred Archer taught through the Zone System can be applied in digital photography. A common problem digital photographers face happens while using a camera with a built-in light meter. The light meter is calibrated to read middle grey, Zone V.
Snow is not Zone V but may record as grey when a snowy landscape fills the camera’s viewfinder and an automatic metering method is used while taking the photo. Instead, make the photo by placing your exposure on Zone VII (lightest tone with texture) by adding two additional stops of light.
What about a portrait of a black cat sitting in the snow? Kitty needs to be placed in Zone III for proper exposure of her dark beautiful fur.
The easiest way to handle situations like this is to shoot with an auto-bracketing setting of -2,0,+2. That is if you do not mind having to cull through all the images, all the time. Think about all that hard drive space filling up.
If you want to master exposure, shoot on manual mode and use a spot meter when you can. You might see a different approach beginning in your work. Throw pre-visualization into the mix and when you need a new challenge, try shooting a film camera. There is something special about film. It makes you slow down and become an integral part of the process. Journey down one path at a time so you can develop understanding and technique.
I hope this article encourages more photographers to give film a try, and learn proper exposure through the Zone System no matter what camera you shoot. This truly is a fantastic time to be a photographer.
About the author: Darlene Almeda is a Florida-based photographer and instructor who has been involved in commercial photography for over three decades.
Image credits: Photographs © Darlene Almeda