How to Transfer Photos from iPhone to Computer in 2026
![]()
Transferring photos from an iPhone to a computer is a common task that doesn’t have to feel like a chore, yet sometimes it can be frustrating if something isn’t working or seems to be taking longer to complete than it should. Thankfully, Apple provides several solutions to move pictures from an iPhone to a computer.
Which method is most useful varies depending on the hardware and software available and knowing every option will help to make the best decision. So whether you want to transfer some photos to share with friends and family or whether you’d like to offload the pictures onto a local backup drive to free up space on your iPhone, read on to learn the best ways to transfer photos from an iPhone to a computer.
Table of Contents
How to Copy iPhone Photos to a Computer via a Cable
Wired connections might be the first method that comes to mind for copying images from an iPhone to a computer. In fact, a direct cable connection was once the only way to collect photos directly from an iPhone without uploading them to the internet first.
For any iPhone released in 2012 or later, a Lightning cable is needed to connect to a computer, and Apple strongly recommends Made For iPhone (MFi) certified cables. This might sound like a ploy by Apple to earn extra money, however, there are actual dangers when using Lightning products that don’t have Apple’s MFi stamp of approval.
A cable that hasn’t met Apple’s guidelines and certification, might not transfer properly or at the fastest speed possible. Unknown Lightning cables and adapters can even contain malware that could affect the computer.

Transferring to a Mac
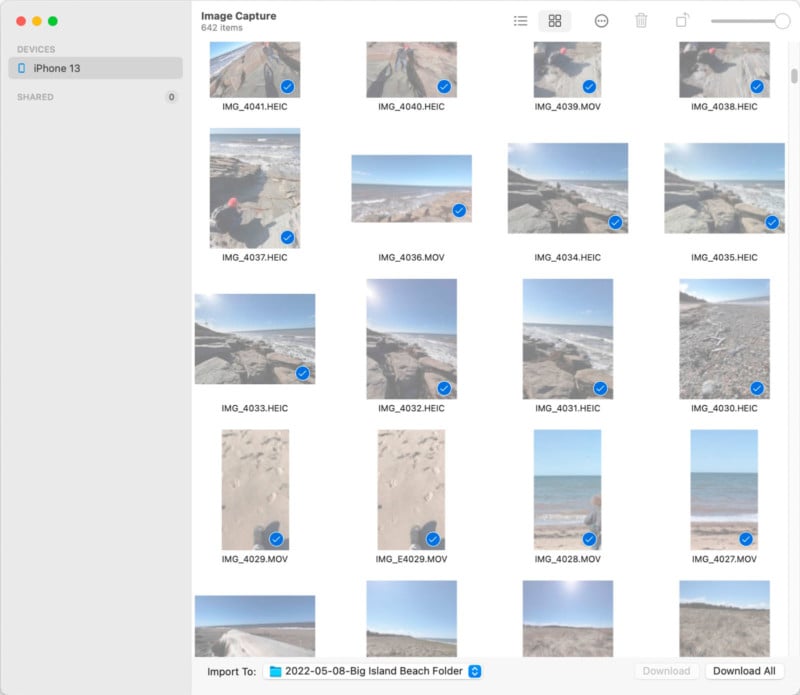
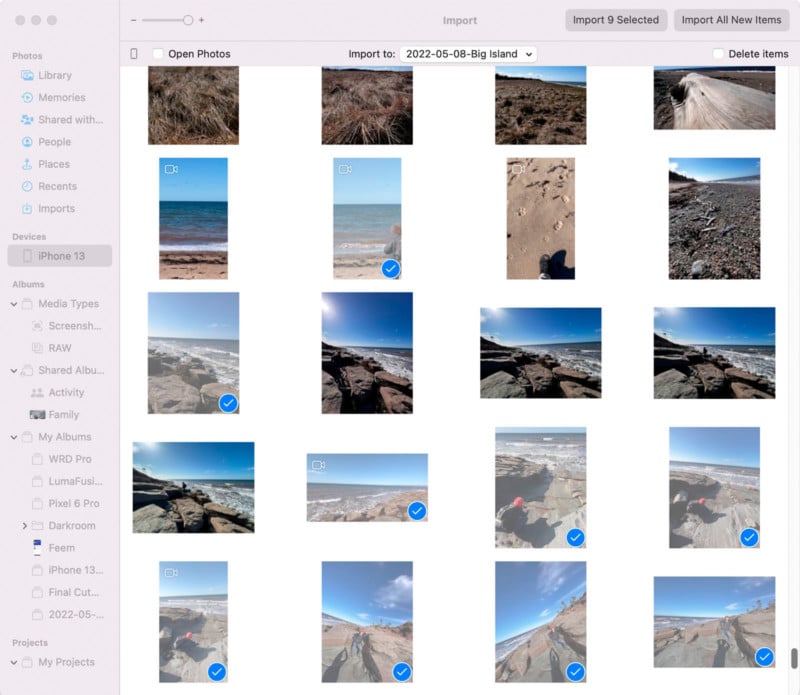
On a Mac computer, there are two apps that can be used to import photos from an iPhone over a Lightning cable, Image Capture or the Photos app. Image Capture allows the user to select a specific drive and folder for storage, providing the most flexibility when the photographer wants to manage their storage options.
The Photos app takes care of the details of where files are stored and provides a more photo-centric interface, as well as the ability to make quick edits to an image.
Transferring to a PC
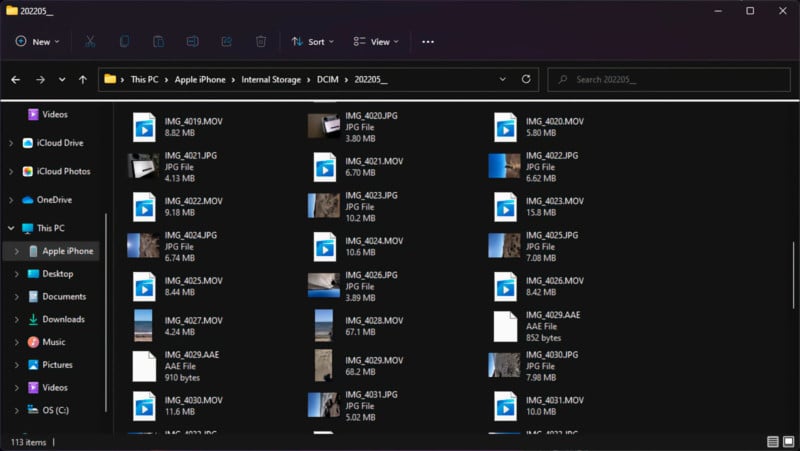
When using a Windows PC, photos can be retrieved from an iPhone by using Windows File Explorer or the Photos app. This is quite similar to the choice provided on a Mac. The Windows Photos app can take care of file management, or when using the File Explorer, complete control of folder structure and file location is possible.
iPhone Not Detected by Your Computer?
If you have connected your iPhone with your computer and the iPhone does not seem to be showing up as a connected storage device, there are some tips you can try.
- Make sure your iPhone is on, unlocked, and on the Home screen.
- After connecting the iPhone, a “Trust This Computer?” message should appear on your iPhone. Make sure you tap “Trust” to give the computer access.
- Unplug and plug the cable in again on both ends to ensure a good connection.
- Check the plugs and ports on the iPhone, cable, and computer to ensure they do not need cleaning.
- Try a different USB port on your computer if there are multiple.
- Restart both your iPhone and your computer.
- Try a different cable to confirm it is not a bad cable you are working with.
- Confirm that your iPhone and computer are up-to-date in their operating systems.
- If your iPhone is still not recognized, Apple has additional steps you can try on Mac and PC.
How to Synchronize iPhone Photos Using iCloud Photos
iCloud Photos can be used to synchronize photos between an iPhone, a Mac computer, and a Windows PC. This is quite convenient if using iCloud to store the entire library of iPhone Photos, however, there’s no way to specify which images are transferred. It’s an all-or-nothing approach that’s not as useful as a more granular solution. If the computer has plenty of storage available, this might be a good solution that eliminates the hassle of getting photos to the computer. As soon as the iPhone has a Wi-Fi connection, new photographs will be uploaded to iCloud and the computer will synchronize them without requiring any effort from the user.
iCloud on a Mac
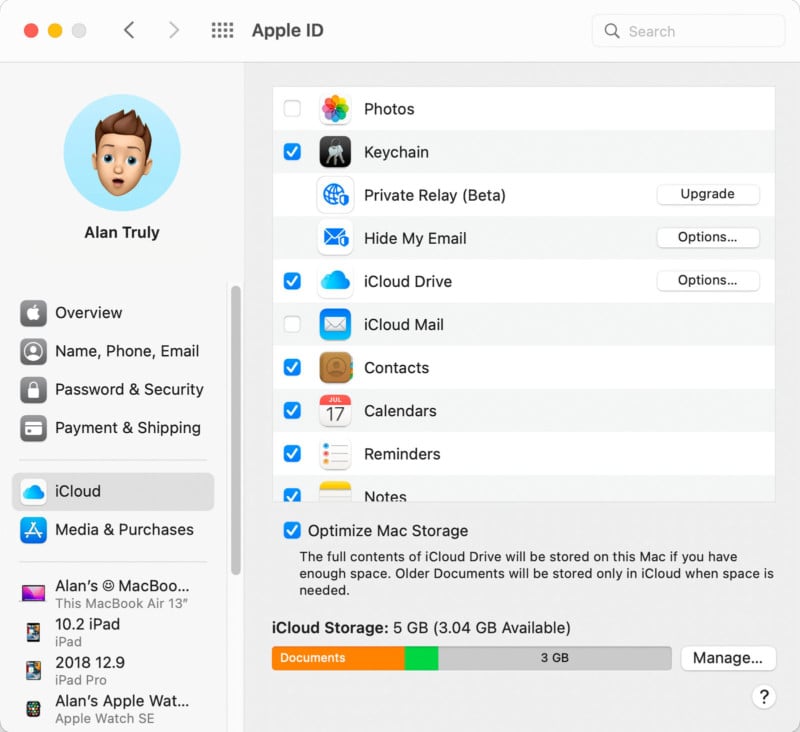
iCloud is built into every iPhone and Mac computer so it simply needs to be switched on. iCloud Photos can be enabled on an iPhone by opening the Settings app, tapping the user’s name that appears near the top, then clicking the iCloud section, and making sure that Photos is switched on. Note that Apple includes only 5 gigabytes of storage for free and this gets used up in a hurry if storing large ProRAW images and ProRes videos. Subscription prices are reasonable but can become costly over time.
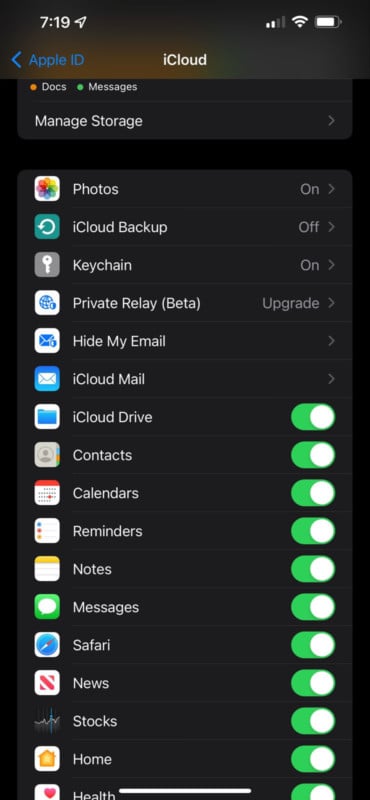
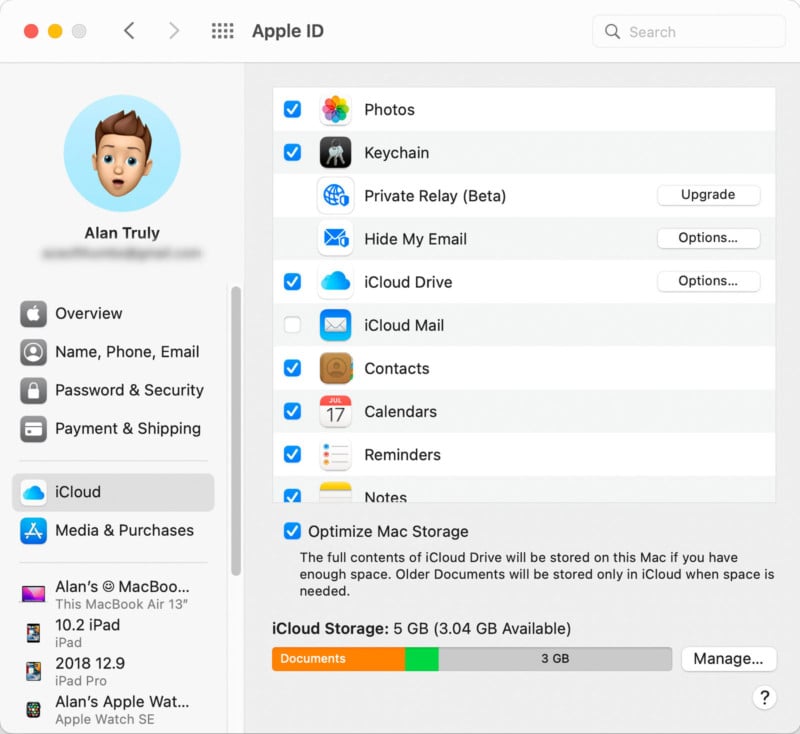
When using a Mac computer, the process for enabling iCloud is quite similar. Starting with the System Preferences app, the user can click on the Apple ID pane, then the iCloud tab, and make sure the checkbox next to Photos is ticked. This enables iPhone photos to sync with the Mac.
iCloud on a PC
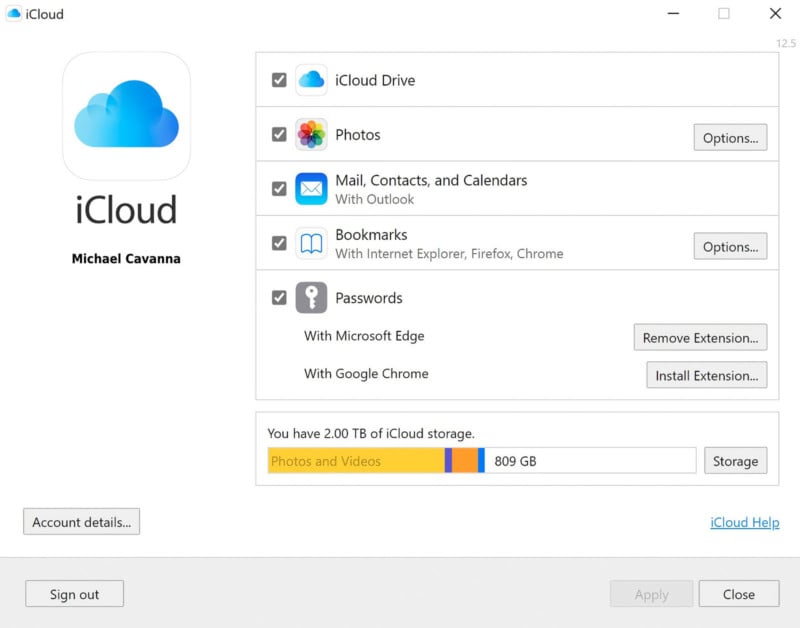
On a Windows PC, iCloud has to be downloaded from the Microsoft Store and only requires logging in with an Apple ID, since Photos is on by default when the app is downloaded. iCloud Drive, Bookmarks, and Passwords allow those apps to sync to the Windows PC if that is wanted.
How to Move iPhone Photos to a Computer Using iCloud Drive
iPhone photos can also be managed more precisely by using iCloud Drive instead of iCloud Photos. The downside to using the automatic synchronization of iCloud Photos is that it transfers every photograph and every video, quickly using up storage and pushing the user to a more expensive subscription plan. For professionals, this cost might be absorbed as a business expense, however, individuals may want to watch the budget more closely and use iCloud strictly as a way to facilitate transfers to a computer.
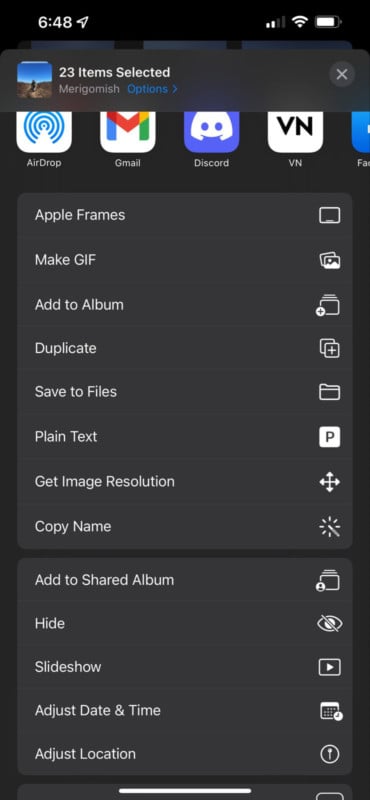
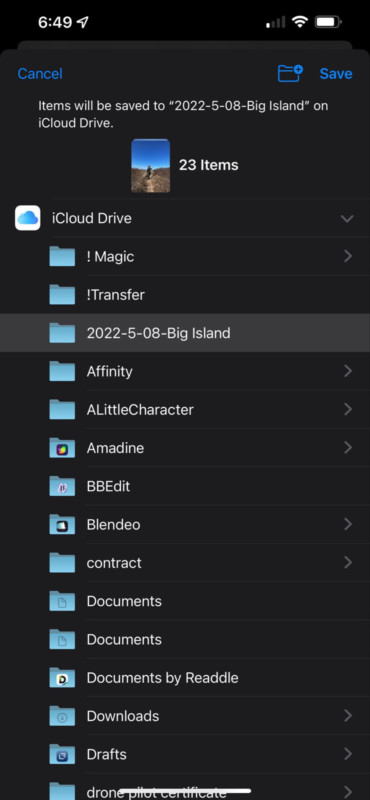
In the iPhone’s Photos app, the user can select any pictures that are to be moved to the computer and then tap the Share Sheet button, scroll down and tap Save to Files.

A file requestor will ask where to save and a folder on iCloud Drive should be selected. After tapping Save, the pictures will be uploaded to iCloud.
iCloud Drive on a Mac
When using a Mac computer, iCloud Drive can be enabled in the Apple ID pane of Systems Preferences by ticking the checkbox beside iCloud Drive.
Enabling iCloud results in an iCloud shortcut appearing in the sidebar of any Finder window and clicking it reveals the files and folders it contains. Dragging photographs to the preferred location on the computer drive will remove them from iCloud and free up that storage so it is available again for the iPhone.
iCloud Drive on a PC
On a Windows PC, iCloud should be installed from the Microsoft Store and the user must log in with an Apple ID and make sure that iCloud Drive is enabled. iCloud Drive will appear in the sidebar of any File Explorer window and files on iCloud Drive can be browsed to locate the pictures and drag them to a Windows drive. As with a Mac, this clears room on iCloud Drive for continued use.

How to Transfer iPhone Photos to a Mac Using AirDrop
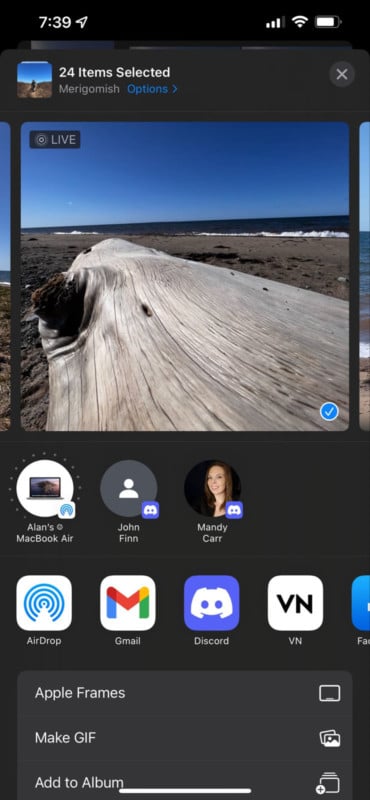
AirDrop is a wireless transfer protocol that allows pictures to be sent from an iPhone to a Mac computer or almost any other Apple device without the need to upload to the internet or connect a cable. Wi-Fi is used so it is relatively quick. Since Apple built this capability into both the iPhone and the Mac, there’s no need to install any apps. The user can simply select the photographs to be transferred, then tap the Share Sheet button to bring up ways to share. AirDrop appears at the top and might even offer a shortcut to send to a nearby Mac.
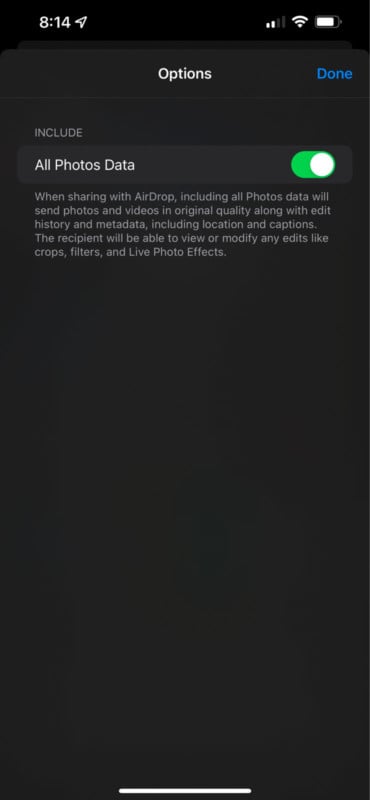
Before the AirDrop process is started, the user can tap options at the top of the screen to include all of the metadata associated with each photograph. The default is to send only the picture itself with edit history, captions and location excluded.
If the receiving device isn’t shown as an AirDrop shortcut, tapping the AirDrop button will bring up a list of people and devices to which the images can be shared, and tapping any of those will begin sending.

How to Send iPhone Photos Wirelessly to a Windows PC
Apple hasn’t made an AirDrop app for Windows, however, there are third-party apps that offer a similar experience. A free app called Feem v4 allows a peer-to-peer Wi-Fi connection between a Windows PC and an iPhone for quick transfers while also including a chat feature.
The app is ad-supported, however, a group of photos can be transferred at once with only one advertisement appearing. For $5 annually, ads can be removed. The iPhone app can be installed from Apple’s App Store and the Windows app is in the Microsoft Store.
Each device that is running Feem will be given an anonymous, random, and somewhat silly name such as ‘Mindless Eagle’ or ‘Rotten Leopard’ which can be used to select where files are sent. It’s possible to have multiple devices and Feem even works on Android and Linux.
To transfer wirelessly from an iPhone to a Windows PC, Feem should be opened on both. If a trusted home or office Wi-Fi network is available, making transfers is as easy as selecting photos on the iPhone and tapping send.

If transferring from an iPhone to a Windows laptop and no Wi-Fi is available, Feem can create a direct connection using the PC’s Wi-Fi. Clicking the Wi-Fi Direct button at the upper-left of the Feem app in Windows will create the hotspot.
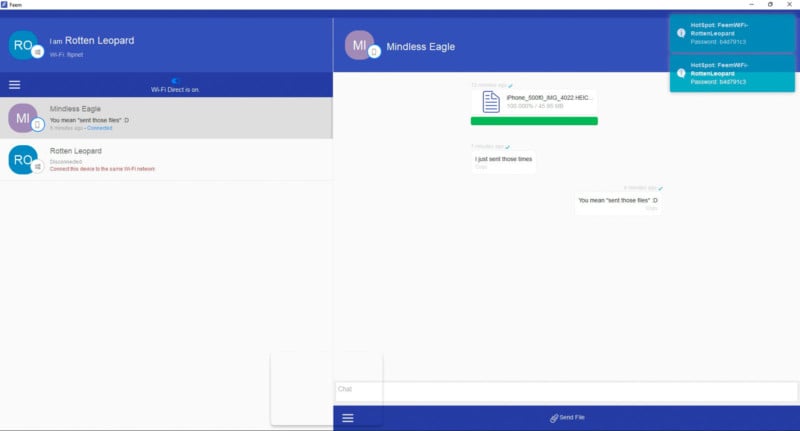
The iPhone will need to connect to the Windows hotspot and this is done in the Settings app under the Wi-Fi tab. The password is shown in the upper right of the Feem app on the Windows PC.

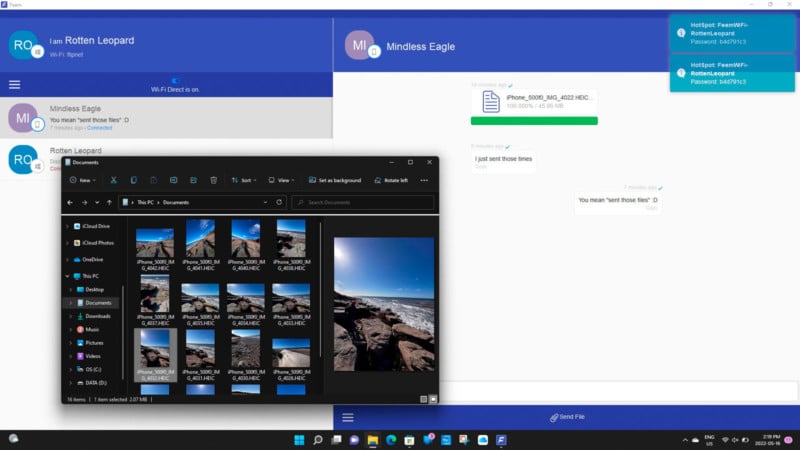
The photos will be placed in the PC’s Documents folder by default but with a subscription to Feem, this can be changed to any location.
There are several other solutions available and the convenience of transferring without plugging in a cable might make downloading an app worthwhile.
Why Even Bother with iPhone Photos?
In most cases, the best camera for you is the one that’s available and ready to take a photo. While Apple has dramatically improved the quality of the cameras and image processing built into the latest iPhone, it still can’t quite compete with the latest DSLR and mirrorless cameras. Bigger sensors and larger lenses give an enormous advantage over even the best computer algorithms and AI enhancement.
However, the iPhone has plenty of tricks up its sleeve, making some features more easily accessible on a smartphone than on a dedicated camera. Macro mode is automatic, slow motion is just a swipe away, and time-lapse automatically chooses a usable frame rate and manages exposure settings. While a DSLR can provide a better result with sufficient effort and experience, the iPhone makes good results immediately available to anyone.
That means it’s worthwhile to use an iPhone when it’s available and experiment with its special features, expanding a photographer’s repertoire beyond their years of experience. Understanding the various methods of transferring photos from an iPhone to a computer, makes it possible to pick the best for a given situation.
Which is the Best Way to Transfer iPhone Photos?
While a wired connection is often the best to move files, that usually isn’t true when it comes to the iPhone. Since it uses a Lightning cable which is built on the USB 2.0 standard, the maximum bandwidth is 480 megabits-per-second. That is quite slow compared to USB 3.2 speeds of up to 20 gigabits-per-second. Unfortunately, there is no way to use USB 3.2 with an iPhone, so a wired connection is capped at the USB 2.0 rate.
That means a direct cable connection is probably no faster than sending images over a good internet connection if the photos have already been uploaded to iCloud Photos or iCloud Drive. If the pictures still need to be uploaded, that might take longer since uploads are typically slower than downloads, even with a fast internet connection. This gives iCloud Photos an edge over iCloud Drive in terms of speed, however, iCloud subscription fees should be taken into consideration.
The iPhone Wi-Fi transfer methods, such as AirDrop, Feem, and others are typically as fast as moving photos via a Lightning cable, without the hassle of finding the cable and plugging it in. AirDrop is built into a Mac and Feem is free and works on Windows and Linux computers. Since speeds are similar no matter which one of these methods is used, this is more of a personal preference and it’s best decided on a case-by-case basis.
Conclusion
The iPhone is often a photographer’s best friend since it’s readily available and simplifies some otherwise tricky situations. At any given moment, it’s easy to grab the iPhone to get a macro, capture a timelapse, or snap a picture of a rare moment that might be missed if rushing to get a larger camera ready to shoot. There’s no lens cap, no tripod, or other accessories needed. The photographs captured with an iPhone can often be quite striking and memorable. Having so many choices is great and shows how versatile an iPhone is for photography from start to finish.
We hope this article was helpful to you in getting those iPhone photos transferred to your computer.