The (Lens) Doctor is In: Servicing Your Own Glass

As I’ve collected more and more camera equipment, especially vintage film gear, I’ve amassed a collection of quite a few lenses that I found for peanuts at flea markets, thrift, and antique stores, or online through marketplaces like eBay.
For those of us who are absolute sticklers for keeping our equipment in pristine condition, and only purchasing equipment in pristine condition, such as myself, you might think that pieces like these that would benefit from some TLC aren’t worth snapping up. After all, sending off even an inexpensive lens to be repaired or given a CLA (Clean, Lube, and Adjustment) can easily run over $100, and for most older lenses it simply isn’t worth doing when you can buy an entire new copy without those issues for less than that.
However, I’ll let you into a little secret: servicing your own lenses — either to preserve the functionality of your favorite piece of glass, or restore the functionality to a lens you got for a steal because the seller had written it off with the grim “As-Is/For Parts/Untested” descriptor — isn’t too difficult, and it’s an incredibly satisfying skill to learn.

Recently, I acquired a Minolta SRT-101 that came with an MC Rokkor-PF 55mm f/1.7, listed on Facebook Marketplace for $40. It was listed as “Untested”, which in my experience means that the seller either doesn’t know how to test it, or that they do know, know that the piece is faulty in some way, and want to give themselves the ability to claim ignorance and respond with “Caveat emptor!” when the thing you bought doesn’t work correctly. It was in great physical condition though, and had clearly not seen much use.
“Oh well”, I thought, “might as well it up to be a donor in case mom’s camera needs parts.” The deal was struck, and a few days later, I was able to take stock of what I’d bought. As it turns out, the camera itself was in excellent condition, with everything, even the light meter and self-timer, working exactly as you would expect. The lens looked to be in serviceable shape. The focus and aperture rings turned very smoothly, there weren’t any dents or chunks taken out of the barrel. Again, it seemed to have not been used very much.
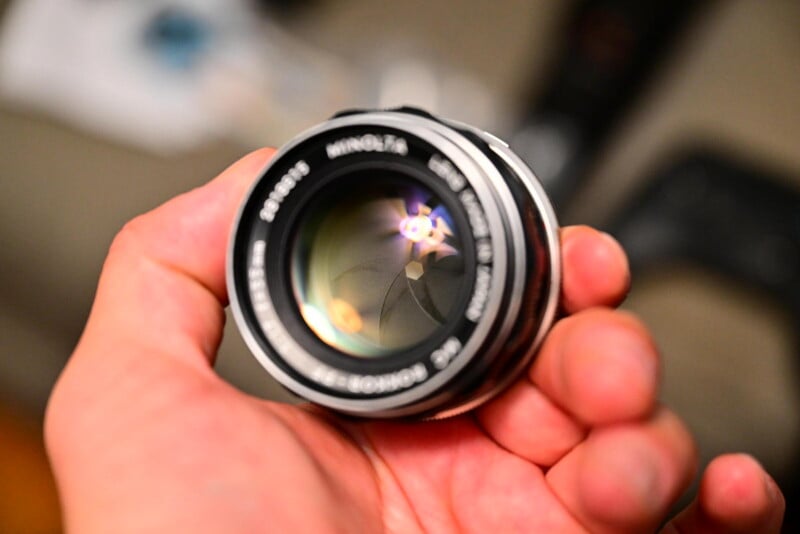
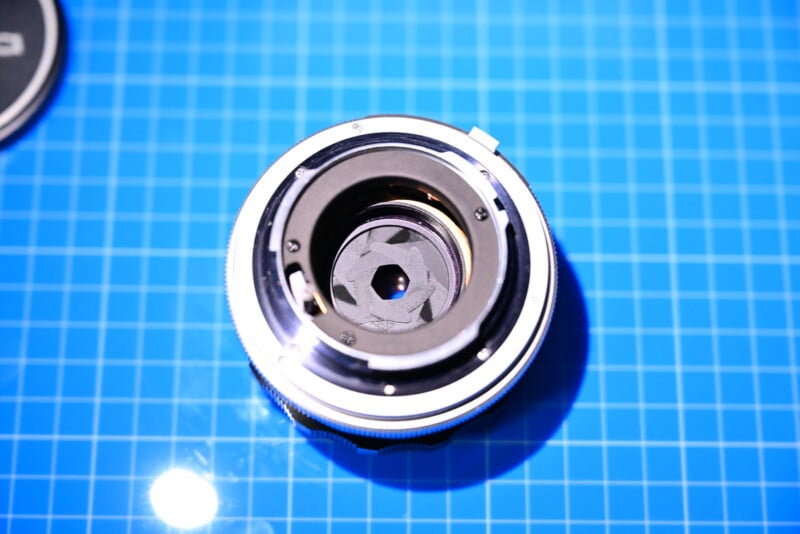
Unfortunately, though, aside from some obvious dust and general grime present, there was a bit of oil visible on the aperture blades. Sometimes, this isn’t really a problem. On fully manual lenses where the aperture mechanism is not coupled to the camera to aid with metering, such as the venerable Helios 44-2, the user operates it by hand at all times, and generally the act of doing this is enough to overcome any stickiness caused by oily aperture blades. However, on cameras that utilize a system that leaves the lens wide open until the shutter button is pressed, like all of my old Minoltas, this “automatic aperture” system is usually reliant on tiny springs in the lens and in the camera body to open and shut the blades during the exposure, and this is frequently not enough force to close the aperture if oil is present. And sure enough, while I could manually close the aperture by moving the pin on the back of the lens, it wouldn’t close when actuated by the camera.
Determined to come out on the other side of this purchase feeling like I’d gotten a spanking deal, and to give myself the option of doing this in the future, I decided to buy some tools and service the lens myself.
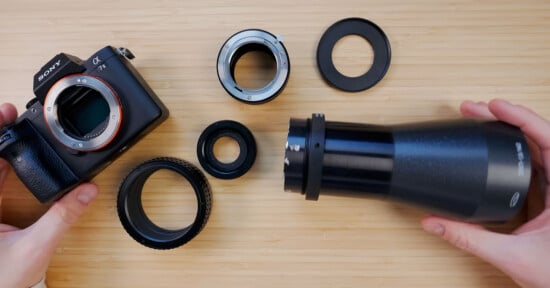
As it turns out, there aren’t actually very many exotic tools you need for a basic service like this. The only “musts” are a spanner wrench, easily found for less than $30 from a variety of different marketplaces, a set of rubber friction rings in common sizes, again not more than about $30, a small “lens sucker” tool to avoid touching the lens elements during teardown and reassembly, a set of Japanese Industrial Standards screwdrivers (absolutely not to be confused with the common Phillips, despite their visual similarity), a rocket blower or can of compressed air, a microfiber cloth and/or a box of Kimwipes, and a clean, organized work area to help you keep track of parts.
I started by watching an excellently thorough teardown video of this specific lens from Matt Bierner on YouTube just to know what I was getting into.
Thankfully, because it’s a standard 50-ish millimeter manual-focus prime, it’s not very complex at all.
Perhaps foolishly, I first tried taking a shortcut — I’d seen several videos and heard reports of people cleaning their aperture blades without disassembling the lens or the mechanism itself. I figured that I might as well give that a shot, so I used a bit of isopropyl alcohol on a cotton swab and tried wiping down the blades after removing the rear element. After multiple passes and oil reappearing every time I actuated the aperture, I realized I was going to have to pull the whole thing apart and do it the right way.
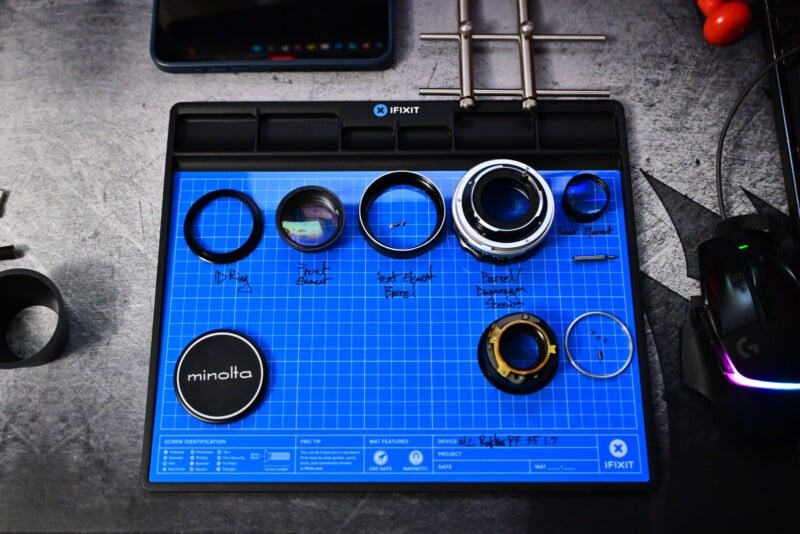
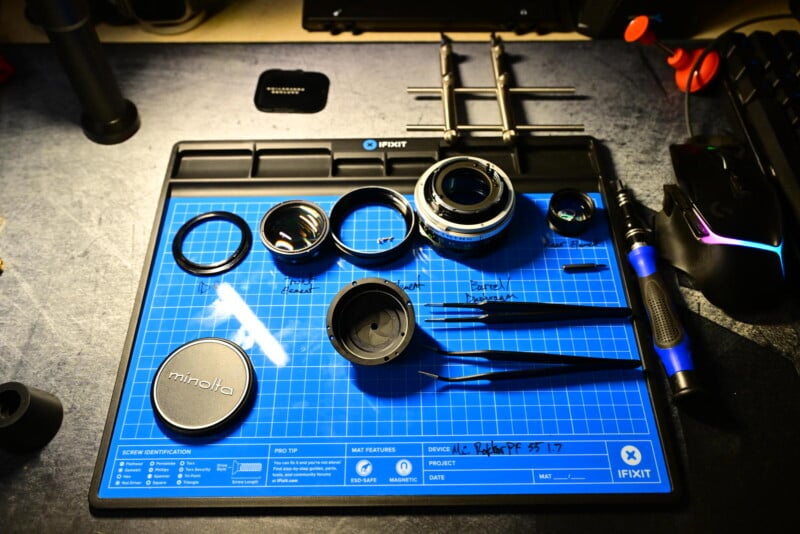
Using the spanner wrench, I broke loose the front ID ring surrounding the front element, unscrewed it, then removed the front element and the part of the barrel that held it in place. Then I pretty much just went step by step per the teardown video, making absolutely certain to keep track of every screw, spring, and other component (I was thanking my past self for buying a magnetic work mat-absolutely worth the investment).
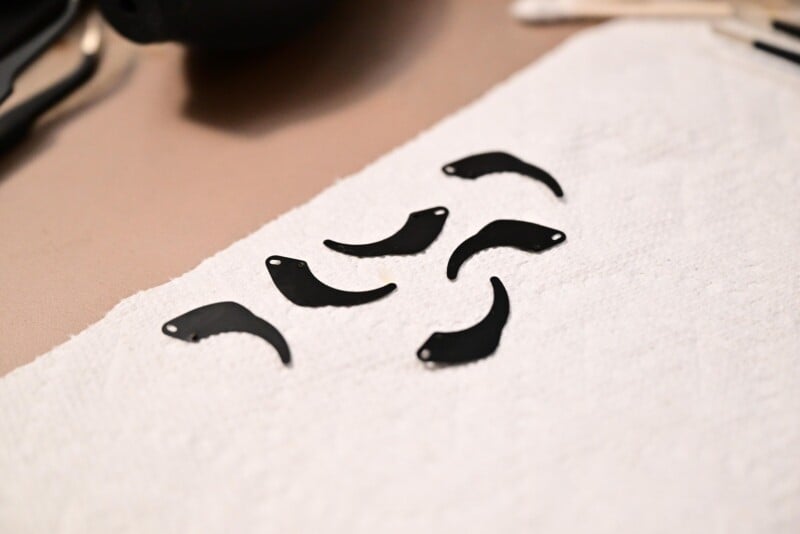
And then came time for the horrendously awful bit, actually working on the diaphragm. I’m not going to lie, this sucked. Not only was it incredibly fiddly, especially given that my hands are quite large and not really suited to this kind of work, but it was also stressful-one slip with the tweezers and I could easily ruin the entire mechanism. Between methodical disassembly, meticulous cleaning of the front and back of each blade, and frustrating reassembly involving three flathead grub screws (let me say again-flathead grub screws) the size of a grain of sand, it took about 3 hours to get the whole thing fixed and back together.
In my naivete, I thought the worst was behind me. Little did I know that I had already made a rookie mistake. In my excitement and satisfaction that I had “successfully” repaired what I needed to repair, I rushed to put the lens back together. Every part, every screw went back in, and only then did I realize that something didn’t seem right-the aperture ring worked, but there seemed to be a huge change in size between f/1.7 and f/2.8, and almost no change in size after about f/8. Surely, something was misaligned, but what could it be? I followed the video exactly, didn’t I?
Reader, I had not. After almost 2 hours of disassembly and reassembly, I discovered that in my haste, I skipped over the 30-second section of the video where Matt describes how to, basically, re-index the diaphragm to the aperture ring to give the correct maximum and minimum aperture size at the extreme settings. Turns out that the actual aperture blade sandwich needs to be oriented in a specific way so that all of the levers, cams, and other components will move the correct amount with each click. For whatever reason, I thought the mechanism would kind of just handle that for me. Never a bad time for a reminder to RTFM, I suppose.
At long last, I gave everything one last thorough clean and a blast from a can of air and completed the final reassembly. Everything went together as it should have, everything lined up, almost like it had been designed to do that when assembled by someone who actually knew what they were doing. Once mounted on the camera, the lens functioned perfectly, exactly as I expected it would have from the factory.
I have to say, for a first-timer trying a DIY fix for something as complicated as a camera lens, I think I enjoyed it on the whole. There were certainly moments of frustration and bewilderment, but they were mostly caused by me being cavalier and assuming I knew something I didn’t. Once I figured out the right way to do things, it really just felt like I was playing with a really precisely-made set of LEGO.
I’m absolutely going to keep my eye out for cheap lenses and other gear that I can use my burgeoning skills on. It’s incredibly satisfying to fix things, even more so when you get to keep vintage gear out of the scrap heap and save a buck doing it. As time goes on, this equipment is only going to get harder to find, so I think anything you can do to be able to save it is worth doing.