How to Craft a Lightroom Keyword Hierarchy
![]()
Words play a significant role in photography in many ways as we talk and write about them. I created the above image many years ago using an online app, Wordle, which used text content and analyzed the significant words. The larger the word, the greater the frequency of use.
You have likely amassed thousands of photographs, each holding memories, moments, and artistic expression. However, finding a specific image can become time-consuming and frustrating as your archive grows. This is where the power of keywording comes in, and for seasoned shooters, moving beyond random tagging to a hierarchical keyword system can be a game-changer.
I have been using a keywording structure for a long time. I developed it to reflect my interests, travels, tools, and techniques, and most of my images are keyworded. I still have many that need keywords, and I periodically add keywords to more of them. If you market your photographs on stock photo sites, keywording becomes particularly important as those sites demand keywords. But first, do it for yourself!
By the way, the samples I will provide here reflect my needs and my interests. I do not mean this is suitable for others. They simply provide examples of how I have developed a keyword set that fits my needs.
While you might already be familiar with adding keywords to your images in Lightroom, tagging with a laundry list of terms can quickly become unwieldy. A hierarchical system allows you to create a structured approach to your keywords, making your library searchable and navigable. Think of it like organizing files on your computer – folders and subfolders make finding what you need significantly easier. The same principle applies to your Lightroom keywords.
What Are Hierarchical Keywords?
At its core, a hierarchical keyword system involves organizing your keywords into parent-child relationships. A parent keyword is a broad category, while child keywords are more specific, granular terms that fall under that category. Below are my top-level keywords, and one of them is partially captured to show the multi-level nature of the keywords.
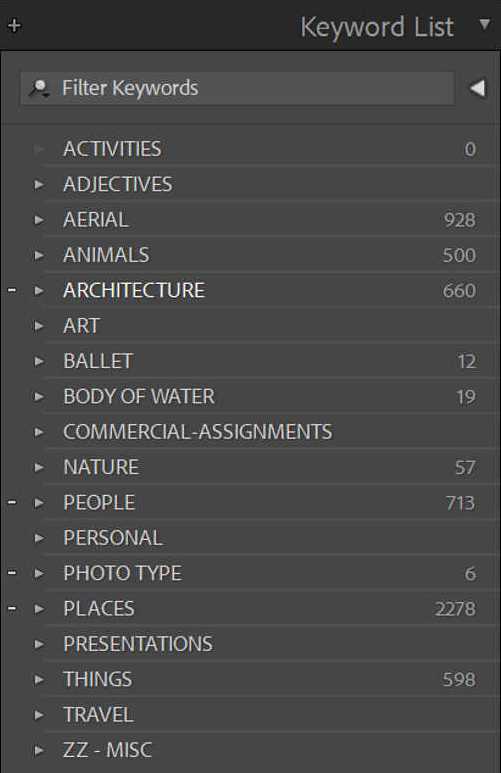
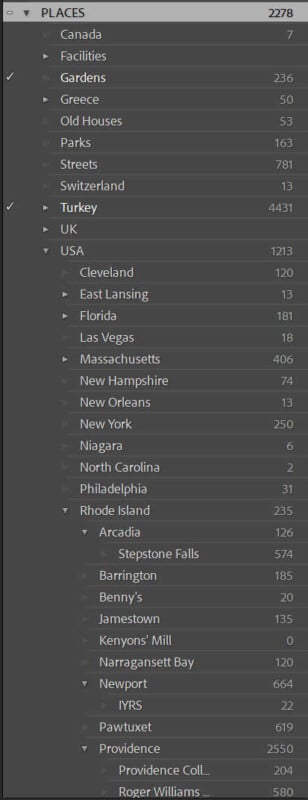
For example, instead of just tagging an image with “Arcadia,” you might have a parent keyword “PLACES” with a child keyword “USA” and a further grandchild keyword “Rhode Island,” and a great-grandchild “Arcadia”. This structure provides several key advantages for the experienced photographer. Anytime you filter out “Rhode Island,” “Arcadia” will be included among the selected photographs. This structure also provides context.
Why Go Hierarchical?
As a photographer, you’re likely dealing with different subjects, locations, and styles. A hierarchical keyword system offers significant benefits tailored to your needs:
Precision in Searching: When you need to find all your images of “birds of prey in flight,” a well-structured hierarchy allows you to drill down quickly instead of sifting through all your “bird” images. They will likely be tagged with the “Birds > Birds of Prey” and “Action > Flight” categories or something similar.
Consistency in Tagging: By formulating clear categories and subcategories, you ensure that similar images are tagged with consistent terminology, thus reducing the chances of using slightly different terms for the same subject, like “Bird” for some and “Birds” for others.
Powering Smart Collections: Hierarchical keywords are even more useful when used with Lightroom’s Smart Collections. You can create dynamic collections that automatically update based on specific keyword combinations within your hierarchy. For example, a “Coastal Landscapes – Golden Hour” collection could automatically pull in any image tagged under “Landscapes > Coastal” AND “Time of Day > Golden Hour.” The separate section below on this tool explains it in detail.
Scalability for Growing Libraries: As your photography interests grow and your image library expands, a hierarchical system provides a robust and scalable framework for managing your ever-increasing collection.
Building Your Hierarchy
The beauty of a hierarchical keyword system is that it can be completely customized to your unique photographic focus and workflow. There’s no one-size-fits-all approach. The key is to think about recurring themes, subjects, and characteristics in your work and how you (or others) might search for those images in the future.
There are keyword structures for sale on the Internet with an extensive range of keywords. Some may even be structured for specific groups, like bird photographers with a long list of species and sub-species. Way back in the day, none of them fit my needs.
Identify Your Top Keyword Categories
Start broad. What are the main buckets your images naturally fall into? Consider these questions:
- What are your primary subjects? (e.g., People, Landscapes, Wildlife, Still Life, Events)
- Do you specialize in specific genres? (e.g., Portraiture, Documentary, Fine Art, Commercial)
- Does location play a significant role in your work? (e.g., Travel, Local Projects, Specific Regions)
- Try to keep the top-level keywords under fifteen broad categories
For instance, if you primarily shoot weddings and portraits, your top-level categories might include “People” and “Events.”
Develop Subcategories (Child Keywords) and Think Synonyms!
Once you have your main categories, start brainstorming more specific terms that fall under each. Consider different attributes, actions, emotions, or technical details relevant to your work. But as you develop these subcategories, also take a moment to consider synonyms and related terms. How else might you or someone else describe this subject or concept?
For example, under the parent keyword “PEOPLE,” you might have child keywords like “Portraits,” “Candid,” “Family,” “Children,” and even more specific terms like “Headshot” “Full Body,” or emotions like “Joyful” or “Reflective.” While you’re at it, you might note that “Kids” is a common synonym for “Children” or that “Emotions” could also be described as “Feelings.” My sub-categories include Family, Friends, and specific people by name.
Incorporating Synonyms in Lightroom
While your hierarchical structure provides the primary organization, you can strategically incorporate synonyms in Lightroom to enhance searchability:
Lightroom offers a powerful feature that allows you to add synonyms to your keywords. This means that even if you search for a term that isn’t your primary keyword, Lightroom can still find images tagged with its synonyms.
For example, if you have a keyword “Automobiles > Sedan,” you can add “Car” and “Vehicle” as synonyms to “Sedan.” Then, if you search your catalog for “Car,” any image tagged with “Automobiles > Sedan” (and its synonyms) will appear in your search results.
How to Add Synonyms in Lightroom
- Open the Keyword List Panel: Navigate to the Library module and open the Keyword List panel on the right side of the interface.
- Select a Keyword: Click on the keyword you want to add synonyms to (e.g., “Sedan” under “Automobiles”).
- Edit the Keyword: Right-click (or Control-click on a Mac) on the keyword and select “Edit Keyword…”
- Add Synonyms: In the “Edit Keyword” dialog box, you’ll find a field labeled “Synonyms.” Enter any relevant synonyms, separated by commas (e.g., Car, Vehicle).
- Click “OK”: Your synonyms are now associated with that keyword.
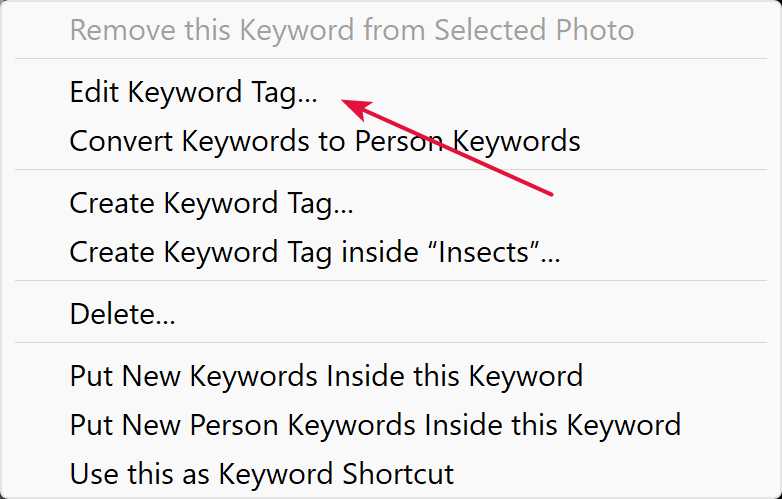
Right-click on keyword, Select Edit Keyword 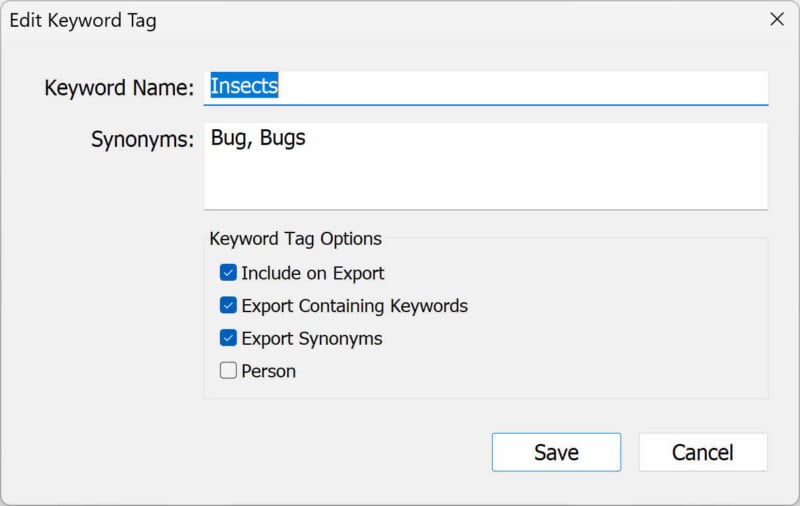
Add synonyms separated by comma
Benefits of Using Lightroom’s Synonym Feature
- Improved Search Flexibility: You and others searching your catalog can use a wider range of terms to find the images you need.
- Maintains Keyword Structure: You keep your primary hierarchical structure clean and consistent while accommodating alternative search terms.
- Streamlined Workflow: Adding synonyms directly to your keywords will avoid redundancy.
Consider Different Hierarchical Structures
![]()
There are several ways you can structure your keyword hierarchy. Here are a few common approaches, and you might even find that a combination works best for you:
- By Subject: This is often the most intuitive starting point. (e.g., Animals > Mammals > Canine > Dog > Golden Retriever)
- By Location: Useful for travel and landscape photographers. (e.g., Continents > Countries > States/Provinces > Cities > Specific Locations)
- By Style/Technique: This helps categorize your artistic approach. (e.g., Black and White, Long Exposure, Macro, Aerial)
- By Event: Essential for event photographers. (e.g., Weddings > Ceremony, Weddings > Reception; Corporate Events > Conference, Corporate Events > Gala)
Take, for instance, the BALLET top-level keyword for my collection. It allows me to organize the photographs based on different performances and projects.
Implementing Your Hierarchy in Lightroom
Lightroom makes it relatively straightforward to create and manage hierarchical keywords:
My top-level keywords are all in caps, as you can see in the sample. I am not sure what made me do that but it may be something to distinguish the top-level, broad keywords from the more specific, granular child keywords. It is quite possible that I read a reference to that somewhere. It was too long ago for me to remember. But, take your pick.
- Open the Keyword List Panel: You will typically find this on the right side of the Lightroom Library module.
- Create Parent Keywords: Click the “+” icon at the top of the panel and enter your broad category (e.g., “PEOPLE” or “PLACES”).
- Create Child Keywords: Select the parent keyword you just created, click the “+” icon again, and enter your more specific term (e.g., “Portraits” or “Family”). Lightroom will automatically nest this as a child keyword. You can also drag and drop keywords within the list to create parent-child relationships.
- Assigning Keywords: When keywording your images, you can type in keywords directly in the Keywording panel on the right side of the Library module or drag keywords from the Keyword List onto your selected images. Alternatively, you can drag the keyword to the selected images, but the simplest is to put a checkmark in the box on the left of the keyword. When you assign a child keyword to an image or a group of images, the parent keyword is automatically associated, and there will be a checkmark next to that keyword and a dash next to the parent(s).
Smart Collections Using Keywords
You may be using collections for various purposes. Once you have a working keyword hierarchy, you can also create dynamic smart collections using your keywords. These smart collections will automatically include the images that fit your criteria.
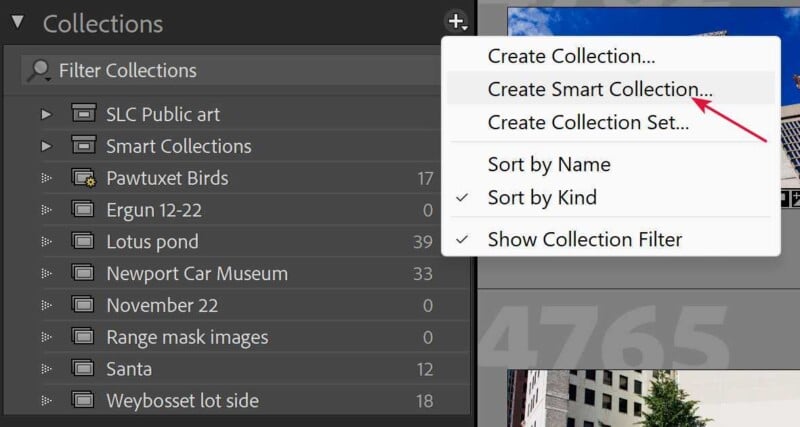
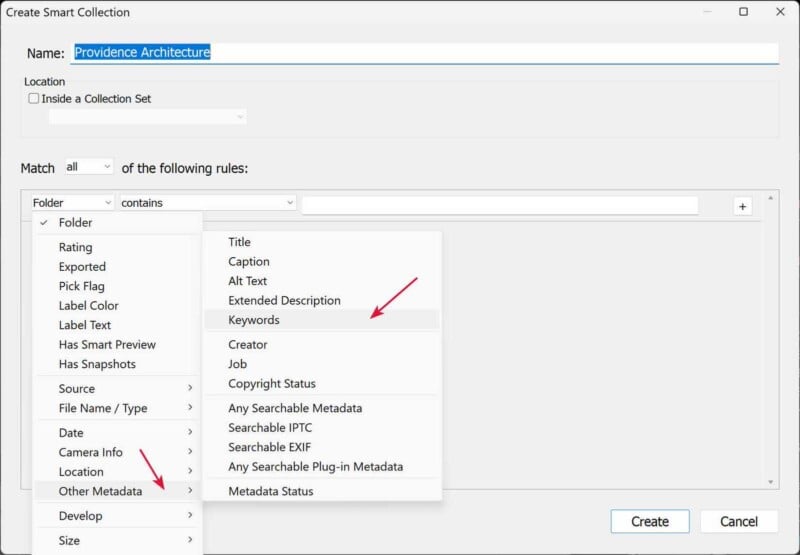
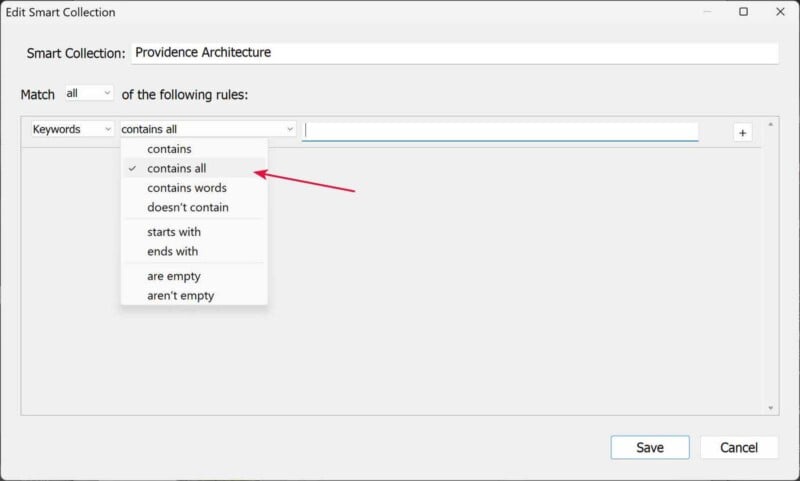
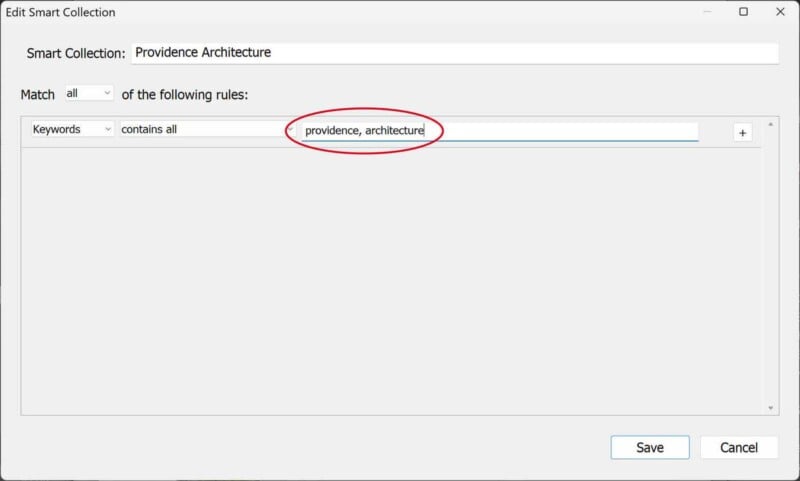
The first step is to decide how to intersect your keywords. For instance, I can combine Providence and Architecture to group all my images that reflect Providence Architecture. Here are the steps with the related screen captures below them.
- Locate the Collections tab on the left side of the Library module.
- Click on the plus sign on the panel heading, choose “Create Smart Collection” and give it a title, like “Providence Architecture”.
- From the options dropdown, select “Other Metadata/Keywords”.
- Change the condition to “Contains all”.
- Enter “providence” and “architecture,” separated by a comma, and click on Save.
- When you select this Smart Collection, it will display all the images that are tagged with both keywords.
Of course, you can create any condition that is helpful to you, and you can create as many of them as you like. Here are screen captures of the above steps.
Tips for a Thriving Keyword System
- Start Simple, Then Expand: You don’t need to create your entire hierarchy overnight. Begin with your most frequently photographed subjects and gradually build out your system.
- Be Consistent: Once you establish a keyword structure, stick with it. Consistency is key to effective searching and organization.
- Review and Refine: Periodically review your keyword list. Are there categories that are no longer relevant? Are there new subjects or styles you need to add? Your keyword system should evolve with your photography.
- Use Synonyms Wisely: While a strict hierarchy is important, incorporating synonyms as non-hierarchical keywords can significantly improve search results.
- If you see things out of order, like a repetitious keyword, drag and drop it onto the keyword where it belongs.
Exporting And Importing Keywords
If you have more than one computer, say a desktop and a laptop, you can export your keywords from its master source and import them to the other devices where Lightroom is installed. This will ensure that you will use the same set when you are traveling or working on your laptop. The export and import keywords option is under the Metadata menu option. Remember that many of your keywords may not have any images assigned to them and show zero images. Don’t delete them, you may need to use them one day.
If you do a lot of work in Lightroom on your laptop, I recommend adding the keywords while you are working on them, even when you first import them to your laptop. When the time comes to copy these images to your desktop, make sure to save metadata to files by selecting all to be copied and pressing Ctrl-S on Windows.
Alternatively, you can select the images, right-click on one of them, and select the “Metadata/Save Metadata to Files” option. This will create XMP files next to each raw file and write the metadata to any DNG file you might have created, like stitching a panorama. When you copy the files in Windows Explorer, make sure to select the XMP files along with the original files.
The Investment in Organization Pays Off
Investing the time and effort to create a well-thought-out hierarchical keyword system in Lightroom is an investment in your future workflow. It will save you time searching for images, empower you to create dynamic Smart Collections, and ultimately allow you to focus more on what you love most: capturing incredible photographs. Take the time to build a structure that reflects your unique photographic vision and how people might search for it, and you’ll unlock a new level of efficiency and organization in your digital darkroom.
About the author: A. Cemal Ekin is a photographer based in Warwick, Rhode Island who has been shooting for roughly 60 years. The opinions expressed in this article are solely those of the author. Ekin retired as a professor of marketing emeritus from Providence College in 2012 after 36 years of service there. Visit his website here. This article was also published here.