Lightroom Keyword Hacks: Making the Most of Your Keywords
Confession time. I hate keywording my photos. I’d rather be cutting the front lawn with a pair of scissors or ironing wallpaper. But about the 10th time it took me an hour or more to find photo, one that I knew was in my Lightroom catalog somewhere, I had to do something about keywording.
The point of keywords is to make my photos searchable—both for me and for those looking online. Keywords are particularly essential for stock photographers.
Keywording is supposed to save me time. But the thing is, I didn’t want to trade time searching for a photo for time spent keywording my images.
Over the years, I’ve developed a few keywording tricks to make this ongoing process quicker and as painless as possible. In this article, I’ll share my tricks with you. Most are ways to effectively use existing tools built into Lightroom. The tools are there, I just had to find them and make the them work for me.
Locating Keywording Tools
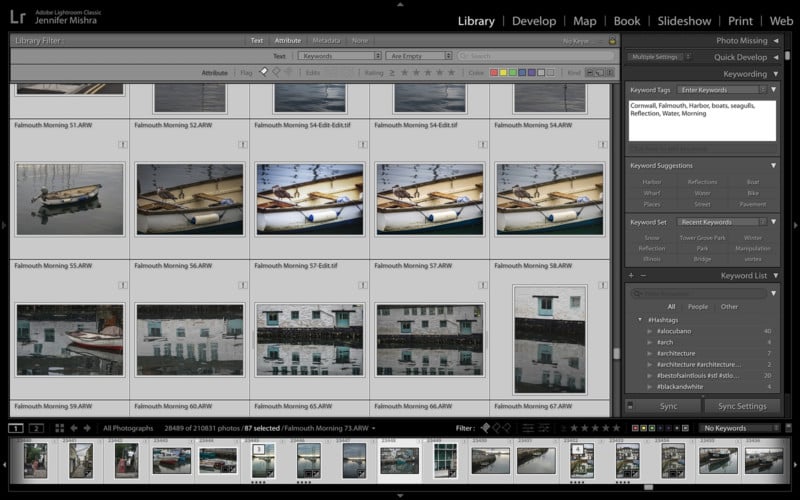
In Lightroom, keyword windows are located in the right-hand-side metadata column. One is labeled “Keywording” and the other is labeled “Keyword List.” Both are useful.
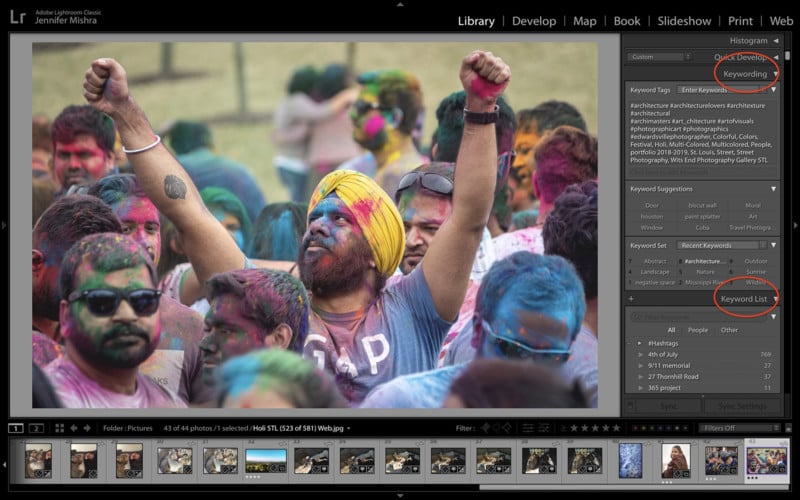
Under KEYWORDING, you should see three sections: Keyword Tags, Keyword Suggestions, and Keyword Sets. I’ll unpack these tools as I go.
What to Keyword
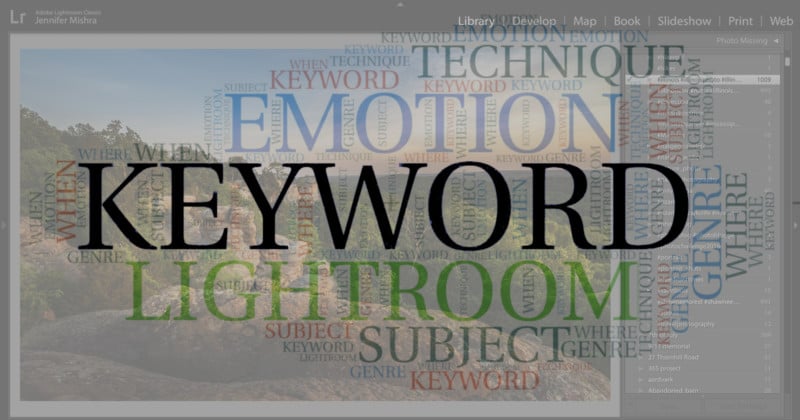
Before I get started, let’s talk about what to keyword. They say a photo is worth a 1,000 words. That’s a lot of keywording!
I’ve tried to simplify the process by asking myself some questions:
- What type of photo is this? (Genre)
- Where was the photo taken?
- When was the photo taken?
- What is the subject of the photo?
- How does the photo make me feel?
- What photographic techniques were used?

The last question is optional but useful since I do a lot of photography education. Examples might be “long exposure” or “leading lines.”
So, for this photo, I might enter:
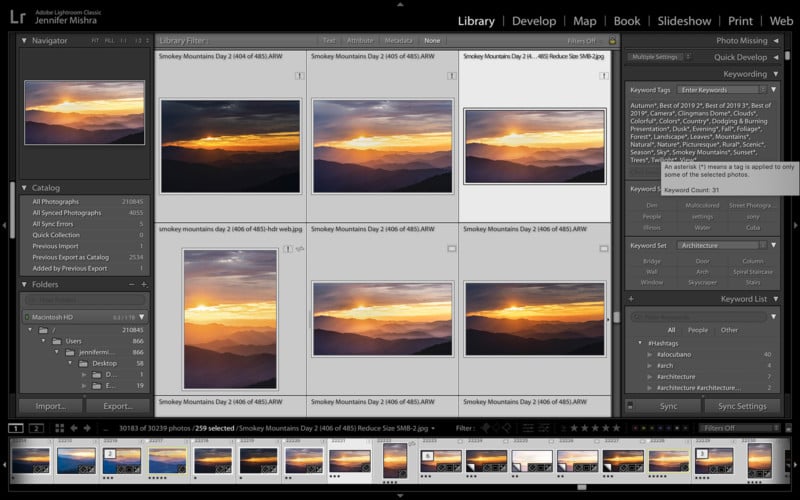
Landscape, Nature, Tennessee, Smokey Mountains, Little River Gorge Road, Autumn, River, Colorful, Foliage, Trees, Peaceful, Long exposure, Panorama

It’s sometimes hard to come up with good keywords. But there will be patterns to your photography. The same keywords will come up again and again. Finding your pattern will greatly speed up the keywording process.
But wouldn’t it be nice if my images were automatically keyworded?
Hack #1: Auto Generate Keywords
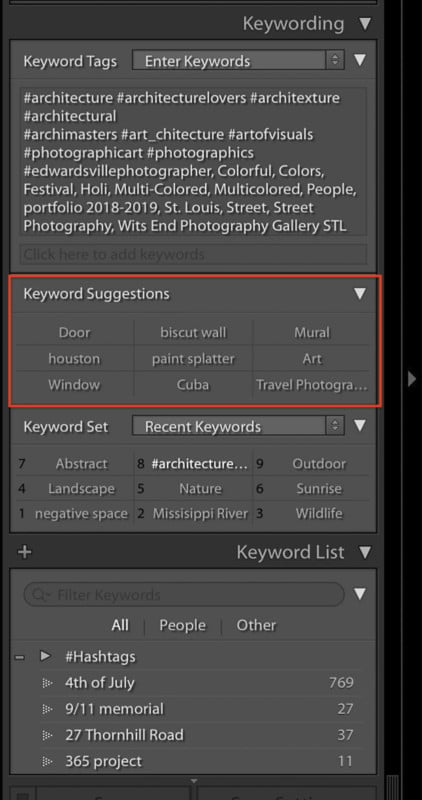
One day, maybe AI will be smart enough to completely automate keywording images. But until then there are tools that make keyword suggestions.
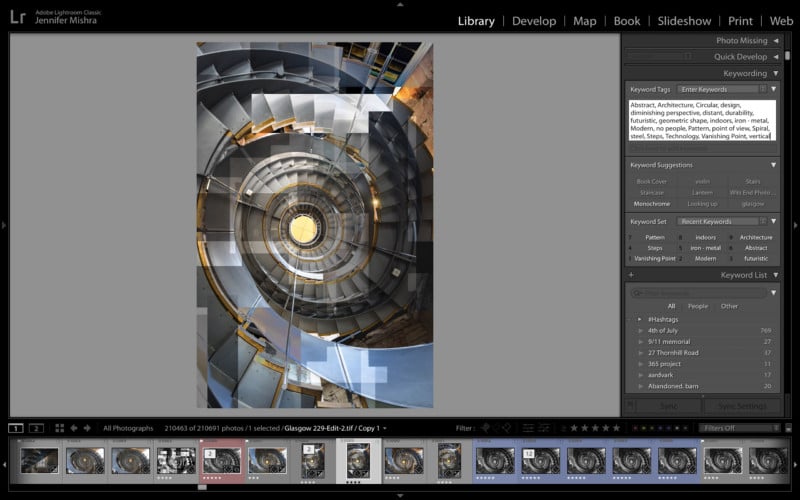
Lightroom’s KEYWORD SUGGESTIONS window gives me tags based on other images in my catalog. The more I keyword, the more useful this tool becomes.
Don’t worry if you only see 9 suggestions. As you start applying tags to the image, more will appear.
There are a lot of auto-keywording tools outside of Lightroom as well. One of the easiest I’ve found is Keywords Ready: I just drag my photo into the site and *poof*, instant keywords.

Most tags generated for this photo are spot-on: steel, spiral, design, architecture, indoors, abstract, modern, futuristic, technology, circular, pattern, vertical, steps, geometric shape, no people, iron – metal, diminishing perspective, point of view, distant, vanishing point, durability
I simply copy the suggested keywords and paste them into the KEYWORD TAGS box in Lightroom.
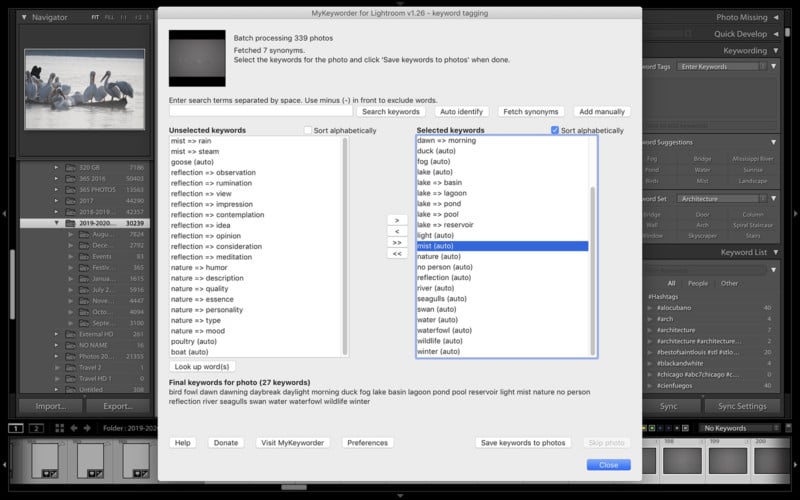
Keyword plug-ins for Lightroom are also available. I’ve used MyKeyworder to auto generate keywords for images in my catalog. It will even fetch synonyms. Some apply to my photo and some don’t. I can choose whether to include each keyword or not. It’s easier on my brain to look through a list and decide what applies then it is to think up the keywords from scratch.
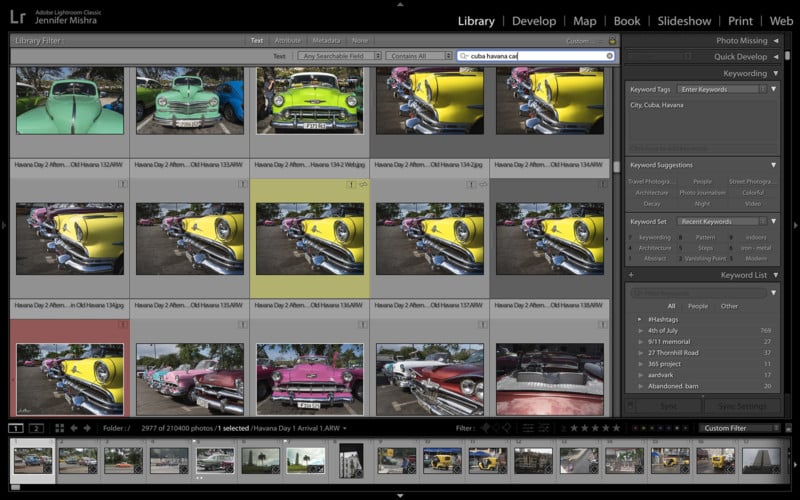
Hack #2: Quick Search by Keyword
If you don’t already know the hotkey combination “Command > F” (Control > F for Windows), then start practicing! This is the “find” command in Lightroom and I use it all the time. It allows me to quickly find photos by keyword.
The command calls up the library filter and searches metadata, including keywords. In the search box, type in a keyword. By default, I am searching all fields, though I can change it to search only keywords. I rarely bother.
To find all my photos from Cuba:
- Click Command > F
- Type “Cuba”
Ok, so I get photos from Cuba, Missouri as well as the country, but it’s a start. Adding another keyword refines the search.
Type “Cuba Havana” or “Cuba Havana car” and now I’ve got what I want.
Hack #3: Create Personalized Keywords
Keywords can be anything: a word, a phrase. Keywords can even be a random combination of letters, numbers and symbols. There are a few symbols that aren’t allowed as they have some functionality in Lightroom (e.g., comma, asterisk), but most are usable.
As long as the keyword makes sense to me, Lightroom will let me use it.
When I apply for an exhibit or enter a competition, I use unique keywords to label the organization and year. When I create an e-book or a portfolio, I create a unique keyword for the project. Even this article has its own keyword “LRKeywordingPetapixel”.
You may not understand my unique combinations, but I can easily search for and find the photos I’ve included in a particular project.
Hack #4: Keywords as Collections
In the past, I used the Collections feature a lot in Lightroom. I don’t know if it’s just me, but collections took forever to load. Even if there weren’t that many photos in the collection, I had to wait.
I’m loading a collection now while I write this. I’m still waiting for it to load.
Waiting… Waiting…
I’ll let you know when it loads.
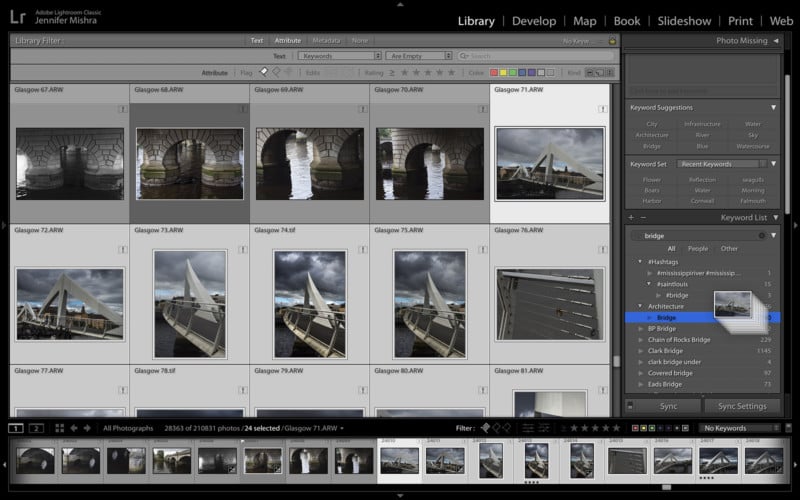
Then I discovered the little arrow to the right of each keyword on the Keyword List. Click the arrow and every photo with that keyword appears almost instantly!
The number tells me how many photos will appear. I have 1808 images tagged as “Waterfalls.” By clicking the arrow, I can see them all.
I was recently selecting my best images from 2019. I keyworded my favorite shots with the keyword “Best of 2019.” I tagged with this keyword 82 images on my first pass. Too many.
So, I created a second keyword for images that made it into the second round “Best of 2019 2.”
Then the third and final round “Best of 2019 3.”
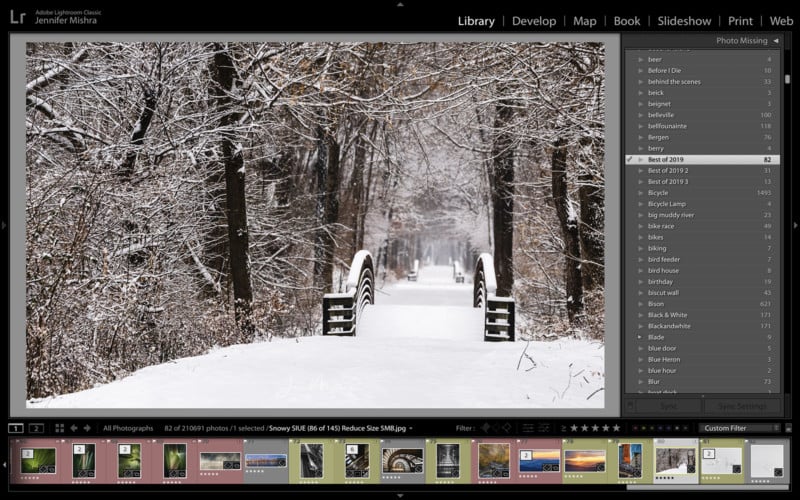
I can easily see my progress and switch photos to a different collection by changing the keyword.
Hack #5: Click Box Toggle
Notice that there is a check box next to entries on the Keyword List. Use the check box to toggle keywords on and off.
If, in my “Best of 2019” example, I decide to move a photo from one category to another (“Best of 2019” to “Best of 2019 2”), I click the check box next to the new category. This applies the new keyword to the image. Unchecking the box removes the keyword.
If there is a minus sign next to the click box, it means that the keyword is applied to only one or some photos in a series. To apply the keyword to all of the photos, click the box. This will change the minus sign to a check mark.
I use this process when I keyword inconsistently. For instance, some of my photos are tagged “animal” and others “animals.” This doesn’t really matter to my searches, but I sometimes get on a keyword cleaning kick.
I select all the plurals by clicking the arrow next to “animals.” In grid mode (grid mode is important), I select all of the entries and then I click the empty box next to the keyword “animal.” This applies the singular keyword to all of my photos. The number next to the keyword will increase.
Then I deselect the box next to “animals.” This removes the keyword from the photos. The number next to “animals” is now at zero and I can delete this keyword.
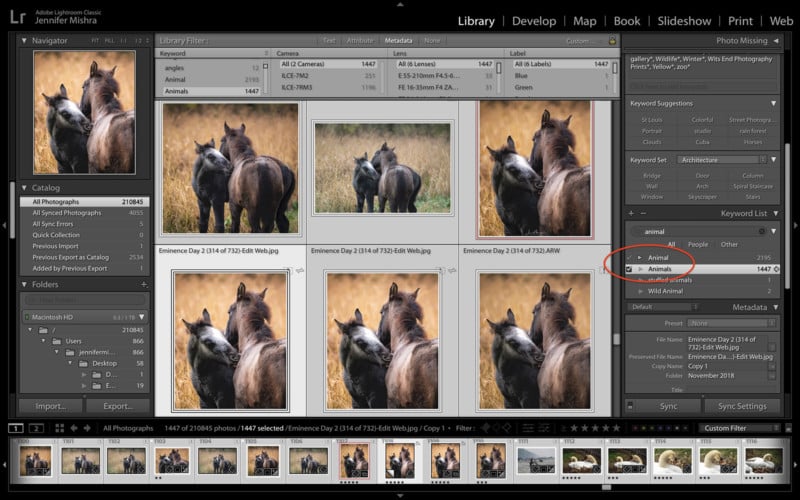
This hack works any time I want to quickly reassign keywords to a series of photos, like if I misspelled a keyword in some images.
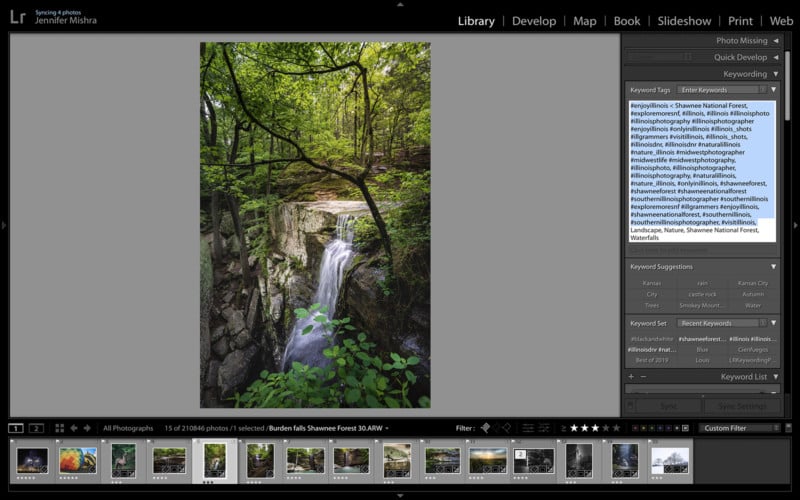
Hack #6: Hashtags as Keywords
I mentioned earlier that Lightroom lets me use symbols as part of a keyword, and this includes the hashtag symbol.
Like keywording, my least favorite part of uploading to Instagram is adding hashtags.
I’ve done a bit of research and found the hashtags that work best for my photos. These I add as keywords to my images in Lightroom.
I can easily search for hashtags across many photos and see which hashtags I applied to similar photos in the past. Also, I can copy the hashtags. This is easy as symbols are alphabetized first in the keyword list and won’t get mixed in with my other keywords.
I copy and paste my keywords directly into the Instagram caption. I then use a user-agent switcher to post to Instagram from my desktop, but apps like Later also allow me to set up Instagram posts on my desktop.
If you don’t know about user-agent switchers, you can learn about that here.
If you post photos from your phone, copy the list of relevant hashtags into a Dropbox or Google Drive file for easy access from a mobile device.
Bonus Tip: While we’re talking about copying keywords, remember to copy a few of your most relevant keywords into the caption or the ALT tag section of any photos that you upload to your webpage. This makes the image visible to search engines.
Hack #7: Apply Synonyms
Often when I apply one keyword, others also apply. For instance, every photo from the spice market in Delhi can also be tagged:
India, Travels, Delhi, Chandni Chowk, Market, Street Photography, People, Colorful, Chaos, …
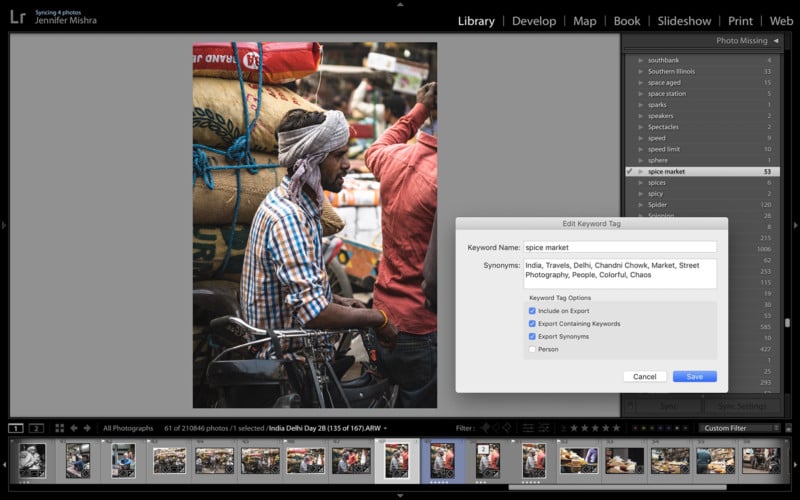
Double click or right click on the keyword and select EDIT KEYWORD TAG. Enter any other keywords that you want to be applied automatically every time you enter the primary keyword.
Rather than entering 9 individual keywords, I enter only “spice market”.
Don’t worry if you can’t see the synonyms in the KEYWORD TAGS box. Change the “Enter Keywords” drop down menu to “Will Export” and you’ll see all the synonyms. Most importantly, the synonyms will show up in keyword searches.
Even if you’re not uploading to stock photography websites, keywording tools available through these sites are useful for finding synonyms. I’m always surprised at some of the synonyms that come up.
A free and easy tool to get started is Microstock Keyword Tool.
Bonus Tip: When choosing hashtags and keywords, I look at photos similar to my own online. Some photographers are great at tagging!
Hack #8: Chaining Keywords
The only drawback to using synonyms is that I can’t copy the list of keywords in the “Will Export” box. This means I can’t copy hashtag synonyms into my Instagram captions. When I apply the #illinois hashtag to a photo, I also want to apply other similar hashtags.
Adobe: Please make the “Will Export” box copiable!
Instead of using synonyms to apply multiple hashtags to one photo, I chain them together.
By chaining I mean listing many keywords as one entry without comma separation. The list looks like this in my Lightroom Keyword Tags box (notice no commas in between hashtags):
#illinois #illinoisphoto #illinoisphotography #illinoisphotographer #enjoyillinois #onlyinillinois #illinois_shots #illgrammers #visitillinois
Instagram doesn’t care if the hashtags are separated with a comma. With one click, I can apply a chain of hashtags to a photo rather than having to apply individual hashtags to my image.
The Keyword List shows only the first couple of entries, but all the hashtags show up as keywords.
Hack #9: Keywording on Import
To limit the amount of time I spend keywording, I’ve made it a habit to keyword when I import my photos. I enter global keywords that apply to all the photos in the images I’m importing.
Well… most of the images anyway.
Even if the keyword doesn’t quite fit all the photos, that’s ok. I’d rather over-keyword than not be able to find a photo later.
I was taking photos at a local aquarium lately. When I imported the photos, I applied “fish” into all the images. Not all the images are photos of fish, but if I’m later looking for a fish photo, my search will find all the aquarium shots. I can always refine the keywords later if it bothers me.
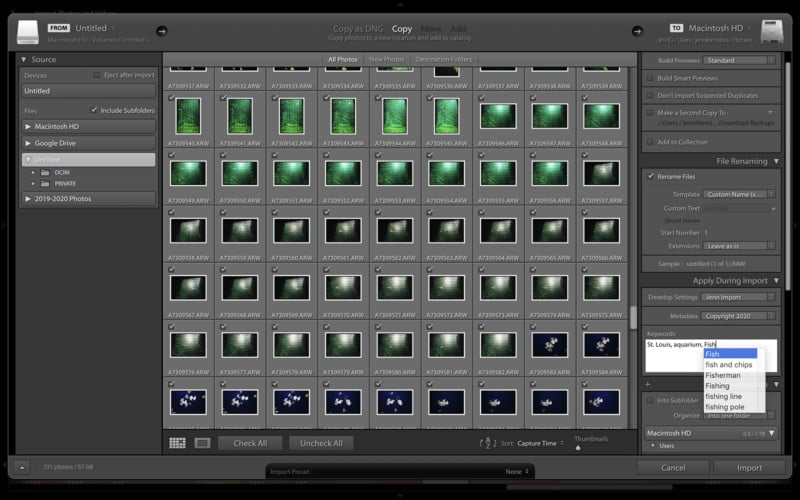
Bonus Tip: Notice in the screen shot that as I start typing, Lightroom suggests previously used keywords. I can select from this reduced list.
Hack #10: Batch Keywording
I’m a great fan of batch keywording, i.e. applying keywords to many photos at once. Who has time to keyword photos individually!?
In grid mode, I select multiple photos and enter keywords that apply to all of the photos. This only works in grid mode, which I sometimes forget. If I’m in Loupe mode, even if I have multiple photos selected, keywords will only be applied to the primary photo.
Hack #11: Drag & Drop Batch Keywording
Another way to batch keyword is to select multiple photos (again in grid mode) and drag these photos to one of the keywords on my Keyword List.
This keyword is applied to all photos.
Bonus Tip: I freely use the search box under KEYWORD LIST. Typing just a few letters of the keyword I have in mind will bring up a shorter, more relevant list.
Hack #12: Keyword Sets
In the Keyword window, there is a section I ignored for years: Keyword Set. I was missing a very powerful keywording tool.
Keyword Set allows me to create lists of my most commonly used keywords. The tool defaults to recently added keywords, but the dropdown menu allows me to create keyword presets.
For instance, I created a preset for Architecture and listed the types of architecture I most often photograph.
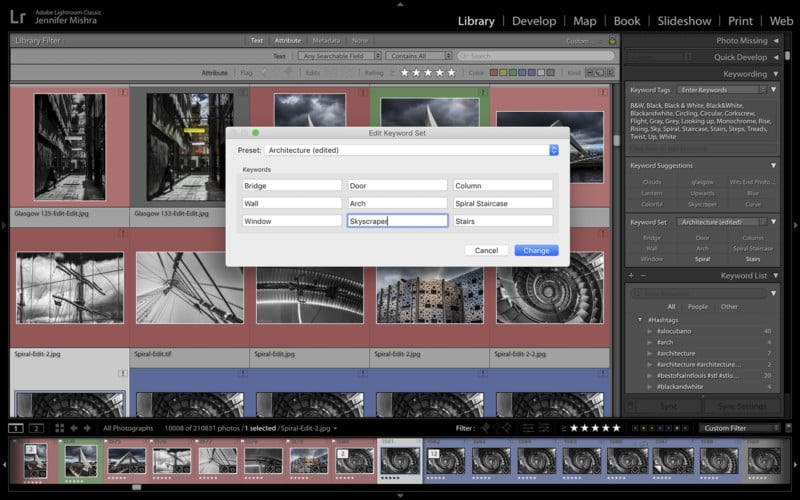
The set is limited to 9 keywords, but each of my 9 keywords contain synonyms, which exponentially expands the power of this tool.
You can make as many presets as you want. These can be general or specific. For instance, I also have a “Genre” preset that lets me choose quickly the type of photograph (e.g., street photography, landscape).
Bonus Tip: The option key will add numbers to the list for hotkey selection.
Hack #13: Remove Asterisk
I’m sometimes inconsistent in my keywording. If I select a series of photos in grid mode, I will see a master list of all the keywords applied to these photos. An asterisk means that the keyword is applied to only one or some of the photos.
By simply removing the asterisk, I apply the keyword to ALL of the photos in this series.
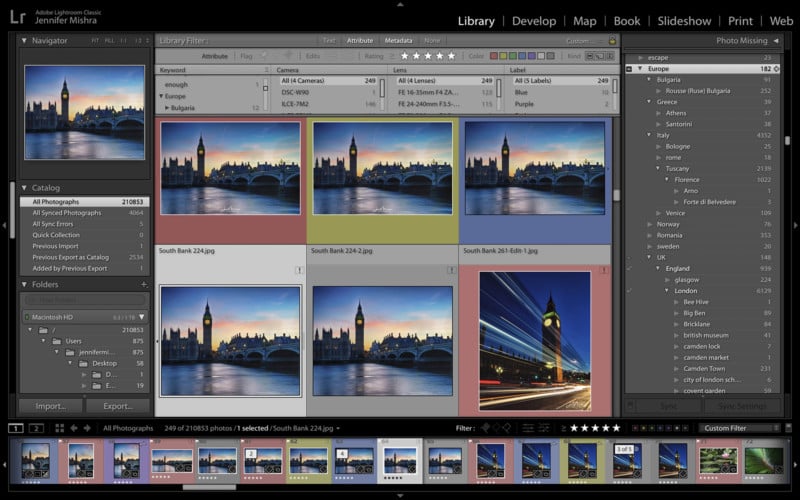
Hack #14: Keyword Hierarchies
Tags in the Keyword List can be embedded into hierarchies. Rather than the keywords listed alphabetically, I can keep similar keywords together.
For instance, I use hierarchies for geographical locations. Tower Bridge is embedded under London, which is under England, which is under UK, which is under Europe (at least for now).
When I tag a photo “Tower Bridge,” the parent keywords are automatically applied.
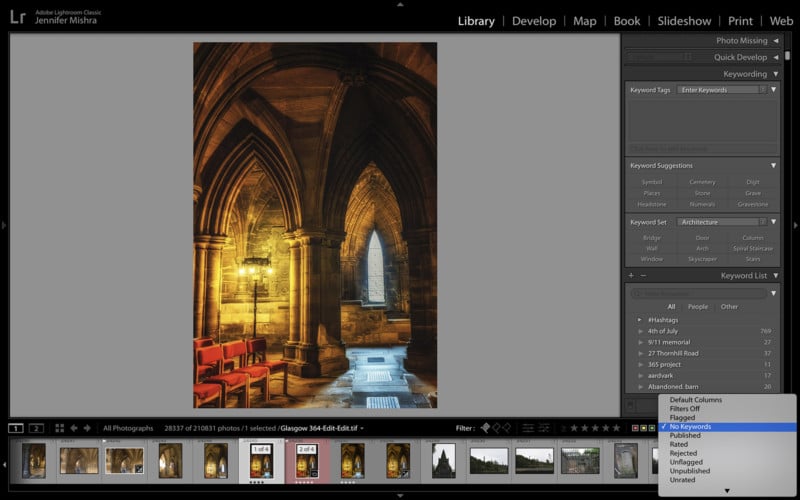
Hack #15: No Keyword Filter
When I decided to get a handle on my keywording, I wanted a quick way to find the photos that didn’t have keywords. I must not be the only one, because Lightroom has this tool built right in.
Just above the film strip to the right, there is a list of filter presets. “No Keyword” is listed. Click that and you’ll see how many photos don’t have keywords.
I about had a heart attack when I first saw how many photos I’d neglected to keyword. These are mainly earlier photos, before I found these keyword hacks, or photos imported from my iPhone.
I try and spend a little time each week keywording these older photos—if I’m sitting in a boring meeting or waiting on hold.
Final Thoughts
There are many ways to keyword in Lightroom. Find the ones that work for you.
As far as I can tell, there’s no limit to the number of keywords you can create or apply to an image—at least I’ve never hit a ceiling. I apply on average about 20 keywords per image (including synonyms).
I’ve read some scuttlebutt online about long keyword lists slowing down Lightroom performance, but that hasn’t been my experience. I’ll add a few more keywords and let you know.
There are a few tools in Lightroom that I didn’t talk about, such as Keyword Shortcut. I’ve never quite been able to get this tool to work for me. Adobe: Maybe you could add a hotkey for this feature?
Keywords applied in Lightroom are part of the metadata for the image and by default will export with the image. Many online platforms read the metadata directly from the image during upload. So, when I upload to Flickr for instance, my keywords come along! No need to double-keyword.
I’m sure you’ve found other keyword hacks. Share them in the comments section below!
About the author: Jenn Mishra is a travel and landscape photographer based in St. Louis. She is a classical musician by training and author of the book iPractice: Technology in the 21st Century Practice Room. Her photos have been featured in a number of solo exhibitions. Her studio is Wits End Photography. You can see more of Jenn’s photos on her website or by visiting her Instagram @jennatwitsend. She photographs with the Sony system.