How to Plan Out Milky Way Photos
Plan your work and work your plan. That’s what… someone important once told me? Anyhow, in my opinion, planning out your Milky Way shots is absolutely one of the best ways to increase the likelihood you will be shooting bangers.
In this article, I will be talking about how to read the weather, Moon phases, light pollution maps, and of course—the timing of the Milky Way core. While I touched upon these items in my Milky Way photography 101 tutorial, I will be going further in-depth in this article so you can really nail it down. Fear not though young citizen, everything here is super easy to follow along with.
Want to hear something cool? Pretty much every tool I am about to describe is free, with a few exceptions depending on your use cases. Let’s run down one by one what I use to plan and what each tool is used for.
- National Weather Service. This free website is by the most accurate way to determine if the weather is going to be good at your location of interest.
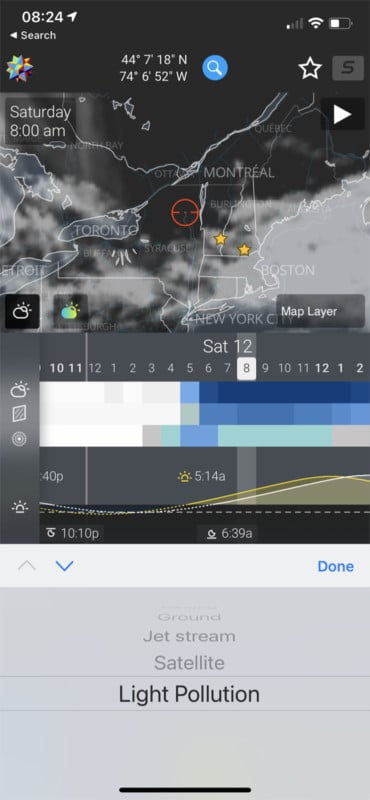
- Astrospheric. This handy free web and phone app is super helpful to determine how “clear” the sky will actually be. More on that later.
- Gaia GPS. This free source is great for hikers and backpackers alike. Optional if you are not into hiking, but if you are chances are you already have this. Note: to use offline features you will need a paid subscription.
- The Light Pollution Map. As you probably are already aware, this free website is the ultimate way to figure out where dark skies are near you.
- Planit Pro and PhotoPills. These paid tools are essential. I don’t like telling people to spend their moolah, but as you will see $10 goes a long way. Each tool has its pros and cons, and this tutorial is cross-compatible with both. Either one works, determining which one is for you will ultimately be up to what interface you think you will enjoy!
- Google Maps. Last but certainly not least, this is mega helpful in determining where you want to go. Street & 360’s views are key, that way you can determine your landscape before even getting there. This is critical for planning.
Note: I am by no means affiliated nor sponsored by any of the above mentioned websites and tools.
Double note: For international folks reading this, chances are your country has a similar service to the NWS. This is most likely going to be your best bet for weather as well.
What I Do With These Things? This Is Already a Lot?
Don’t worry, we will break these down one by one. I have a very linear thought pattern so we will go through them in the order I use them.
First Things First, Determine the Darknessness
The first thing I like to do when it comes to planning my shot is determine IF it will be dark enough. I mean, come on, makes sense right? Why waste the time figuring out all of the other nonsense if the sky is going to be way too light polluted?
So, simply fire up the light pollution map. Now, if you are not already familiar with the color-coding this map uses, lemme explain real quick…
This map uses something called the Bortle Scale. Essentially, the brighter, warmer colors depict MORE light pollution with white being the brightest, while the cooler and darker colors depict less light pollution. Here is a graphic I made that correlates to this scale:
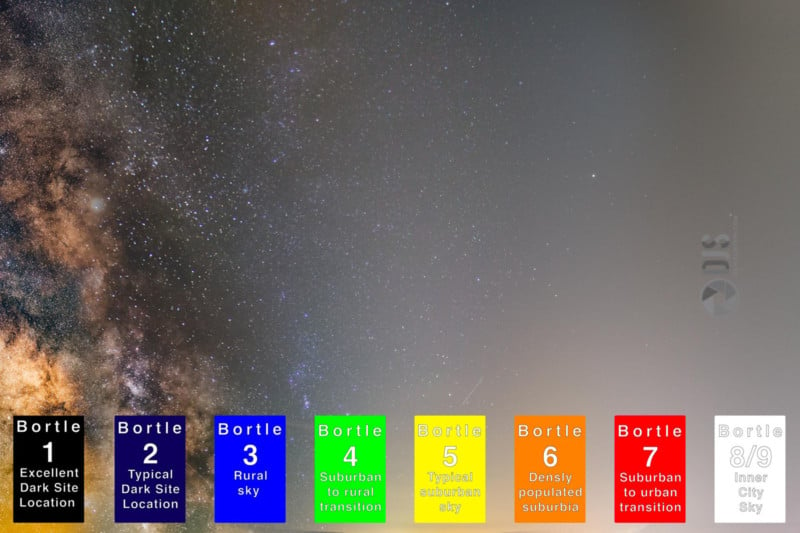
In order to photograph our galaxy, you will want to shoot for a Bortle Zone 4 or better. The darker the skies, the more potent the Milky Way will be. This is a great starting point for determining a location where you want to shoot.
Here is something you need to consider: not only does the Light Pollution in the spot where you are shooting from matter, but so does the direction you are looking towards. If you are looking towards a Core rising in the heart of a massive city, you will capture lots of light pollution on the horizon in that direction.
When to See the Core
The visibility of the Milky Way core is not consistent from one night to the next. Rather, it is determined by these factors:
- Time of year
- Latitude
- Moon phase
- The direction you are facing (which kind of goes into time of year — more on that below)
I will break these down below.
Time of Year and Direction
As briefly discussed in my Milky Way basics article, the core rises and sets at different times and directions throughout the year. Here are examples:
During “early core season” such as March, the core will rise in the very early morning such as about 03:00 due Southeast.
During “mid peak season” such as July, the core can be seen rising once dark night has begun due at about 23:00 due South.

During “late season” such as September, the core can be seen setting due Southwest just after sunset at about 21:00.
Note that these times and directions will vary slightly based on your latitude.
Oh Look, Latitude
What in tarnation is latitude? Sounds complicated. The latitude is the measurement of your location in relation to the Earth’s poles. Since, believe it or not, the Earth is indeed a sphere, think about a circle. Halfway around a circle is 180º of rotation. Latitude starts at -90º and spans to 90º. So there you go, 180º of rotation.
If you are standing at -90º, you would be on the South pole. If you are standing at 0º, you would be dead-center at the equator. Likewise at 90º, you would be directly under the North Pole with that dude who is always wearing fluffy red jackets.
We can apply this to finding the Milky Way by understanding that the latitude you plan to shoot at will affect how much dark night you actually have to work with. Think about how there is a summer and winter solstice and how they affect daylight hours. During the summer solstice in the northern hemisphere, the days are long but the nights are short. This will ultimately limit the window of time you can shoot, as will our rock buddy, the moon!
This is a biggy and it is easy to understand why! The Moon acts as one big ol’ bucket of light in the sky that will wash out the sky during a Full Moon, but completely reveal even the faintest detail of nebula during a New Moon.
What is New Moon exactly then? Well no, the Moon is not literally new, but rather its phase is. The New Moon phase is when the location of the Moon is between the Earth and Sun. Therefore, the bright side of the Moon is facing away from us essentially makes the Moon invisible to us. Full Moon is, of course, the opposite.
The Moon transitions from New Moon to Full Moon over the course of 14 days. This is called waxing. As it transitions from Full Moon back to New Moon, it is then waning. The Moon rises in the East and Sets in the West every night, just like the Sun. Once we understand these Moon Phases, we can then apply it to our Core timing we learned above and thus realize that it does not always need to be New Moon to shoot the Milky Way Core!
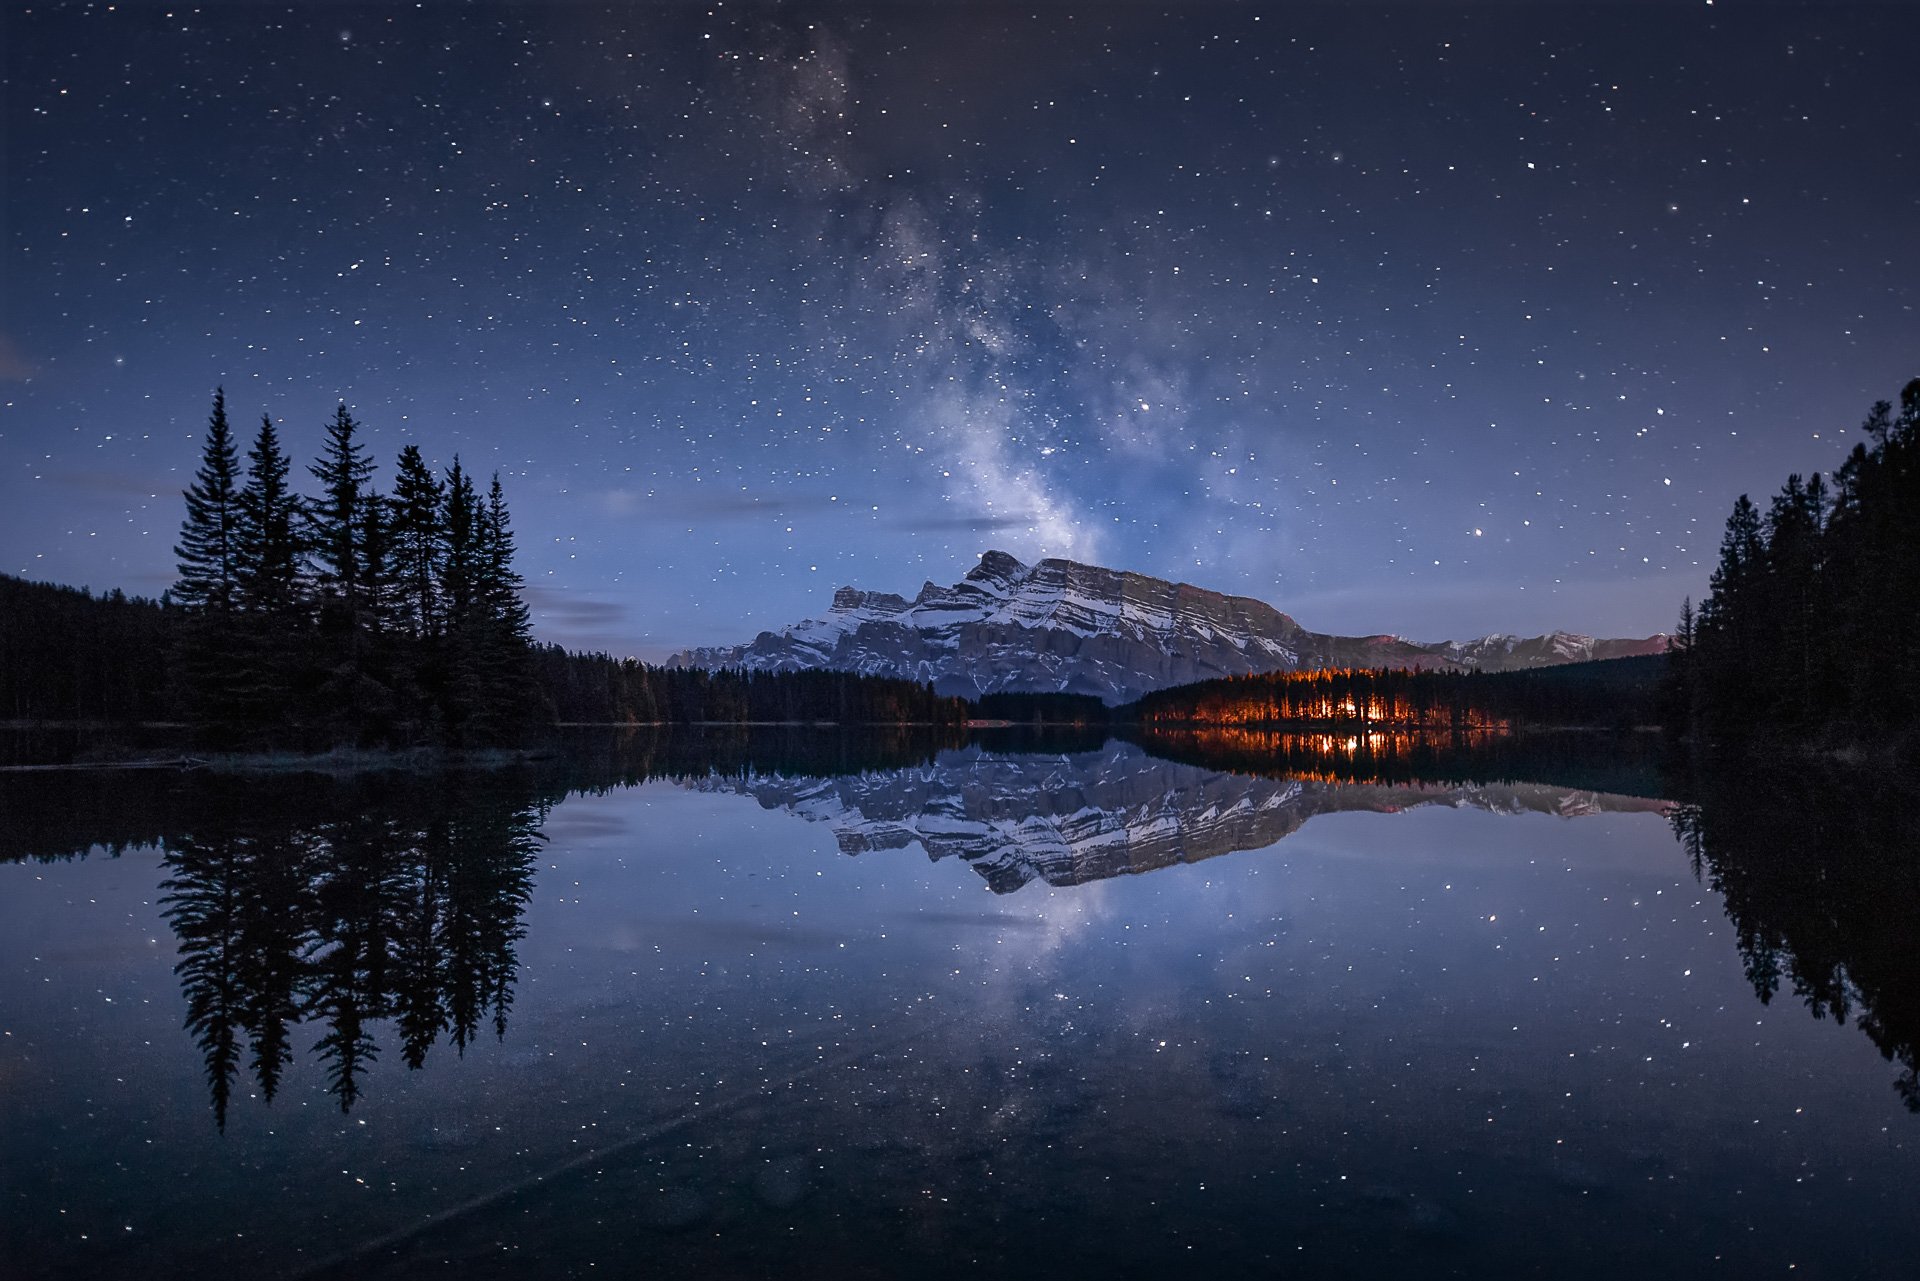
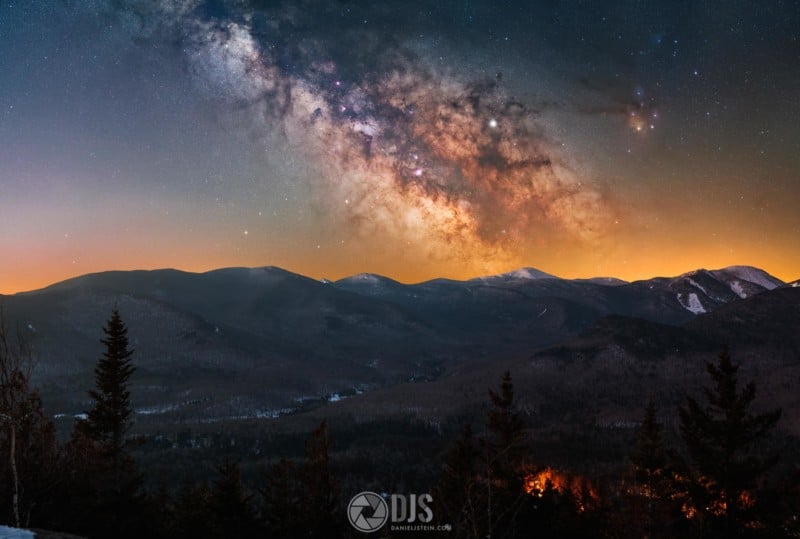
In this shot for example, I captured a Waxing Crescent Moon setting on the horizon:

This means that despite the Moon Phase not being New, it was still going to set in time for me to shoot the Milky Way Core shortly afterward.
Using the Apps
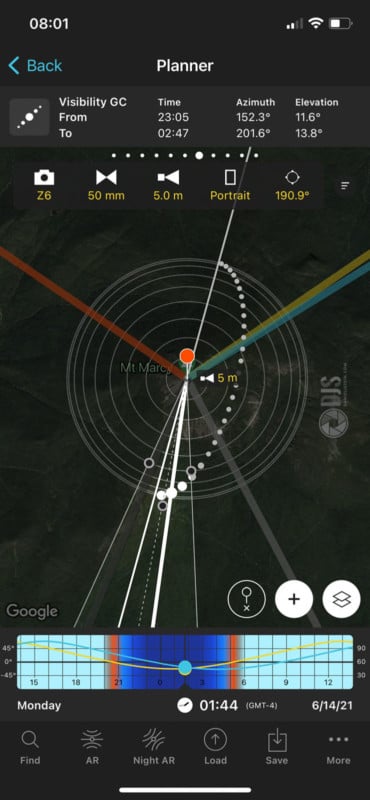
At this point, you can use the above information directly in an app like PhotoPills or Planit. This will allow you to make a specific plan for a specific shot, down to the act time and focal length. That way, you can visualize your shot before you get there, thus reducing the possibility of perhaps looking in the wrong direction, or being there when the moon is too bright. This is why planning is critical. Why get to a location only to find the shot is a no-go. Plan, plan, and plan some more.
Putting All the Wow Together
So now you know how to time the Milky Way Core, let’s apply this to how I would use these tools to plan a shot.
1. Check the Light pollution Map to find your spot.
You can actually do this right in Planit or Astrospheric which is super handy!
2. Zoom out on the map to determine your surroundings. How much light pollution is going to be on the horizon? In my example, there will certainly be some.
3. Use Google Maps to figure out what your shot looks like.
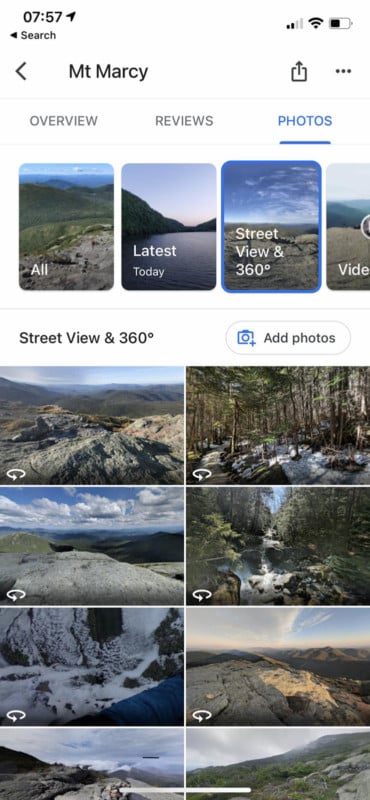
If you are lucky, maybe you can drop that little dude to determine there is a street or 360º view someone took of your location, therefore figuring out what your landscape looks like. Do this side by side with Photopills or Planit to figure out the different features and what your shot may look like. Plug in your focal length and figure out if you want to shoot wide or telephoto.
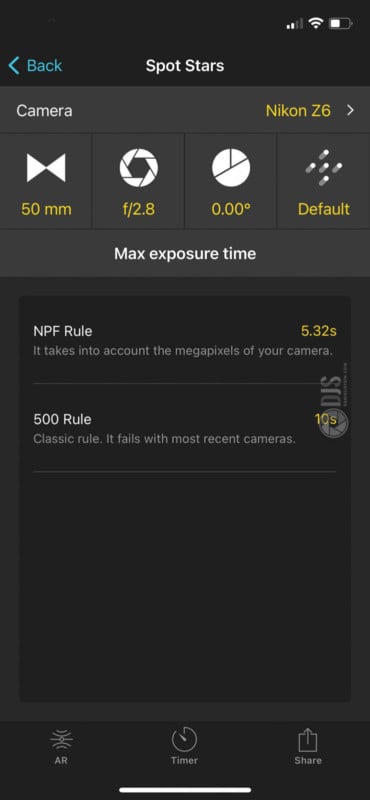
4. These apps have the NPF calculator built-in, so if you are not shooting with a tracker, you can figure out your shutter speed based on your camera and focal length easy peasy!
5. Determine when you want to shoot your shot. What time of year are you going? And as a result, what direction will the Core be rising and setting to and from?
How is the light pollution on the horizon affected by this?
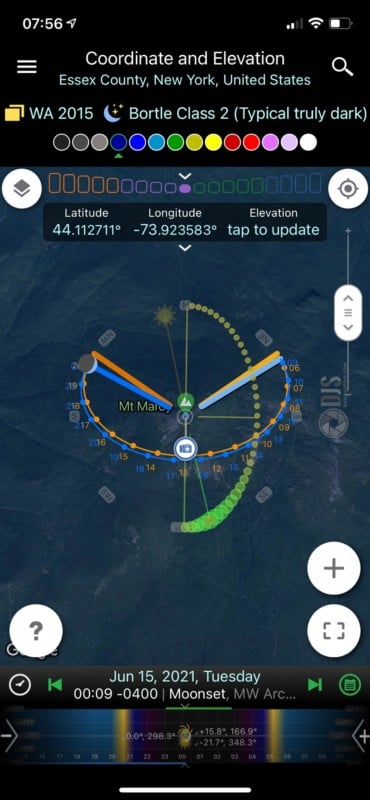
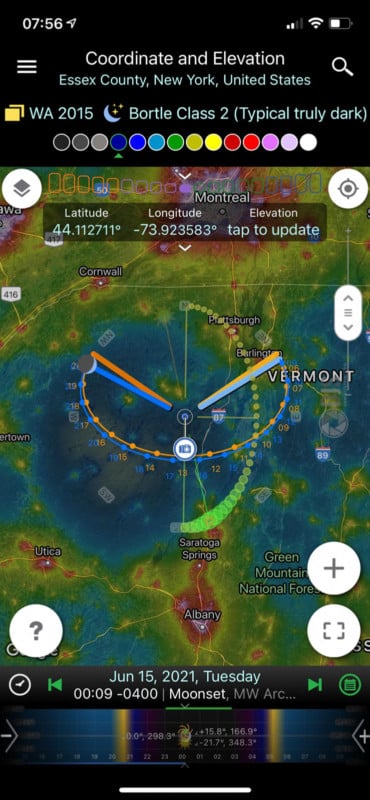
6. Look at the Moon phase! What time is it rising and setting?
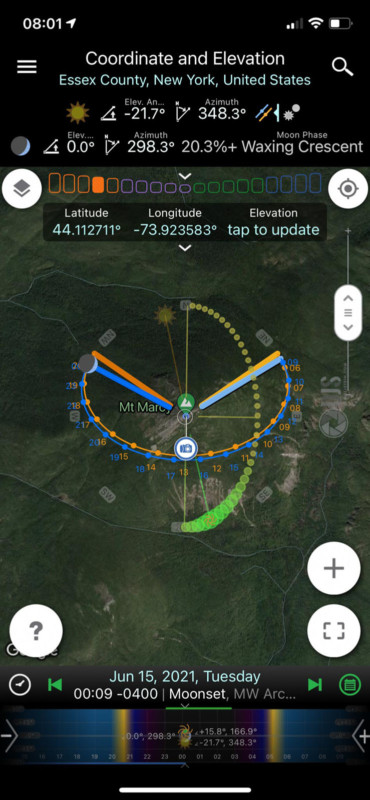
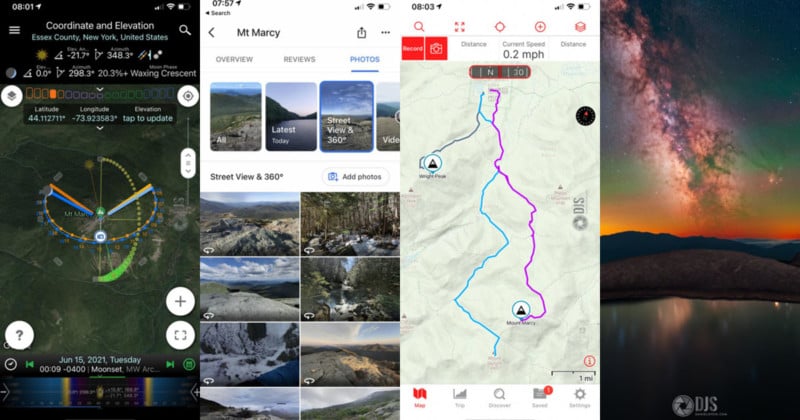
Will the Core be visible before or after the Moon rises or sets? In my example, it looks like the Moon sets at 00:09, while the Core will already have risen. This means I would have the rest of the night to shoot! Weeeee.
7. Okay, so now we know the timing works out, but what about how to get there? Back to Google Maps for a second here. If your shot is car accessible, legally, no problem. But if you will be hiking, this is where an app like Gaia GPS will be critical for planning.
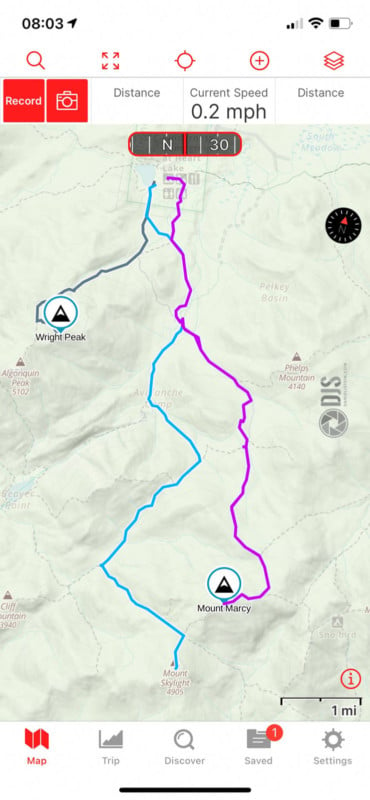
I will not get too deep into hiking basics and etiquette here as that is an entire post on its own, but regardless of where you choose to go, please leave no trace!
8. We are so close! Now it is up to Mama Nature to determine if our plan can come to life. So, let’s check the weather.
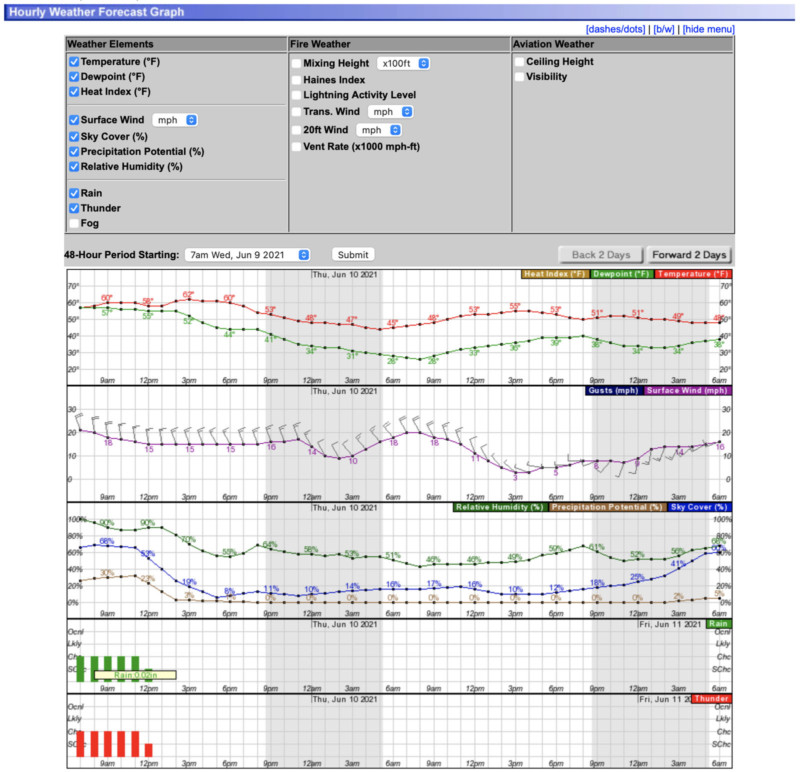
Note that this really does not become accurate until perhaps a few days out, maybe even the day of. Type in your location into the NWS site. See what the clouds are doing, and do not forget to check the wind speeds! If it is too windy, it may be too difficult to set up a tripod and get good exposures.
9. Use the forecast as an opportunity to be prepared. What clothing do you need to bring? How many layers, etc…
10. One last often overlooked step is to determine how clear the sky will actually be beyond just cloud cover. Astrospheric shines at this. You can use the map layers to determine sky transparency, as well as if there is any smoke or haze in your area.
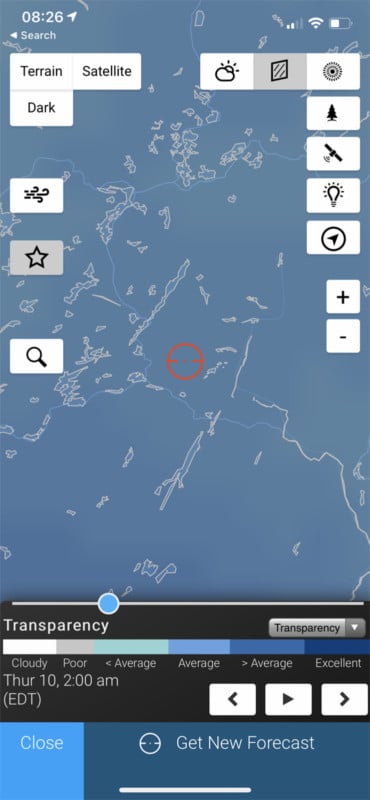
The clearer the skies, the juicier the shot.
11. It is time. Let’s go. You worked hard for this shot. Make it happen.
So, what shots are you going to plan this year?
About the author: Daniel J. Stein is a passionate nightscape photographer working full-time in New Jersey in his family’s commercial plumbing contracting business. The opinions expressed in this article are solely those of the author. You can find more of Stein’s work on his website and Instagram. This article was also published here.